Page 119 of 441
.
1Reset button
The instrument cluster is activated when
you
�open")
118 Controls in detail
Instrument cluster
For a full view illustration of the instrument
cluster, see “At a glance” (
�page 24).
1Reset button
The instrument cluster is activated when
you
�open a door
�switch on ignition (�page 32)
�press reset button1
�switch on the exterior lighting
You can change the instrument cluster
settings in the Instrument cluster submenu
of the control system (
�page 134).Adjusting instrument cluster
illumination
Use reset button1 to adjust the
illumination brightness for the instrument
cluster.
To brighten illumination
�Turn reset button1 clockwise.
The instrument cluster illumination will
brighten.
To dim illumination
�Turn reset button1 counterclock-
wise.
The instrument cluster illumination will
dim.
Warning!G
No messages will be displayed if either the
instrument cluster or the multifunction dis-
play is inoperative.
As a result, you will not be able to see infor-
mation about your driving conditions, such
as speed or outside temperature,
warning/indicator lamps,
malfunction/warning messages or the
failure of any systems. Driving
characteristics may be impaired.
If you must continue to drive, please do so
with added caution. Visit an authorized
Mercedes-Benz Center as soon as possible.
iThe instrument cluster illumination is
dimmed or brightened automatically to suit am-
bient light conditions.
The instrument cluster illumination will also be
adjusted automatically when you switch on the
vehicle’s exterior lamps.
Page 122 of 441

121 Controls in detail
Control system
�Control system
The control system is activated as soon as
the SmartKey in the starter switch is
turned to position1. The control system
enables you to
�call up information about your vehicle
�change vehicle settings
For example, you can use the control
system to find out when your vehicle is
next due for service, to set the language
for messages in the instrument cluster
display, and much more.
The control system relays information to
the multifunction display.
Multifunction display
1Trip odometer
2Main odometer
3Current program mode
(automatic transmission*)
4Current gear selector lever
position/gear range
(automatic transmission*)
5Digital clock
6Status indicator (outside tempera-
ture/digital speedometer)
iThe displays for the audio systems (radio,
CD player) will appear in English, regardless of
the language selected.
Warning!G
A driver’s attention to the road and traffic
conditions must always be his/her primary
focus when driving.
For your safety and the safety of others,
selecting features through the multifunction
steering wheel should only be done by the
driver when traffic and road conditions
permit it to be done safely.
Bear in mind that at a speed of just 30 mph
(approximately 50 km/h), your vehicle is
covering a distance of 44 feet
(approximately 14 m) every second.
Page 134 of 441
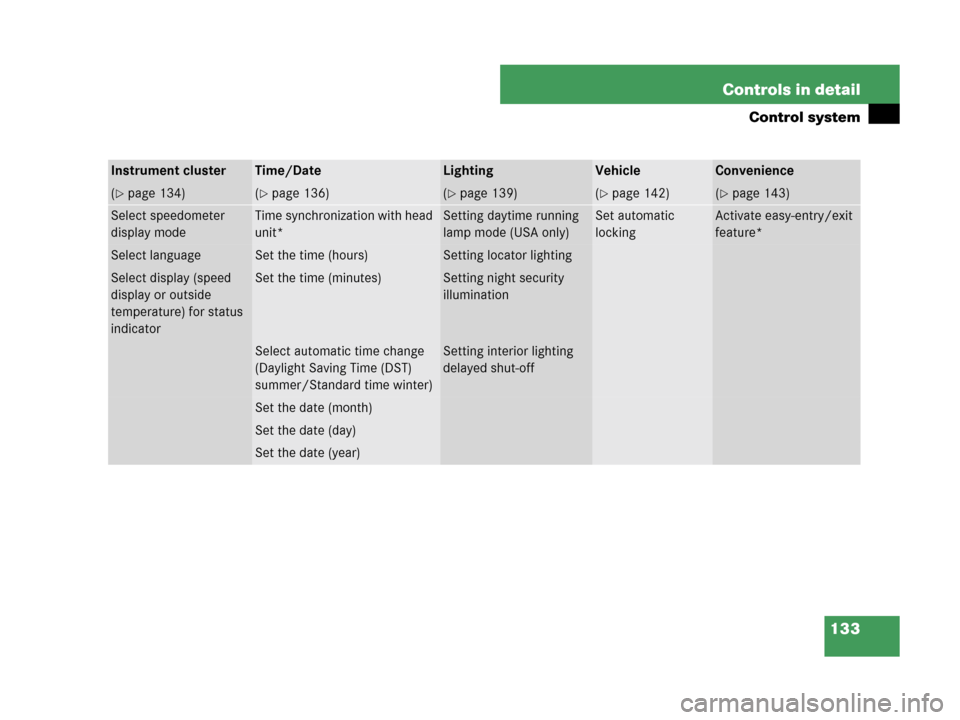
133 Controls in detail
Control system
Instrument clusterTime/DateLightingVehicleConvenience
(�page 134)(�page 136)(�page 139)(�page 142)(�page 143)
Select speedometer
display modeTime synchronization with head
unit*Setting daytime running
lamp mode (USA only)Set automatic
lockingActivate easy-entry/exit
feature*
Select languageSet the time (hours)Setting locator lighting
Select display (speed
display or outside
temperature) for status
indicatorSet the time (minutes)Setting night security
illumination
Select automatic time change
(Daylight Saving Time (DST)
summer/Standard time winter)Setting interior lighting
delayed shut-off
Set the date (month)
Set the date (day)
Set the date (year)
Page 141 of 441
 or daytime
running lamp mode (
Constant).
With daytime running lamp mode activated
and the exterior l")
140 Controls in detail
Control system
�Press buttonæ orç to select
manual operation (
Manual) or daytime
running lamp mode (
Constant).
With daytime running lamp mode activated
and the exterior lamp switch in
positionM orU, the low beam
headlamps are switched on when the
engine is running.
In low ambient light conditions the
following lamps will switch on additionally:
�Parking lamps
�Tail lamps
�License plate lamps
�Side marker lamps
For more information on the daytime
running lamp mode, see “Lighting”
(
�page 109).Setting locator lighting
With the locator lighting feature activated
and the exterior lamp switch in
positionU, the following lamps will
switch on during darkness when the vehi-
cle is unlocked with the SmartKey:
�Parking lamps
�Tail lamps
�License plate lamps
�Side marker lamps
�Front fog lamps
The locator lighting switches off when the
driver’s door is opened.If you do not open a door after unlocking
the vehicle with the SmartKey, the lamps
will switch off automatically after
approximately 40 seconds.
�Move the selection marker with
buttonæ orç to the
Lighting
submenu.
�Press buttonj ork repeatedly
until the message
Surround lighting
appears in the multifunction display.
The selection marker is on the current
setting.
�Press buttonæ orç to switch
the locator lighting function
On or Off.
iFor safety reasons, resetting the Lighting
submenu to factory settings (
�page 131) while
driving will not deactivate the daytime running
lamp mode.
The following message appears in the
multifunction display:
Lighting - Cannot be completely reset
to factory settings while driving.
��
Page 143 of 441

142 Controls in detail
Control system
Setting interior lighting delayed shut-off
Use this function to set whether you would
like the interior lighting to remain on for
10 seconds during darkness after you have
removed the SmartKey from the starter
switch.
�Move the selection marker with
buttonæ orç to the
Lighting
submenu.
�Press buttonj ork repeatedly
until the message
Interior light.
delay.sw.off
appears in the multifunc-
tion display.
The selection marker is on the current
setting.
�Press buttonæ orç to switch
the interior lighting delayed shut-off
feature
Off or On.
Vehicle submenu
Access the
Vehicle submenu via the
Settings menu. Use the Vehicle submenu
to make general vehicle settings.
The following function is available:
Selecting audio search function
Use of the
Audio search function to select
a radio station (
�page 127) will enable
you to start a frequency scan (
Frequency)
or select a radio station stored in memory
(
Memory).
�Move the selection marker with
buttonæ orç to the
Vehicle
submenu.
�Press buttonj ork repeatedly
until the message
Audio search
appears in the multifunction display.
The selection marker is on the current
setting.
�Press buttonæ or ç to set the
audio search function to
Frequency
or
Memory.
To select a radio station, see “Selecting ra-
dio station” (
�page 127).
FunctionPage
Selecting audio search function142
Setting automatic locking143
Page 144 of 441
143 Controls in detail
Control system
Setting automatic locking
Use this function to activate or deactivate
the automatic central locking. With the
automatic central locking system
activated, the vehicle is centrally locked at
vehicle speeds of approximately 9 mph
(15 km/h).
�Move the selection marker with
buttonæ orç to the
Vehicle
submenu.
�Press buttonj ork repeatedly
until the message
Automatic door
lock
appears in the multifunction dis-
play.
The selection marker is on the current
setting.
�Press buttonæ orç to switch
the automatic central locking
On or Off.Convenience submenu
Access the
Convenience submenu via the
Settings menu. Use the Convenience
submenu to change the settings for a
number of convenience features.
The following functions are available:
FunctionPage
Activate
easy-entry/exit feature*144
Page 145 of 441
.
�Move the selection marker with
button")
144 Controls in detail
Control system
Activate easy-entry/exit feature*
Use this function to activate and
deactivate the easy-entry/exit feature
(
�page 40).
�Move the selection marker with
buttonæ orç to the
Convenience submenu.
�Press buttonj ork repeatedly
until the message
Easy-entry feature
appears in the multifunction display.
The selection marker is on the current
setting.
�Press buttonæ orç to switch
the easy-entry feature
On or Off.
Trip computer menu
Use the trip computer menu to call up
statistical data on your vehicle.
The following information is available:
Fuel consumption statistics from start
�Press buttonÿ orè repeatedly
until the first function of the trip
computer menu appears in the
multifunction display.
�Press buttonj ork repeatedly
until the message
From start appears
in the multifunction display.
Warning!G
You must make sure no one can become
trapped or injured by the moving steering
wheel when the easy-entry/exit feature is
activated.
To stop steering wheel movement, do one of
the following:
�Move steering wheel adjustment stalk*
(
�page 40).
�Press memory position switch*
(
�page 108).
Do not leave children unattended in the ve-
hicle, or with access to an unlocked vehicle.
Children could open the driver’s door and
unintentionally activate the easy-entry/exit
feature, which could result in an accident
and/or serious personal injury.
FunctionPage
Fuel consumption statistics from
start144
Fuel consumption statistics
since last reset145
Distance to empty146
Page 150 of 441

149 Controls in detail
Manual transmission
�Manual transmission
Manual transmission is standard
equipment on select models and not
available on all models.
For information on driving with a manual
transmission, see “Manual transmission”
(
�page 46).
Warning!G
For vehicles equipped with a manual trans-
mission, getting out of your vehicle with the
gearshift lever not engaged in first or
reverse gear and parking brake engaged is
dangerous.
Also, when parked on an incline, an engaged
first or reverse gear alone may not prevent
your vehicle from moving, possibly hitting
people or objects.
Always set the parking brake in addition to
engaging first or reverse gear (
�page 54).
When parked on an incline, turn front wheels
towards the road curb.
Do not park this vehicle in areas where
combustible materials such as grass, hay or
leaves can come into contact with the hot
exhaust system, as these materials could be
ignited and cause a vehicle fire.
Warning!G
When leaving the vehicle, always remove the
SmartKey from the starter switch, take it
with you, and lock the vehicle. Do not leave
children unattended in the vehicle, or with
access to an unlocked vehicle. Children
could move the gearshift lever, which could
result in an accident and/or serious person-
al injury.
Warning!G
On slippery road surfaces, never downshift
in order to obtain braking action. This could
result in drive wheel slip and reduced
vehicle control. Your vehicle’s ABS will not
prevent this type of loss of control.
Warning!G
Make sure that absolutely no objects are ob-
structing the pedals’ range of movement.
Keep the driver’s footwell clear of all obsta-
cles. If there are any floormats or carpets in
the footwell, make sure that the pedals still
have sufficient clearance.
During sudden driving or braking maneuvers
the objects could get caught between or be-
neath the pedals. You could then no longer
brake or accelerate. This could lead to acci-
dents and injury.