Page 258 of 377
Display
messages 25
5 Display messages Possible cause/consequence Possible solution
. 4-button multi-function
steering wheel:
Trailer left tail
lamp
or
Trailer rt. tail
lamp
12-button luxury multi-
function steering
wheel:
Trailer left tail
lamp
or
Trailer right tail
lamp The left-hand or right-hand trailer tail lamp
is faulty. X
Replace the bulb as soon as possible. . 4-button multi-function
steering wheel:
AUTO lights inop-
erativ
e
12-button luxury multi-
function steering
wheel:
AUTO lights inop-
erativ e The light sensor is faulty. Daytime driving
lights are switched on. X
Use the light switch to switch the lighting on/
off (Y page 102). Practical advice
204_AKB; 2; 3, en-GB
mkalafa,
2007-06-26T23:11:51+02:00 - Seite 255 Z
Page 282 of 377
Troubleshooting
27
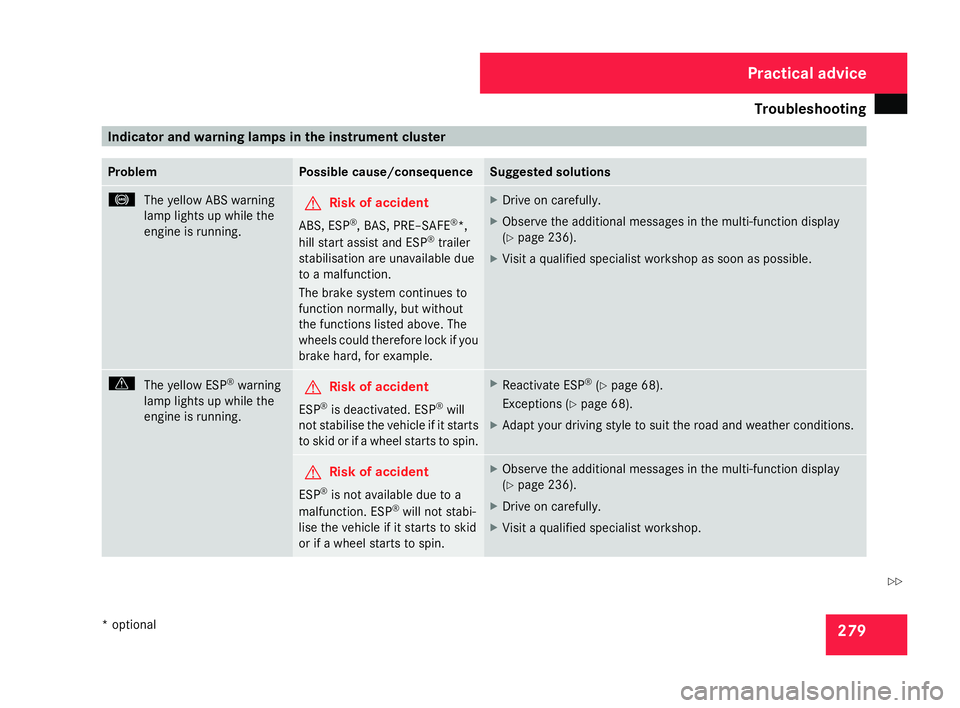
9 Indicator and warning lamps in the instrument cluster
Problem Possible cause/consequence Suggested solutions
-
The yellow ABS warning
lamp lights up while the
engine is running. G
Risk of accident
ABS, ESP ®
, BAS, PRE–SAFE ®
*,
hill start assist and ESP ®
trailer
stabilisation are unavailable du e
to a malfunction.
The brake system continues to
function normally, but without
the functions listed above. Th e
wheels could therefore lock if you
brake hard, for example. X
Drive on carefully.
X Observe the additional messages in the multi-function display
(Y page 236).
X Visit a qualified specialist workshop as soon as possible. v
The yellow ESP ®
warning
lamp lights up while th e
engine is running. G
Risk of accident
ESP ®
is deactivated. ES P®
will
not stabilise the vehicle if it start s
to skid or if a wheel starts to spin. X
Reactivate ES P®
(Y page 68).
Exceptions (Y page 68).
X Adapt your driving style to suit the road and weather conditions. G
Risk of accident
ESP ®
is not available due to a
malfunction. ESP ®
will not stabi-
lise the vehicle if it starts to skid
or if a wheel starts to spin . X
Observe the additional messages in the multi-function display
(Y page 236).
X Drive on carefully.
X Visit a qualified specialist workshop. Practical advice
* optional
204_AKB; 2; 3, en-GB
mkalafa,
2007-06-26T23:11:51+02:00 - Seite 279 Z
Page 333 of 377
Towing and tow-startin
g330
R
Vehicles with an automatic transmission*
must not be tow-started.
R If the engine does not start, try jump-start-
ing it (Y page 328).
R If it is not possible to jump-start the vehicle ,
have it towed to the nearest qualified spe-
cialist workshop, e.g. a Mercedes-Ben z
Service Centre.
R If the vehicle has suffered transmission
damage, only tow it with the propeller shaft
disconnected.
R The selector lever must be in position Non
vehicles with automatic transmission*.
R If you are towing the vehicle over a consid-
erable distance, this may only be done with
the rear axle raised.
R The ignition must be switched off if you are
towing the vehicle with the front/rear axle
raised. Intervention by ESP ®
could other-
wise damage the brake system.
R Vehicles with 4MATIC* may not be towed
with the front or rear axle raised.
R Before towing the vehicle, make sure that
the battery is connected and charged. Oth-
erwise : -
You cannot switch on the ignition
- You cannot move the selector lever
to N(on vehicles with automatic trans-
mission*)
- You have no support when braking
i Switch off the automatic locking feature
before the vehicle is towed. You could oth-
erwise be locked out when pushing or tow -
ing the vehicle.
Deactivate tow-away protection befor e
towing (Y page 71). Fitting the towing eye
Vehicles with a trailer coupling: your vehi-
cle does not have a rear threaded socket for
mounting the towing eye. If you intend to use
the vehicle for towing, fold out the ball cou-
pling and secure the towline to it
( Y page 220).
Opening the front cover The fixtures for the removable towing eyes
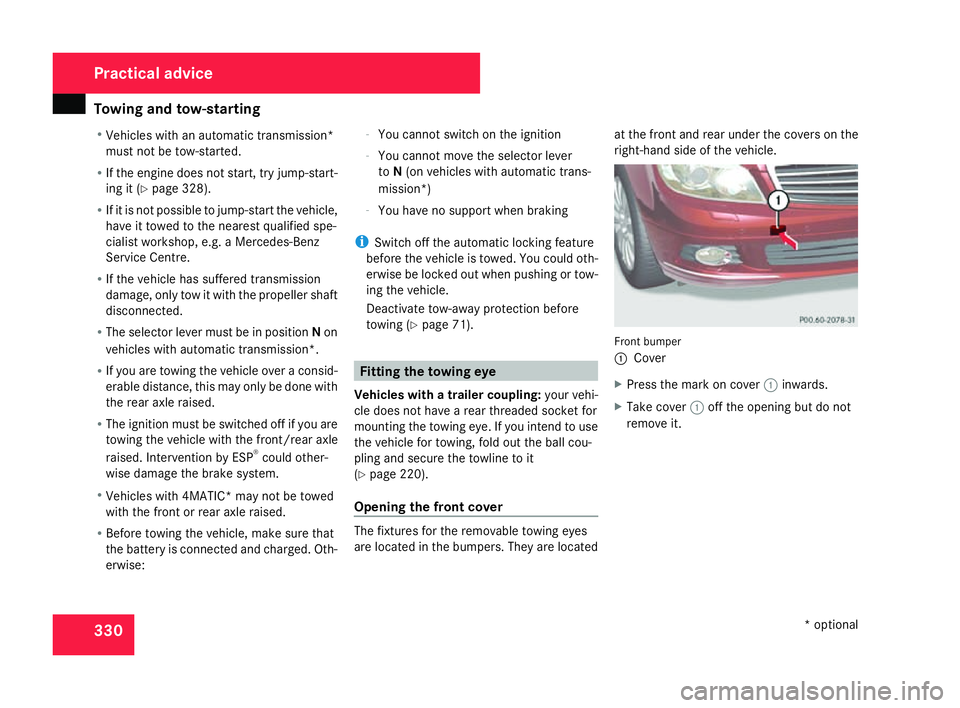
are located in the bumpers. They are locatedat the front and rear under the covers on the
right-hand side of the vehicle.
Front bumper
1
Cove r
X Press the mark on cover 1inwards.
X Take cover 1off the opening but do not
remove it. Practical advice
* optional
204_AKB; 2; 3, en-GB
mkalafa,
2007-06-26T23:11:51+02:00 - Seite 330
Page 335 of 377
Fuse
s 332 Removing the towing eye
X Take the wheel wrench from the vehicle
tool kit (Y page 234).
X Insert the wheel wrench handle into the
towing eye and turn it anti-clockwise.
X Unscrew the towing eye.
X Replace the cover and press it until it
engages.
X Return the towing eye and the whee l
wrench to the vehicle tool kit .Transporting the vehicle
The towing eyes can be used to pull the vehi-
cle onto a trailer or transporter for transport-
ing purposes.
! Only lash the vehicle down by the wheels
or wheel rims, not by parts of the vehicl e
such as axle or steering components. The
vehicle could otherwise be damaged.
Vehicles with manual transmission X
Shift to neutral . Vehicles with automatic transmission
* X
Turn the key to position 2in the ignition
lock .
X Move the selector lever to N. Fuses
Notes on changing fuses
The fuses in your vehicle serve to close down
faulty circuits. If a fuse blows, all the compo -
nents on the circuit and their functions will
fail .
i Blown fuses must be replaced with fuses
of the same rating (which can be recog -
nised by the colour and amperage) and
which have the amperage specified in the
fuse allocation chart. A Mercedes-Benz
Service Centre will be happy to advise you. G
Risk of fire
Only use fuses that have been approved for
Mercedes-Benz vehicles and which have
the correct amperage for the system con-
cerned. Do not attempt to repair or bridge
faulty fuses. A circuit overload could other-
wise cause a fire. Have the cause trace d
and rectified at a qualified specialist work -
shop, e.g. a Mercedes-Benz Service Centre.
If the newly inserted fuse also blows, have the
cause traced and rectified at a qualified spe-
cialist workshop, e.g. a Mercedes-Benz
Service Centre. Practical advice
* optional
204_AKB; 2; 3, en-GB
mkalafa,
2007-06-26T23:11:51+02:00 - Seite 332
Page 338 of 377
335
Introduction to technical data
.........336
Genuine Mercedes-Benz parts .........336
Vehicle electronics ...........................337
Vehicle identification plates ............339
Engine ................................................ 341
Performance ...................................... 343
Tyres and wheels .............................. 347
Vehicle dimensions ..........................355
Vehicle weights ................................. 355
Trailer coupling* ............................... 358
Service products and capacities .....360 Technical data
204_AKB; 2; 3, en-GB
mkalafa,
2007-06-26T23:11:51+02:00 - Seite 335
Page 359 of 377
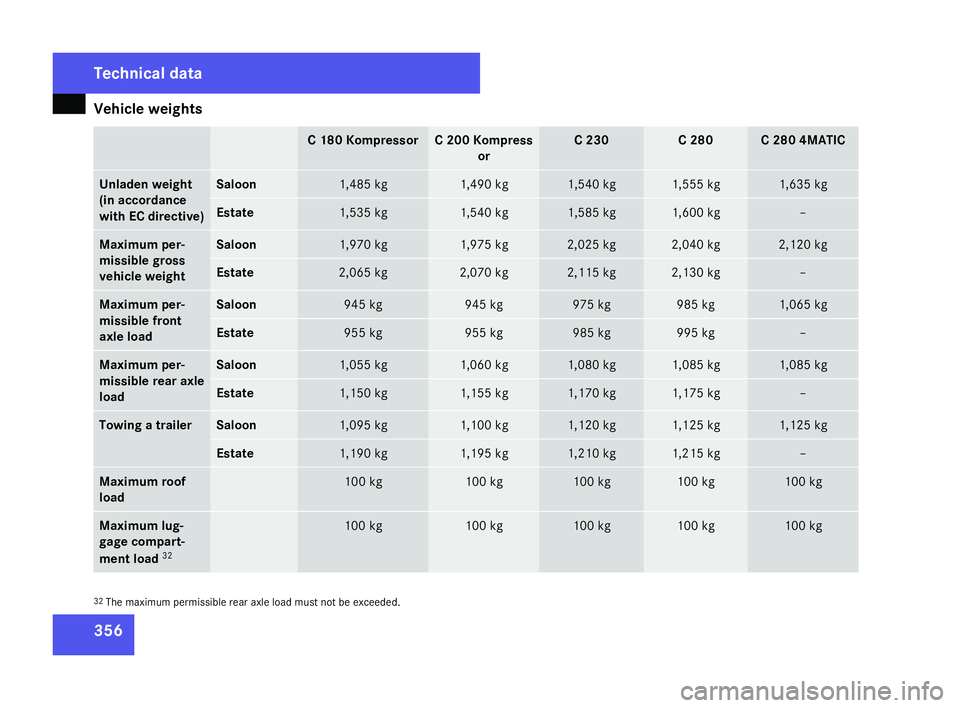
Vehicle weights
35
6 C 180 Kompressor C 200 Kompres
s
or C 230 C 280 C 280 4MATIC
Unladen weight
(in accordance
with EC directive) Saloon 1,485 kg 1,490 kg 1,540 kg 1,555 kg 1,635 kg
Estate 1,535 kg 1,540 kg 1,585 kg 1,600 kg –
Maximum per-
missible gross
vehicle weight Saloon 1,970 kg 1,975 kg 2,025 kg 2,040 kg 2,120 kg
Estate 2,065 kg 2,070 kg 2,115 kg 2,130 kg –
Maximum per-
missible front
axle load Saloon 945 kg 945 kg 975 kg 985 kg 1,065 kg
Estate 955 kg 955 kg 985 kg 995 kg –
Maximum per-
missible rear axle
load Saloon 1,055 kg 1,060 kg 1,080 kg 1,085 kg 1,085 kg
Estate 1,150 kg 1,155 kg 1,170 kg 1,175 kg –
Towing a trailer Saloo
n 1,095 kg 1,100 kg 1,120 kg 1,125 kg 1,125 kg
Estate 1,190 kg 1,195 kg 1,210 kg 1,215 kg –
Maximum roof
load 100 kg 100 kg 100 kg 100 kg 100 kg
Maximum lug-
gage compart
-
ment load 32 100 kg 100 kg 100 kg 100 kg 100 kg
32
The maximum permissible rear axle load must not be exceeded .Techni
cal data
204_AKB; 2; 3, en-GB
mkalafa
, 2007-06-26T23:11:51+02:00 - Seite 356
Page 360 of 377
Vehicle weights
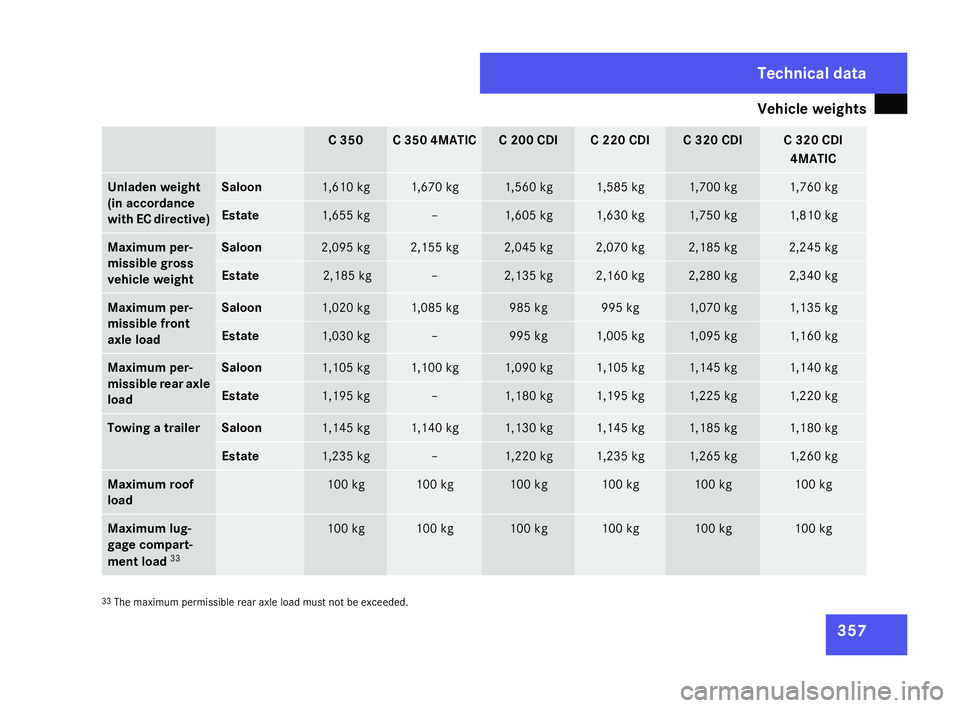
35
7 C 350 C 350 4MATIC C 200 CDI C 220 CDI C 320 CDI C 320 CDI
4MATIC Unladen weight
(in accordance
with EC directive) Saloon 1,610 kg 1,670 kg 1,560 kg 1,585 kg 1,700 kg 1,760 kg
Estat
e 1,655 kg – 1,605 kg 1,630 kg 1,750 kg 1,810 kg
Maximum per-
missible gross
vehicle weight Saloon 2,095 kg 2,155 kg 2,045 kg 2,070 kg 2,185 kg 2,245 kg
Estate 21
85 kg – 2,135 kg 2,160 kg 2,280 kg 2,340 kg
Maximum per-
missible front
axle load Saloon 1,020 kg 1,085 kg 985 kg 995 kg 1,070 kg 1,135 kg
Estate 1,030 kg – 995 kg 1,005 kg 1,095 kg 1,160 kg
Maximum per-
missible rear axle
load Saloon 1,105 kg 1,100 kg 1,090 kg 1,105 kg 1,145 kg 1,140 kg
Estate 1,195 kg – 1,180 kg 1,195 kg 1,225 kg 1,220 kg
Towing a trailer Saloon 1,145 kg 1,140 kg 1,130 kg 1,145 kg 1,185 kg 1,180 kg
Estate 1,23 kg – 1,220 kg 1,235 kg 1,265 kg 1,260 kg
Maximum roof
load 100 kg 100 kg 100 kg 100 kg 100 kg 100 kg
Maximum lug-
gage compart-
ment load
33 100 kg 100 kg 100 kg 100 kg 100 kg 100 kg
33
The maximum permissible rear axle load must not be exceeded. Technical data
204_AKB; 2; 3, en-GB
mkalafa,
2007-06-26T23:11:51+02:00 - Seite 357 5
,
Page 361 of 377
Trailer coupling*
35
8 Trailer coupling
* Mounting dimensions
G
Risk of accident
Only have a trailer tow hitch retrofitted at a
qualified specialist workshop which has the
necessary specialist knowledge and tools
to carry out the work required. Mercedes-
Benz recommends that you use a
Mercedes-Benz Service Centre for this pur-
pose. In particular, work relevant to safety
or on safety-related systems must be car-
ried out at a qualified specialist workshop.
! If you have a trailer tow hitch retrofitted,
changes to the cooling system may be nec-
essary, depending on the vehicle type.
If you have a trailer tow hitch retrofitted,
observe the anchorage points on the chas-
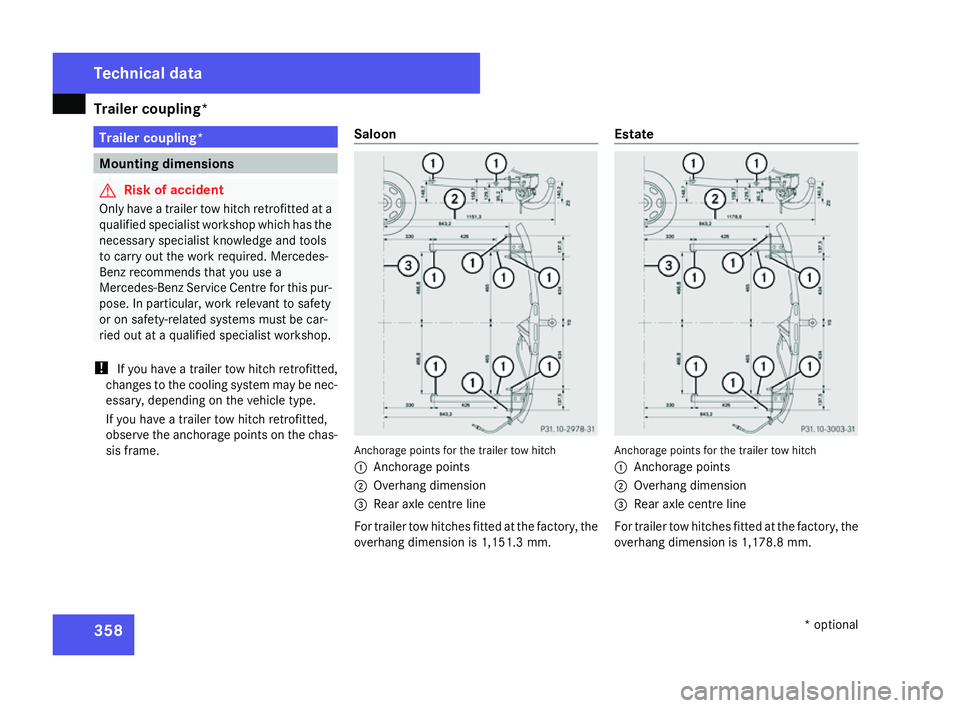
sis frame. Saloon
Anchorage points for the trailer tow hitch
1
Anchorage points
2 Overhang dimension
3 Rear axle centre lin e
For trailer tow hitches fitted at the factory, the
overhang dimension is 1,151.3 mm. Estate
Anchorage points for the trailer tow hitch
1
Anchorage points
2 Overhang dimension
3 Rear axle centre lin e
For trailer tow hitches fitted at the factory, the
overhang dimension is 1,178.8 mm. Technical data
* optional
204_AKB; 2; 3, en-GB
mkalafa
, 2007-06-26T23:11:51+02:00 - Seite 358