Page 164 of 377
Thermatic
16
1
X
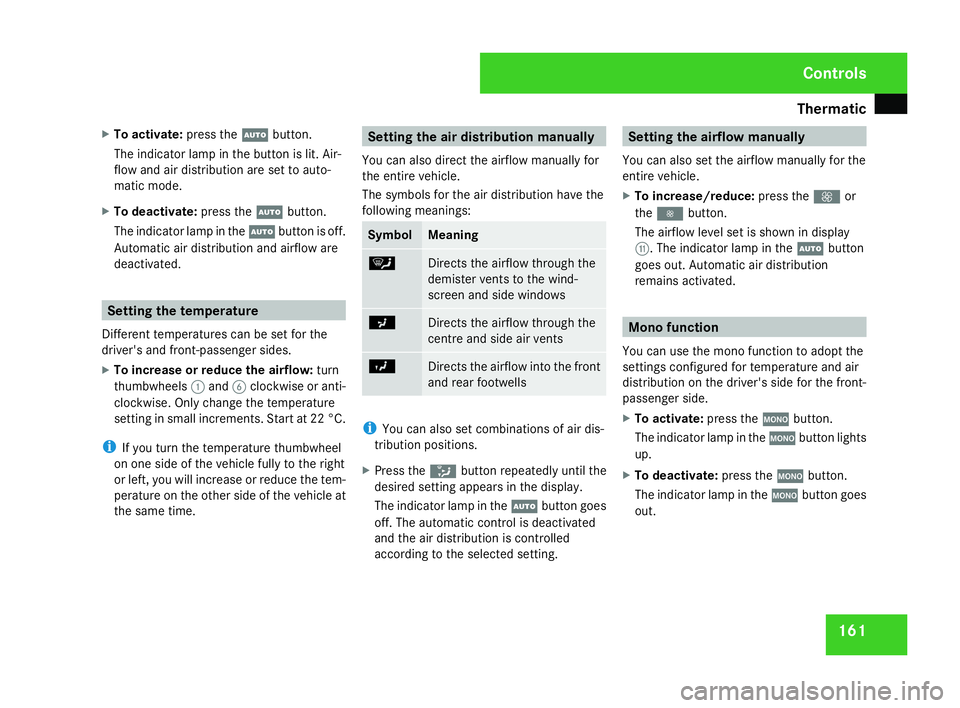
To activate :press the Ubutton.
The indicator lamp in the button is lit. Air-
flow and air distribution are set to auto-
matic mode.
X To deactivate: press theUbutton.
The indicator lamp in the Ubutton is off.
Automatic air distribution and airflow are
deactivated. Setting the temperatur
e
Different temperatures can be set for the
driver's and front-passenger sides.
X To increase or reduce the airflow: turn
thumbwheels 1and 6clockwise or anti -
clockwise. Only change the temperature
setting in small increments. Start at 22 °C .
i If you turn the temperature thumbwheel
on one side of the vehicle fully to the right
or left, you will increase or reduce the tem-
perature on the other side of the vehicle at
the same time. Setting the air distribution manually
You can also direct the airflow manually for
the entire vehicle .
The symbols for the air distribution have the
following meanings: Symbol Meaning
{
Directs the airflow through the
demister vents to the wind-
screen and side windows
a
Directs the airflow through the
centre and side air vents
Y
Directs the airflow into the front
and rear footwell
s i
You can also set combinations of air dis-
tribution positions .
X Press the Zbutton repeatedly until the
desired setting appears in the display.
The indicator lamp in the Ubutton goes
off. The automatic control is deactivated
and the air distribution is controlled
according to the selected setting. Setting the airflow manually
You can also set the airflow manually for the
entire vehicle.
X To increase/reduce: press theQor
the Ï button.
The airflow level set is shown in display
b . The indicator lamp in the Ubutton
goes out. Automatic air distribution
remains activated. Mono function
You can use the mono function to adopt the
settings configured for temperature and air
distribution on the driver's side for the front-
passenger side.
X To activate :press the zbutton.
The indicator lamp in the zbutton lights
up.
X To deactivate: press thezbutton.
The indicator lamp in the zbutton goes
out. Controls
204_AKB; 2; 3, en-GB
mkalafa,
2007-06-26T23:11:51+02:00 - Seite 161
Page 172 of 377
Thermotronic*
16
9 Setting the airflow manually
You can also set the airflow manually for the
entire vehicle.
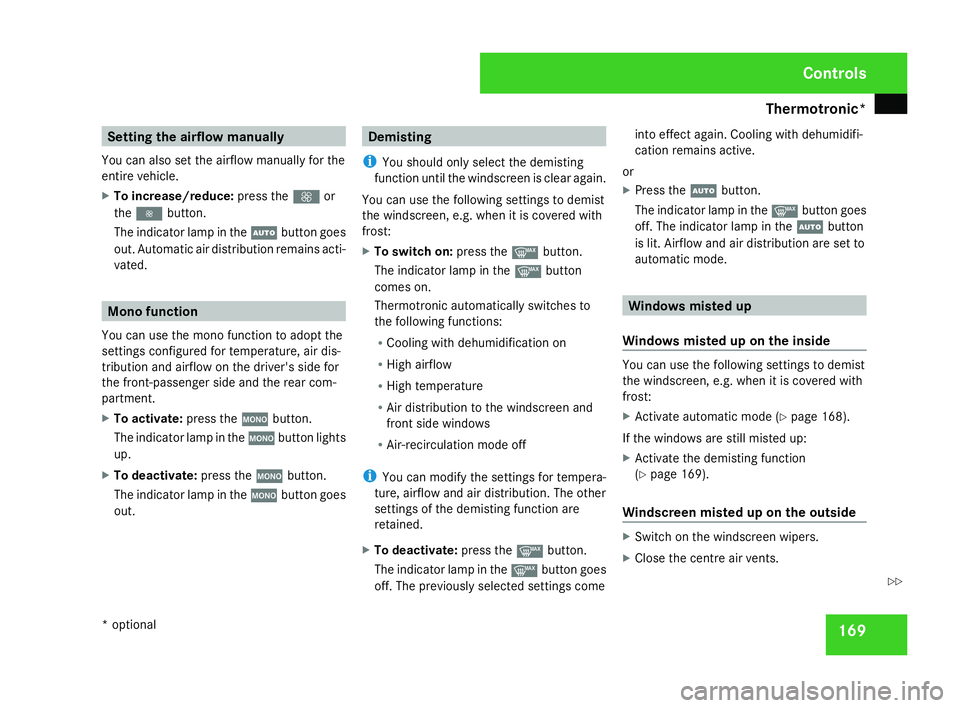
X To increase/reduce: press theQor
the Ï button.
The indicator lamp in the Ubutton goes
out. Automatic air distribution remains acti-
vated. Mono function
You can use the mono function to adopt the
settings configured for temperature, air dis-
tribution and airflow on the driver's side for
the front-passenger side and the rear com-
partment .
X To activate :press the zbutton.
The indicator lamp in the zbutton lights
up.
X To deactivate: press thezbutton.
The indicator lamp in the zbutton goes
out. Demisting
i You should only select the demisting
function until the windscreen is clear again.
You can use the following settings to demist
the windscreen, e.g. when it is covered with
frost:
X To switch on :press the ybutton.
The indicator lamp in the ybutton
comes on.
Thermotronic automatically switches to
the following functions:
R Cooling with dehumidification on
R High airflo w
R High temperature
R Air distribution to the windscreen and
front side windows
R Air-recirculation mode off
i You can modify the settings for tempera-
ture, airflow and air distribution. The other
settings of the demisting function are
retained.
X To deactivate: press theybutton.
The indicator lamp in the ybutton goes
off. The previously selected settings come into effect again. Cooling with dehumidifi-
cation remains active.
or
X Press the Ubutton.
The indicator lamp in the ybutton goes
off. The indicator lamp in the Ubutton
is lit. Airflow and air distribution are set to
automatic mode. Windows misted up
Windows misted up on the inside You can use the following settings to demist
the windscreen, e.g. when it is covered with
frost
:
X Activate automatic mode (Y page 168).
If the windows are still misted up:
X Activate the demisting functio n
( Y page 169).
Windscreen misted up on the outsid e X
Switch on the windscreen wipers.
X Close the centre air vents . Cont
rols
* optional
204_AKB; 2; 3, en-GB
mkalafa,
2007-06-26T23:11:51+02:00 - Seite 169 Z
Page 198 of 377
Features
195
Stowage compartment/telephon
e
compartment under the armrest 1
Right-hand butto n
2 Left-hand button
X To open: press left-hand button 2or right-
hand button 1.
The stowage compartment opens.
i A small and a large stowage compartment
are located under the armrest. The small
stowage compartment can be removed for
emptying. The telephone bracket* is loca-
ted in the large stowage compartment. Stowage compartment in the rear seat
armres t 1
Cove r
2 Rear seat armres t
X Fold down rear seat armrest 2.
X Fold cover 1of the rear seat armrest
upwards. Features
Sun visors
G
Risk of accident
Keep the mirrors in the sun visors covered
while driving. You could otherwise be daz-
zled by bright lights, impairing your view of
traffic conditions. As a result you could
cause an accident. 1
Mirror light
2 Retainer
3 Retaining clip, e.g. for a car park ticket
4 Vanity mirror
5 Mirror cover Controls
* optional
204_AKB; 2; 3, en-GB
mkalafa,
2007-06-26T23:11:51+02:00 - Seite 195
Page 241 of 377
Display
messages 23
8 Display messages Possible cause/consequence Possible solution
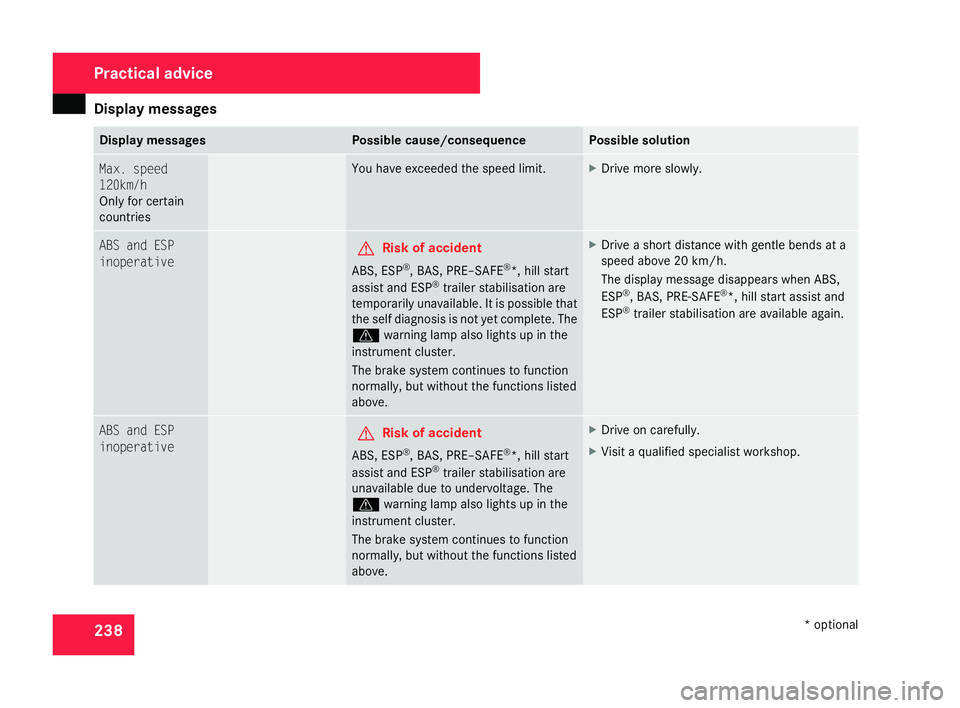
Max. speed
120km/
h
Only for certain
countries You have exceeded the speed limit. X
Drive more slowly . ABS and ESP
inoperative
G
Risk of accident
ABS, ESP ®
, BAS, PRE–SAFE ®
*, hill start
assist and ESP ®
trailer stabilisation ar e
temporarily unavailable. It is possible tha t
the self diagnosis is not yet complete. Th e
v warning lamp also lights up in th e
instrument cluster.
The brake system continues to function
normally, but without the functions listed
above. X
Drive a short distance with gentle bends at a
speed above 20 km/h.
The display message disappears when ABS,
ESP ®
, BAS, PRE-SAFE ®
*, hill start assist and
ESP ®
trailer stabilisation are available again. ABS and ESP
inoperative
G
Risk of accident
ABS, ESP ®
, BAS, PRE–SAFE ®
*, hill start
assist and ESP ®
trailer stabilisation ar e
unavailable due to undervoltage. The
v warning lamp also lights up in th e
instrument cluster.
The brake system continues to function
normally, but without the functions listed
above. X
Drive on carefully.
X Visit a qualified specialist workshop. Practical advice
* optional
204_AKB; 2; 3, en-GB
mkalafa,
2007-06-26T23:11:51+02:00 - Seite 238
Page 242 of 377
Display
messages 23
9 Display messages Possible cause/consequence Possible solution
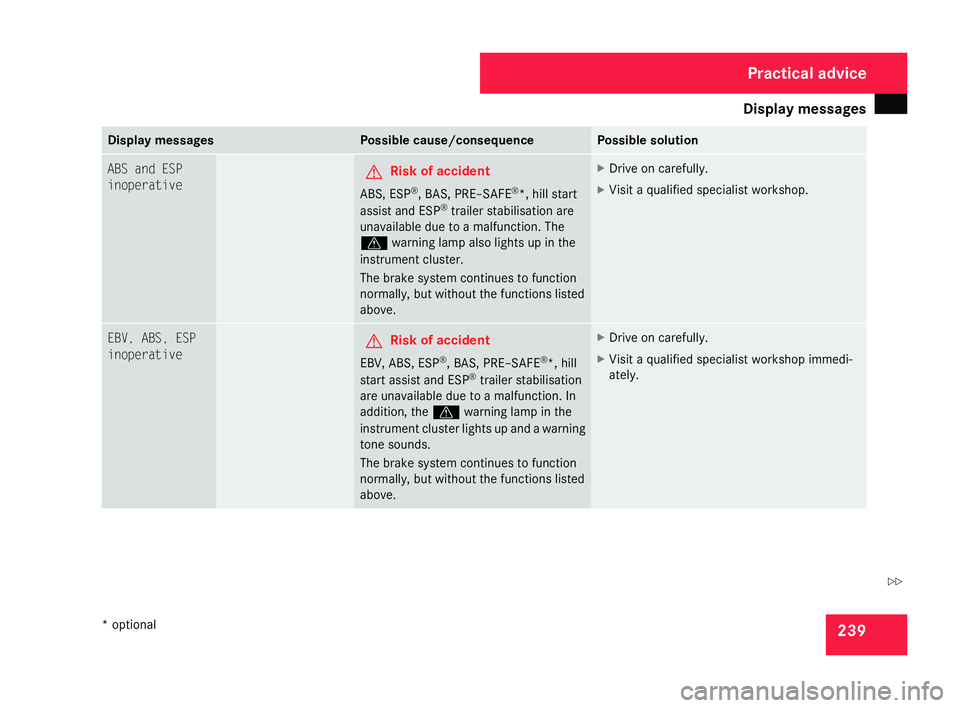
ABS and ESP
inoperative
G
Risk of accident
ABS, ESP ®
, BAS, PRE–SAFE ®
*, hill start
assist and ESP ®
trailer stabilisation ar e
unavailable due to a malfunction. The
v warning lamp also lights up in th e
instrument cluster.
The brake system continues to function
normally, but without the functions listed
above. X
Drive on carefully.
X Visit a qualified specialist workshop. EBV, ABS, ESP
inoperative
G
Risk of accident
EBV, ABS, ESP ®
, BAS, PRE–SAFE ®
*, hill
start assist and ESP ®
trailer stabilisatio n
are unavailable due to a malfunction. In
addition, the vwarning lamp in th e
instrument cluster lights up and a warnin g
tone sounds.
The brake system continues to functio n
normally, but without the functions listed
above . X
Drive on carefully.
X Visit a qualified specialist workshop immedi-
ately. Practical advice
* optional
204_AKB; 2; 3, en-GB
mkalafa,
2007-06-26T23:11:51+02:00 - Seite 239 Z
Page 243 of 377
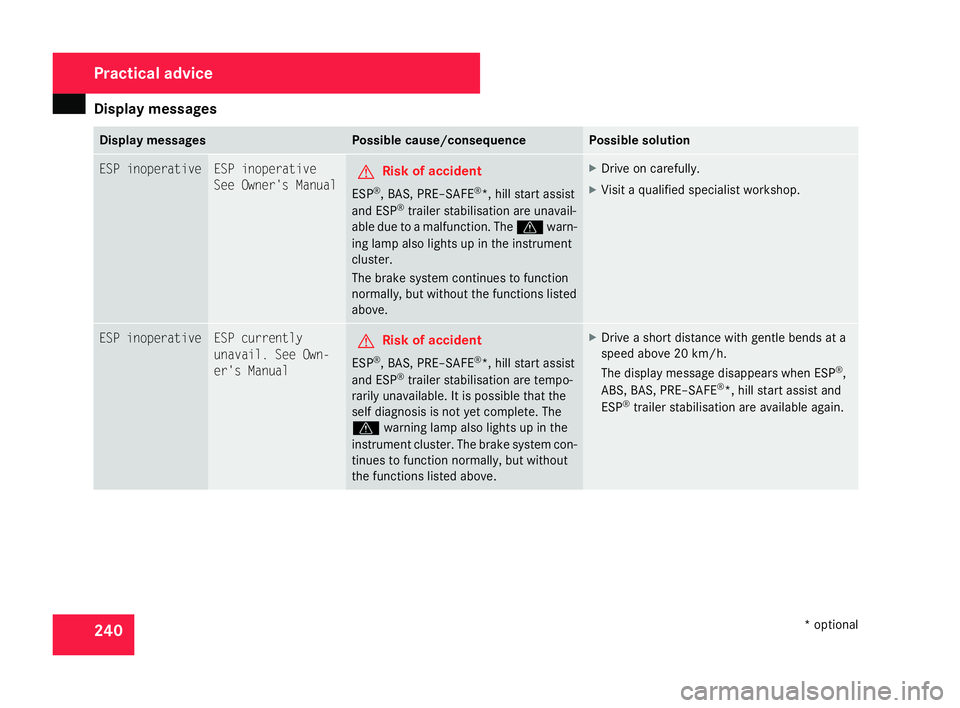
Display
messages 24
0 Display messages Possible cause/consequence Possible solution
ESP inoperative ESP inoperative
See Owner's Manual
G
Risk of accident
ESP ®
, BAS, PRE–SAFE ®
*, hill start assist
and ESP ®
trailer stabilisation are unavail -
able due to a malfunction. The vwarn-
ing lamp also lights up in the instrumen t
cluster.
The brake system continues to function
normally, but without the functions listed
above . X
Drive on carefully.
X Visit a qualified specialist workshop. ESP inoperative ESP currently
unavail. See Own-
er's Manual
G
Risk of accident
ESP ®
, BAS, PRE–SAFE ®
*, hill start assist
and ESP ®
trailer stabilisation are tempo-
rarily unavailable. It is possible that the
self diagnosis is not yet complete. Th e
v warning lamp also lights up in th e
instrument cluster. The brake system con -
tinues to function normally, but without
the functions listed above . X
Drive a short distance with gentle bends at a
speed above 20 km/h.
The display message disappears when ESP ®
,
ABS, BAS, PRE–SAFE ®
*, hill start assist and
ESP ®
trailer stabilisation are available again. Practical advice
* optional
204_AKB; 2; 3, en-G
B
mkalafa , 2007-06-26T23:11:51+02:00 - Seite 240
Page 244 of 377
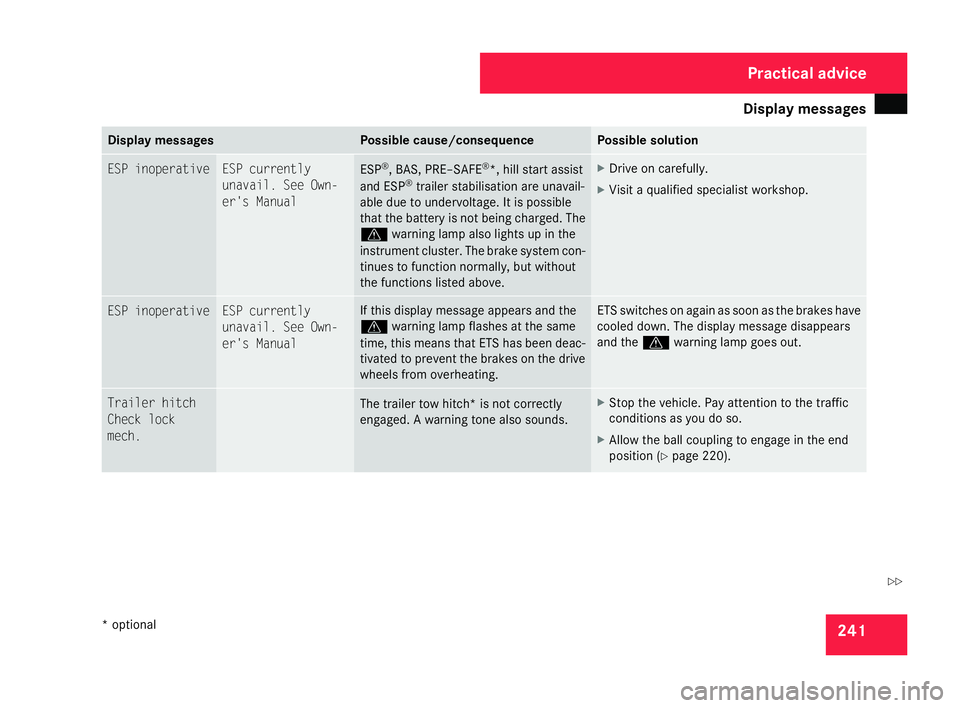
Display
messages 24
1 Display messages Possible cause/consequence Possible solution
ESP inoperative ESP currently
unavail. See Own
-
er's Manual ESP
®
, BAS, PRE–SAFE ®
*, hill start assist
and ESP ®
trailer stabilisation are unavail -
able due to undervoltage. It is possible
that the battery is not being charged. The
v warning lamp also lights up in th e
instrument cluster. The brake system con -
tinues to function normally, but without
the functions listed above . X
Drive on carefully.
X Visit a qualified specialist workshop. ESP inoperative ESP currently
unavail. See Own-
er's Manual If this display message appears and the
v
warning lamp flashes at the same
time, this means that ETS has been deac-
tivated to prevent the brakes on the driv e
wheels from overheating . ETS switches on again as soon as the brakes have
cooled down. The display message disappears
and the
vwarning lamp goes out. Trailer hitch
Check loc
k
mech. The trailer tow hitch* is not correctly
engaged. A warning tone also sounds. X
Stop the vehicle. Pay attention to the traffic
conditions as you do so.
X Allow the ball coupling to engage in the end
position (Y page 220). Practical advice
* optional
204_AKB; 2; 3, en-GB
mkalafa,
2007-06-26T23:11:51+02:00 - Seite 241 Z
Page 245 of 377

Display
messages 24
2 Display messages Possible cause/consequence Possible solution
Check brake
fluid level
G
Risk of accident
There is insufficient brake fluid in the
brake fluid reservoir. In addition, the
3 warning lamp in the instrument clus-
ter lights up and a warning tone sounds. X
Pull over as soon as it is safe to do so.
X Do not continue driving under any circumstan-
ces .
X Consult the nearest qualified specialist work -
shop.
X Do not top up the brake fluid. This will not rec -
tify the malfunction. P
Shift to
P P
Shift to
P You have switched off the engine with the
KEYLESS GO* button and opened the driv-
er's door.
You have attempted to lock the vehicle. X
Move the selector lever to P.
The engine can be started again. To start
engine, shift
to either P or
N To start engine,
shift to either
P
or N You have attempted to start the engin
e
while the selector lever is not in position
P or N. X
Move the selector lever to Por N. Clean the fuel
filter X
Visit a qualified specialist workshop. Practical advice
* optional
204_AKB; 2; 3, en-GB
mkalafa,
2007-06-26T23:11:51+02:00 - Seite 242