2007 MERCEDES-BENZ C-CLASS ESTATE lights
[x] Cancel search: lightsPage 97 of 377
Mirrors
94 Exterior mirrors
G
Risk of accident
The exterior mirrors reduce the size of the
image. Objects are actually closer than
they appear. You could misjudge the dis-
tance from vehicles driving behind and
cause an accident, e.g. when changing
lane. For this reason, make sure of the
actual distance from the vehicle driving
behind by glancing over your shoulder .
The convex exterior mirrors give a larger field
of vision.
At low outside temperatures, the exterior mir-
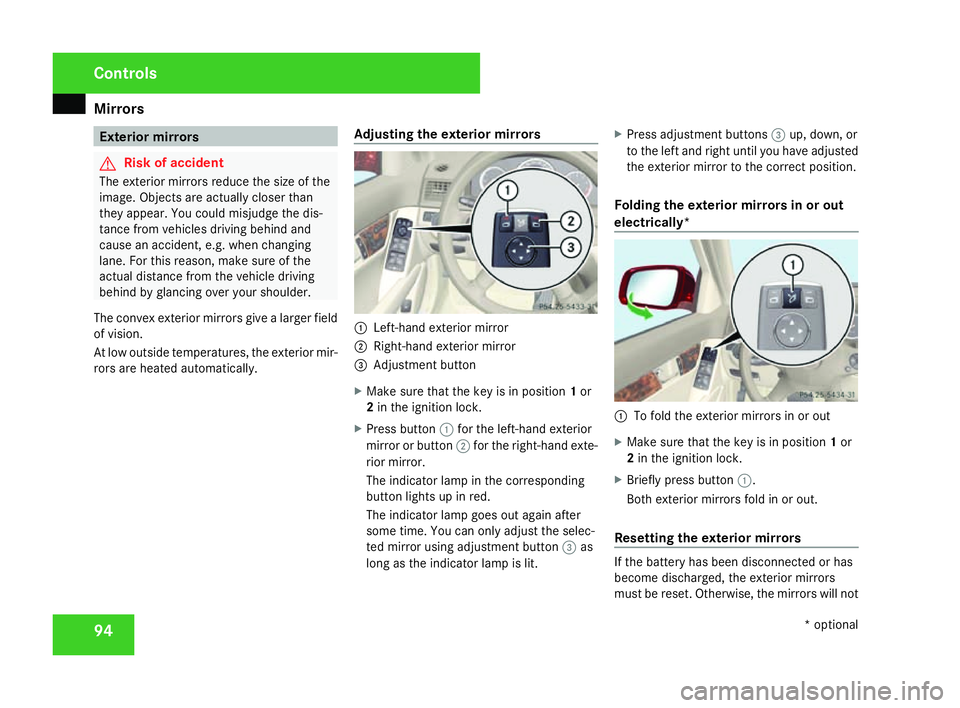
rors are heated automatically. Adjusting the exterior mirrors 1
Left-hand exterior mirror
2 Right-hand exterior mirror
3 Adjustment button
X Make sure that the key is in position 1or
2 in the ignition lock .
X Press button 1for the left-hand exterior
mirror or button 2for the right-hand exte-
rior mirror.
The indicator lamp in the corresponding
button lights up in red.
The indicator lamp goes out again after
some time. You can only adjust the selec-
ted mirror using adjustment button 3as
long as the indicator lamp is lit .X
Press adjustment buttons 3up, down, or
to the left and right until you have adjusted
the exterior mirror to the correct position .
Folding the exterior mirrors in or out
electrically * 1
To fold the exterior mirrors in or out
X Make sure that the key is in position 1or
2 in the ignition lock .
X Briefly press button 1.
Both exterior mirrors fold in or out.
Resetting the exterior mirrors If the battery has been disconnected or ha
s
become discharged, the exterior mirror s
must be reset. Otherwise, the mirrors will not Controls
* optional
204_AKB; 2; 3, en-GB
mkalafa,
2007-06-26T23:11:51+02:00 - Seite 94
Page 99 of 377
Memory functions*
961
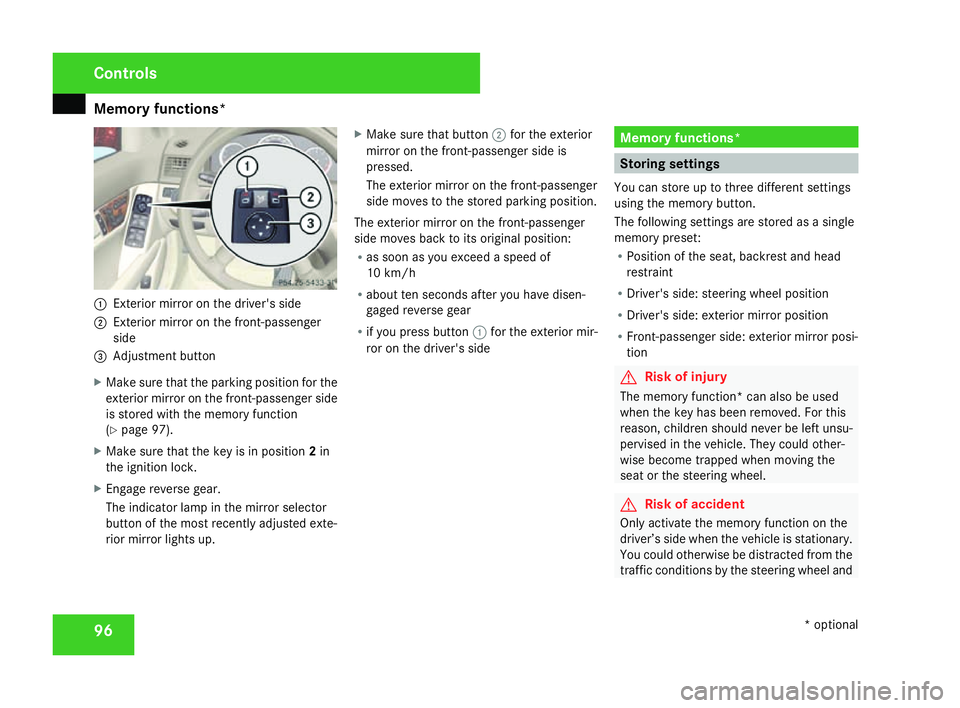
Exterior mirror on the driver's side
2 Exterior mirror on the front-passenge r
side
3 Adjustment button
X Make sure that the parking position for the
exterior mirror on the front-passenger side
is stored with the memory function
( Y page 97).
X Make sure that the key is in position 2in
the ignition lock .
X Engage reverse gear .
The indicator lamp in the mirror selector
button of the most recently adjusted exte-
rior mirror lights up. X
Make sure that button 2for the exterior
mirror on the front-passenger side is
pressed.
The exterior mirror on the front-passenger
side moves to the stored parking position.
The exterior mirror on the front-passenger
side moves back to its original position:
R as soon as you exceed a speed of
10 km/h
R about ten seconds after you have disen -
gaged reverse gear
R if you press button 1for the exterior mir-
ror on the driver's side Memory functions
* Storing settings
You can store up to three different settings
using the memory button.
The following settings are stored as a single
memory preset:
R Position of the seat, backrest and head
restraint
R Driver's side: steering wheel positio n
R Driver's side: exterior mirror positio n
R Front-passenger side: exterior mirror posi-
tion G
Risk of injury
The memory function* can also be used
when the key has been removed. For this
reason, children should never be left unsu-
pervised in the vehicle. They could other-
wise become trapped when moving the
seat or the steering wheel . G
Risk of accident
Only activate the memory function on the
driver’s side when the vehicle is stationary.
You could otherwise be distracted from the
traffic conditions by the steering wheel and Control
s
* optional
204_AKB; 2; 3, en-GB
mkalafa,
2007-06-26T23:11:51+02:00 - Seite 96
Page 103 of 377
Seat belts
100
X
Click belt tongue 2into buckle3 .
X If necessary, adjust the belt to the appro-
priate height (Y page 100).
X If necessary, pull upwards on the shoulder
section of the belt to tighten the belt across
your body.
Routing the belt X
Press release button 4and guide belt
tongue 2back towards belt sash guide
1 . Belt warning for driver and fron
t
passenge r
The < seat belt warning lamp in the instru-
ment cluster reminds you that all occupants
should fasten their seat belts. The
or it may flash. Additionally there may be a
warning tone.
The < seat belt warning lamp goes out and
the warning tone ceases when the driver and
the front passenger have fastened their seat
belt.
For certain countries only: independent of
whether the driver or the front passenger are already secured, the
has been started. The
front passenger have fastened their seat belt.
i Further information about the
You can adjust the seat belt height on the
driver's seat and front-passenger seat.
Adjust the belt to a height that allows it to be
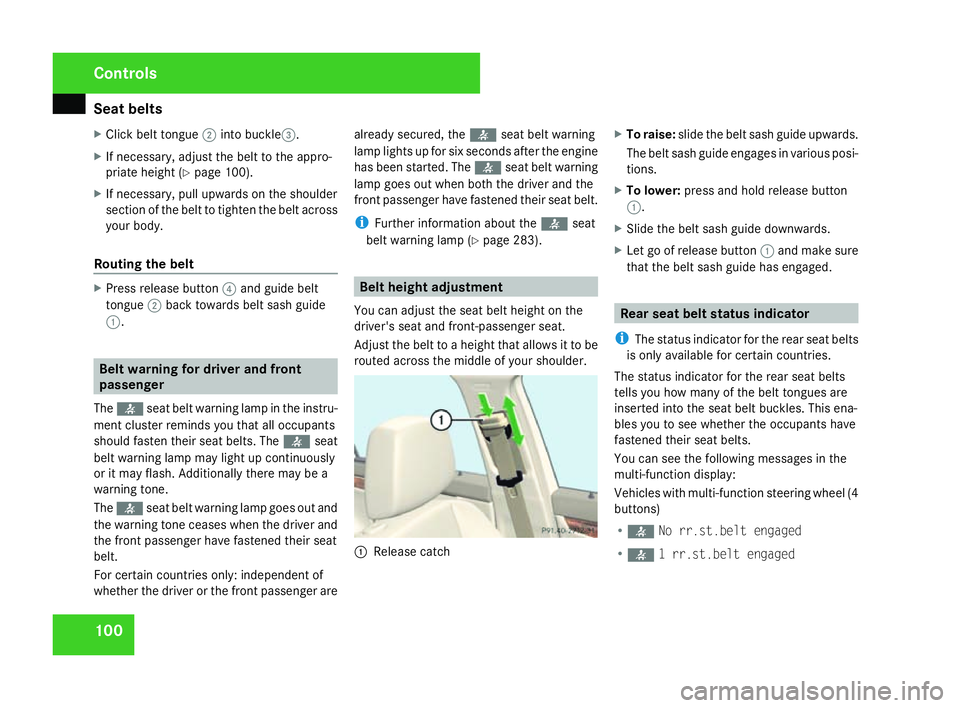
routed across the middle of your shoulder. 1
Release catch X
To raise: slide the belt sash guide upwards .
The belt sash guide engages in various posi-
tions.
X To lower: press and hold release button
1 .
X Slide the belt sash guide downwards .
X Let go of release button 1and make sure
that the belt sash guide has engaged . Rear seat belt status indicator
i The status indicator for the rear seat belts
is only available for certain countries.
The status indicator for the rear seat belts
tells you how many of the belt tongues are
inserted into the seat belt buckles. This ena-
bles you to see whether the occupants have
fastened their seat belts.
You can see the following messages in the
multi-function display :
Vehicles with multi-function steering wheel (4
buttons)
R < No rr.st.belt engaged
R < 1 rr.st.belt engaged Controls
204_AKB; 2; 3, en-GB
mkalafa,
2007-06-26T23:11:51+02:00 - Seite 100
Page 105 of 377
Light
s 102It should:
R
fit snugly across your body
R be routed across the middle of your
shoulder
R routed in your pelvic area across the hip
joints Lights
Light switch
For reasons of safety, Mercedes-Benz recom-
mends that you drive with the lights switched
on even during the daytime. In some coun-
tries, daytime use of headlamps varies due to
legal requirements and self-imposed obliga-
tions. In these countries, dipped-beam head-
lamps are switched on when the ignition is
switched on.
Vehicles with a luxury multi-function steering
wheel*: you can use the on-board computer
to change this setting in countries where day-
time driving lights are not legally required; se e
the section on daytime driving lights
( Y page 140).
i If you drive in countries in which traffic
drives on the opposite side of the road to
the country where the vehicle is registered ,
oncoming traffic may be dazzled by the
asymmetrical dipped-beam headlamps.
Have the headlamps changed to symmet-
rical dipped beam when driving in these
countries. You can obtain information
about this from any Mercedes-Benz Servic e
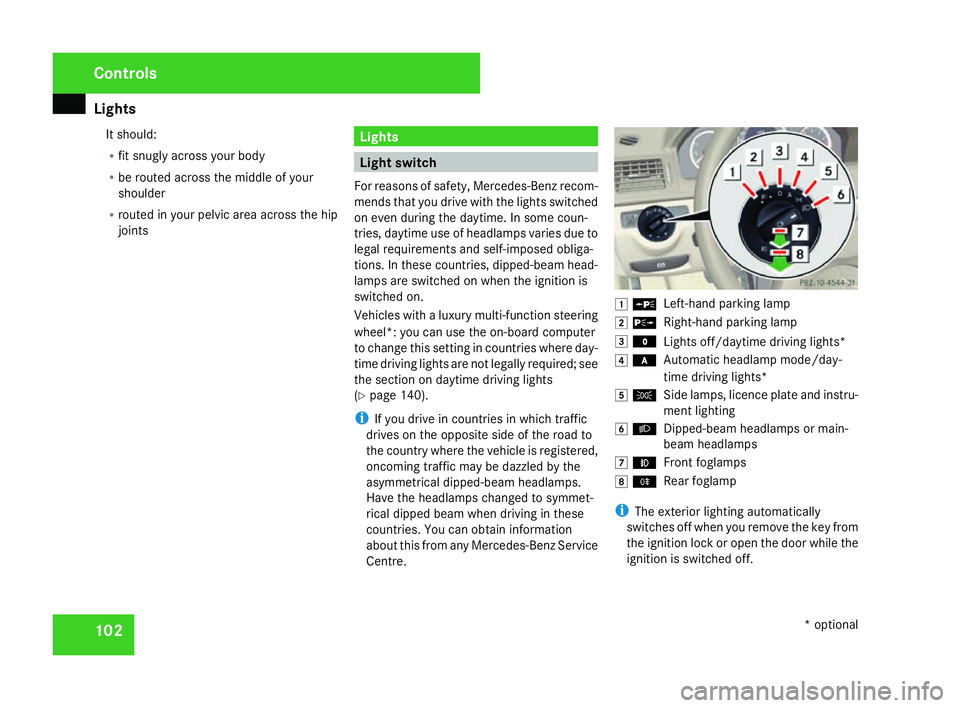
Centre. $
a
Left-hand parking lamp
% g
Right-hand parking lamp
& M
Lights off/daytime driving lights*
( *
Automatic headlamp mode/day -
time driving lights*
) C
Side lamps, licence plate and instru-
ment lighting
* B
Dipped-beam headlamps or main-
beam headlamps
, ¥
Front foglamp s
. †
Rear foglamp
i The exterior lighting automatically
switches off when you remove the key from
the ignition lock or open the door while the
ignition is switched off. Controls
* optional
204_AKB; 2; 3, en-GB
mkalafa,
2007-06-26T23:11:51+02:00 - Seite 102
Page 106 of 377
Light
s 103
!
Switch off the side lamps or parking lamp
when you leave the vehicle. This prevents
the battery from discharging.
Dipped-beam headlamps X
Make sure that the key is in position 2of
the ignition lock or that the engine is run-
ning.
X To switch on :turn the light switch to
B .
The dipped-beam headlamps, parking
lamps and licence plate lamps are switched
on. The parking lamp indicator lamp next to
the light switch is lit.
i On some country-specific vehicle models,
the dipped-beam headlamps come on as
soon as the ignition is switched on.
Daytime driving lights* On vehicles with a luxury multi-function steer-
ing wheel*, you can set the daytime driving
lights using the on-board computer
(
Y page 143). X
To switch on :turn the light switch to
M or* .
The dipped-beam headlamps, side lamps
and licence plate lighting are switched on
when the engine is running.
Automatic headlamp mode The side lamps, dipped-beam headlamps and
licence plate lighting are switched on or off
automatically, depending on the brightness of
the ambient light.
G
Risk of accident
If the light switch is set to *the head -
lamps may temporarily switch off due to
exposure to light, or the lights may not
come on automatically if it is foggy. This can
endanger yourself and others. Therefore,
turn the light switch to Bin the dark or
in fog.
The automatic headlamp feature is only an
aid. The driver is responsible for the vehicle
lighting at all times. G
Risk of accident
When it is dark or foggy, turn the light
switch quickly from *toB . You could otherwise cause an accident if the
headlamps were to switch off temporarily.
X To switch on :turn the light switch to
* .
The side lamps are switched on and off
automatically when the key is in position
1 in the ignition lock .
The dipped-beam headlamps, side lamps
and licence plate lighting are switched on
automatically when the engine is running.
When the parking lamp or dipped-beam
headlamps are switched on, the indicator
lamp next to the light switch lights up.
Front foglamps/rear foglamp G
Risk of accident
If you suspect that driving conditions will be
foggy, turn the light switch to Bbefore
you start your journey. Otherwise, your
vehicle may not be visible and you could
therefore endanger yourself and others. G
Risk of accident
When it is dark or foggy, turn the light
switch quickly from *toB . You Cont
rols
* optional
204_AKB; 2; 3, en-GB
mkalafa,
2007-06-26T23:11:51+02:00 - Seite 103 Z
Page 107 of 377
Light
s 104 could otherwise cause an accident if the
headlamps were to switch off temporarily.
i When the light switch is set to *you
cannot switch on the front or rear fog-
lamps.
X Make sure that the key is in position 2in
the ignition lock .
X To switch on the front foglamps: turn the
light switch to the BorC position .
X Pull the light switch out to the first stop.
The ¥ green indicator lamp next to the
light switch lights up.
X To switch on the rear foglamp: turn the
light switch to the Bposition .
X Pull the light switch out to the second stop.
The † yellow indicator lamp next to th e
light switch lights up.
X To switch off the front foglamps/rear
foglamp: push in the light switch to the
stop .
The corresponding indicator lamp goes out. Combination switch (turn signals,
main-beam headlamps and headlam
p
flasher)
Turn signals Combination switch
1 To indicate a right turn
2 To indicate a left turn
X To switch on :press the combination
switch in the direction of arrow 1or2 .
The corresponding turn signal indicator
lamp in the instrument cluster flashes.
i If you only wish to indicate a minor change
of direction, press the combination switch
briefly in the appropriate direction. The cor-
responding turn signal flashes three times. Main-beam headlamps/headlamp flas-
her
Combination switch
1
Main-beam headlamps
2 Headlamp flasher
Main-beam headlamps
X Turn the light switch to Bor* .
X To switch on: press the combinatio n
switch in the direction of arrow 1.
The main-beam indicator lamp in the instru-
ment cluster lights up.
X To switch off: move the combinatio n
switch back to its normal position.
The main-beam indicator lamp in the instru-
ment cluster goes out. Controls
204_AKB; 2; 3, en-GB
mkalafa,
2007-06-26T23:11:51+02:00 - Seite 104
Page 109 of 377
Light
s 106 Headlamp cleaning system*
i The headlamps are cleaned automatically
if the "Wipe with windscreen washer fluid"
function is operated while the lights are on
and the engine is running. The headlamps
are cleaned again every tenth time the
windscreen is wiped with washer fluid.
When the ignition is switched off, the auto-
matic headlamp cleaning feature is reset
and counting resumes from 0. Intelligent Light System* (vehicles
with bi-xenon headlamps*)
The Intelligent Light System adapts the light-
ing of the front headlamps to the prevailing
driving conditions so that the road is illumi-
nated better .
On vehicles with a luxury multi-function steer-
ing wheel* you can activate or deactivate the
function using the on-board computer .
i The Intelligent Light System is only active
when it is dark.
The Intelligent Light System comprises:
R Active light functio n
R Cornering light function R
Motorway mode
R Extended range foglamps
Active light function For the active light function, the dipped-beam
headlamps swivel horizontally. The swivel
angle changes according to the respectiv
e
driving situation .
i The active light function is not active
when the vehicle is stationary.
Cornering light function Specially designed headlamps light up the
area into which you are driving when turnin
g
corners.
The cornering lights only light up :
R when it is dark
R at speeds below 40 km/h
R when the front foglamps are switched off
Switching on
X Make sure that the engine is running.
X Switch on the dipped-beam headlamps. X
Switch on the turn signal .
The cornering light on the same side as the
turn signal comes on, even if you turn the
steering wheel in the opposite direction
after indicating.
or
X Turn the steering wheel in the required
direction .
When in a forward gear: the cornering light
on the inside of the bend comes on.
When in reverse gear: the cornering light on
the outside of the bend comes on.
Switching off
X Switch off the turn signal .
i The cornering light is activated until you
turn the steering wheel back to the straight -
ahead position and the turn signal switches
off. The cornering light may remain lit for a
short time, but no more than three minutes.
It then goes out, even if the turn signal is
still switched on.
Motorway mode Motorway mode optimises the illumination of
the road by:Controls
* optional
204_AKB; 2; 3, en-GB
mkalafa,
2007-06-26T23:11:51+02:00 - Seite 106
Page 117 of 377
Driving and pa
rking11
4
Manual transmission
X
Shift to neutral .
X Depress the parking brake (Y page 116).
Further information about the manual trans-
mission (Y page 117). Automatic transmission* P
Park position (selector lever lock)
R Reverse gear
N Neutral
D Drive positio n
X Before starting, make sure Pis selected.
i The engine can also be started when the
selector lever is in position N.
Further information about the automatic
transmission (Y page 118).
Starting the engine with the key i
Vehicles with automatic transmission*:
You can also use the "touch-start" function.
To do this, turn the key to position 3and release it immediately. The engine then
starts automatically.
X To start a petrol engine :turn the key to
position 3in the ignition lock and release it
as soon as the engine is running.
X To start a diesel engine :turn the key to
position 2in the ignition lock .
The q preglow indicator lamp in the
instrument cluster lights up.
X When the qpreglow indicator lamp
goes out, turn the key to position 3and
release it as soon as the engine is running.
i You can start the engine without preglow
if the engine is warm.
Starting the engine with KEYLESS GO* G
Risk of injury
Your vehicle can be started using a valid
KEYLESS GO key*. For this reason, childre n
should never be left unsupervised in the
vehicle. Always take the KEYLESS GO
key* with you when leaving the vehicle,
even if you are only leaving it for a short
time. Controls
* optional
204_AKB; 2; 3, en-GB
mkalafa,
2007-06-26T23:11:51+02:00 - Seite 114