2007 MERCEDES-BENZ C-CLASS ESTATE phone
[x] Cancel search: phonePage 136 of 377
On-board computer (vehicles with the luxury multi-function steering wheel*, 12 buttons)
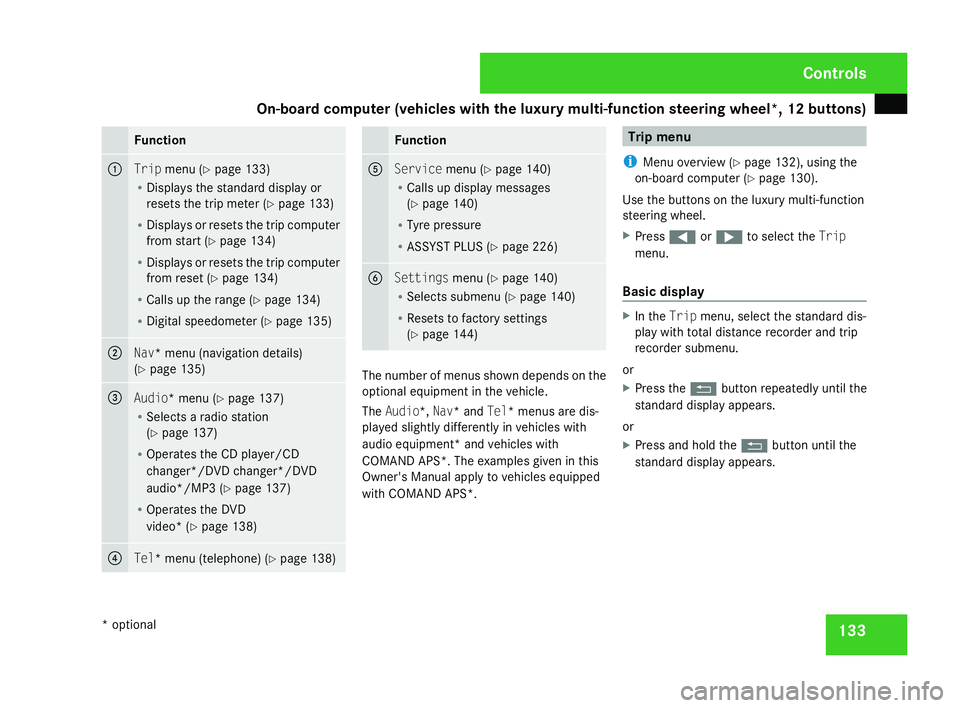
133Function
1
Trip
menu (Y page 133 )
R Displays the standard display or
resets the trip meter (Y page 133 )
R Displays or resets the trip compute r
from start (Y page 134 )
R Displays or resets the trip compute r
from reset (Y page 134 )
R Calls up the range (Y page 134 )
R Digital speedometer (Y page 135 ) 2
Nav* menu (navigation details)
( Y page 135 ) 3
Audio* menu
(Y page 137 )
R Selects a radio station
(Y page 137 )
R Operates the CD player/CD
changer*/DVD changer*/DVD
audio*/MP3 (Y page 137 )
R Operates the DVD
video* (Y page 138 ) 4
Tel* menu (telephone)
(Y page 138 ) Function
5
Service
menu(Y page 140 )
R Calls up display message s
( Y page 140 )
R Tyre pressure
R ASSYST PLUS (Y page 226 ) 6
Settings
menu(Y page 140 )
R Selects submenu (Y page 140 )
R Resets to factory setting s
( Y page 144 ) The number of menus shown depends on the
optional equipment in the vehicle.
The Audio*, Nav* and Tel* menus are dis-
played slightly differently in vehicles with
audio equipment* and vehicles with
COMAND APS*. The examples given in this
Owner's Manual apply to vehicles equipped
with COMAND APS*. Trip men
u
i Menu overview (Y page 132), using the
on-board computer (Y page 130).
Use the buttons on the luxury multi-function
steering wheel.
X Press (or& to select the Trip
menu.
Basic display X
In the Tripmenu, select the standard dis-
play with total distance recorder and trip
recorder submenu.
or
X Press the Lbutton repeatedly until the
standard display appears.
or
X Press and hold the Lbutton until the
standard display appears. Controls
* optional
204_AKB; 2; 3, en-GB
mkalafa,
2007-06-26T23:11:51+02:00 - Seite 133
Page 141 of 377
On-board computer (vehicles with the luxury multi-function steering wheel*, 12 buttons)
138
i
If you are playing a CD or DVD with track
information, the multi-function display
shows the name and number of the track.
The title is displayed for MP3s.
Operating the DVD video* X
Switch on COMAND APS* and select DVD
video; see the separate Operating Instruc-
tions . 1
Current scen e
X To select the next or previous scene:
briefly press the %or the $button.
or
X To search for the next or previous
scene: press and hold the %or the
$ button. Tel* menu
Functions and displays are dependent on the
optional equipment installed in your vehicle.
i Menu overview (Y page 132), using the
on-board computer (Y page 130).
You can use the functions in the Telmenu to
operate your mobile phone if you have inser-
ted it into the mobile phone
bracket* (Y page 199).
i If you have a Bluetooth mobile phone, you
can set up a Bluetooth connection to the
audio equipment* or COMAND APS*; see
the separate Operating Instructions.
Use the buttons on the luxury multi-function
steering wheel.
X Switch on the audio equipment* or
COMAND APS* and select the radio; see
the separate Operating Instructions .
X Press (or& to select the Telmenu .
Mobile phone on PIN code not yet entered
The
Please enter PIN message appears in
the multi-function display. X
Enter the PIN using the mobile phone, Lin-
guatronic*, the audio equipment* or
COMAND APS* .
The mobile phone will search for a network.
During this time, No networkappears in
the multi-function display .
Mobile phone ready to receive
The multi-function display shows the name of
the GSM network provider.
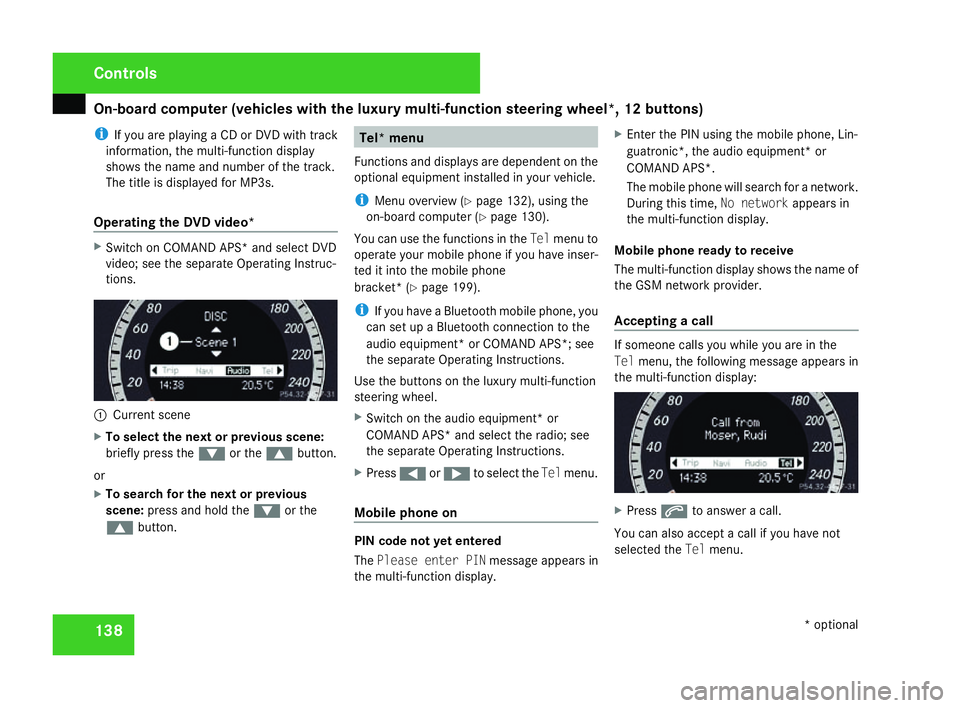
Accepting a call If someone calls you while you are in the
Tel
menu, the following message appears in
the multi-function display: X
Press sto answer a call.
You can also accept a call if you have not
selected the Telmenu . Cont
rols
* optional
204_AKB; 2; 3, en-GB
mkalafa,
2007-06-26T23:11:51+02:00 - Seite 138
Page 142 of 377
On-board computer (vehicles with the luxury multi-function steering wheel*, 12 buttons)
139
Rejecting or ending a call X
Press t.
You can also reject or end a call if you have
not selected the Telmenu.
Dialling a number from the phone book For information on entering new phone num-
bers in the phone book, see the respectiv e
Operating Instructions for the mobile phone,
the audio equipment* or COMAND APS*.
If your mobile phone is able to receive calls,
you can search for and dial a number from the
phone book in the audio equipment* or
COMAND APS* at any time.
X Copy the phone book of your mobile phon e
to the audio equipment* or COMAND
APS*; see the separate Operating Instruc -
tions for the audio equipment* or COMAND
APS* .
X Press %,$ or# to call up the
phone book.
X Press %or$ to select the name yo u
are searching for .
To scroll rapidly, press and hold the %
or the $button for longer than 1 sec- ond. After four seconds, the rapid scroll
speeds up.
The rapid scroll stops when you release the
button or reach the end of the list.
X If only one telephone number is stored
for a name: presssor# to start
dialling.
The Connecting call.. .message and
the telephone number dialled appear in the
multi-function display. The name also
appears, provided it is stored in the phon e
book. The dialled number is stored in the
NOS. DIALLE Dlist .
If a call is connected, the phone book entry
appears in the multi-function display.
or
X If there is more than one number for a
particular name: presssor# to
display the numbers.
X Press %or$ to select the numbe r
you want to dial.
X Press sor# to start dialling.
The Connecting call.. .message and
the telephone number dialled appear in the
multi-function display. The name also
appears, provided it is stored in the phon ebook. The dialled number is stored in the
NOS. DIALLE Dlist .
If a call is connected, the phone book entry
appears in the multi-function display.
or
X If you do not want to make a call: press the
t button.
Redialling The on-board computer stores the most
recently dialled names and numbers from the
mobile phone.
X Press the sbutton to go to the most
recently dialled number or name in the
redial menu.
X Press %or$ to select the numbe r
or name you are looking for.
X Press sor# to start dialling. Controls
* optional
204_AKB; 2; 3, en-G
B
mkalafa , 2007-06-26T23:11:51+02:00 - Seite 139
Page 198 of 377
Features
195
Stowage compartment/telephon
e
compartment under the armrest 1
Right-hand butto n
2 Left-hand button
X To open: press left-hand button 2or right-
hand button 1.
The stowage compartment opens.
i A small and a large stowage compartment
are located under the armrest. The small
stowage compartment can be removed for
emptying. The telephone bracket* is loca-
ted in the large stowage compartment. Stowage compartment in the rear seat
armres t 1
Cove r
2 Rear seat armres t
X Fold down rear seat armrest 2.
X Fold cover 1of the rear seat armrest
upwards. Features
Sun visors
G
Risk of accident
Keep the mirrors in the sun visors covered
while driving. You could otherwise be daz-
zled by bright lights, impairing your view of
traffic conditions. As a result you could
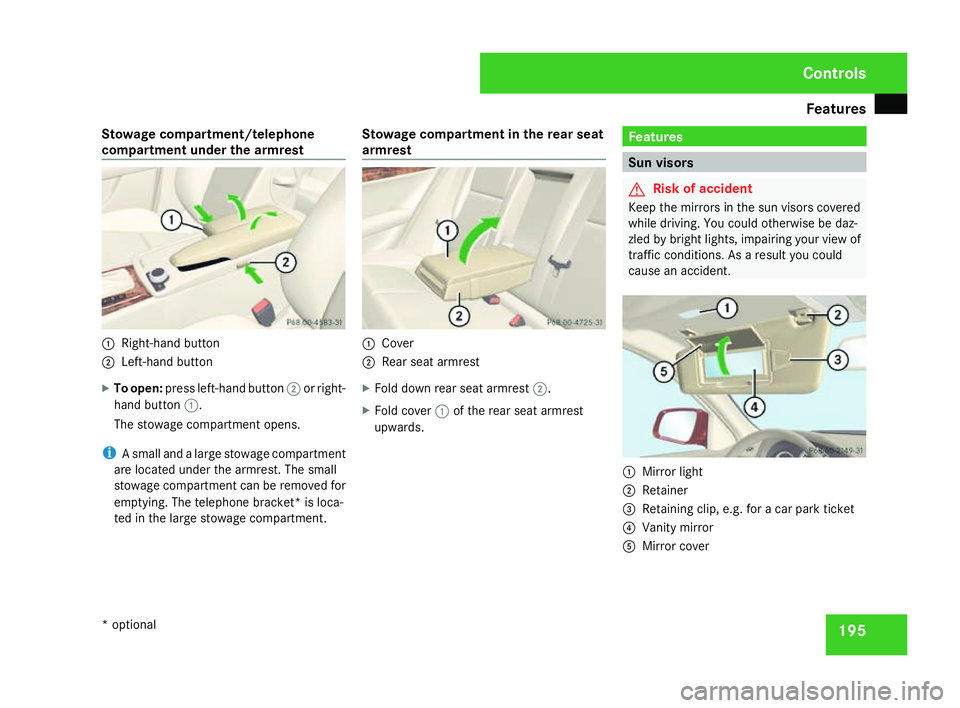
cause an accident. 1
Mirror light
2 Retainer
3 Retaining clip, e.g. for a car park ticket
4 Vanity mirror
5 Mirror cover Controls
* optional
204_AKB; 2; 3, en-GB
mkalafa,
2007-06-26T23:11:51+02:00 - Seite 195
Page 202 of 377
Features
199
Power socket in the luggage compart
-
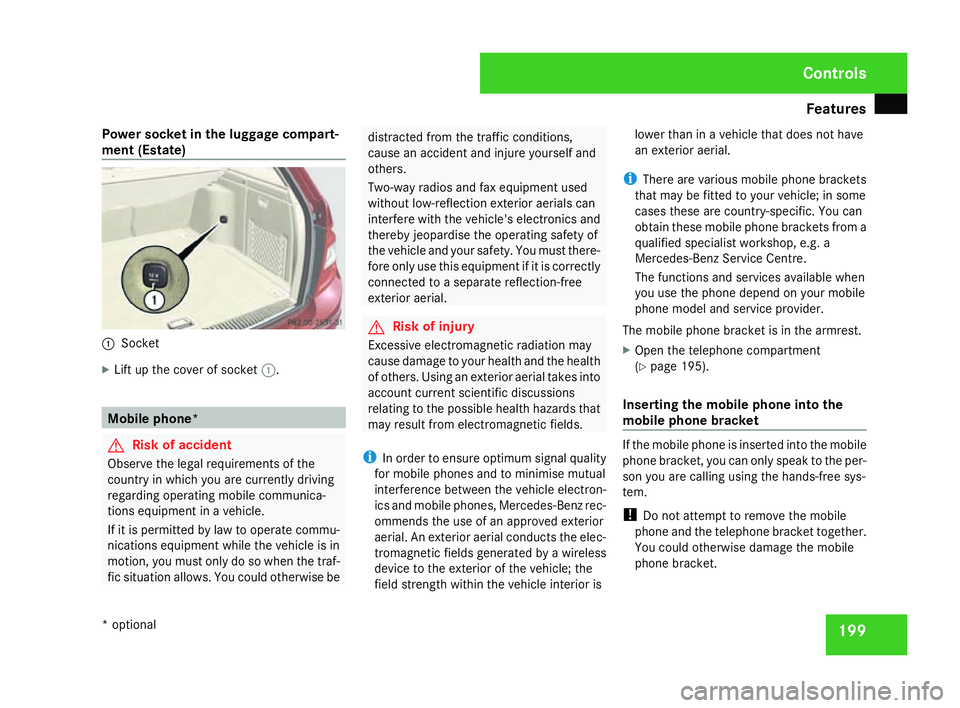
ment (Estate ) 1
Socket
X Lift up the cover of socket 1. Mobile phone
* G
Risk of accident
Observe the legal requirements of the
country in which you are currently driving
regarding operating mobile communica -
tions equipment in a vehicle.
If it is permitted by law to operate commu -
nications equipment while the vehicle is in
motion, you must only do so when the traf -
fic situation allows. You could otherwise be distracted from the traffic conditions,
cause an accident and injure yourself and
others.
Two-way radios and fax equipment use
d
without low-reflection exterior aerials can
interfere with the vehicle's electronics and
thereby jeopardise the operating safety of
the vehicle and your safety. You must there-
fore only use this equipment if it is correctly
connected to a separate reflection-free
exterior aerial. G
Risk of injury
Excessive electromagnetic radiation may
cause damage to your health and the health
of others. Using an exterior aerial takes into
account current scientific discussions
relating to the possible health hazards that
may result from electromagnetic fields.
i In order to ensure optimum signal quality
for mobile phones and to minimise mutual
interference between the vehicle electron -
ics and mobile phones, Mercedes-Benz rec -
ommends the use of an approved exterior
aerial. An exterior aerial conducts the elec-
tromagnetic fields generated by a wireless
device to the exterior of the vehicle; the
field strength within the vehicle interior is lower than in a vehicle that does not have
an exterior aerial.
i There are various mobile phone bracket s
that may be fitted to your vehicle; in some
cases these are country-specific. You can
obtain these mobile phone brackets from a
qualified specialist workshop, e.g. a
Mercedes-Benz Service Centre.
The functions and services available when
you use the phone depend on your mobile
phone model and service provider.
The mobile phone bracket is in the armrest.
X Open the telephone compartment
(Y page 195).
Inserting the mobile phone into the
mobile phone bracket If the mobile phone is inserted into the mobile
phone bracket, you can only speak to the per-
son you are calling using the hands-free sys-
tem.
!
Do not attempt to remove the mobile
phone and the telephone bracket together.
You could otherwise damage the mobile
phone bracket. Controls
* optional
204_AKB; 2; 3, en-GB
mkalafa,
2007-06-26T23:11:51+02:00 - Seite 199
Page 203 of 377
Features
200
X
Remove the cover of the aerial plug from
the back of the mobile phone and stow it in
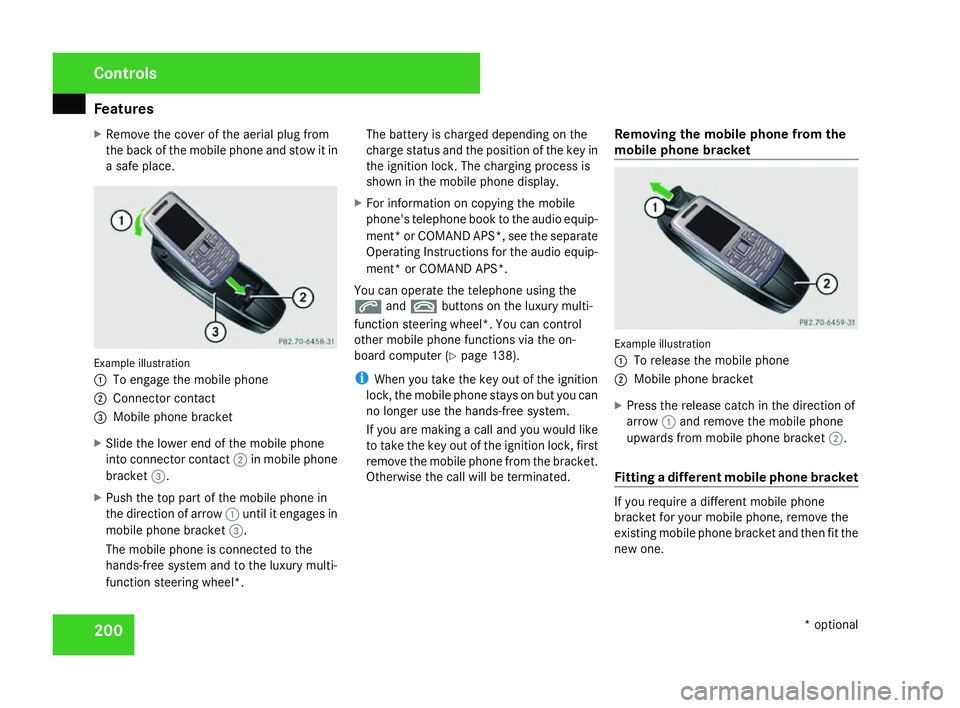
a safe place. Example illustration
1
To engage the mobile phone
2 Connector contact
3 Mobile phone bracket
X Slide the lower end of the mobile phone
into connector contact 2in mobile phon e
bracket 3.
X Push the top part of the mobile phone in
the direction of arrow 1until it engages in
mobile phone bracket 3.
The mobile phone is connected to the
hands-free system and to the luxury multi-
function steering wheel*. The battery is charged depending on the
charge status and the position of the key in
the ignition lock. The charging process is
shown in the mobile phone display
.
X For information on copying the mobil e
phone's telephone book to the audio equip-
ment *or COMAND APS*, see the separate
Operating Instructions for the audio equip-
ment* or COMAND APS* .
You can operate the telephone using the
s andt buttons on the luxury multi-
function steering wheel*. You can contro l
other mobile phone functions via the on-
board computer (Y page 138).
i When you take the key out of the ignition
lock, the mobile phone stays on but you can
no longer use the hands-free system.
If you are making a call and you would like
to take the key out of the ignition lock, first
remove the mobile phone from the bracket .
Otherwise the call will be terminated. Removing the mobile phone from the
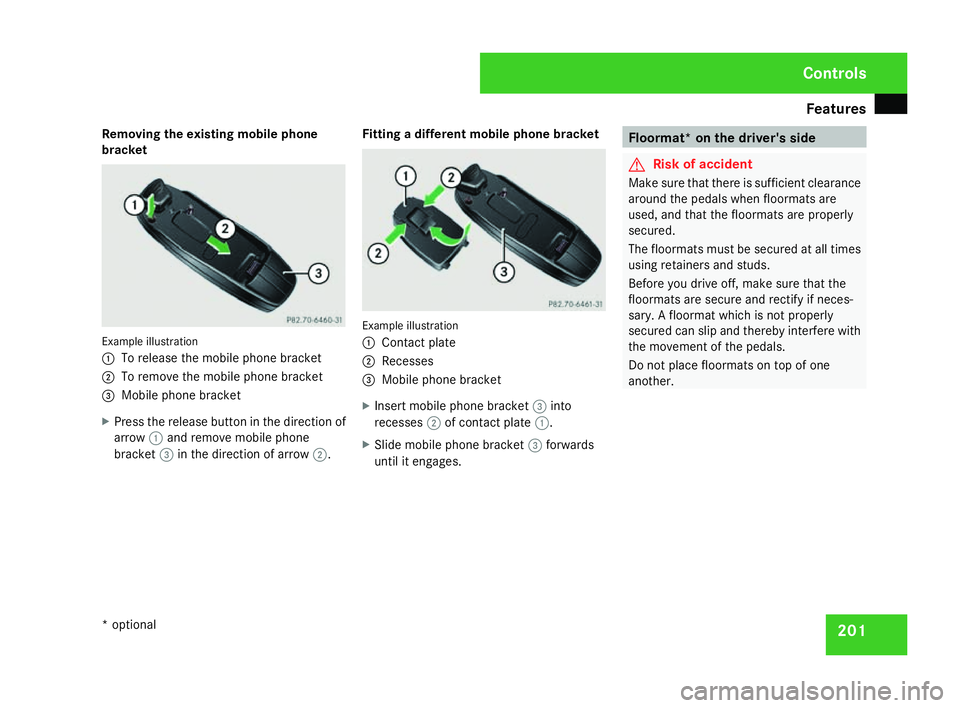
mobile phone bracket Example illustration
1
To release the mobile phone
2 Mobile phone bracket
X Press the release catch in the direction of
arrow 1and remove the mobile phon e
upwards from mobile phone bracket 2.
Fitting a different mobile phone bracket If you require a different mobile phon
e
bracket for your mobile phone, remove the
existing mobile phone bracket and then fit the
new one. Controls
* optional
204_AKB; 2; 3, en-GB
mkalafa,
2007-06-26T23:11:51+02:00 - Seite 200
Page 204 of 377
Features
201
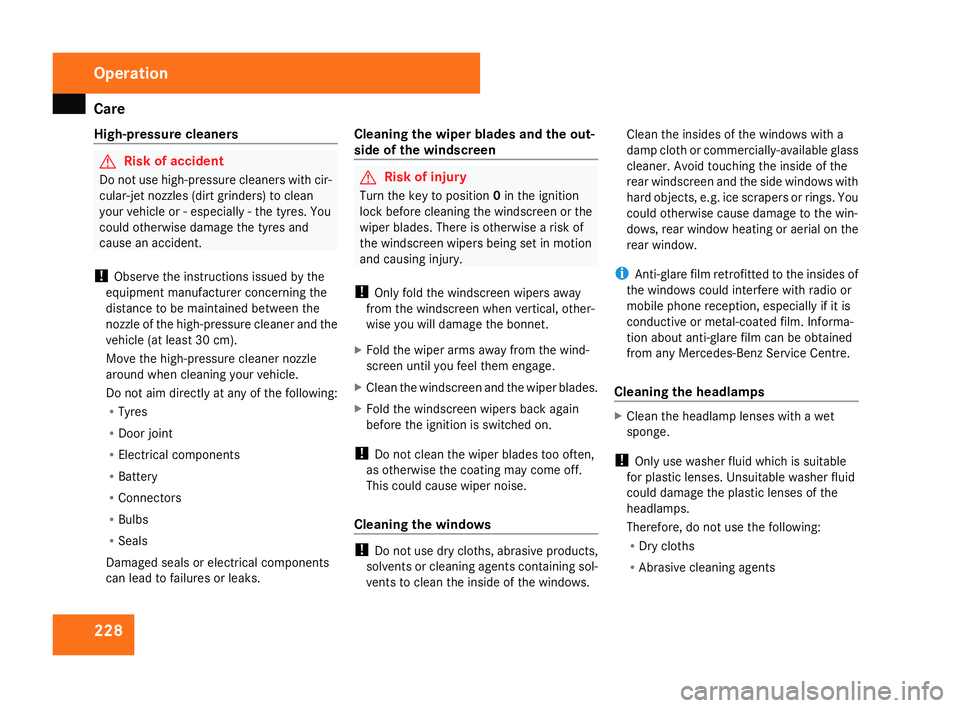
Removing the existing mobile phone
bracket Example illustration
1
To release the mobile phone bracket
2 To remove the mobile phone bracket
3 Mobile phone bracket
X Press the release button in the direction of
arrow 1and remove mobile phon e
bracket 3in the direction of arrow 2. Fitting a different mobile phone bracket Example illustration
1
Contact plat e
2 Recesses
3 Mobile phone bracket
X Insert mobile phone bracket 3into
recesses 2of contact plate 1.
X Slide mobile phone bracket 3forwards
until it engages. Floormat* on the driver's side
G
Risk of accident
Make sure that there is sufficient clearance
around the pedals when floormats are
used, and that the floormats are properly
secured .
The floormats must be secured at all times
using retainers and studs.
Before you drive off, make sure that the
floormats are secure and rectify if neces-
sary. A floormat which is not properly
secured can slip and thereby interfere with
the movement of the pedals.
Do not place floormats on top of one
another . Cont
rols
* optional
204_AKB; 2; 3, en-GB
mkalafa,
2007-06-26T23:11:51+02:00 - Seite 201
Page 231 of 377
Car
e 228
High-pressure cleaners G
Risk of accident
Do not use high-pressure cleaners with cir-
cular-jet nozzles (dirt grinders) to clean
your vehicle or - especially - the tyres. Yo u
could otherwise damage the tyres and
cause an accident.
! Observe the instructions issued by the
equipment manufacturer concerning the
distance to be maintained between the
nozzle of the high-pressure cleaner and the
vehicle (at least 30 cm).
Move the high-pressure cleaner nozzle
around when cleaning your vehicle .
Do not aim directly at any of the following:
R Tyres
R Door joint
R Electrical components
R Batter y
R Connectors
R Bulbs
R Seals
Damaged seals or electrical components
can lead to failures or leaks .Cleaning the wiper blades and the out
-
side of the windscreen G
Risk of injury
Turn the key to position 0in the ignition
lock before cleaning the windscreen or the
wiper blades. There is otherwise a risk of
the windscreen wipers being set in motion
and causing injury.
! Only fold the windscreen wipers away
from the windscreen when vertical, other-
wise you will damage the bonnet.
X Fold the wiper arms away from the wind-
screen until you feel them engage.
X Clean the windscreen and the wiper blades .
X Fold the windscreen wipers back agai n
before the ignition is switched on.
! Do not clean the wiper blades too often,
as otherwise the coating may come off.
This could cause wiper noise.
Cleaning the windows !
Do not use dry cloths, abrasive products,
solvents or cleaning agents containing sol-
vents to clean the inside of the windows. Clean the insides of the windows with
a
damp cloth or commercially-available glass
cleaner. Avoid touching the inside of the
rear windscreen and the side windows with
hard objects, e.g. ice scrapers or rings. You
could otherwise cause damage to the win-
dows, rear window heating or aerial on the
rear window.
i Anti-glare film retrofitted to the insides of
the windows could interfere with radio or
mobile phone reception, especially if it is
conductive or metal-coated film. Informa -
tion about anti-glare film can be obtained
from any Mercedes-Benz Service Centre.
Cleaning the headlamps X
Clean the headlamp lenses with a wet
sponge.
! Only use washer fluid which is suitable
for plastic lenses. Unsuitable washer fluid
could damage the plastic lenses of th e
headlamps.
Therefore, do not use the following:
R Dry cloths
R Abrasive cleaning agents Operatio
n
204_AKB; 2; 3, en-GB
mkalafa,
2007-06-26T23:11:51+02:00 - Seite 228