Page 45 of 94
44
RoutingAddress
Book
Navigation Set UP
Navigation Set Up
l
You can alter the map display conditions, the route guidance conditions and show the
system information.
nStop your vehicle before the following operations. Do not change the settings and destination locations while driving. Minimize the time
spent viewing the monitor screen and listening to the voice guidance while driving.
Operating the system will distract the driver from looking ahead of the vehicle and may
cause an accident.
Always stop the vehicle in a safe location and put the parking brake on before operating
the system.
Before Stepsselect
Warning
MENU
Open
[ N AV I G AT I O N S E T U P ] ( page 45)
( page 47)
( page 51)
( page 52)
( page 48)
( page 50)
�%�:�����A�'�#���D�Q�Q�M�����2�C�I�G�����������6�J�W�T�U�F�C�[�����/�C�T�E�J���������������������������������2�/
Page 46 of 94
![MAZDA MODEL CX-7 2007 Navigation Manual (in English) 45
Navigation Set UP
Navigation Set Up
Before Steps
select
select
User Setting
MENU
Open the
[USER SETTINGS]
screen
nMap Color
Select a screen color from to options.
nMap Mode
lAuto : T MAZDA MODEL CX-7 2007 Navigation Manual (in English) 45
Navigation Set UP
Navigation Set Up
Before Steps
select
select
User Setting
MENU
Open the
[USER SETTINGS]
screen
nMap Color
Select a screen color from to options.
nMap Mode
lAuto : T](/manual-img/28/13911/w960_13911-45.png)
45
Navigation Set UP
Navigation Set Up
Before Steps
select
select
User Setting
MENU
Open the
[USER SETTINGS]
screen
nMap Color
Select a screen color from to options.
nMap Mode
lAuto : The display will automatically switch between Day
and Night illumination mode when the headlights are
turned off and on respectively.
lDay :The display will be presented in Day illumination mode
regardless of whether the headlights are on or off.
lNight : The display will be presented in Night illumination mode regardless of whether the headlights are on or off.
nDistance
Select the distance unit from or .
nAverage speed
Set the average speed for each road to be driven.
(This function sets the standard speed (average vehicle speed
for each route) used for calculating the estimated arrival time
when calculating the route time.)
: Average speed setting:Changes back to default
nRoad Restriction Warnings
The display of warnings during route guidance when passing
through areas with traffic restrictions can be turned on or off.
�%�:�����A�'�#���D�Q�Q�M�����2�C�I�G�����������6�J�W�T�U�F�C�[�����/�C�T�E�J���������������������������������2�/
Page 51 of 94
![MAZDA MODEL CX-7 2007 Navigation Manual (in English) 50
RoutingAddress
Book
Navigation Set UP
Navigation Set Up
This function replaces all the settings in the mobile navigation system with the initial default
settings.
[Default List]
Restore System Def MAZDA MODEL CX-7 2007 Navigation Manual (in English) 50
RoutingAddress
Book
Navigation Set UP
Navigation Set Up
This function replaces all the settings in the mobile navigation system with the initial default
settings.
[Default List]
Restore System Def](/manual-img/28/13911/w960_13911-50.png)
50
RoutingAddress
Book
Navigation Set UP
Navigation Set Up
This function replaces all the settings in the mobile navigation system with the initial default
settings.
[Default List]
Restore System Defaults
Before Steps
select
select
MENU
Open the [SYSTEM DEFAULTS] screen
Select .
If you execute Restore System Defaults, all of your stored setting data will be deleted.
ItemInitial condition
Menu names
Map Orientation North up
Map display mode Single-screen display
Map Display scale/Map scale for Dual-screen is not object of backup.Single-screen: 10,000 map (1/16 mi)Display guidance language English
Quick-POI map display All Off
Quick-POI Selection A : Gas station
B : ATM
C : Police Station
D : Grocery store
E : All Restaurant
F : Hotel
Search Area US9 (including Washington DC)
Map Color 1
Day/Night/Auto Setting Auto
Distance Units (Miles/KM) (Global setting) Miles
Volume Presets 4
Time display change (12h/24h)24h
Keyboard layout ABC
Arrival Time Time
Navigation Setup (Clock) Off
Navigation Setup (Beep) On
Map Configuration
Freeway Infor m ation O ff
Guidance Screen ON
Map screen Single
Turn Guidance Screen Turn List
�%�:�����A�'�#���D�Q�Q�M�����2�C�I�G�����������6�J�W�T�U�F�C�[�����/�C�T�E�J���������������������������������2�/
Page 54 of 94

53
If necessary
Precautions/System Performance
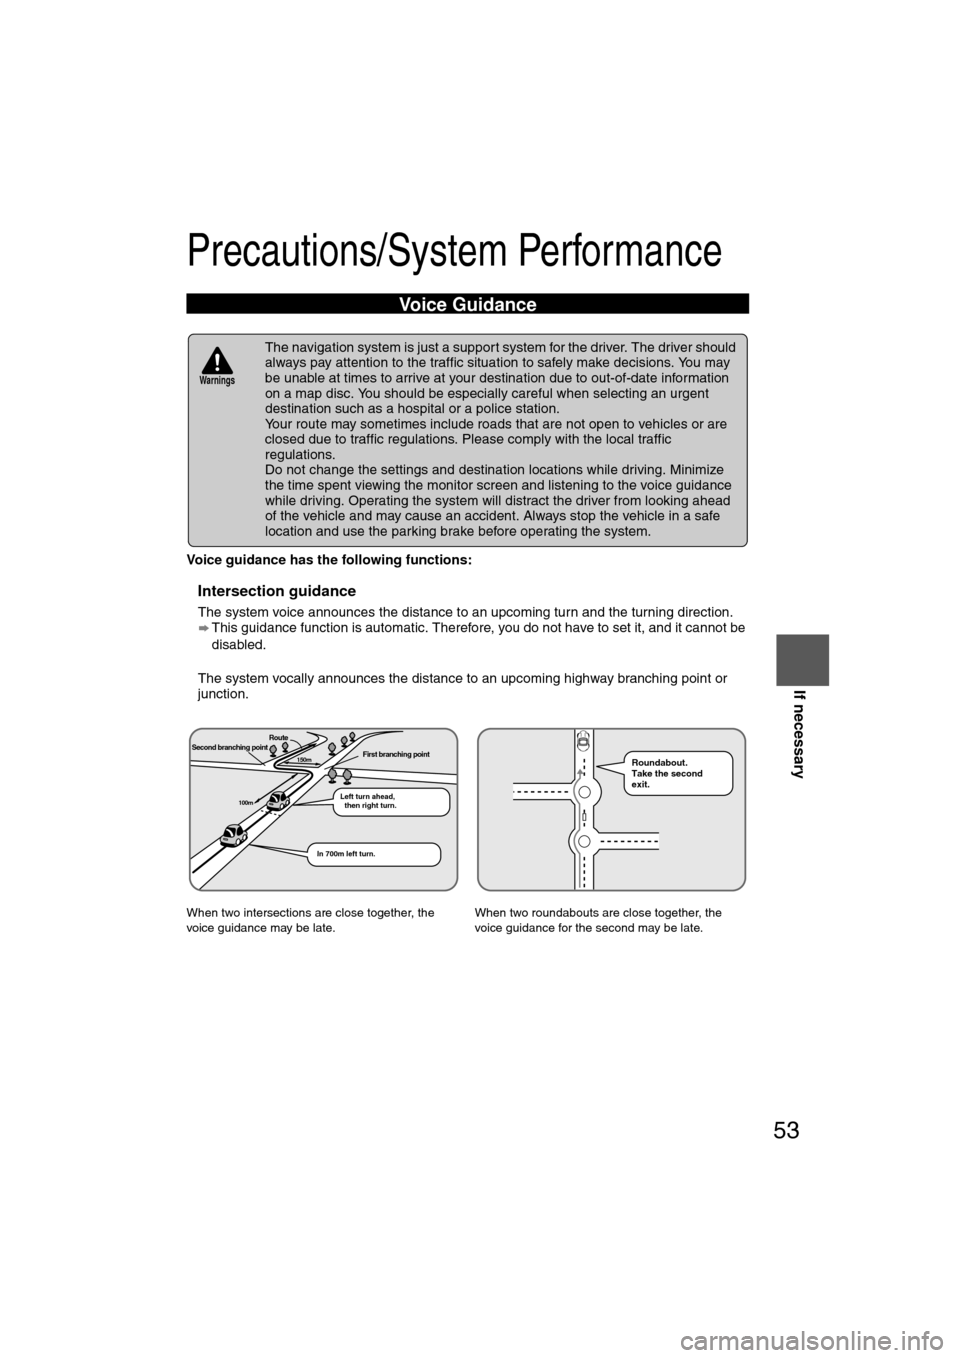
Voice guidance has the following functions:
nIntersection guidance
lThe system voice announces the distance to an upcoming turn and the turning direction.
This guidance function is automatic. Therefore, you do not have to set it, and it cannot be
disabled.
l The system vocally announces the distance to an upcoming highway branching point or
junction.
Voice Guidance
l The navigation system is just a support system for the driver. The driver should
always pay attention to the traffic situation to safely make decisions. You may
be unable at times to arrive at your destination due to out-of-date information
on a map disc. You should be especially careful when selecting an urgent
destination such as a hospital or a police station.
l Your route may sometimes include roads that are not open to vehicles or are
closed due to traffic regulations. Please comply with the local traffic
regulations.
l Do not change the settings and destination locations while driving. Minimize
the time spent viewing the monitor screen and listening to the voice guidance
while driving. Operating the system will distract the driver from looking ahead
of the vehicle and may cause an accident. Always stop the vehicle in a safe
location and use the parking brake before operating the system.
When two intersections are close together, the
voice guidance may be late. When two roundabouts are close together, the
voice guidance for the second may be late.
Warnings
Second branching pointFirst branching point150m
100m
Route
In 700m left turn. Left turn ahead,
then right turn.
Roundabout.
Take the second
exit.
�%�:�����A�'�#���D�Q�Q�M�����2�C�I�G�����������6�J�W�T�U�F�C�[�����/�C�T�E�J���������������������������������2�/
Page 66 of 94

65
Audio Operation
Note
lPressing an on-screen adjustment button for 0.5 seconds or more progressively changes
the adjustment range towards +/-, up/down, or left/right.
l While an adjustment button is selected in this manner, the level indicator will momentarily
stop at the medium range position and a beep sound will be heard before proceeding.
Note
lSelect the on-screen button to reset bass, treble, and balance.
l To return to the previous screen, select the on-screen button.
n*1AudioPilot
AudioPilot automatically adjusts audio volume and sound quality in accordance with the level
of noise entering the vehicle interior while driving. When AudioPilot is turned ON, the system
automatically calculates the conditions for optimum hearing of sound which may be difficult to
hear depending on exterior noise.
Each time the on-screen button is selected, the Audio Pilot turns on and off.
*1 AudioPilot is a registered trademark of BOSE Corporation.
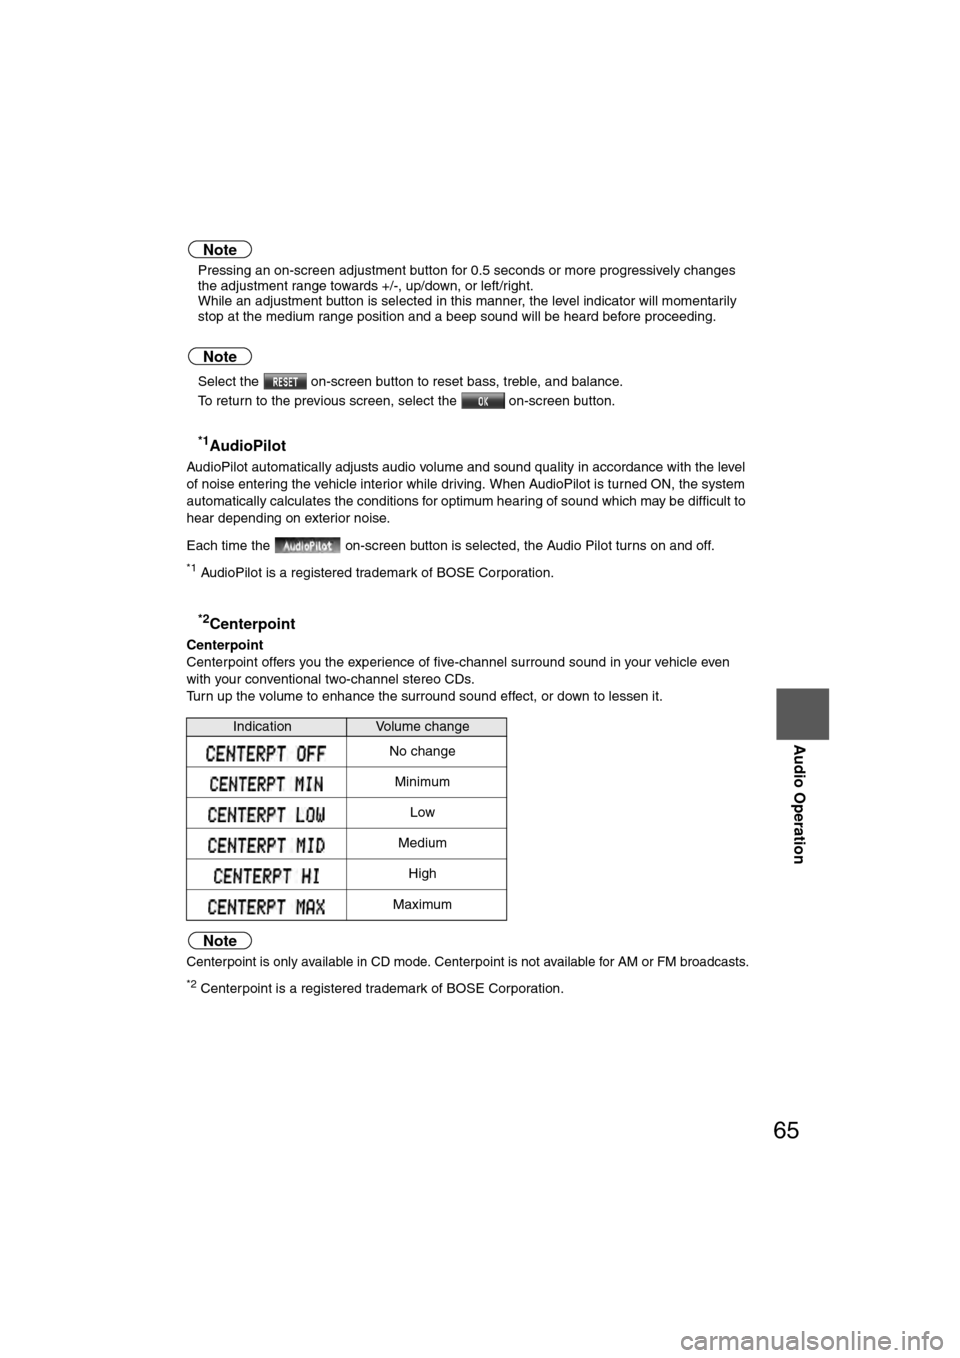
n*2Centerpoint
Centerpoint
Centerpoint offers you the experience of five-channel surround sound in your vehicle even
with your conventional two-channel stereo CDs.
Turn up the volume to enhance the surround sound effect, or down to lessen it.
Note
Centerpoint is only available in CD mode. Centerpoint is not available for AM or FM broadcasts.
*2 Centerpoint is a registered trademark of BOSE Corporation.
IndicationVolume change
No change
Minimum
Low
Medium
High
Maximum
�%�:�����A�'�#���D�Q�Q�M�����2�C�I�G�����������6�J�W�T�U�F�C�[�����/�C�T�E�J���������������������������������2�/
Page 73 of 94
72
Before
UseGetting
started
RoutingAddress
Book
Vo i c e Recognition
Navigation
Set Up
RDM-TMC
Audio Operation
Navigation
Set Up
nPlaying
Press the (CD) button to start play when a CD is in the unit.
If there is no CD in the unit when the (CD) button is pressed, “NO DISC”
will flash on and off.
The song information will be displayed during playback.
Music CD
MP3 CD
Note
l
"-------" will be displayed for files without a file, track or other name input.
l This unit can read English (including numerals), French, and Spanish one-byte characters.
l The displayable number of characters on each title is a maximum of 64.
Select the on-screen button if the whole title cannot be displayed at one time. The
screen changes to display the rest of the characters.
�%�:�����A�'�#���D�Q�Q�M�����2�C�I�G�����������6�J�W�T�U�F�C�[�����/�C�T�E�J���������������������������������2�/
Page 85 of 94

12
RoutingAddress
Book
Getting started
Activation
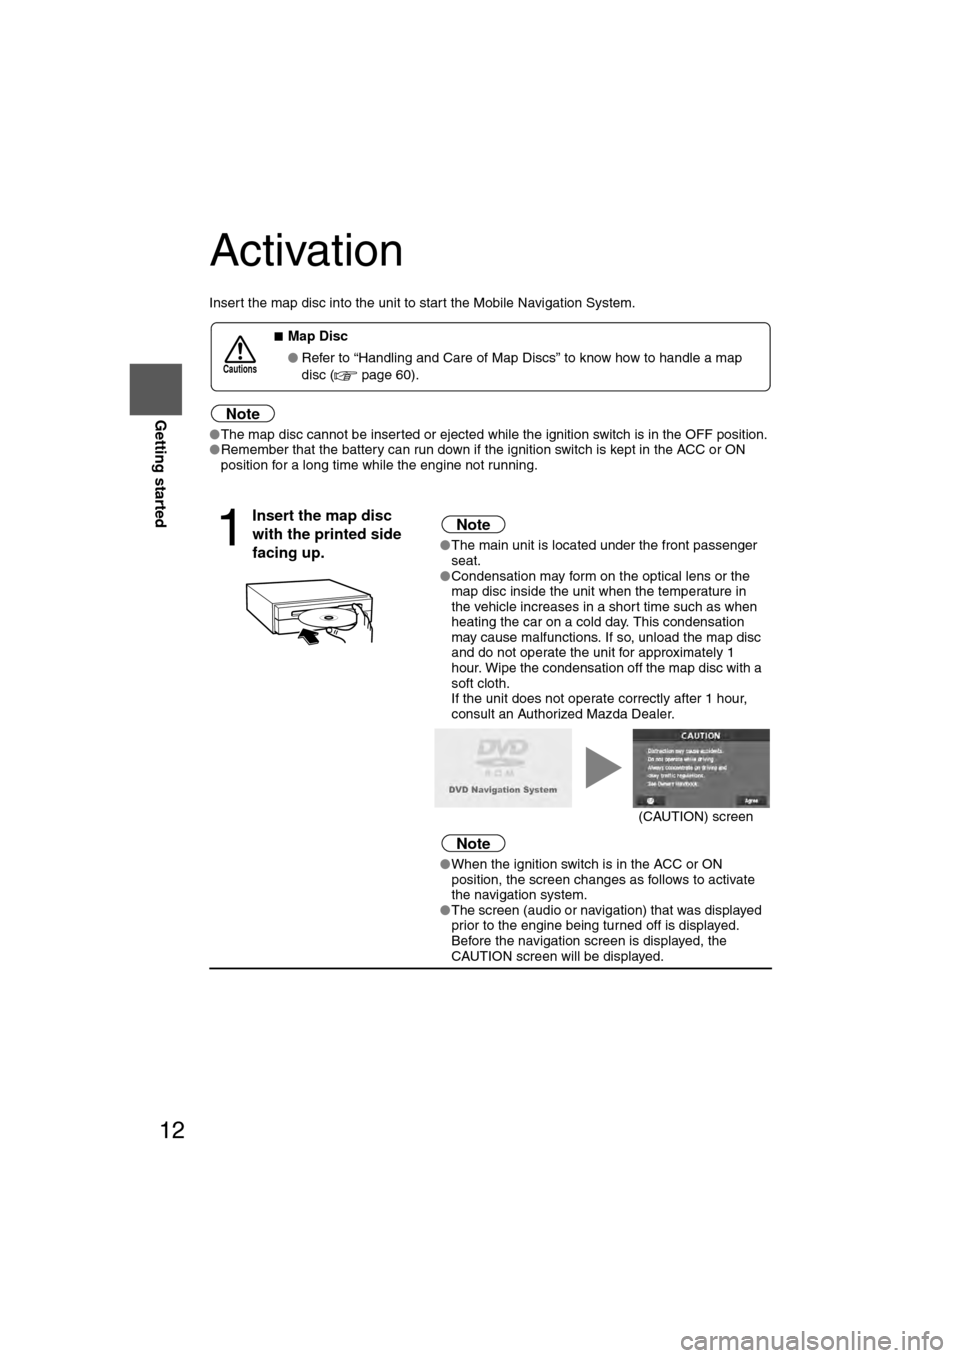
Insert the map disc into the unit to start the Mobile Navigation System.
Note
l
The map disc cannot be inserted or ejected while the ignition switch is in the OFF position.
l Remember that the battery can run down if the ignition switch is kept in the ACC or ON
position for a long time while the engine not running.
nMap Disc
l Refer to “Handling and Care of Map Discs” to know how to handle a map
disc ( page 60).
1
Insert the map disc
with the printed side
facing up.Note
lThe main unit is located under the front passenger
seat.
l Condensation may form on the optical lens or the
map disc inside the unit when the temperature in
the vehicle increases in a short time such as when
heating the car on a cold day. This condensation
may cause malfunctions. If so, unload the map disc
and do not operate the unit for approximately 1
hour. Wipe the condensation off the map disc with a
soft cloth.
If the unit does not operate correctly after 1 hour,
consult an Authorized Mazda Dealer.
Note
lWhen the ignition switch is in the ACC or ON
position, the screen changes as follows to activate
the navigation system.
l The screen (audio or navigation) that was displayed
prior to the engine being turned off is displayed.
Before the navigation screen is displayed, the
CAUTION screen will be displayed.
Cautions
(CAUTION) screen
�%�:�����A�'�#���D�Q�Q�M�����2�C�I�G�����������6�J�W�T�U�F�C�[�����/�C�T�E�J���������������������������������2�/
Page 87 of 94

19
Getting started
If necessary
Rear View
Monitor
Screen change
nDo not keep your eyes fixed on the monitor screen or operate the system
while driving
Do not change the settings and destination locations while driving. Minimize the time
spent viewing the monitor screen and listening to the voice guidance while driving.
Operating the system will distract the driver from looking ahead of the vehicle and may
cause an accident. Always stop the vehicle in a safe location and use the parking brake
before operating the system.
Map
orientation
Map scale
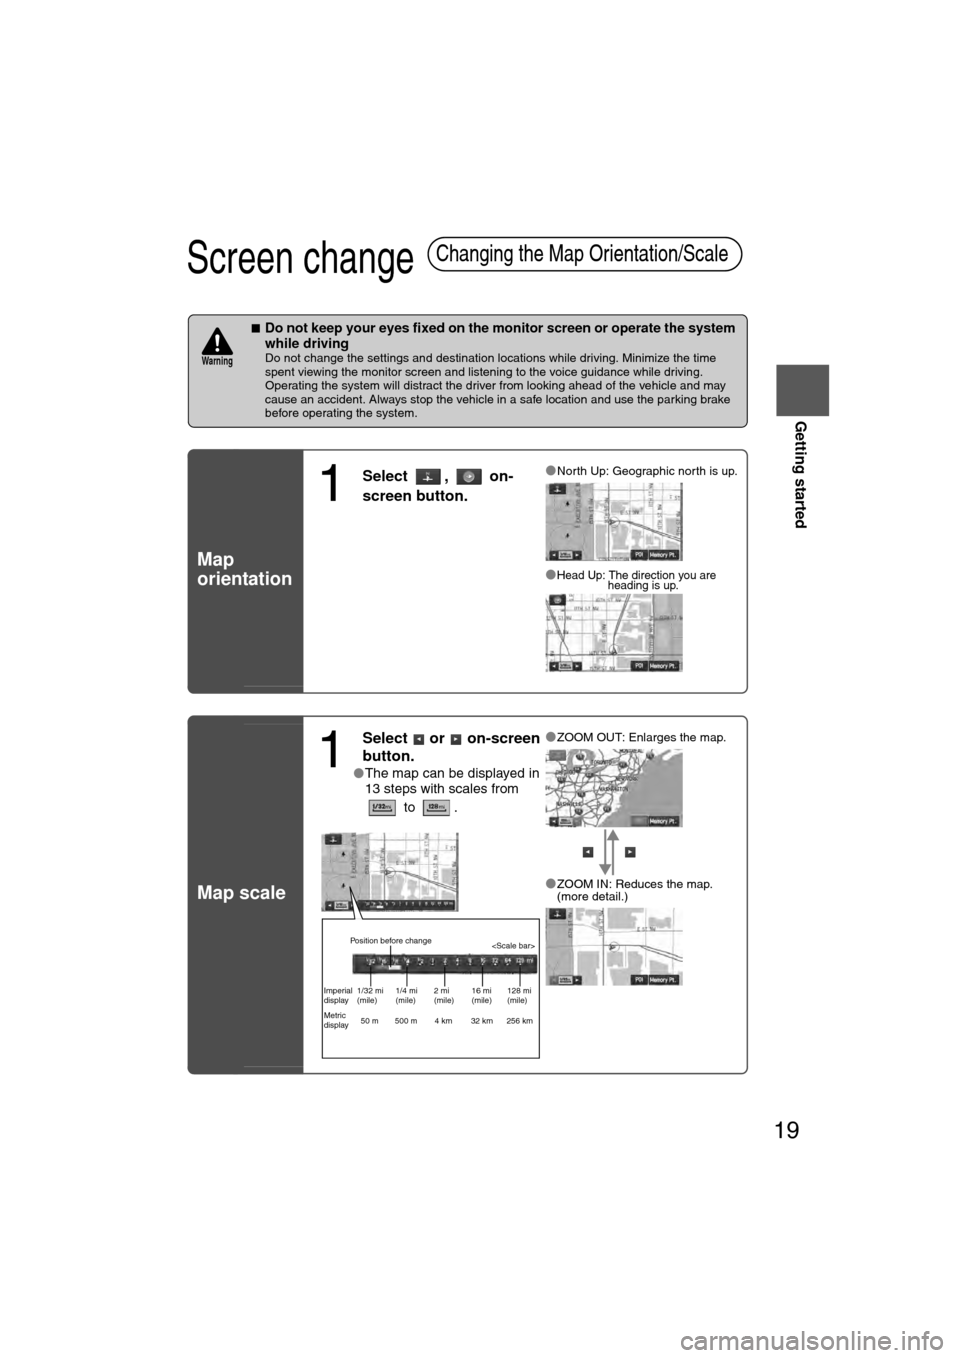
Changing the Map Orientation/Scale
Warning
1
Select , on-
screen button.lNorth Up: Geographic north is up.
lHead Up: The direction you are heading is up.
1
Select or on-screen
button.
lThe map can be displayed in
13 steps with scales from
to . l
ZOOM OUT: Enlarges the map.
lZOOM IN: Reduces the map.
(more detail.)
Position before change
Imperial
display1/32 mi
(mile) 1/4 mi
(mile)2 mi
(mile)16 mi
(mile)128 mi
(mile)
Metric
display 50 m 500 m 4 km 32 km 256 km
�%�:�����A�'�#���D�Q�Q�M�����2�C�I�G�����������6�J�W�T�U�F�C�[�����/�C�T�E�J���������������������������������2�/