Page 33 of 54
Topic 5
Driving Comfort
33
nLoading a CD
Press the LOAD button.
WAIT is shown on the display.
Insert a CD when the indicators on the slot turn from amber to green.
The display changes from WAIT to LOAD.
nLoading multiple CDs
Press and hold the LOAD button until you hear a beep.
WAIT is shown on the display.
Insert a CD when the indicators on the slot turn from amber to green.
The display changes from WAIT to LOAD.
The indicators on the slot turn to amber when the CD is inserted.
Insert the next CD when the indicators on the slot turn from amber to green again.
Repeat the procedure for the remaining CDs.
To stop the operation, press the DISC-AUX button.
nRemote control (steering wheel switches)
The audio system can be operated using the remote control located on the steering wheel.
Power on/change mode: press
Power off: press and hold
Vo l u m e
Radio: radio tuner
CD: CD/track/file (MP3/WMA) select
1
2
3
53588U_IS_01.book Page 33 Friday, October 28, 2016 9:51 AM
Page 34 of 54

Topic 5
Driving Comfort
34
Entering and Exiting
When Driving
Rain and
Night Driving
Driving ComfortDriving Comfort
Opening and Closing
What to do if ...
Customizing
Yo u r L e x u s
Before Driving
Air Conditioning System (without navigation system)
Owners of models equipped with a navigation system should refer to the “Navigation System
Owner's Manual”.
nUsing the automatic mode
Press the AUTO button.
Adjust the temperature using the TEMP but-
tons.
nAdjusting the temperature in DUAL mode
In DUAL mode, driver and passenger side tem-
perature settings can be adjusted separately.
Press the DUAL button.
Adjust the driver side temperature using the
TEMP buttons, and the passenger side temper-
ature using the PASSENGER TEMP buttons.
Driver side temperature control
Switch to automatic mode
Driver side temperature display
OFF button
Fan speed controls
Air flow controlsPassenger side temperature display
Micro dust and pollen filter
Passenger side temperature control
Windshield defog/defrost
Outside air/recirculated air mode switch
A/C switch
Dual mode switch1
2
3
4
5
6
7
8
9
10
11
12
13
53588U_IS_01.book Page 34 Friday, October 28, 2016 9:51 AM
Page 35 of 54
Topic 5
Driving Comfort
35
Ashtrays
Front
To remove the ashtray, push the release lever.
Rear
To remove the ashtray, press down on the plate
and lift the ashtray out.
Seat Heaters / Seat Heaters and
Ventilators (If Equipped)
Seat heaters
Tu r n t h e d i a l t o w a r d .
Seat heaters and ventilators
Seat heaters: turn the dial toward .
Ventilators: turn the dial toward .
1
1
2
53588U_IS_01.book Page 35 Friday, October 28, 2016 9:51 AM
Page 36 of 54
Topic 5
Driving Comfort
36
Entering and Exiting
When Driving
Rain and
Night Driving
Driving ComfortDriving Comfort
Opening and Closing
What to do if ...
Customizing
Yo u r L e x u s
Before Driving
Console Boxes
Front
To open, slide and lift the armrest with the knob
pulled up.
Rear (if equipped)
To open, press the lock release button and lift the
armrest.
Overhead console
To open, press the lid.
There is a power outlet located in the front console box.
53588U_IS_01.book Page 36 Friday, October 28, 2016 9:51 AM
Page 37 of 54
Topic 5
Driving Comfort
37
Glove Box
Open: press the button.
Lock
Unlock
The glove box can be locked and unlocked using
the mechanical key.
Cup Holders
Front (type A)
To open, press down on the front of the lid.
Front (type B)
To open, pull and hold the knob and slide the arm-
rest.
Rear
To open, press in and release.
1
2
3
53588U_IS_01.book Page 37 Friday, October 28, 2016 9:51 AM
Page 38 of 54
Topic 5
Driving Comfort
38
Entering and Exiting
When Driving
Rain and
Night Driving
Driving ComfortDriving Comfort
Opening and Closing
What to do if ...
Customizing
Yo u r L e x u s
Before Driving
Interior Lights
Without moon roof
Door position ON/OFF
ON/OFF
With moon roof
Door position ON/OFF
ON/OFF
Rear Sunshade (If Equipped)
To raise the rear sunshade, press the switch.
Press the switch again to lower it.
The sunshade automatically lowers to ensure visi-
bility when reversing.
Compass
To display the compass, press and hold the AUTO
button for 3 or more seconds.
To cancel the display, press and hold the AUTO
button again for 3 or more seconds.
1
2
1
2
53588U_IS_01.book Page 38 Friday, October 28, 2016 9:51 AM
Page 39 of 54
Topic 5
Driving Comfort
39
Extended Trunk
Pull down the rear armrest.
Open the inside trunk door from the trunk and
load baggage or other items.
Luggage Mat
Pull the lever upwards when lifting the luggage
mat up.
The lever can be hooked on the edge of the trunk.
Longer items can be loaded in the vehicle by utilizing the trunk space and rear seat area.
53588U_IS_01.book Page 39 Friday, October 28, 2016 9:51 AM
Page 40 of 54
Opening and ClosingTopic 6
Door Locks .............................................................. 41
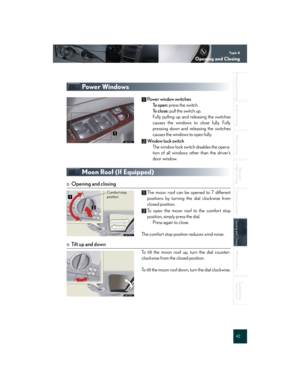
Power Windows .................................................... 42
Moon Roof .............................................................. 42
Fuel Tank Cap ........................................................ 43
Hood ......................................................................... 43
Trunk......................................................................... 44
53588U_IS_01.book Page 40 Friday, October 28, 2016 9:51 AM


To open, press down on the front")


