Page 226 of 562
206
3-3. Using the audio system
■Traffic announcement
To u c h on the screen.
“TRAF SEEK” appears on the dis -
play, and the radio will start seeking
any station
broadcasting traffic
program information.
If no traffic program station is
found, “NO
THING” appears on
the display.
XM® Satellite Radio (if equipped)
■ R
eceiving XM® Satellite Radio
Press until “SAT” appears
on the screen.
The display changes as follows
each time the switch is pressed.
AM SA
T1 SAT2 SAT3
Turn the dial to select a desired channel from all the catego -
ries or press or on to select a desired channel in the
current category.
■ P
resetting XM® Satellite Radio channels
Select the desired channe l. T
ouch one of the preset stations (1 - 6) and
hold it until you hear a beep.
■ Changing the channel categor
y
To u c h or on the screen.
STEP1
STEP2
Page 227 of 562
207
3-3. Using the audio system
3
Interior features
■Scanning XM® Satellite Radio channels
● Scanning channels in the curr
ent category
To u c h on the screen or press .
“SCAN” appears on the screen.
When the desired channel is reached, touch or press
the button once again.
● Scanning pr
eset channels
To u c h on the screen or press and hold it until
you hear a beep.
“P SCAN” appears on the screen.
When the desired cha nnel is reached, touch or press
the button once again.
■ Displaying the title and ar
tist name
To u c h on the screen.
The screen will display up to 10
characters.
Touch the button once again to
r
eturn to the previous screen.
STEP1
STEP2
STEP1
STEP2
Page 228 of 562

208
3-3. Using the audio system
■When the battery is disconnected
All preset stations are erased.
■Reception sensitivity
●Maintaining perfect radio reception at all times is difficult due to the continually
changing position of the antenna, differences in signal strength and surrounding
objects, such as trains, transmitters, etc.
●The radio antenna is mounted inside the rear window. To maintain clear radio
reception, do not attach metallic window tinting or other metallic objects to the
antenna wire mounted in side the rear window.
■Receiving XM® Satellite Radio
The optional Lexus genuine satellite radio tuner and antenna allows you to receive
and play XM
® Satellite Radio broadcasts. (Subscription is required. Available only
in the 48 contiguous United States.)
*
●XM® subscriptions
For detailed information about XM® Satellite Radio or to subscribe, visit XM®
on the web at www.xmradio.com or call 1-877-515-3987.
●Radio ID
You will need the radio ID when activating XM
® service or reporting a prob -
lem. Select “CH000” using the dial, and the receiver's 8-character ID
number will appear.
●Satellite tuner
The tuner supports only Audio Services (Music and Talk) and the accompany -
ing Text Information of XM
® Satellite Radio.
*: Terms and services provided by XM® Satellite Radio are subject to change with -
out notice.
Page 229 of 562

209
3-3. Using the audio system
3
Interior features
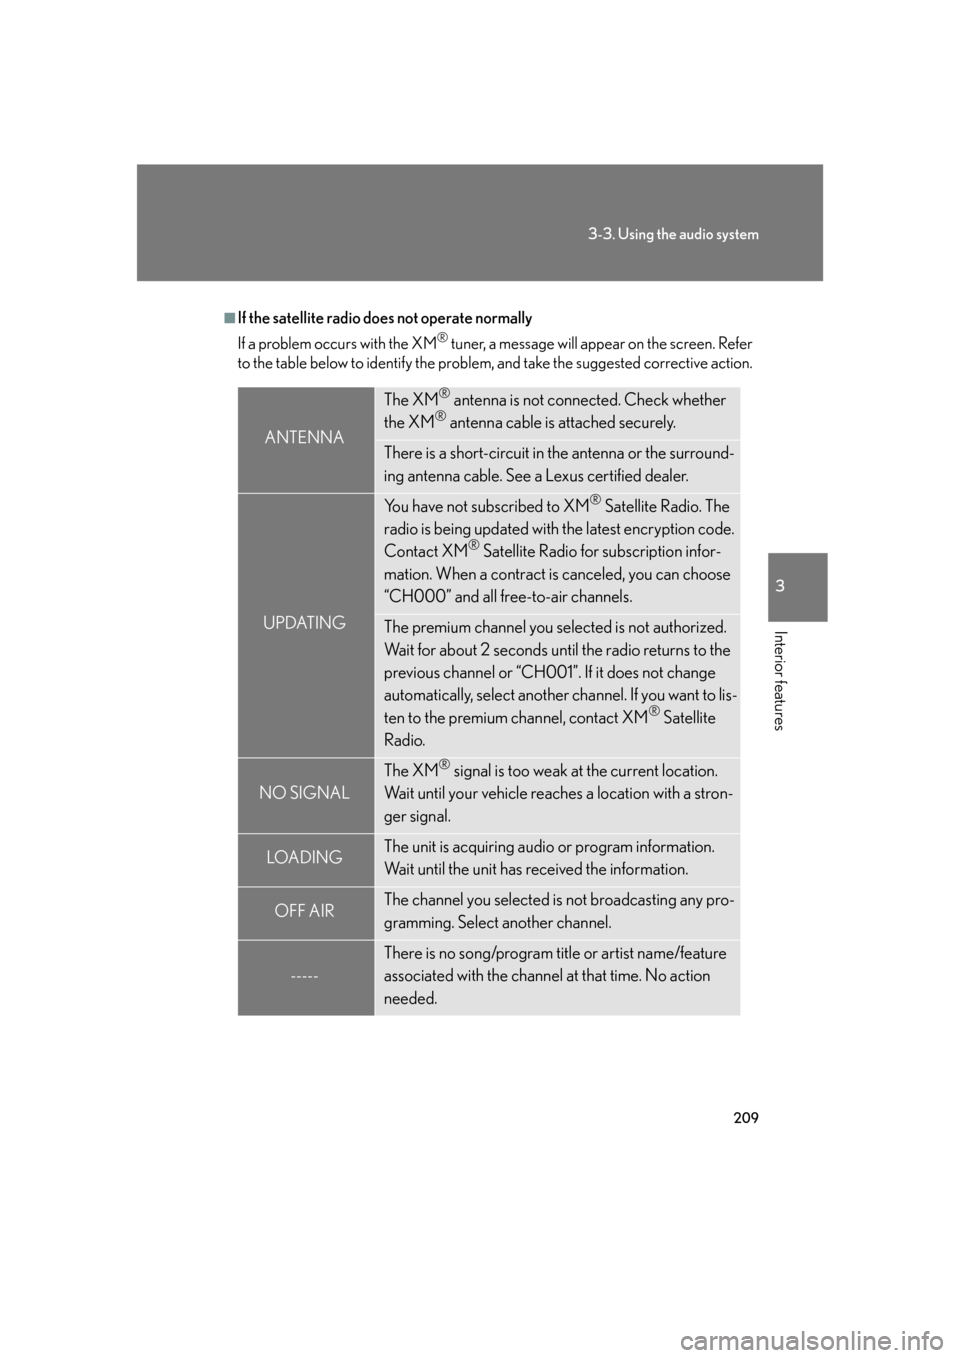
■If the satellite radio does not operate normally
If a problem occurs with the XM
® tuner, a message will appear on the screen. Refer
to the table below to identify the problem, and take the suggested corrective action.
ANTENNA
The XM® antenna is not connected. Check whether
the XM® antenna cable is attached securely.
There is a short-circuit in the antenna or the surround-
ing antenna cable. See a Lexus certified dealer.
UPDATING
You have not subscribed to XM® Satellite Radio. The
radio is being updated with the latest encryption code.
Contact XM
® Satellite Radio for subscription infor-
mation. When a contract is canceled, you can choose
“CH000” and all free-to-air channels.
The premium channel you selected is not authorized.
Wait for about 2 seconds until the radio returns to the
previous channel or “CH001”. If it does not change
automatically, select another channel. If you want to lis-
ten to the premium channel, contact XM
® Satellite
Radio.
NO SIGNAL
The XM® signal is too weak at the current location.
Wait until your vehicle reaches a location with a stron-
ger signal.
LOADIN GThe unit is acquiring audio or program information.
Wait until the unit has received the information.
OFF AIRThe channel you selected is not broadcasting any pro-
gramming. Select another channel.
-----
There is no song/program title or artist name/feature
associated with the channel at that time. No action
needed.
Page 230 of 562

210
3-3. Using the audio system
Contact the XM® Listener Care Center at 1-877-515-3987 during the following
hours
*.
Monday - Saturday: 6 a.m. - 2 a.m. Eastern Time
Sunday: 8 a.m. - 8 p.m. Eastern Time
*: Subject to change without notice.
■Certifications for the radio tuner
This equipment has been tested and found to comply with the limits for a class B
digital device, pursuant to Part 15 of th e FCC Rules. These limits are designed to
provide reasonable protection against harmful interference in a residential installa-
tion. This equipment generate s, uses and can radiate radio frequency energy and, if
not installed and used in accordance with the instructions, may cause harmful inter-
ference to radio communications. However, there is no guarantee that interference
will not occur in a particular installation.
If this equipment does cause harmful interf erence to radio or television reception,
which can be determined by turning the eq uipment off and on, the user is encour-
aged to try to correct the interference by trying one or more of the following:
●Reorienting or relocating the receiving antenna.
●Increasing the separation between the equipment and receiver.
●Connecting the equipment into an outlet on a circuit different from that to which
the receiver is connected.
●Consulting the dealer or an experienced radio/TV technician for help.
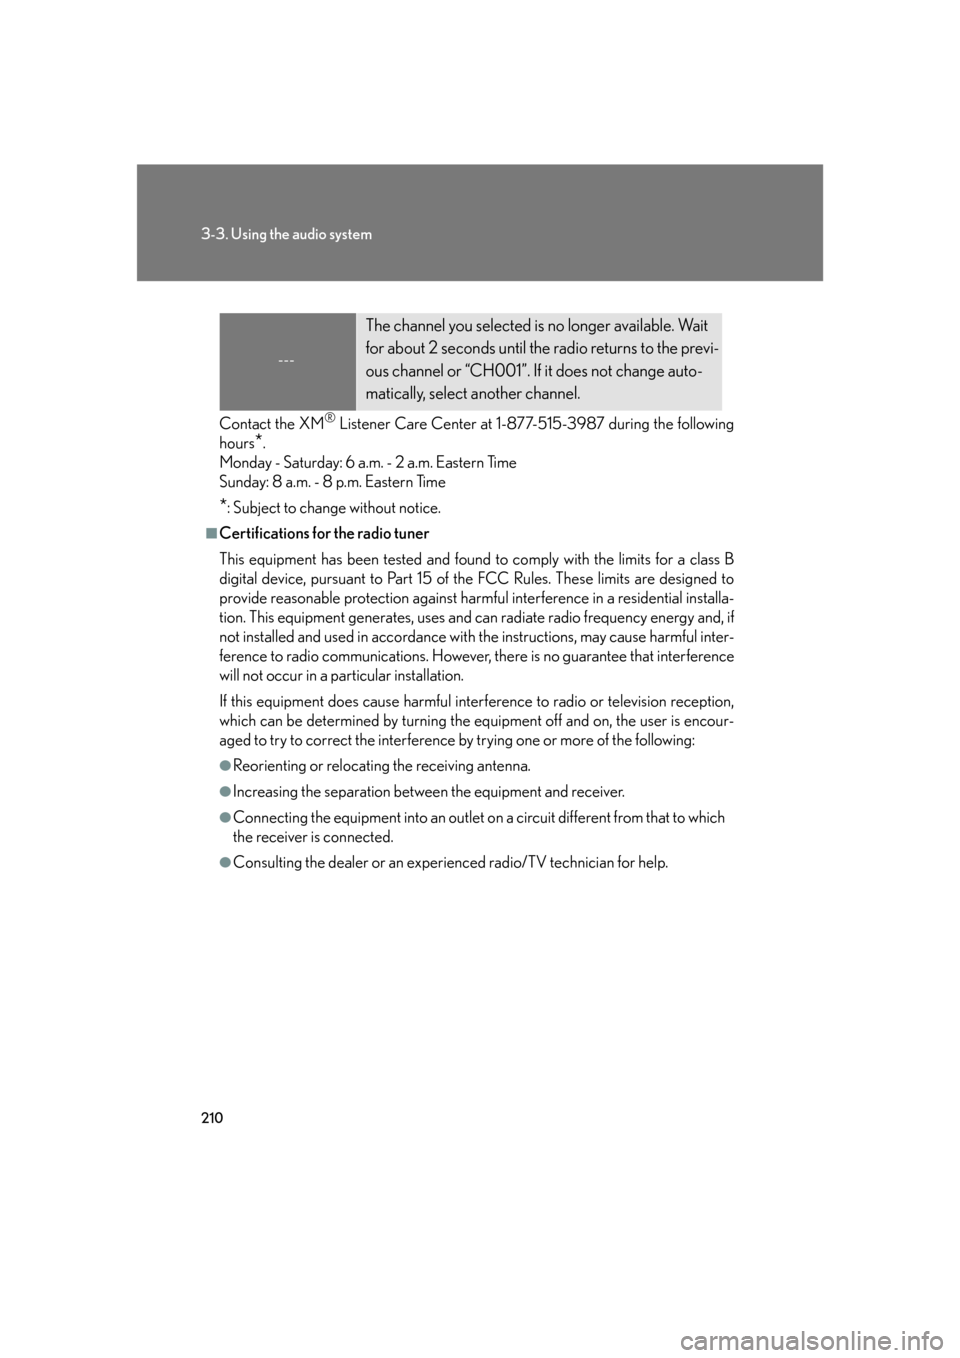
---
The channel you selected is no longer available. Wait
for about 2 seconds until the radio returns to the previ-
ous channel or “CH001”. If it does not change auto-
matically, select another channel.
Page 231 of 562
211
3-3. Using the audio system
3
Interior features
Using the cassette player
Insert a cassette tape or press with a tape inserted.
When you press while listening to the tape, the following audio con -
trol screen appears.
This illustration is a vehicle not equipped with the DVD player.
Display audio control screen
Powe r Vo l u m e Change playback
direction
Tape eject Playback
Skip play
Ta p e s l o t Repeat play
Track selection
Change playback
direction Noise reduction
Rewind
Fast for ward
Page 232 of 562
212
3-3. Using the audio system
Selecting a track
■Skip a number of tracks at a time.
Press on .
Press until the number y
ou want
to skip appears.
9 tracks can be skipped at a time.
■ Rewind a number of tracks at a time.
Press on .
Press until the number y
ou want
to rewind appears.
9 tracks can be rewound at a time.
Note that the number includes the
curr
ent track.
STEP1
STEP2
STEP1
STEP2
Page 233 of 562

213
3-3. Using the audio system
3
Interior features
Using Dolby® Noise Reduction
To u c h on the screen.
Reduces the level of noise for tapes recorded with Dolby NR only.
Dolby noise reduction is manufactured under license from Dolby Laborato-
ries Licensing Corporation. DO LB
Y and the double-D symbol are
registered trademarks of Dolby Laboratories.
■Canceling noise reduction, skip play, repeat play, rewind and fast forward
To c a n c e l , and : Touch the corresponding button on the screen.
To c a n c e l and : Touch the corresponding button on the screen or press
.
■Auto-reverse feature
After the cassette player reaches the end of a tape, it automatically reverses and
be
gins to play the other side, regardless of whether the cassette was playing or fast
forwarding.
■When the cassette player does not operate correctly due to the cassette record -
ing conditions
Forwarding to the beginning of a track, repeat, blank tape skip and fast-forward
ma
y not be possible in the following situations:
●The interval between tracks is less th an 3 seconds (beginning of track and
repeat playback) or less than 15 seconds (blank tape skip).
●When there is noise between 2 tracks.
●The beginning and end of subsequent tracks are not clearly defined.
■Cleaning the cassette player
Cassette player components (heads, capstan, pinch rollers) should be cleaned at
le
ast once a month using a cleaning tape to remove dirt and dust that can easily
build up.
■Using long playing cassette tapes
Avoid using tapes with a length of more than 90 minutes, as the tape used is very
thin an
d may become tangle d in the cassette player.