Page 16 of 350
37
Knowing your vehicle
1
2
3
4
5
6
7
8
9
Your vehicle is equipped with an
electronic engine immobilizer system
to reduce the risk of unauthorized
vehicle use.
Your immobilizer system is com-
prised of a small transponder in the
ignition key, and antenna coil in the
key cylinder and Immobilizer Control
Unit (or Smartra Unit).
With this system, whenever you
insert your ignition key into the igni-
tion switch and turn it to ON, the
antenna coil in the ignition switch
receives a signal from the transpon-
der in the ignition key and then sends
the signal to the ECU (Engine
Control Unit).
The ECU checks the signal whether
the ignition key is valid.
If the key is determined to be valid,
the engine will start.
If the key is determined to be invalid,
the engine will not start.To deactivate the immobilizer sys-
tem:
Insert the ignition key into the key
cylinder and turn it to the ON posi-
tion.
To activate the immobilizer sys-
tem:
Turn the ignition key to the OFF posi-
tion. The immobilizer system acti-
vates automatically. Without a valid
ignition key for your vehicle, the
engine will not start.
✽ ✽
NOTICEWhen starting the engine, do not use
the key with other immobilizer keys
around. Otherwise the engine may
not start or may stop soon after it
starts. Keep each key separately not
to have any malfunction after you
receive your new vehicle.
Limp home (override) proce-
dureWhen you turn the ignition key to the
ON position, if the IMMO indicator
goes off after blinking 5 times, your
transponder equipped in the ignition
key is out of order. You cannot start
the engine without the lime home pro-
cedure. To start the engine, you have
to input your password by using the
ignition switch.
The following procedure is how to
input your password of “2345” as an
example.
1. Turn the ignition key to the ON posi-
tion. The IMMO indicator ( ) will
blink 5 times and go off indicating
the beginning of the limp home pro-
cedure.
2. Turn the ignition key to the ACC position.
3. To enter the first digit (in this example “2”), turn the ignition key
to the ON and ACC position twice.
Perform the same procedure for
the next digits between 3 seconds
and 10 seconds (for example, for
“3”, turn the ignition ON and ACC
3 times).
IMMOBILIZER SYSTEM (IF EQUIPPED)
Page 18 of 350
39
Knowing your vehicle
1
2
3
4
5
6
7
8
9
Operating door locks from
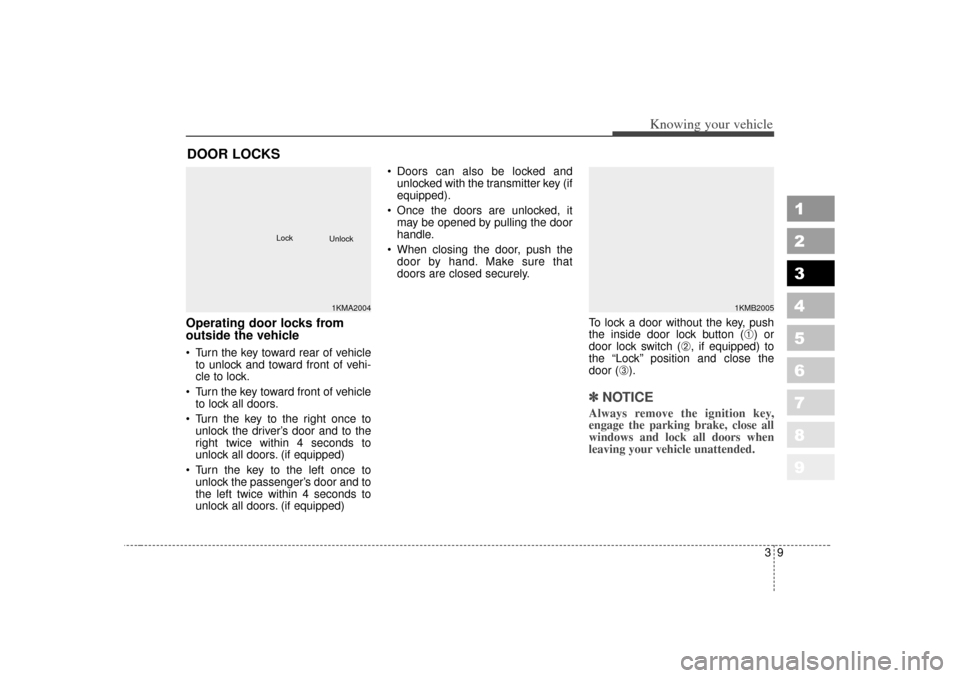
outside the vehicle Turn the key toward rear of vehicleto unlock and toward front of vehi-
cle to lock.
Turn the key toward front of vehicle to lock all doors.
Turn the key to the right once to unlock the driver’s door and to the
right twice within 4 seconds to
unlock all doors. (if equipped)
Turn the key to the left once to unlock the passenger’s door and to
the left twice within 4 seconds to
unlock all doors. (if equipped) Doors can also be locked and
unlocked with the transmitter key (if
equipped).
Once the doors are unlocked, it may be opened by pulling the door
handle.
When closing the door, push the door by hand. Make sure that
doors are closed securely.
To lock a door without the key, push
the inside door lock button (
➀) or
door lock switch (
➁, if equipped) to
the “Lock” position and close the
door (
➂).
✽ ✽ NOTICEAlways remove the ignition key,
engage the parking brake, close all
windows and lock all doors when
leaving your vehicle unattended.
DOOR LOCKS
1KMA2004
Lock
Unlock
1KMB2005
Page 23 of 350
Knowing your vehicle14
3
1
2
3
4
5
6
7
8
9
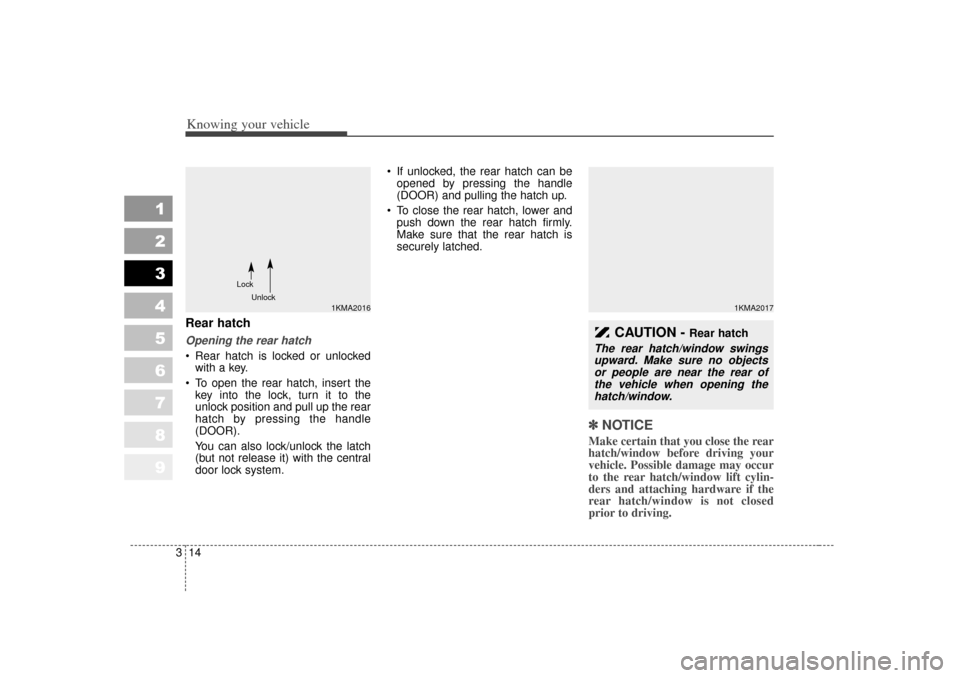
Rear hatchOpening the rear hatch Rear hatch is locked or unlocked
with a key.
To open the rear hatch, insert the key into the lock, turn it to the
unlock position and pull up the rear
hatch by pressing the handle
(DOOR).
You can also lock/unlock the latch
(but not release it) with the central
door lock system. If unlocked, the rear hatch can be
opened by pressing the handle
(DOOR) and pulling the hatch up.
To close the rear hatch, lower and push down the rear hatch firmly.
Make sure that the rear hatch is
securely latched.
✽ ✽ NOTICEMake certain that you close the rear
hatch/window before driving your
vehicle. Possible damage may occur
to the rear hatch/window lift cylin-
ders and attaching hardware if the
rear hatch/window is not closed
prior to driving.
1KMA2017
CAUTION -
Rear hatch
The rear hatch/window swings
upward. Make sure no objectsor people are near the rear ofthe vehicle when opening thehatch/window.
1KMA2016
Lock
Unlock
Page 24 of 350
315
Knowing your vehicle
1
2
3
4
5
6
7
8
9
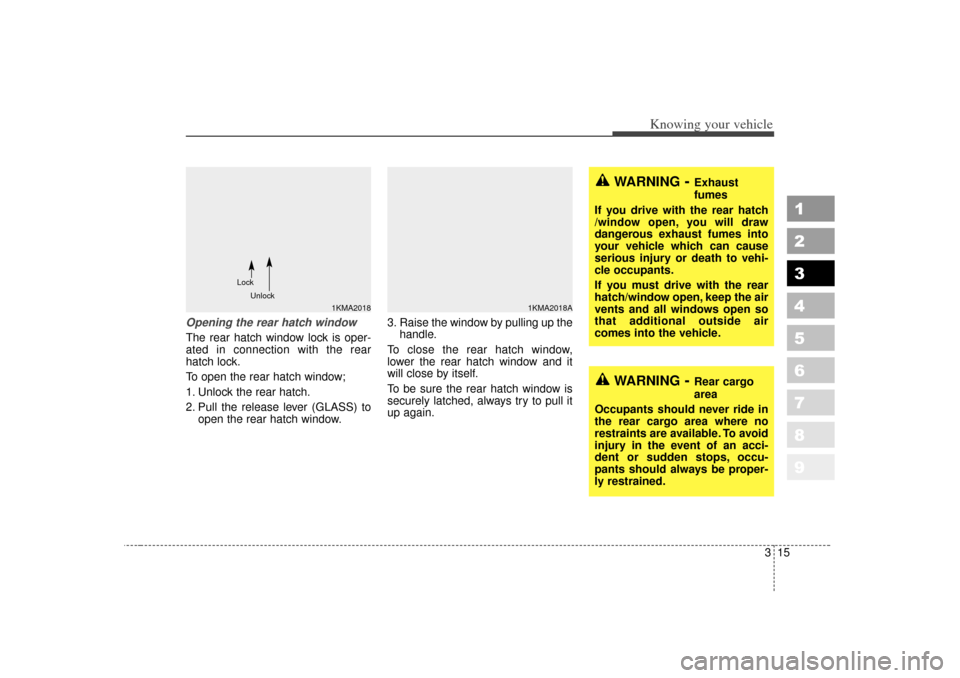
Opening the rear hatch windowThe rear hatch window lock is oper-
ated in connection with the rear
hatch lock.
To open the rear hatch window;
1. Unlock the rear hatch.
2. Pull the release lever (GLASS) toopen the rear hatch window. 3. Raise the window by pulling up the
handle.
To close the rear hatch window,
lower the rear hatch window and it
will close by itself.
To be sure the rear hatch window is
securely latched, always try to pull it
up again.
1KMA2018A
1KMA2018
Lock
Unlock
WARNING
- Exhaust
fumes
If you drive with the rear hatch
/window open, you will draw
dangerous exhaust fumes into
your vehicle which can cause
serious injury or death to vehi-
cle occupants.
If you must drive with the rear
hatch/window open, keep the air
vents and all windows open so
that additional outside air
comes into the vehicle.
WARNING
- Rear cargo
area
Occupants should never ride in
the rear cargo area where no
restraints are available. To avoid
injury in the event of an acci-
dent or sudden stops, occu-
pants should always be proper-
ly restrained.
Page 30 of 350
321
Knowing your vehicle
1
2
3
4
5
6
7
8
9
Front seat adjustmentAdjusting the seat forward andbackwardTo move the seat forward or back-
ward:
1. Pull the seat slide adjustment lever under the front edge of the
seat cushion up and hold it.
2. Slide the seat to the position you desire.
3. Release the lever and make sure the seat is locked in place. Adjust the seat before driving, and
make sure the seat is locked secure-
ly by trying to move forward and
backward without using the control
knob. If the seat moves, it is not
locked properly.
Adjusting the seatback reclinerTo recline the seatback:
1. Lean forward slightly and lift up on
the seatback recline lever located
on the outside of the seat, at the
rear.
2. Carefully lean back on the seat and adjust the seatback of the
seat to the position you desire.
3. Release the lever and make sure the seatback is locked in place.
(The lever MUST return to its orig-
inal position for the seatback to
lock.)
1KMA2035
1KMA2037
Page 37 of 350
Knowing your vehicle28
3
1
2
3
4
5
6
7
8
9
To unfold the rear seat;
1. Pull the lock release lever located
on the top of the seatback.
2. Lift and push the seatback back- ward firmly until it clicks into place.
Make sure the seatback is locked
in place.
3. Return the rear safety belt to the proper position.
WARNING
- Cargo
Cargo should always be
secured to prevent it from being
thrown about the vehicle in a
collision and causing injury to
the vehicle occupants. Special
care should be taken of objects
placed in the rear seats, since
those may hit the front seat
occupants in a frontal collision.
CAUTION -
Cargo loading
Make sure the engine is off, the transaxle is in P and the parkingbrake is applied whenever load-ing or unloading cargo. Failureto take these steps may allowthe vehicle to move if shift leveris inadvertently moved to anoth-er position.
CAUTION -
Rear floor
Do not remove the floor carpetin your vehicle. Emission con-trol system components in thearea of the rear seats causehigh exhaust temperaturesunder the floor.
Page 43 of 350
Knowing your vehicle34
3
1
2
3
4
5
6
7
8
9
The rear safety belts use a special
auto-lock feature designed to allow a
child restraint to be used in these
positions without an added locking
clip. They normally lock only under
extreme or emergency conditions
(emergency lock mode). However
they can be adjusted so that they
remain fixed and locked when a child
restraint system is placed in these
positions. (Use this auto-lock mode
only to secure a child restraint, never
for passengers restrained by the
safety belts.) Page 3-48 gives
instructions on placing the safety belt
in the auto lock mode.
The drivers safety belt can only oper-
ate in the emergency lock mode. Safety belts provide the best restraint
when:
The seatback is upright.
The occupant is sitting upright (not
slouched).
The lap belt is snug across the hips.
The shoulder belt is snug across the chest.
The knees are straight forward.
To help you remember to fasten your
safety belt, a warning light will blink.
See “Safety belt warning light and
chime” on page 3-36.
WARNING
- After a colli- sion
Lap/shoulder belt assemblies may be stretched or damaged
when subjected to the stress
and forces of a collision.
The entire restraint system should be inspected following
any collision. All belts, retrac-
tors, anchors and hardware
damaged by a collision should
be replaced before the vehicle
is operated again.
WARNING -
Cargo area
Passengers should never be
allowed to ride in the cargo area
of a vehicle. No safety belts are
provided for the cargo area.
Persons riding in the vehicle
without a fastened safety belt
are much more likely to suffer
serious bodily injury or death
during an accident.
Page 48 of 350
339
Knowing your vehicle
1
2
3
4
5
6
7
8
9
4. Position the lap portion (
➀) of the
belt across your lap as LOW ON
THE HIPS as possible to reduce
the risk of sliding under it during
an accident. Adjust the belt to a
SNUG FIT by pulling up on the
shoulder portion (
➁) of the safety
belt. The belt retractor is designed
to take up excess webbing auto-
matically and to maintain tension
on the belt. For your safety do not
put any excess slack into the safe-
ty belt.
To unfasten the rear lap/shoulder
belt:Press the release button on the
buckle and allow the belt to slowly
retract.
3 Point rear center belt
(if equipped) To fasten the rear center belt1. Extract the tongue plate from the hole on the belt assembly cover
and slowly pull the tongue plates
out from the retractor.
1GHA2264
4GQB0338
1KMN3441
CAUTION
- Cargo
Be sure that the cargo is secure-ly loaded in the rear cargo area.Loose cargo may damage therear center safety belt in suddenstops or certain collisions.