Page 28 of 350
319
Knowing your vehicle
1
2
3
4
5
6
7
8
9
Driver’s seat➀
Seat adjustment, forward /
backward (see page 3- 21)
➁
Seatback recliner(see page 3- 21)
➂
Seat adjustment, height(see page 3- 22)
➃
Seat heater switch*(see page 3- 22)
➄
Headrest adjustment (see page 3- 23)Front passenger seat
\b
Seat adjustment, forward /
backward (see page 3- 21)
➆
Seatback recliner(see page 3- 21)
➇
Seat heater switch* (see page 3- 22)
➈
Headrest adjustment (see page 3- 23)
Rear seat
\f
Armrest (see page 3- 29)
Headrest adjustment (see page 3- 30)
Split folding rear seat (see page 3- 27)
* if equipped
SEAT
1KMA2034
1112
Page 32 of 350

323
Knowing your vehicle
1
2
3
4
5
6
7
8
9
✽ ✽NOTICE• The seat warmer will not operate
if ambient temperature is above
37±3°C (98.5±5.5°F).
• If the seat warmer doesn't work when the ambient temperature is
below 28±3.5°C (82.5±5.5°F), have
the system checked by an autho-
rized dealer.✽ ✽ NOTICE• When cleaning the seats, do not
use an organic solvent such as
thinner, benzene, alcohol and
gasoline. Doing so may damage
the surface of the heater or seats.
• To prevent overheating the seat warmer, do not place blankets,
cushions or seat covers on the
seats while the seat warmer is in
operation.
• Do not place heavy or sharp objects on seats equipped with
seat warmers. Damage to the seat
warming components could occur.
Front headrest adjustmentAdjusting the height up and down
The headrest not only provides com-
fort for the driver and passengers,
but also helps to protect the head
and neck in the event of a collision.
To raise the headrest, pull it up to the
desired position (
➀). To lower the
headrest, push and hold the release
button (
➁) on the headrest support
and lower the headrest to the desired
position (➂). For best protection,
adjust the headrest so its center is as
high as your ears. Also adjust the
headrest so its distance from the
head is as wide as your fist.
WARNING
- Seat heater
burns
Passengers should use extreme
caution when using seat warm-
ers due to the possibility of
excess heating or burns. In par-
ticular, the driver must exercise
extreme care for the following
types of passengers:
1. Infants, children, elderly or handicapped persons, or hos-
pital outpatients
2. Persons with sensitive skin or those that burn easily
3. Fatigued individuals
4. Intoxicated individuals
5. Individuals taking medication that can cause drowsiness or
sleepiness (sleeping pills,
cold tablets, etc.)
1KMA2040
Page 38 of 350

329
Knowing your vehicle
1
2
3
4
5
6
7
8
9
ArmrestThe armrest is located in the center
of the rear seat. Pull the armrest
down from the seatback.
Rear headrest adjustmentAdjusting the height up and down
The headrest not only provides com-
fort for the rear passengers, but also
helps to protect the head and neck in
the event of a collision.
To raise the headrest, pull it up to the
desired position (
➀). To lower the
headrest, push and hold the release
button (
➁) on the headrest support
and lower the headrest to the desired
position (➂). For best protection,
adjust the headrest so its center is as
high as your ears. Also adjust the
headrest so its distance from the
head is as wide as your fist. Removal
To remove the headrest, raise it as
far as it can go then press the
release lever (
➀) while pulling
upward (
➁).
1KMA2046
1KMA2047
WARNING
- Rear head-
rests
To reduce the risk of head and
neck injuries to rear passen-
gers, do not operate the vehicle
with the rear headrests removed
or improperly positioned.
1KMA2048
Page 46 of 350

337
Knowing your vehicle
1
2
3
4
5
6
7
8
9
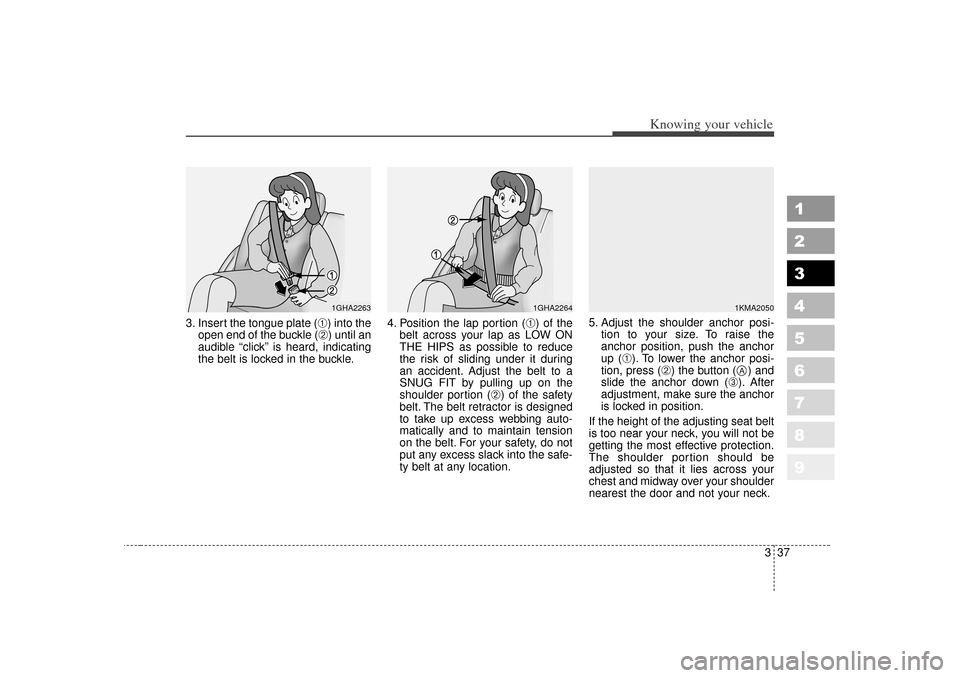
3. Insert the tongue plate (
➀) into the
open end of the buckle (➁) until an
audible “click” is heard, indicating
the belt is locked in the buckle. 4. Position the lap portion (
➀) of the
belt across your lap as LOW ON
THE HIPS as possible to reduce
the risk of sliding under it during
an accident. Adjust the belt to a
SNUG FIT by pulling up on the
shoulder portion (
➁) of the safety
belt. The belt retractor is designed
to take up excess webbing auto-
matically and to maintain tension
on the belt. For your safety, do not
put any excess slack into the safe-
ty belt at any location. 5. Adjust the shoulder anchor posi-
tion to your size. To raise the
anchor position, push the anchor
up (
➀). To lower the anchor posi-
tion, press (
➁) the button ( ) and
slide the anchor down (
➂). After
adjustment, make sure the anchor
is locked in position.
If the height of the adjusting seat belt
is too near your neck, you will not be
getting the most effective protection.
The shoulder portion should be
adjusted so that it lies across your
chest and midway over your shoulder
nearest the door and not your neck.
1GHA2263
1GHA2264
1KMA2050A
Page 47 of 350
Knowing your vehicle38
3
1
2
3
4
5
6
7
8
9
To unfasten the front lap/shoulder
belt:Press the release button on the
buckle and allow the belt to slowly
retract.
Rear lap/shoulder belt To fasten the rear lap/shoulderbelt:1. Grasp the buckle and tongue plate.
2. Slowly pull the lap/shoulder belt out.
3. Insert the tongue plate (
➀) into the
open end of the buckle (➁) until an
audible “click’’ is heard, indicating
the belt is locked in the buckle.
4GQB0338
1GHA2263
WARNING
The height adjuster must be in the locked position when the
vehicle is moving.
The misadjustment of height of the shoulder belt could
reduce the effectiveness of
the seat belt in a crash.