Page 153 of 221

Driving tips85Snow tires If you mount snow tires on your Kia,
make sure they are radial tires of the
same size and load range as the original
tires. Mount snow tires on all four wheels
to balance your vehicle’s handling in all
weather conditions. Keep in mind that the
traction provided by snow tires on dry
roads may not be as high as your vehi-
cle's original equipment tires. You should
drive cautiously even when the roads are
clear. Check with the tire dealer for max-
imum speed recommendations.Do not install studded tires without firstchecking local, state and municipal regu-lations for possible restrictions againsttheir use.
Driving in flooded areas Avoid driving through flooded areas
unless you are sure the water is no high-
er than the bottom of the wheel hub.
Drive through any water slowly. Allow
adequate stopping distance because
brake performance may be affected.
After driving through water, dry the
brakes by gently applying them several
times while the vehicle is moving slowly.
WARNING
- Snow tire size
Snow tires should be equivalent in
size and type to the vehicle's stan-
dard tires. Otherwise, the safety and
handling of your vehicle may be
adversely affected.
Page 154 of 221
59
Driving tips
TRAILER TOWINGWe do not recommend using this
vehicle for trailer towing.
OVERLOADING
CAUTION
- Vehicle weight
The gross axle weight rating(GAWR) and the gross vehicleweight rating (GVWR) for your vehi- cle are on the manufacturer's labelattached to the driver's door.Exceeding these ratings can causean accident or vehicle damage. Youcan calculate the weight of your load by weighing the items (andpeople) before putting them in thevehicle. Be careful not to overloadyour vehicle.
Page 155 of 221
Driving tips10
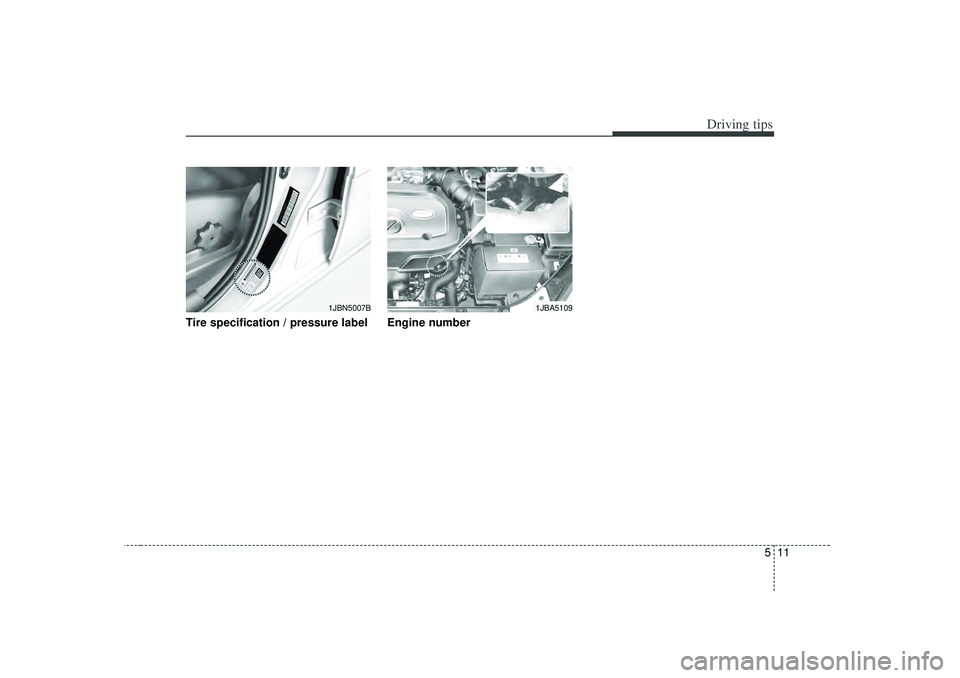
5LABEL INFORMATION There are several important labels and
identification numbers located on your
vehicle. The label locations are identified
in the illustrations shown.
Vehicle identification number
(VIN) To check the frame number under the
passenger seat, remove the cover.
1JBA50041JBA5003
1JBA50051JBN5007A1JBN5007
Compliance label (if equipped)VIN bar code (if equipped)
Frame numberIdentification label (if equipped)
VIN (if equipped)
Page 156 of 221
511
Driving tips
Tire specification / pressure label Engine number
1JBA5109
1JBN5007B
Page 157 of 221
6
Road warning / 6-2
Overheating / 6-2
Emergency starting / 6-3
Electrical circuit protection / 6-6
Towing / 6-12
If you have a flat tire / 6-17
In case of an emergency
Page 158 of 221

In case of an emergency26ROAD WARNING Hazard warning flasher The hazard warning flasher serves as a
warning to other drivers to exercise
extreme caution when approaching,
overtaking, or passing your vehicle. It
should be used whenever emergency
repairs are being made or when the vehi-
cle is stopped near the edge of a road-
way.
Depress the flasher switch with the igni-
tion switch in any position. The flasher
switch is located in the center console
switch panel. All turn signal lights will
flash simultaneously.• The hazard warning flasher operates
whether your vehicle is running or not.
The turn signals do not work when the hazard flasher is on.
Care must be taken when using the hazard warning flasher while the vehi-
cle is being towed. If your temperature gauge indicates over-
heating, if you experience a loss of
power, or if you hear a loud knocking or
pinging noise, the engine has probably
overheated. Should any of these symp-
toms occur, use the following procedure:
1. Turn on the hazard warning flasher,
then drive to the nearest safe location
and stop your vehicle; set the automat-
ic transaxle in P (Park), or shift the
manual transaxle to N (Neutral) and
apply the parking brake.
2. Make sure the air conditioner is off.
3. If coolant or steam is boiling out of the radiator, stop the engine and call an
authorized Kia dealer for assistance.
If coolant is not boiling out, allow the
engine to idle and open the hood to
permit the engine to cool gradually.
If the temperature does not go down
with the engine idling, stop the engine
and allow sufficient time for it to cool.
1JBN6001
OVERHEATING
Page 159 of 221

63
In case of an emergency
4. The coolant level should then bechecked. If the level in the reservoir is
low, look for leaks at the radiator hoses
and connections, heater hoses and
connections, radiator, and water
pump. If you find a major leak or anoth-
er problem that may have caused the
engine to overheat, do not operate the
engine until it has been corrected. Call
an authorized Kia dealer for assis-
tance. If you do not find a leak or other
problem, carefully add coolant to the
reservoir.If the engine frequently overheats, havethe cooling system checked and repairedby an authorized Kia dealer.
Jump starting Jump starting can be dangerous if done
incorrectly. Therefore, to avoid harm to
yourself or damage to your vehicle or
battery, follow the jump starting proce-
dures. If in doubt, we strongly recom-
mend that you have a competent techni-
cian or towing service jump start your
vehicle.✽ ✽ NOTICEUse only a 12-volt jumper system. You
can damage a 12-volt starting motor,
ignition system, and other electrical
parts beyond repair by use of a 24-volt
power supply (either two 12-volt batter-
ies in series or a 24-volt motor generator
set).
WARNING
- Removing
radiator cap
Do not remove the radiator cap
when the engine and radiator are
hot. Scalding hot coolant and steam
may blow out under pressure. This
could cause serious injury.
EMERGENCY STARTING
WARNING
- Battery
• Keep all flames or sparks away
from the battery. The battery pro-
duces hydrogen gas which may
explode if exposed to flame or
sparks.
Do not attempt to jump start the vehicle if the discharged battery
is frozen or if the electrolyte level
is low; the battery may rupture or
explode.
WARNING
- Battery
Never attempt to check the elec-
trolyte level of the battery as this
may cause the battery to rupture or
explode causing serious injury.
Page 160 of 221

In case of an emergency46Connecting jumper cables Jump starting procedure
1. Make sure the booster battery is 12-
volt and that its negative terminal is
grounded.
2. If the booster battery is in another vehicle, do not allow the vehicles to
touch.
3. Turn off all unnecessary electrical loads.
4. Connect the jumper cables in the exact sequence shown in the previous illus-
tration. First connect one end of a
jumper cable to the positive terminal of
the discharged battery ( 1), then con-
nect the other end to the positive ter-
minal on the booster battery ( 2).
5. Proceed to connect one end of the other jumper cable to the negative ter-
minal of the booster battery ( 3), then
the other end to a solid, stationary,
metallic point (for example, the engine
lifting bracket) away from the battery
( 4 ). Do not connect it to or near any
part that moves when the engine is
cranked. Do not connect the jumper
cable from the negative terminal of the
booster battery to the negative termi-
nal of the discharged battery.
Connect cables in numerical order and disconnect in reverse order.
Discharged battery Booster battery
1JBA6002
Jumper Cables