Page 217 of 294

513
Driving tips
When you are ready to leave afterparking on a hill 1. With the automatic transaxle in P (Park), apply your brakes and hold the
brake pedal down while you:
Start your engine;
Shift into gear; and
Release the parking brake.
2. Slowly remove your foot from the brake pedal.
3. Drive slowly forward until the trailer is clear of the chocks.
4. Stop and have someone pick up and store the chocks.Maintenance when trailer towing Your vehicle will need service more often
when you regularly pull a trailer.
Important items to pay particular atten-
tion to include engine oil, automatic
transaxle fluid, axle lubricant and cooling
system fluid. Brake condition is another
important item to frequently check. Each
item is covered in this manual, and the
Index will help you find them quickly. If
you’re trailering, it’s a good idea to review
these sections before you start your trip. Don’t forget to also maintain your trailer
and hitch. Follow the maintenance
schedule that accompanied your trailer
and check it periodically. Preferably, con-
duct the check at the start of each day’s
driving. Most importantly, all hitch nuts
and bolts should be tight.
✽ ✽
NOTICE• Due to higher load during trailer
usage, overheating might occur in hot
days or during uphill driving. If the
coolant gauge indicates over-heating,
switch off the A/C and stop the vehicle
in a safe area to cool down the engine.
• When towing check transaxle fluid more frequently.
• If your vehicle is not equipped with the air conditioner, you should install
a condenser fan to improve engine
performance when towing a trailer.
If you do decide to pull a trailerHere are some important points if you
decide to pull a trailer:
Consider using a sway control. You can
ask a hitch dealer about sway control.
After your odometer indicates 800 km (500 miles) or more, you can tow a
trailer. For the first 800 km (500 miles)
that you tow a trailer, don’t drive over
80 km/h (50 mph) and don’t make
starts at full throttle. This helps your
engine and other parts of your vehicle
“wear” in at the heavier loads.
Always drive your vehicle at a moder- ate speed (less than 100 km/h (60
mph)).
On a long uphill grade, do not exceed 70 km/h (45 mph) or the posted towing
speed limit, whichever is lower.
The important considerations have to do with weight:
Weight of the trailer
How heavy can a trailer safely be? It
should never weigh more than the maxi-
mum trailer weight with trailer brakes. But
even that can be too heavy. If you feel that
the trailer is adversely affecting the move-
ment of your vehicle, reduce your speed,
avoid uneven or winding roads, avoid
roads with steep grades, and/or lighten
your trailer load.
Page 218 of 294

Driving tips14
5Weight of the trailer tongue
The tongue load of any trailer is an
important weight to measure because it
affects the total gross vehicle weight
(GVW) of your vehicle since that is the
trailer weight pushing down on the hitch
on your vehicle. The rest of the trailer
weight is sitting on the trailer’s wheels.
The trailer tongue should weigh a maxi-
mum of 10% of the total loaded trailer
weight. After you've loaded the trailer, go
to a Weigh Station and weigh the trailer
and then the tongue, separately, to see if
the weights are proper. If they aren’t, you
may be able to correct them simply by
moving some items around in the trailer.
WARNING -
Trailer balance
Never load a trailer with more
weight in the rear than in the
front. The front should be loaded
with approximately 60% of the
total trailer load; the rear should
be loaded with approximately
40% of the total trailer load.
Never exceed the maximum weight limits of the trailer or trail-
er towing equipment. Improper
loading can result in excessive
personal injury. Check weights
and loading at a commercial
scale or highway patrol office
equipped with scales.
An improperly loaded trailer can cause loss of vehicle control.
WARNING
- Vehicle weight
The gross axle weight rating
(GAWR) and the gross vehicle
weight rating (GVWR) for your vehi-
cle are on the manufacturer's label
attached to the driver's door.
Exceeding these ratings can cause
an accident or vehicle damage. You
can calculate the weight of your
load by weighing the items (and
people) before putting them in the
vehicle. Be careful not to overload
your vehicle.
OVERLOADING
Page 219 of 294
515
Driving tips
LABEL INFORMATION There are several important labels and
identification numbers located on your
vehicle. The label locations are identified
in the illustrations shown.
Vehicle identification number
(VIN) To check the frame number under the
passenger seat, remove the cover.
OMG055005
Frame numberIdentification label (if equipped)Type A
Type B
VIN (if equipped)VIN bar code (if equipped)OMG055004
OMG055002
OMG055001
OMG055003
Compliance label (if equipped)Type A
Type B
Page 220 of 294
Driving tips16
5Tire specification / pressure label
Engine number
OMG055004N
OMG055007OMG055008
2.4 Gasoline engine2.7 Gasoline engine
Page 221 of 294
6
Road warning / 6-2
Overheating / 6-2
Emergency starting / 6-3
Electrical circuit protection / 6-6
Towing / 6-13
Tires pressure monitoring system (TPMS) / 6-18
If you have a flat tire / 6-22
In case of an emergency
Page 222 of 294

In case of an emergency26ROAD WARNING Hazard warning flasher The hazard warning flasher serves as a
warning to other drivers to exercise
extreme caution when approaching,
overtaking, or passing your vehicle. It
should be used whenever emergency
repairs are being made or when the vehi-
cle is stopped near the edge of a road-
way.
Depress the flasher switch with the igni-
tion switch in any position. The flasher
switch is located in the center console
switch panel. All turn signal lights will
flash simultaneously.• The hazard warning flasher operates
whether your vehicle is running or not.
The turn signals do not work when the hazard flasher is on.
Care must be taken when using the hazard warning flasher while the vehi-
cle is being towed. If your temperature gauge indicates over-
heating, if you experience a loss of
power, or if you hear a loud knocking or
pinging noise, the engine has probably
overheated. Should any of these symp-
toms occur, use the following procedure:
1. Turn on the hazard warning flasher,
then drive to the nearest safe location
and stop your vehicle; set the automat-
ic transaxle in P (Park), or shift the
manual transaxle to N (Neutral) and
apply the parking brake.
2. Make sure the air conditioner is off.
3. If coolant or steam is boiling out of the radiator, stop the engine and call an
authorized Kia dealer for assistance.
If coolant is not boiling out, allow the
engine to idle and open the hood to
permit the engine to cool gradually.
If the temperature does not go down
with the engine idling, stop the engine
and allow sufficient time for it to cool.
OVERHEATING
OMG065001
Page 223 of 294

63
In case of an emergency
4. The coolant level should then bechecked. If the level in the reservoir is
low, look for leaks at the radiator hoses
and connections, heater hoses and
connections, radiator, and water
pump. If you find a major leak or anoth-
er problem that may have caused the
engine to overheat, do not operate the
engine until it has been corrected. Call
an authorized Kia dealer for assis-
tance. If you do not find a leak or other
problem, carefully add coolant to the
reservoir.If the engine frequently overheats, havethe cooling system checked and repairedby an authorized Kia dealer.
Jump starting Jump starting can be dangerous if done
incorrectly. Therefore, to avoid harm to
yourself or damage to your vehicle or
battery, follow the jump starting proce-
dures. If in doubt, we strongly recom-
mend that you have a competent techni-
cian or towing service jump start your
vehicle.✽ ✽ NOTICEUse only a 12-volt jumper system. You
can damage a 12-volt starting motor,
ignition system, and other electrical
parts beyond repair by use of a 24-volt
power supply (either two 12-volt batter-
ies in series or a 24-volt motor generator
set).
WARNING
- Removing
radiator cap
Do not remove the radiator cap
when the engine and radiator are
hot. Scalding hot coolant and steam
may blow out under pressure. This
could cause serious injury.
EMERGENCY STARTING
WARNING
- Battery
• Keep all flames or sparks away
from the battery. The battery pro-
duces hydrogen gas which may
explode if exposed to flame or
sparks.
Do not attempt to jump start the vehicle if the discharged battery
is frozen or if the electrolyte level
is low; the battery may rupture or
explode.
WARNING
- Battery
Never attempt to check the elec-
trolyte level of the battery as this
may cause the battery to rupture or
explode causing serious injury.
Page 224 of 294

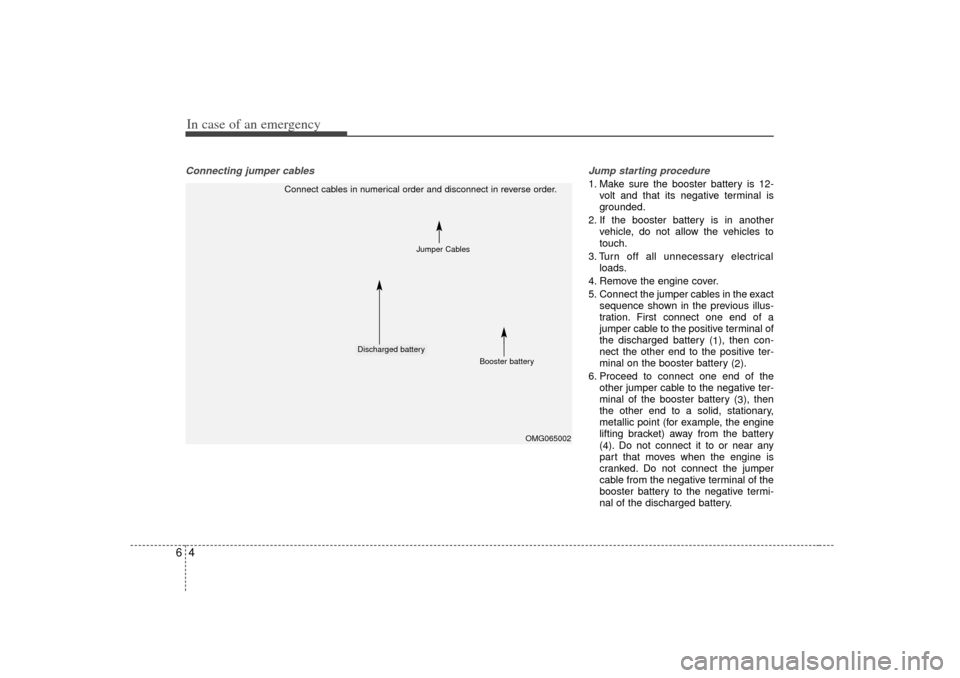
In case of an emergency46Connecting jumper cables Jump starting procedure
1. Make sure the booster battery is 12-
volt and that its negative terminal is
grounded.
2. If the booster battery is in another vehicle, do not allow the vehicles to
touch.
3. Turn off all unnecessary electrical loads.
4. Remove the engine cover.
5. Connect the jumper cables in the exact sequence shown in the previous illus-
tration. First connect one end of a
jumper cable to the positive terminal of
the discharged battery ( 1), then con-
nect the other end to the positive ter-
minal on the booster battery ( 2).
6. Proceed to connect one end of the other jumper cable to the negative ter-
minal of the booster battery ( 3), then
the other end to a solid, stationary,
metallic point (for example, the engine
lifting bracket) away from the battery
( 4 ). Do not connect it to or near any
part that moves when the engine is
cranked. Do not connect the jumper
cable from the negative terminal of the
booster battery to the negative termi-
nal of the discharged battery.
Connect cables in numerical order and disconnect in reverse order.
Discharged battery
Booster battery
OMG065002
Jumper Cables