Page 128 of 329
Knowing your vehicle
118
3
1 23456789
9. CD EJECT Button
When the button is pressed with a CD loaded, the CD will eject.
Forcing to eject : To force to eject a
CD, press this button for more than 3
seconds. (Do this only when a CD is jammed
and you can not eject it in the normal
way - e.g.) in case that you have
inserted 2 CDs by mistake)
10. CD SCAN (BSM) Button
To playback the first 10 seconds of
each track, press the CD SCAN
(BSM) button more than 0.8 seconds.
To playback the first 10 seconds of each track in the selected folder,
press the CD SCAN (BSM) button
within 0.8 seconds. (MP3 CD only)
Press the CD SCAN (BSM) button again within 10 sec. when you
have reached the desired track.
11. FILE SEARCH Knob
(TUNE Select Knob)
You can skip the track (file) by turn-ing the FILE SEARCH knob clock-
wise or counterclockwise.
After selecting the desired track (file), press the FILE SEARCH
knob to playback the track (file).
If you do not press the FILE
SEARCH knob within five seconds,
the search will stop.
12. DIRECTORY SEARCH (DIR)
Button
You can move through the folder bypushing the DIR button to up ( )
and down( ).
After moving the desired folder, press the FILE SEARCH knob to
play back in the selected folder. If
you do not press the FILE
SEARCH knob within 5 seconds,
the folder searching function will be
released. It can not be operated in
a single folder.
✽✽ NOTICE
Page 131 of 329
1. Power on/off and volumecontrol button
When the ignition switch is on ACC
or ON, push this button to power on.
Push this button again to power off.
2. Volume control button
Rotate this button clockwise to vol-
ume up and anti-clockwise to volume
down.
3. Radio selection button (FM/AM)
Push [FM/AM] button for FM or AM
radio. Each press will changeFM1 ➟FM2 ➟AM ➟FM1 and repeats.
4. Scan button
Push this button to automatically
select available stations and remains
for 5 seconds from current station.
Push again to stay on current station.BSM button
Push [BSM] button to start automatic
search from current station. The sta-
tions are memorized in 1~6 pre-set
buttons from smallest station.Number 1 pre-set station will be on
after the search and memory.
5. Automatic station selection button (Seek)
Push [seek ] button, to increase
the band and [seek ] button to
decrease the band. It automatically
finds available station. If the station is
already memorized in pre-set memo-
ry, it will show the pre-set number.
6. Manual station selection button (Tune)
Rotate this tune button clockwise 1
click to increase band 1 step and
anti-clockwise to decrease.
Regular export
FM: Move by 0.1MHz (87.5 ➟87.6 ➟87.7····87.7 ➟87.6
➟ 87.5) AM: Move by 9 KHz
(531 ➟
540 ➟549····549 ➟540 ➟531)
North America export (Columbian
units FM move by 0.1 MHz)
FM: Move by 0.2MHz
(87.5 ➟87.7 ➟87.9····87.9 ➟87.7
➟ 87.5)
AM: Move by 10 KHz
(530 ➟
540 ➟550····550 ➟540 ➟530)
7. Pre-set button (1~6)
Push these buttons to listen to mem-
orized stations. Push pre-set button
for more than 1.5 seconds (with a
beep) to memorize current station.
8. LCD display It indicates FM1/FM2/AM along with cur- rent band, pre-set channel, FM stereowith "ST".
3 121
Knowing your vehicle
1 23456789
Page 132 of 329
Knowing your vehicle
122
3
1 23456789
9. Bass control/ left, right
audio control
Push this button to select BASS ➟
MIDDLE ➟TREBBLE ➟FADER ➟BALA
NCE on LCD display screen.Rotate the volume button
clockwise to increasehigh sound and anti-
clockwise to decreasehigh sound.
Rotate the volume button
clockwise to enable right
speakers and anti-clock-
wise to enable left speak-
ers.
Rotate the volume button
clockwise to increase
back speaker sound and
anti-clockwise to increa-
se front speaker sound.
TREBLE BALANCE
FADER
Rotate the volume button
clockwise to increaseBass sound and anti-
clockwise to decreaseBass sound.
Rotate the volume button
clockwise to increasemiddle sound and anti-
clockwise to decreaseMiddle sound.
BASS MIDDLE
Page 259 of 329
619
In case of an emergency
1 23456789
IF YOU HAVE A FLAT TIRE
The spare tire, jack, jack handle,
wheel lug nut wrench are stored in
the trunk compartment. Move the
carpeting out of the way to reach thisequipment. Removing the spare tire
Turn the tire hold-down wing bolt
counterclockwise.
Store the tire in the reverse order of
removal.
To prevent the spare tire and tools
from “rattling” while the vehicle is in
motion, store them properly.Changing tires
Jacking instructions
The jack is provided for emergency
tire changing only.
Follow jacking instructions to reduce
the possibility of personal injury.
1LDA40091LDA4010
Page 261 of 329
621
In case of an emergency
1 23456789
4. Remove the wheel lug nut wrench,jack, jack handle, and spare tire
from the vehicle.
5. Block both the front and rear of the wheel that is diagonally opposite
the jack position. 6. Loosen the wheel lug nuts coun-
terclockwise one turn each, but do
not remove any nut until the tire
has been raised off the ground.
WARNING - Changing a tire
To prevent vehicle movement
while changing a tire, always
set the parking brake fully, and
always block the wheel diago-
nally opposite the wheel being
changed.
It is recommended that the wheels of the vehicle be
chocked, and that no person
should remain in a vehicle that
is being jacked.
1JBA6504OLD046014
Page 262 of 329
In case of an emergency
22
6
1 23456789
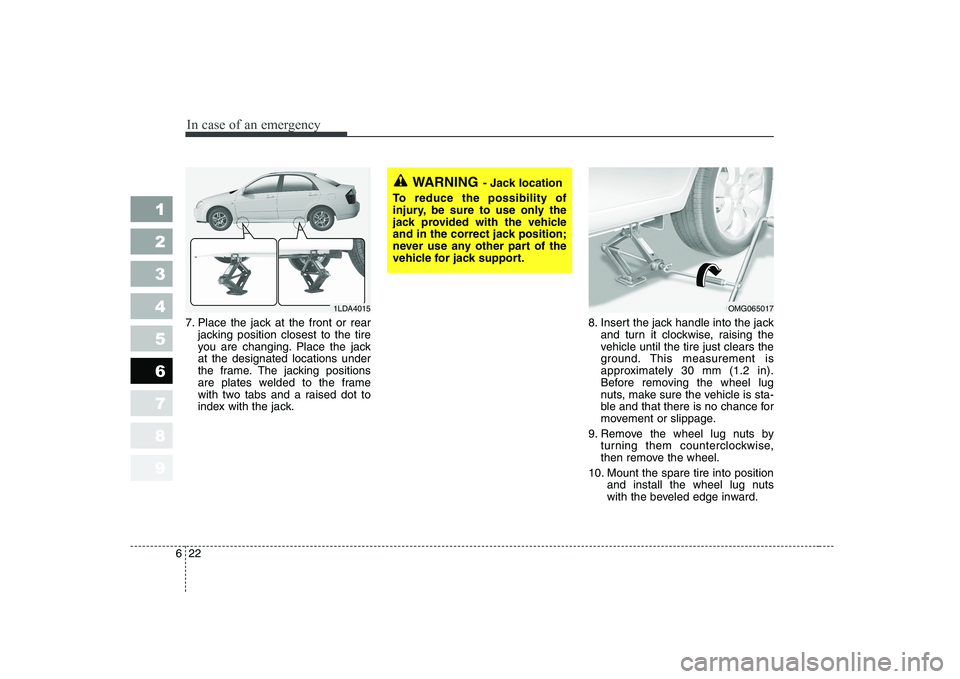
7. Place the jack at the front or rear
jacking position closest to the tire
you are changing. Place the jackat the designated locations under
the frame. The jacking positions
are plates welded to the frame
with two tabs and a raised dot to
index with the jack. 8. Insert the jack handle into the jack
and turn it clockwise, raising the
vehicle until the tire just clears the
ground. This measurement is
approximately 30 mm (1.2 in).
Before removing the wheel lug
nuts, make sure the vehicle is sta-
ble and that there is no chance for
movement or slippage.
9. Remove the wheel lug nuts by turning them counterclockwise,
then remove the wheel.
10. Mount the spare tire into position and install the wheel lug nuts
with the beveled edge inward.
WARNING - Jack location
To reduce the possibility of
injury, be sure to use only the
jack provided with the vehicle
and in the correct jack position;
never use any other part of the
vehicle for jack support.
OMG0650171LDA4015
Page 283 of 329
Maintenance
18
7
1 23456789
Changing the engine oil and filter
Have engine oil and filter changed by
an authorized KIA dealer accordingto the Maintenance Schedule at thebeginning of this section. The high-pressure cooling system
has a reservoir filled with year-round
antifreeze coolant. The reservoir is
filled at the factory.
Check the antifreeze protection and
coolant level at least once a week, atthe beginning of the winter season,
and before traveling to a colder cli-
mate.
Checking the coolant level
WARNING
Used engine oil may cause irri- tation or cancer of the skin if left
in contact with the skin for pro-
longed periods of time. Used
engine oil contains chemicals
that have caused cancer in lab-
oratory animals. Always protect
your skin by washing your
hands thoroughly with soap and
warm water as soon as possibleafter handling used oil.
ENGINE COOLING SYSTEM
WARNING - Removing
radiator cap
Never attempt to remove the radiator cap while the engine
is operating or hot. Doing somight lead to cooling system
and engine damage and could
result in serious personal
injury from escaping hotcoolant or steam.
(Continued)
(Continued)
Turn the engine off and waituntil it cools down. Even then,
use extreme care when
removing the radiator cap.
Wrap a thick towel around it,
and turn it counterclockwise
slowly to the first stop. Step
back while the pressure is
released from the cooling sys-
tem. When you are sure all thepressure has been released,
press down on the cap, using
a thick towel, and continue
turning counterclockwise to
remove it.
Even if the engine is not oper- ating, do not remove the radi-ator cap or the drain plugwhile the engine and radiator
are hot. Hot coolant and steam
may still blow out under pres-
sure, causing serious injury.
Page 300 of 329
735
Maintenance
1 23456789
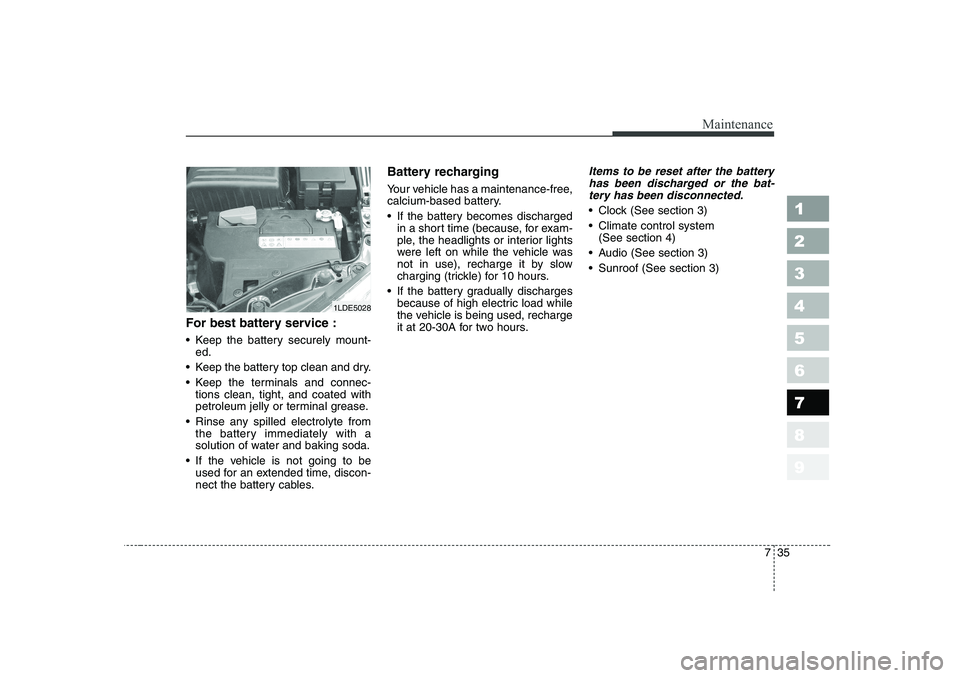
For best battery service :
Keep the battery securely mount-ed.
Keep the battery top clean and dry.
Keep the terminals and connec- tions clean, tight, and coated with
petroleum jelly or terminal grease.
Rinse any spilled electrolyte from the battery immediately with a
solution of water and baking soda.
If the vehicle is not going to be used for an extended time, discon-
nect the battery cables. Battery recharging
Your vehicle has a maintenance-free,
calcium-based battery.
If the battery becomes discharged
in a short time (because, for exam-
ple, the headlights or interior lights
were left on while the vehicle was
not in use), recharge it by slow
charging (trickle) for 10 hours.
If the battery gradually discharges because of high electric load while
the vehicle is being used, recharge
it at 20-30A for two hours.
Items to be reset after the battery
has been discharged or the bat-tery has been disconnected.
Clock (See section 3)
Climate control system (See section 4)
Audio (See section 3)
Sunroof (See section 3)
1LDE5028