Page 129 of 329

3 119
Knowing your vehicle
1 23456789
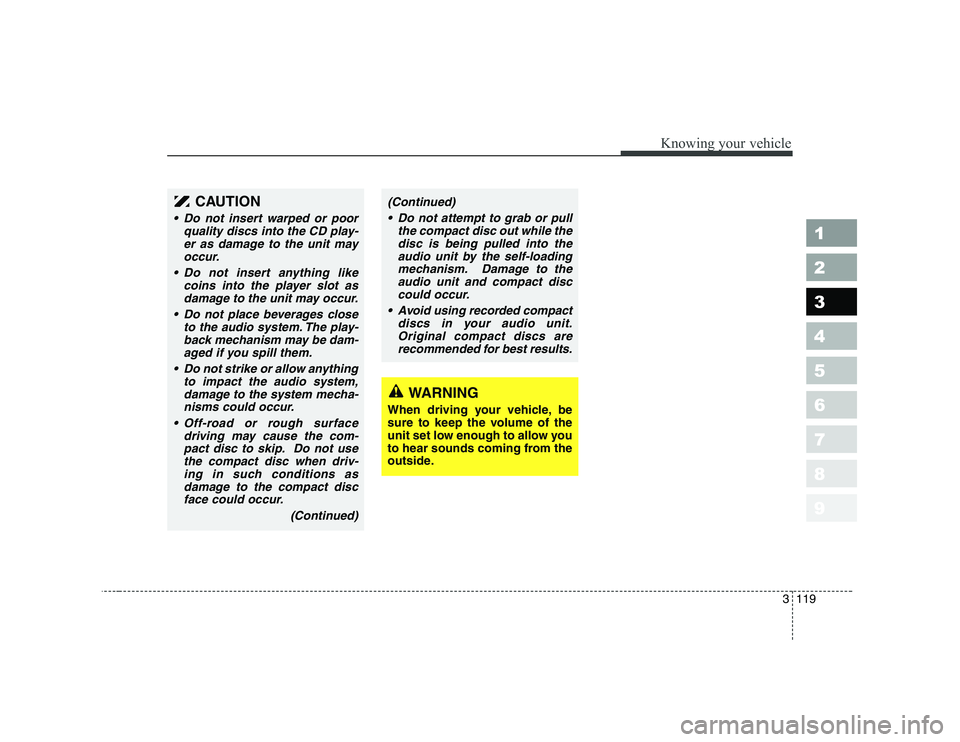
(Continued) Do not attempt to grab or pull the compact disc out while thedisc is being pulled into theaudio unit by the self-loadingmechanism. Damage to the audio unit and compact disccould occur.
Avoid using recorded compact discs in your audio unit.Original compact discs are recommended for best results.
WARNING
When driving your vehicle, be
sure to keep the volume of the
unit set low enough to allow you
to hear sounds coming from the
outside.
CAUTION
Do not insert warped or poor quality discs into the CD play-er as damage to the unit mayoccur.
Do not insert anything like coins into the player slot asdamage to the unit may occur.
Do not place beverages close to the audio system. The play-back mechanism may be dam- aged if you spill them.
Do not strike or allow anything to impact the audio system,damage to the system mecha- nisms could occur.
Off-road or rough surface driving may cause the com-pact disc to skip. Do not usethe compact disc when driv- ing in such conditions asdamage to the compact discface could occur.
(Continued)
Page 130 of 329
Knowing your vehicle
120
3
1 23456789
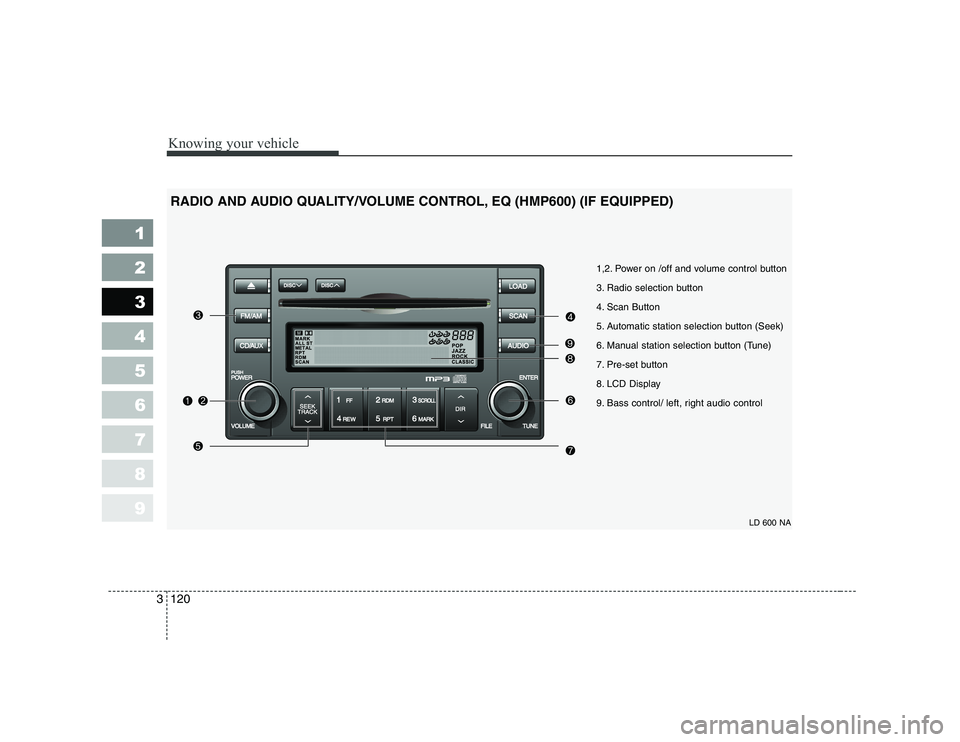
LD 600 NA
1,2. Power on /off and volume control button
3. Radio selection button
4. Scan Button
5. Automatic station selection button (Seek)
6. Manual station selection button (Tune)
7. Pre-set button
8. LCD Display
9. Bass control/ left, right audio control
RADIO AND AUDIO QUALITY/VOLUME CONTROL, EQ (HMP600) (IF EQUIPPED)
Page 131 of 329

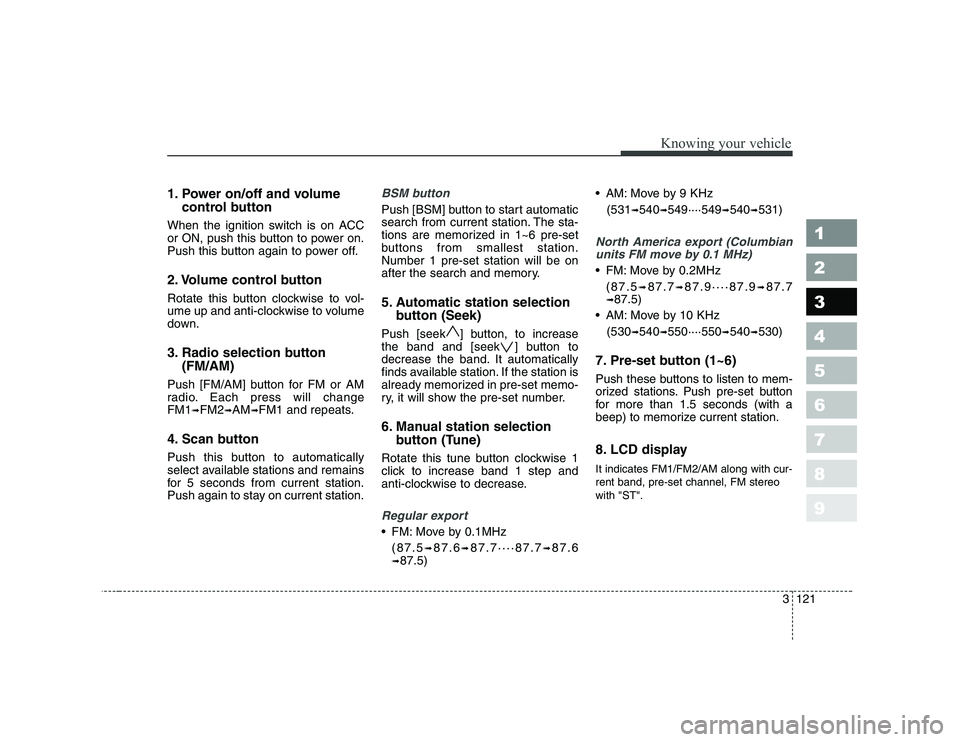
1. Power on/off and volumecontrol button
When the ignition switch is on ACC
or ON, push this button to power on.
Push this button again to power off.
2. Volume control button
Rotate this button clockwise to vol-
ume up and anti-clockwise to volume
down.
3. Radio selection button (FM/AM)
Push [FM/AM] button for FM or AM
radio. Each press will changeFM1 ➟FM2 ➟AM ➟FM1 and repeats.
4. Scan button
Push this button to automatically
select available stations and remains
for 5 seconds from current station.
Push again to stay on current station.BSM button
Push [BSM] button to start automatic
search from current station. The sta-
tions are memorized in 1~6 pre-set
buttons from smallest station.Number 1 pre-set station will be on
after the search and memory.
5. Automatic station selection button (Seek)
Push [seek ] button, to increase
the band and [seek ] button to
decrease the band. It automatically
finds available station. If the station is
already memorized in pre-set memo-
ry, it will show the pre-set number.
6. Manual station selection button (Tune)
Rotate this tune button clockwise 1
click to increase band 1 step and
anti-clockwise to decrease.
Regular export
FM: Move by 0.1MHz (87.5 ➟87.6 ➟87.7····87.7 ➟87.6
➟ 87.5) AM: Move by 9 KHz
(531 ➟
540 ➟549····549 ➟540 ➟531)
North America export (Columbian
units FM move by 0.1 MHz)
FM: Move by 0.2MHz
(87.5 ➟87.7 ➟87.9····87.9 ➟87.7
➟ 87.5)
AM: Move by 10 KHz
(530 ➟
540 ➟550····550 ➟540 ➟530)
7. Pre-set button (1~6)
Push these buttons to listen to mem-
orized stations. Push pre-set button
for more than 1.5 seconds (with a
beep) to memorize current station.
8. LCD display It indicates FM1/FM2/AM along with cur- rent band, pre-set channel, FM stereowith "ST".
3 121
Knowing your vehicle
1 23456789
Page 132 of 329
Knowing your vehicle
122
3
1 23456789
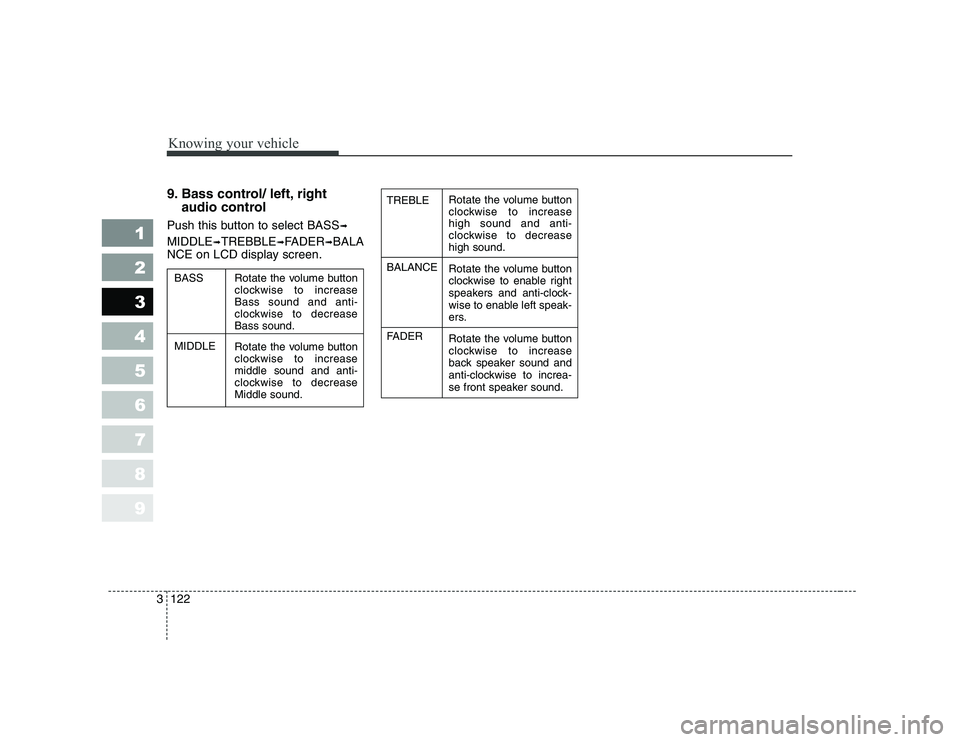
9. Bass control/ left, right
audio control
Push this button to select BASS ➟
MIDDLE ➟TREBBLE ➟FADER ➟BALA
NCE on LCD display screen.Rotate the volume button
clockwise to increasehigh sound and anti-
clockwise to decreasehigh sound.
Rotate the volume button
clockwise to enable right
speakers and anti-clock-
wise to enable left speak-
ers.
Rotate the volume button
clockwise to increase
back speaker sound and
anti-clockwise to increa-
se front speaker sound.
TREBLE BALANCE
FADER
Rotate the volume button
clockwise to increaseBass sound and anti-
clockwise to decreaseBass sound.
Rotate the volume button
clockwise to increasemiddle sound and anti-
clockwise to decreaseMiddle sound.
BASS MIDDLE
Page 133 of 329
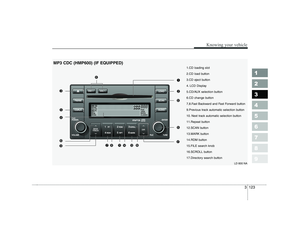
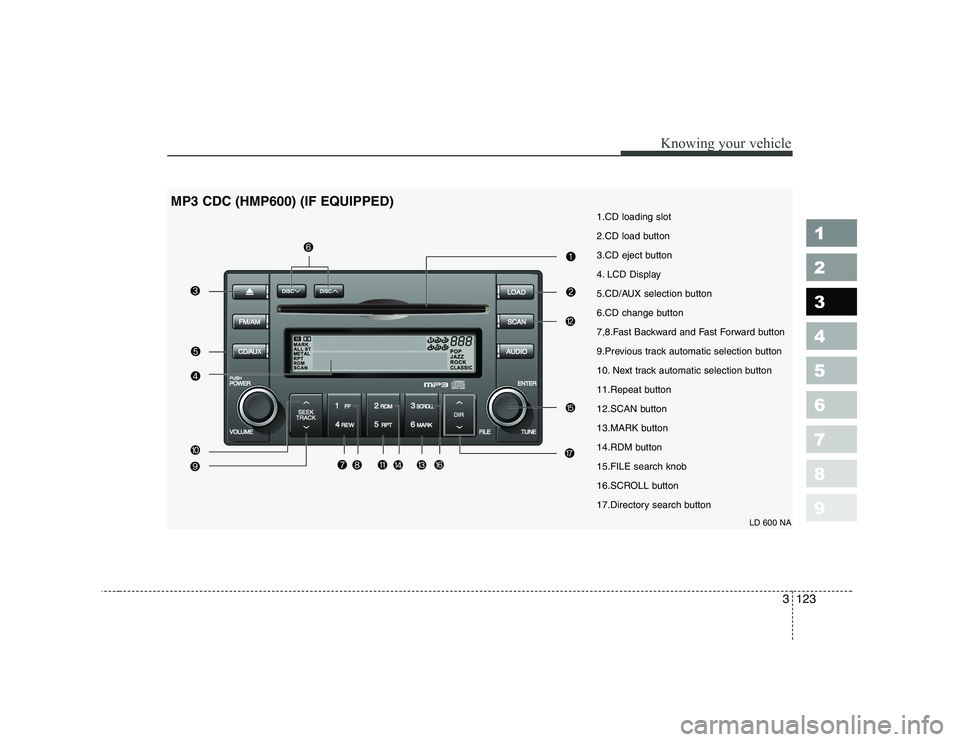
1.CD loading slot
2.CD load button
3.CD eject button
4. LCD Display
5.CD/AUX selection button
6.CD change button
7,8.Fast Backward and Fast Forward button
9.Previous track automatic selection button
10. Next track automatic selection button
11.Repeat button
12.SCAN button
13.MARK button
14.RDM button15.FILE search knob
16.SCROLL button
17.Directory search buttonLD 600 NA
MP3 CDC (HMP600) (IF EQUIPPED)
3 123
Knowing your vehicle
1 23456789
Page 134 of 329
![KIA CERATO 2007 Owners Manual Knowing your vehicle
124
3
1 23456789
1. CD loading slot
Push [LOAD] button to open CD slot.
Please face printed side upward and
gently push in. This CDC supports
only 12 cm CDs.
2. CD load button KIA CERATO 2007 Owners Manual Knowing your vehicle
124
3
1 23456789
1. CD loading slot
Push [LOAD] button to open CD slot.
Please face printed side upward and
gently push in. This CDC supports
only 12 cm CDs.
2. CD load button](/manual-img/2/57948/w960_57948-133.png)
Knowing your vehicle
124
3
1 23456789
1. CD loading slot
Push [LOAD] button to open CD slot.
Please face printed side upward and
gently push in. This CDC supports
only 12 cm CDs.
2. CD load button
Pressing the "LODE" button opens
an empty tray of lowest order in the
CDC deck. When a CD is loaded, the
slot closes and the CD plays. To load
CDs in all empty slots, press the
"LOAD" button for more than 1.5 sec-
onds. Be sure to insert only one CD
into slot at a time. Then, lastly loaded
CD is played. IF you do not load CDs
or press any button for 10 seconds
after pressing the "LOAD" button, the
LOAD function will be canceled.
3. CD eject button
Push button to eject the CD dur-
ing CD playback. Push this button formore than 1.5 seconds to eject all
the CDs. If CD number 3 is currently
playing, ejecting order is 3,4,5,6,1,2. 4. LCD display It indicates location of CD in CD
deck. When loading and ejecting CD,
corresponding CD indicator number
blinks.
5. CD/AUX selection button
CD Select
When power is off while CD is loaded
or radio/AUX is playing, push [CD]
button to play CDC. When there is no
available CD, "no disc" message will
be indicated for 2 seconds and
returns to previous mode.
AUX-IN Select
When the AUX device (such as
portable MP3 players) is connect-
ed to vehicle's AUX-IN terminal,
you can switch to AUX-IN mode by
pressing CD/AUX button.
With a CD loaded and AUX device connected at the same time, this
button switches between AUX-IN
mode and CD mode. AUX 3.5mm STEREO MINI PLUG
✽✽
NOTICE
Page 135 of 329
![KIA CERATO 2007 Owners Manual 6. CD change button
Push [DISC ] button to change to
next CD (From CD 1 to CD 2).
Push [DISC ] button to change to
previous CD (From CD 2 to CD 1). Ifchanger is not fully load, the
changes will be KIA CERATO 2007 Owners Manual 6. CD change button
Push [DISC ] button to change to
next CD (From CD 1 to CD 2).
Push [DISC ] button to change to
previous CD (From CD 2 to CD 1). Ifchanger is not fully load, the
changes will be](/manual-img/2/57948/w960_57948-134.png)
6. CD change button
Push [DISC ] button to change to
next CD (From CD 1 to CD 2).
Push [DISC ] button to change to
previous CD (From CD 2 to CD 1). Ifchanger is not fully load, the
changes will be next available CD.
7. Fast Backward button
During CD playback, push [REW]
button to fast backward. For first 5seconds 5X and 15X after 5 sec-
onds. While the button is pressed
sound is reduced to 12dB.
8. Fast Forward button
During CD playback, push [FF] but-
ton to fast forward. For first 5 sec-
onds 5X and 15X after 5 seconds.
While the button is pressed sound is
reduced to 12dB.
9. Previous track automaticselection button
Push [TRACK ] button to go to
beginning of currently playing track.
Push again to move to beginning of
previous track. 10. Next track automatic selec-
tion button
Push [SEEK ] button to go to move
to beginning of next track.
11. Repeat button
Push [RPT] button to repeat current
track. Push again to disable.
12. SCAN button
Push [SCAN] button to listen each
track for 10 seconds. Push again to
disable.
13. Book Mark button
This is selecting desired tracks.
Select desired tracks and push
[MARK] button for more than 2 sec-
onds. [M] symbol will be indicated
and push for within 1 second to play
[M] selected tracks.
14. RDM button
This button randomly selects track.✽✽ NOTICE
Using CD-R/CD-RW, it may not be played according to CD manufactur-
er, or how it was created. If it does not
play, please avoid using it. It could
cause problems on the system.
15. File search knob
Turn knob left and right to change
track. Push within 5 seconds to play
selected track. It will return to cur-
rently playing track number after 5
seconds.
16. Scroll button
If the tile is too long for MP3/WMA
files, push [SCROLL] button to indi-
cate on LCD display screen.
17. Directory search button
For MP3/WMA files, if there are more
than 2 directories in a CD, push
[Directory Search] buttons to search.
Select desired directory and use
"File Search knob" to search file.Push "File Search knob" within 5
seconds otherwise it will go back to
current playing track.
3 125
Knowing your vehicle
1 23456789
Page 136 of 329
1 23456789Ignition switch / 4-2
Starting the engine / 4-4Manual transaxle / 4-7Automatic transaxle / 4-8Brake system / 4-14
Steering wheel / 4-20
Cruise control / 4-23
Traction control system / 4-27
Instrument cluster / 4-30Gauges / 4-31
Warnings and indicators / 4-37Lighting / 4-45
Wipers and washers / 4-51
Defroster / 4-53
Hazard warning flasher / 4-54
Manual climate control system / 4-55
Automatic climate control system / 4-64
Windshield defrosting and defogging / 4-76Theft-alarm system / 4-81
Driving your vehicle