Page 108 of 440
Mobile
Mute
Mute off
New entry
No
Pager
Pair a phone
Phone pairing Pairing
Phonebook Phone book
Previous
Record again
Redial
Return to main menu Return. Main menu
Select phone Select
Send
Set up Phone settings / Phone
set upTowing assistance
Transfer call
Try again
Voice training
Work
Ye s
General Information
This device complies with part 15 of the FCC rules and
RSS 210 of Industry Canada. Operation is subject to the
following conditions:
²This device may not cause harmful interference.
²This device must accept any interference received,
including interference that may cause undesired op-
eration.
UNDERSTANDING THE FEATURES OF YOUR VEHICLE 107
3
Page 150 of 440
Sunroof Maintenance
Use only a non-abrasive cleaner and a soft cloth to clean
the glass panel.
IGNITION OFF OPERATION
The sunroof will also operate up to 45 seconds after the
ignition has been turned off. The sunroof operation will
be canceled if either of the front doors are opened during
the accessory delay time or set accessory delay time.
ELECTRICAL POWER OUTLETS Ð IF EQUIPPED
There is a standard 12-Volt power outlet in the instru-
ment panel and a 115 Volt (150 Watts Maximum) power
outlet in the center console on certain models for added
convenience. These outlets can power cell phones, elec-
tronics and other low power devices.
NOTE:Due to overload protection the inverter will shut
down if the power rating is exceeded.
WARNING!
To Avoid Serious Injury or Death:
²Donotusea3-Prong Adaptor.
²Do not insert any objects into the receptacles.
²Do not touch with wet hands.
²Close the lid when not in use, and while driving
the vehicle
²If this outlet is mishandled it may cause an electric
shock and failure.
UNDERSTANDING THE FEATURES OF YOUR VEHICLE 149
3
Page 152 of 440
Electrical Outlet Use With Engine Off
CAUTION!
²Many accessories that can be plugged in draw
power from the vehicle's battery, even when not in
use (i.e. cellular phones, etc.). Eventually, if
plugged in long enough, the vehicle's battery will
discharge sufficiently to degrade battery life
and/or prevent engine starting.
²Accessories that draw higher power (i.e. coolers,
vacuum cleaners, lights, etc.); will degrade the
battery even more quickly. Only use these inter-
mittently and with greater caution.
²After the use of high power draw accessories, or
long periods of the vehicle not being started (with
accessories still plugged in), the vehicle must be
driven a sufficient length of time to allow the
generator to recharge the vehicle's battery.
CONSOLE FEATURES
WARNING!
Do not operate this vehicle with the console compart-
ment lid in the open position. Cell phones, music
players, and other hand held electronic devices
should be stowed while driving. Use of these devices
while driving can cause an accident due to distrac-
tion, resulting in death or injury.
UNDERSTANDING THE FEATURES OF YOUR VEHICLE 151
3
Page 153 of 440
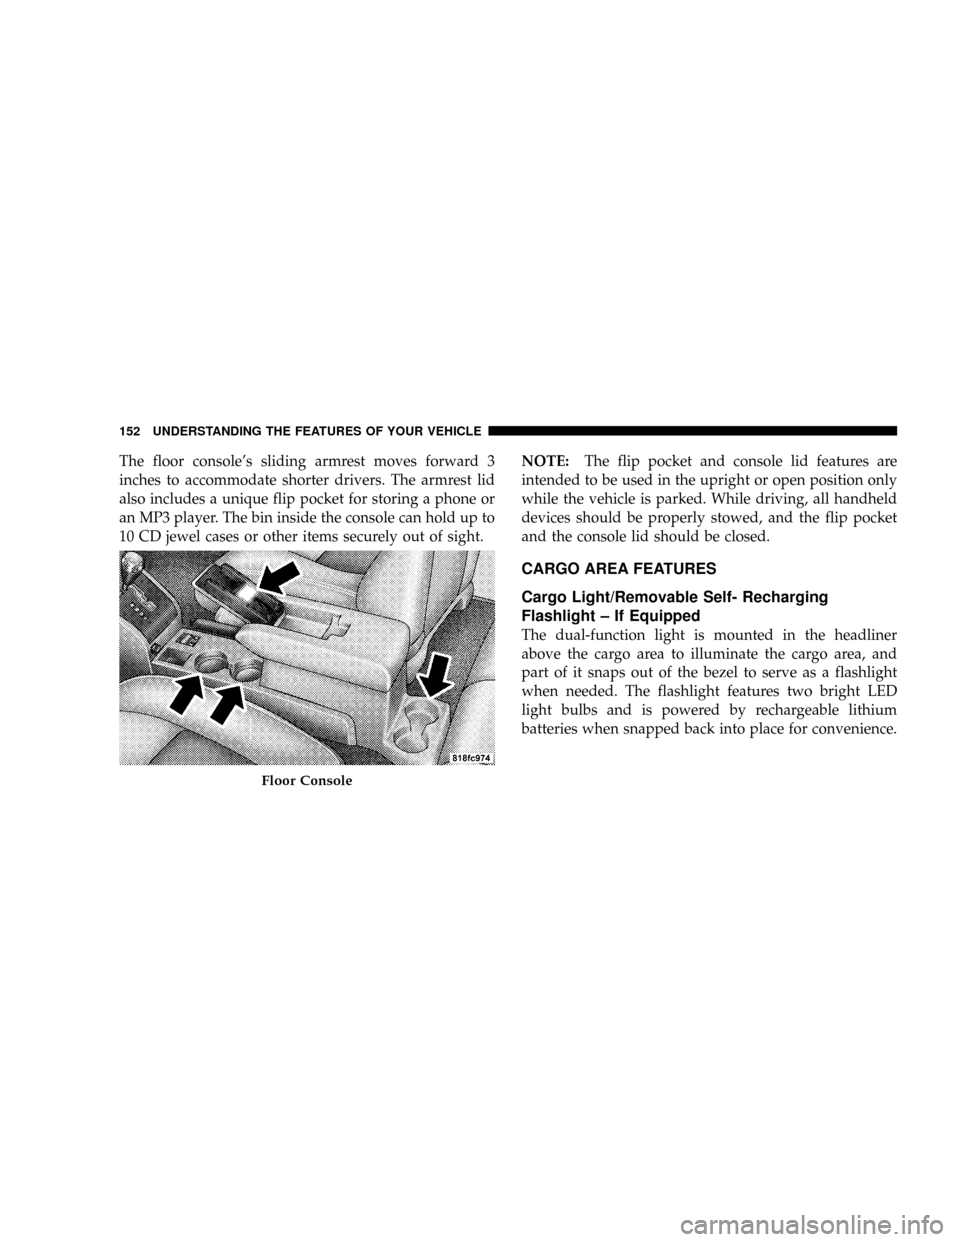
The floor console's sliding armrest moves forward 3
inches to accommodate shorter drivers. The armrest lid
also includes a unique flip pocket for storing a phone or
an MP3 player. The bin inside the console can hold up to
10 CD jewel cases or other items securely out of sight.NOTE:The flip pocket and console lid features are
intended to be used in the upright or open position only
while the vehicle is parked. While driving, all handheld
devices should be properly stowed, and the flip pocket
and the console lid should be closed.
CARGO AREA FEATURES
Cargo Light/Removable Self- Recharging
Flashlight ± If Equipped
The dual-function light is mounted in the headliner
above the cargo area to illuminate the cargo area, and
part of it snaps out of the bezel to serve as a flashlight
when needed. The flashlight features two bright LED
light bulbs and is powered by rechargeable lithium
batteries when snapped back into place for convenience.
Floor Console
152 UNDERSTANDING THE FEATURES OF YOUR VEHICLE
Page 165 of 440
NTwo Types Of Signals..................189
NElectrical Disturbances..................190
NAM Reception.......................190
NFM Reception........................190
mElectronic Digital Clock..................190
NClock Setting Procedure.................191
mSales Code REF Ð AM/FM/CD (Single Disc) Radio
With Optional Satellite Radio And Hands Free Phone
Capability............................191
NOperating Instructions - Radio Mode.......192
NOperation Instructions - CD Mode.........195
NOperation Instructions - Auxiliary Mode.....197
NOperating Instructions - Hands Free Phone Ð If
Equipped...........................198NOperating Instructions - Satellite Radio Ð If
Equipped...........................199
mSales Code RAQ ± AM/FM/CD (6-Disc) Radio With
Optional Satellite Radio, Hands Free Phone, And
Vehicle Entertainment Systems (VES)
Capabilities...........................199
NOperating Instructions - Radio Mode.......199
NOperation Instructions - (CD Mode For CD Audio
Play)..............................204
NLoad/Eject Button (CD Mode For CD Audio
Play)..............................206
NNotes On Playing MP3 Files.............208
NOperation Instructions - (CD Mode For MP3 Audio
Play)..............................210
NLoad/Eject Button (CD Mode For MP3 Play) . . 210
164 UNDERSTANDING YOUR INSTRUMENT PANEL
Page 166 of 440
mSales Code REC Ð AM/FM/CD (6±Disc) Radio With
Navigation System......................213
NOperating Instructions Ð Satellite Radio (If
Equipped)..........................213
NREC Setting The Clock.................213
NAudio Clock Display...................215
mSatellite Radio Ð If Equipped..............217
NSystem Activation.....................217
NElectronic Serial Number/Sirius Identification
Number (ESN/SID)....................217
NSelecting Satellite Mode In REF, And RAQ,
Radios.............................218
NSelecting a Channel....................218
NStoring And Selecting Pre-Set Channels......219NUsing The PTY (Program Type) Button (If
Equipped)..........................219
NPTY Button9Scan9.....................219
NPTY Button9Seek9.....................220
NSatellite Antenna......................220
NReception Quality.....................220
mRemote Sound System Controls Ð If Equipped . . 221
NRadio Operation......................221
NCD Player..........................222
mCD/DVD Disc Maintenance...............222
mRadio Operation And Cellular Phones........223
mClimate Controls.......................223
NClimate Controls......................223
UNDERSTANDING YOUR INSTRUMENT PANEL 165
4
Page 192 of 440
Clock Setting Procedure
1. Press and hold the time button until the hours blink.
2. Adjust the hours by turning the right side Tune /
Audio control.
3. After the hours are adjusted, press the right side Tune
/ Audio control to set the minutes.
4. Adjust the minutes using the right side Tune / Audio
control.
5. To exit, press any button/knob or wait approximately
5 seconds.
SALES CODE REF Ð AM/FM/CD (SINGLE DISC)
RADIO WITH OPTIONAL SATELLITE RADIO AND
HANDS FREE PHONE CAPABILITY
NOTE:The radio sales code is located on the lower right
side of your radio faceplate.
REF Radio
UNDERSTANDING YOUR INSTRUMENT PANEL 191
4
Page 194 of 440
NOTE:In Hands Free Phone (if equipped) mode, the
MUTE button mutes the microphone.
SCAN Button (Radio Mode)
Pressing the SCAN button causes the tuner to search for
the next listenable station in either, AM, FM, or Satellite
(if equipped) frequencies, pausing for 5 seconds at each
listenable station before continuing to the next. To stop
the search, press SCAN a second time.
PSCAN Button (Radio Mode)
Pressing the PSCAN button causes the tuner to scan
through preset stations in either, AM, FM, or Satellite (if
equipped) frequencies, pausing for 5 seconds at each
preset station before continuing to the next. To stop the
search, press PSCAN a second time.
Time Button
Press the time button and the time of day will display for
5 seconds.
Clock Setting Procedure
1. Press and hold the time button until the hours blink.
2. Adjust the hours by turning the right side Tune/
Audio control.
3. After the hours are adjusted, press the right side
Tune/Audio control to set the minutes. The minutes will
begin to blink.
4. Adjust the minutes using the right side Tune/Audio
control.
5. To exit, press any button/knob or wait 5 seconds.
RW/FF (Radio Mode)
Pressing the rewind/fast forward button causes the tuner
to search for the next frequency in the direction of the
arrows. This feature operates in either AM, FM or Satel-
lite (if equipped) frequencies.
UNDERSTANDING YOUR INSTRUMENT PANEL 193
4