Page 81 of 456

The UConnect™ phonebook enables you to store up to 32
names and four numbers per name. Each language has a
separate 32-name phonebook accessible only in that
language. This system is driven through your Blue-
tooth™ Hands-Free profile cellular phone. UConnect™
features Bluetooth™ technology - the global standard
that enables different electronic devices to connect to
each other without wires or a docking station, so UCon-
nect works no matter where you stow your cellular
phone (be it your purse, pocket, or briefcase), as long as
your phone is turned on and has been paired to the
vehicle’s UConnect™ system. The UConnect™ system
allows up to seven cellular phones to be linked to system.
Only one linked (or paired) cellular phone can be used
with the system at a time. The system is available in
English, Spanish, or French languages (as equipped).
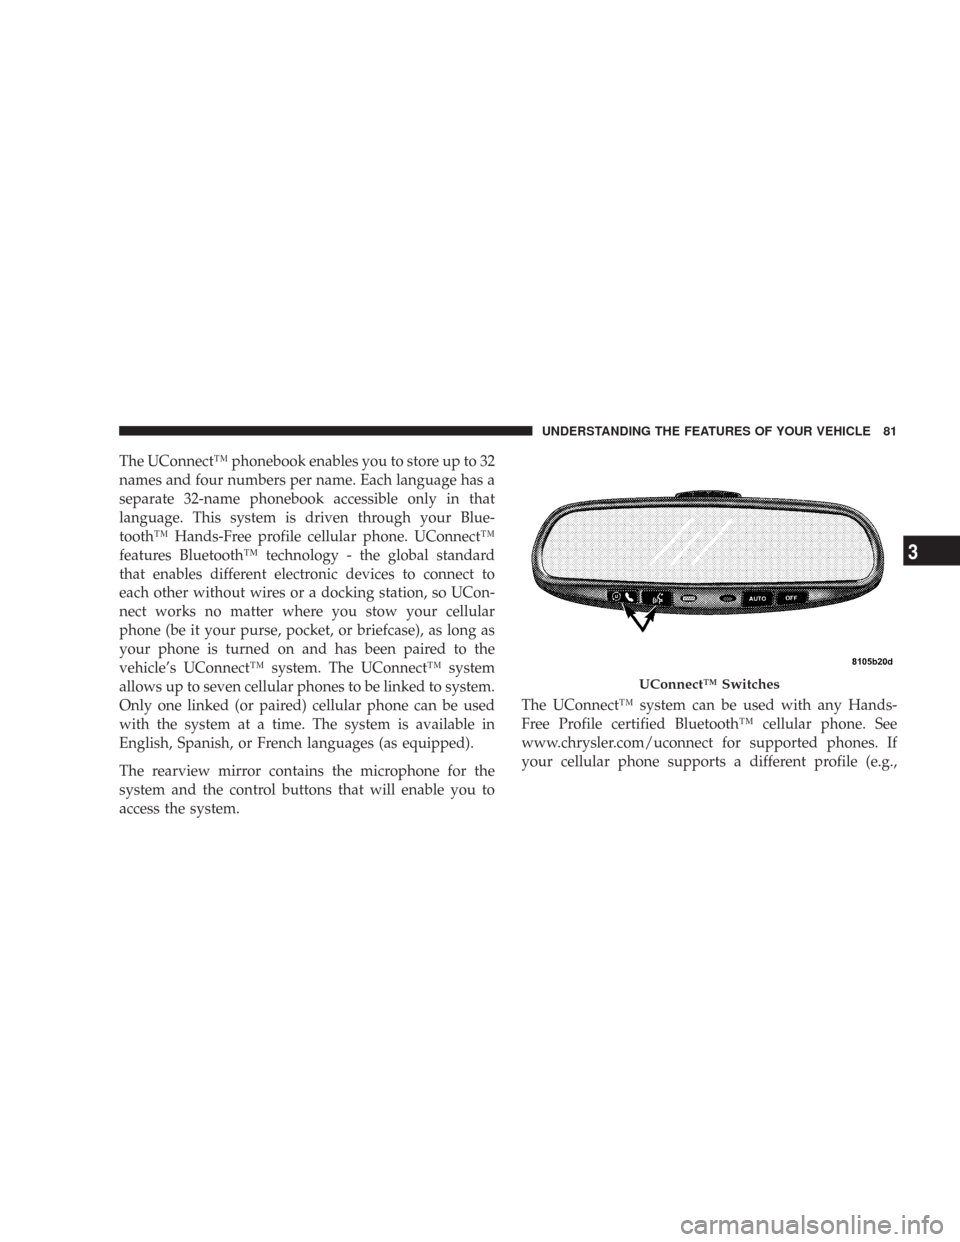
The rearview mirror contains the microphone for the
system and the control buttons that will enable you to
access the system.The UConnect™ system can be used with any Hands-
Free Profile certified Bluetooth™ cellular phone. See
www.chrysler.com/uconnect for supported phones. If
your cellular phone supports a different profile (e.g.,
UConnect™ Switches
UNDERSTANDING THE FEATURES OF YOUR VEHICLE 81
3
Page 113 of 456

4. Close the tailgate.
WARNING!
The cargo area in the rear of the vehicle (with the
rear seatbacks in the locked-up or folded down
position) should not be used as a play area by
children when the vehicle is in motion. They could
be seriously injured in an accident. Children should
be seated and using the proper restraint system.
DRIVER MEMORY SEAT — IF EQUIPPED
Once programmed, the memory buttons 1 and 2 on the
driver’s door panel can be used to recall the driver’s seat,
driver’s outside mirror, adjustable brake and accelerator
pedals, and radio station preset settings. Your Remote
Keyless Entry transmitters can also be programmed to
recall the same positions when the “Unlock” button is
pressed.Your vehicle may have been delivered with two Remote
Keyless Entry transmitters. One or both transmitters can
be linked to either memory position. The memory system
can accommodate up to four transmitters, each one
linked to either of the two memory positions.
Driver Memory Switches
UNDERSTANDING THE FEATURES OF YOUR VEHICLE 113
3
Page 115 of 456

11. Select�Remote Linked to Memory�in the Electronic
Vehicle Information Center (EVIC) and enter�Ye s�or
select�Use Factory Settings�from the EVIC and enter
�Ye s�. Refer to “Electronic Vehicle Information Center
(EVIC) — Customer Programmable Features” in Section
4 for more information.
12. Repeat the above steps to set the next memory
position using the other numbered memory button or to
link another Remote Keyless Entry transmitter to
memory.
Memory Position Recall
NOTE:The vehicle must be in Park to recall memory
positions. If a recall is attempted when the vehicle is not
in Park, a message will be displayed in the Electronic
Vehicle Information Center (EVIC).To recall the memory settings for driver one, press
memory button number 1 on the driver’s door or the
“Unlock” button on the Remote Keyless Entry transmit-
ter linked to memory position 1.
To recall the memory setting for driver two, press
memory button number 2 on the driver’s door or the
“Unlock” button on the Remote Keyless Entry transmit-
ter linked to memory position 2.
A recall can be cancelled by pressing any of the memory
buttons on the drivers door during a recall (S, 1, or 2).
When a recall is cancelled, the driver’s seat, driver’s
mirror, and the pedals stop moving. A delay of one
second will occur before another recall can be selected.
UNDERSTANDING THE FEATURES OF YOUR VEHICLE 115
3
Page 154 of 456

1. Press and hold the two outer HomeLink buttons, and
release only when the EVIC display shows “CHANNELS
CLEARED” (after 20 seconds).Do nothold the buttons
for longer than 30 seconds anddo notrepeat step one to
program a second and/or third hand-held transmitter to
the remaining two HomeLink buttons.2. Position the end of your hand-held transmitter 1-3
inches (3-8 cm) away from the HomeLink buttons.
3. Simultaneously press and hold both the HomeLink
button that you want to train and the hand-held trans-
mitter buttons.Do not release the buttons until step 4
has been completed.
NOTE:Some gate operators and garage door openers
may require you to replace this Programming Step 3 with
procedures noted in the�Gate Operator/Canadian Pro-
gramming�section.
4. The EVIC display will show “CHANNEL X TRAIN-
ING” (where X is Channel 1, 2, or 3). Release both buttons
after the EVIC display shows “CHANNEL X TRAINED.”
NOTE:If the EVIC display shows “DID NOT TRAIN”
repeat steps 2–4.
HomeLink Buttons
154 UNDERSTANDING THE FEATURES OF YOUR VEHICLE
Page 157 of 456

Erasing HomeLink Buttons
To erase programming from the three buttons (individual
buttons cannot be erased but can be�reprogrammed�-
note below), follow the step noted:
•Press and hold the two outer HomeLink buttons and
release only when the EVIC display shows “CHAN-
NELS CLEARED” (after 20 seconds). Release both
buttons. Do not hold for longer that 30 seconds.
HomeLink is now in the train (or learning) mode and
can be programmed at any time beginning with�Pro-
gramming�- Step 2.
Reprogramming a Single HomeLink Button
To program a device to HomeLink using a HomeLink
button previously trained, follow these steps:
1. Press and hold the desired HomeLink button.Do
NOTrelease the button.2. The EVIC display will show “CHANNEL X TRANS-
MIT” (where X is Channel 1, 2, or 3) for 20 seconds and
then change to “CHANNEL X TRAINING.” Without
releasing the HomeLink button, proceed with�Program-
ming�Step 2.
For questions or comments, contact HomeLink at:
www.homelink.com or 1-800-355-3515.
Security
If you sell your vehicle, be sure to erase the frequencies
by following the “Erasing HomeLink Buttons” instruc-
tions in this section.
This device complies with part 15 of FCC rules and with
RSS-210 of Industry Canada. Operation is subject to the
following conditions:
•This device may not cause harmful interference.
UNDERSTANDING THE FEATURES OF YOUR VEHICLE 157
3
Page 204 of 456

You may add a second station to each push-button by
repeating the above procedure with this exception: Press
the SET/DIR button twice and SET 2 will show in the
display window. Each button can be set for SET 1 and
SET 2 in both AM and FM. This allows a total of 12 AM,12
FM and 12 Satellite (if equipped) stations to be stored into
push-button memory. The stations stored in SET 2
memory can be selected by pressing the push-button
twice.
Every time a preset button is used a corresponding
button number will be displayed.
Buttons1-6(Radio Mode)
These buttons tune the Radio to the stations that you
commit to push-button memory {12AM, 12 FM, and 12
Satellite (if equipped) stations}.
Operation Instructions - (CD MODE for CD Audio
Play)
NOTE:The ignition switch must be in the ON or ACC
position to operate the radio.
NOTE:Note: This Radio is capable of playing compact
discs (CD), recordable compact discs (CD-R), rewritable
compact discs (CD-RW) compact discs with MP3 tracks
and multisession compact discs with CD and MP3 tracks.
Inserting Compact Disc(s)
Gently insert one CD into the CD player with the CD
label facing up. The CD will automatically be pulled into
the CD Player and the CD icon will illuminate on the
radio display.
204 UNDERSTANDING YOUR INSTRUMENT PANEL
Page 207 of 456

TIME Button (CD MODE for CD Audio Play)
Press this button to change the display from a large CD
playing time display to a small CD playing time display.
RW/FF (CD MODE for CD Audio Play)
Press and hold FF (Fast Forward) and the CD player will
begin to fast forward until FF is released or RW or
another CD button is pressed. The RW (Reverse) button
works in a similar manner.
TUNE Control (CD MODE for CD Audio Play)
Pressing the TUNE control allows the setting of the Tone,
Fade, and Balance. See Radio Mode.
AM/FM Button (CD MODE for CD Audio Play)
Switches the Radio to the Radio mode.
RND/PTY Button (Random Play Button) (CD
MODE for CD Audio Play)
Press this button while the CD is playing to activate
Random Play. This feature plays the selections on the
compact disc in random order to provide an interesting
change of pace.
Press the SEEK button to move to the next randomly
selected track.
Press and hold the FF button to fast forward through the
tracks. Release the FF button to stop the fast forward
feature.
Press the RND button a second time to stop Random
Play.
Buttons1-6(CDMODEforCDAudio Play)
Selects disc positions 1 - 6 for Play/Load/Eject.
UNDERSTANDING YOUR INSTRUMENT PANEL 207
4
Page 212 of 456
AM/FM Button (CD Mode for MP3 Play)
Switches back to Radio mode.
RND/ PTY Button (CD Mode for MP3 Play)
Pressing this button plays files randomly.
SET/DIR Button (CD Mode for MP3 Play)
Press the SET/DIR Button to display folders, when
playing an MP3 discs that have a file/folder structure.
Turn the TUNE control to display available folders or
move through available folders. Press the TUNE control
to select a folder.
Buttons1-6(CDModeforMP3Play)
Selects disc positions 1 - 6 for Play/Load/Eject.
Operating Instructions - Hands Free Phone (If
Equipped)
Refer to Hands Free Phone in Section 3 of the Owner’s
Manual.
Operating Instructions - Satellite Radio Mode (If
Equipped)
Refer to the Satellite Radio section of the Owner’s
Manual.
Operating Instructions - Video Entertainment
System (VES�) (If Equipped)
Refer to separate Video Entertainment System (VES�)
Guide.
212 UNDERSTANDING YOUR INSTRUMENT PANEL