2007 ISUZU KB P190 low oil pressure
[x] Cancel search: low oil pressurePage 4429 of 6020

TRANSMISSION CONTROL SYSTEM (JR405E) 7A2-145
Legend1. Oil pump cover
2. Inner rotor
3. Outer rotor
4. Oil pump housing
The oil pump generating oil pressure is a small sized
trochoid gear type oil pump. It feeds oil to the torque
converter, lubricates the power train mechanism, and
feeds the oil pressure to the oil pressure control unit
under pressure. The oil pump is located behind the
torque converter. Since the inner rotor in the oil pump is
fitted with the drive sleeve of the torque converter, it
works using power from the engine.
Legend
1. Pressure regulator valve
2. Outlet
3. Inlet
When the inner rotor in the oil pump rotates,
transmission fluid is sucked in from the oil pan, passed
between the inner rotor, outer rotor and crescent, and
then discharged. This discharged pressure is sent to
the pressure regulator valve in the valve body, and
adjusted as required for operating the transmission.
The flow rate under pressure increases or decreases in
proportion to the number of rotations.
Input Shaft
The input shaft has some oil holes, through which
lubricating transmission fluid is supplied to the torque
converter, the bearings, etc. The input shaft is fitted to
the turbine runner in the torque converter, the reverse &
high clutch drum and the rear sun gear by means of the
spline. Therefore, the engine driving force received by
the torque converter is transmitted to the reverse &
high clutch drum and rear sun gear.
Output Shaft
The output shaft has some oil holes, through which the
lubricating transmission fluid is supplied to the
bearings, the planetary gear unit, etc. The output shaft
transmits the engine driving force from the planetary
gear to the propeller shaft. The front internal gear is
fitted with the rear carrier assembly by spline. The
parking gear is also fitted by spline. By fixing this gear
mechanically, the output shaft is fixed as required when
parking the vehicle.
BACK TO CHAPTER INDEX
TO MODEL INDEX
ISUZU KB P190 2007
Page 4430 of 6020
7A2-146 TRANSMISSION CONTROL SYSTEM (JR405E)
Low Clutch, High Clutch and Reverse Clutch
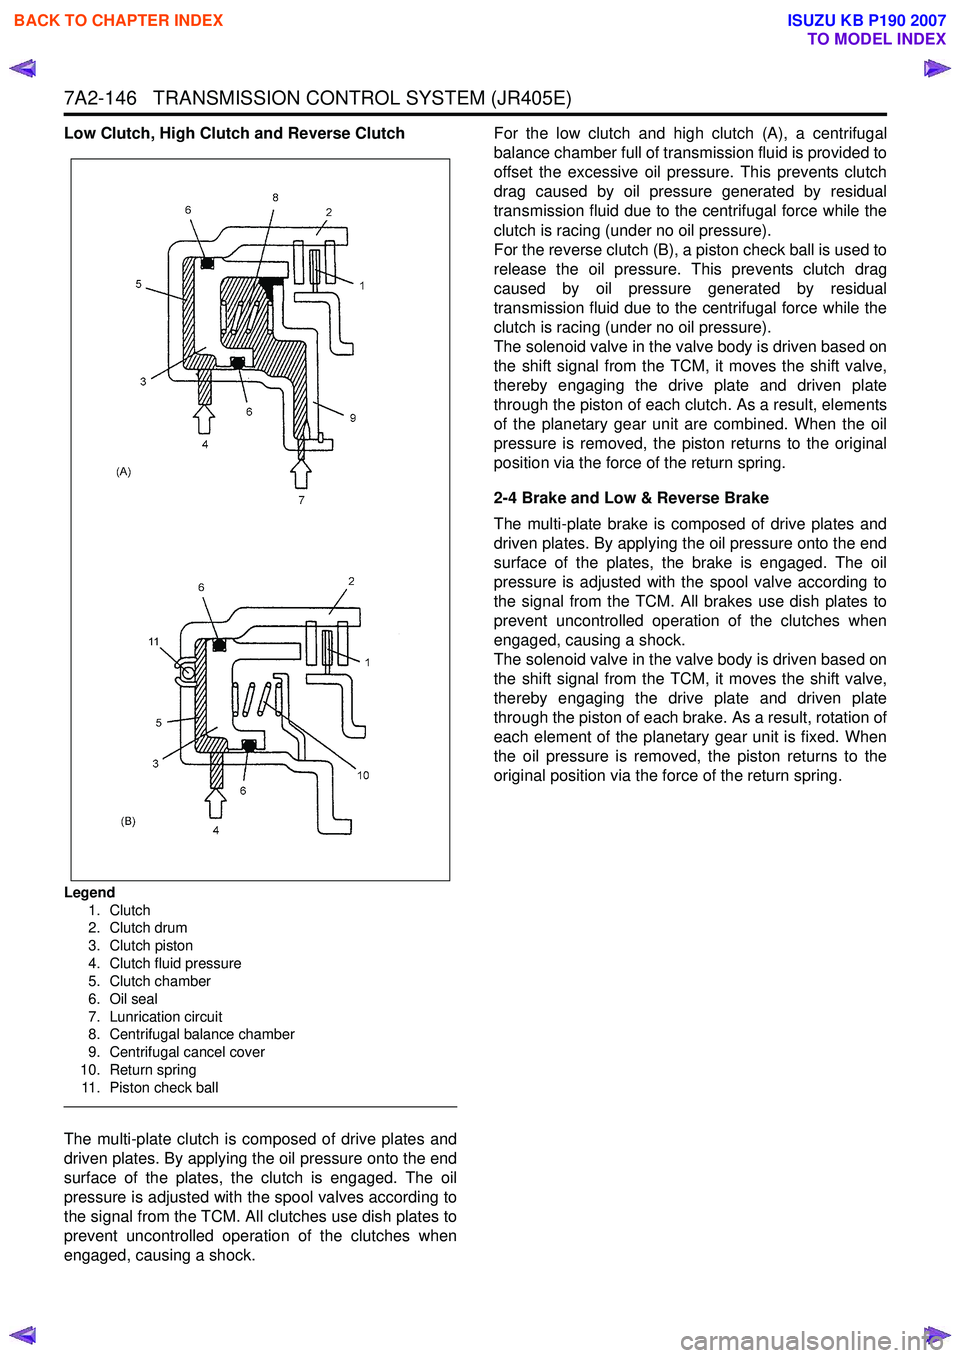
Legend1. Clutch
2. Clutch drum
3. Clutch piston
4. Clutch fluid pressure
5. Clutch chamber
6. Oil seal
7. Lunrication circuit
8. Centrifugal balance chamber
9. Centrifugal cancel cover
10. Return spring 11. Piston check ball
The multi-plate clutch is composed of drive plates and
driven plates. By applying the oil pressure onto the end
surface of the plates, the clutch is engaged. The oil
pressure is adjusted with the spool valves according to
the signal from the TCM. All clutches use dish plates to
prevent uncontrolled operation of the clutches when
engaged, causing a shock. For the low clutch and high clutch (A), a centrifugal
balance chamber full of transmission fluid is provided to
offset the excessive oil pressure. This prevents clutch
drag caused by oil pressure generated by residual
transmission fluid due to the centrifugal force while the
clutch is racing (under no oil pressure).
For the reverse clutch (B), a piston check ball is used to
release the oil pressure. This prevents clutch drag
caused by oil pressure generated by residual
transmission fluid due to the centrifugal force while the
clutch is racing (under no oil pressure).
The solenoid valve in the valve body is driven based on
the shift signal from the TCM, it moves the shift valve,
thereby engaging the drive plate and driven plate
through the piston of each clutch. As a result, elements
of the planetary gear unit are combined. When the oil
pressure is removed, the piston returns to the original
position via the force of the return spring.
2-4 Brake and Low & Reverse Brake
The multi-plate brake is composed of drive plates and
driven plates. By applying the oil pressure onto the end
surface of the plates, the brake is engaged. The oil
pressure is adjusted with the spool valve according to
the signal from the TCM. All brakes use dish plates to
prevent uncontrolled operation of the clutches when
engaged, causing a shock.
The solenoid valve in the valve body is driven based on
the shift signal from the TCM, it moves the shift valve,
thereby engaging the drive plate and driven plate
through the piston of each brake. As a result, rotation of
each element of the planetary gear unit is fixed. When
the oil pressure is removed, the piston returns to the
original position via the force of the return spring.
BACK TO CHAPTER INDEX
TO MODEL INDEX
ISUZU KB P190 2007
Page 4432 of 6020
7A2-148 TRANSMISSION CONTROL SYSTEM (JR405E)
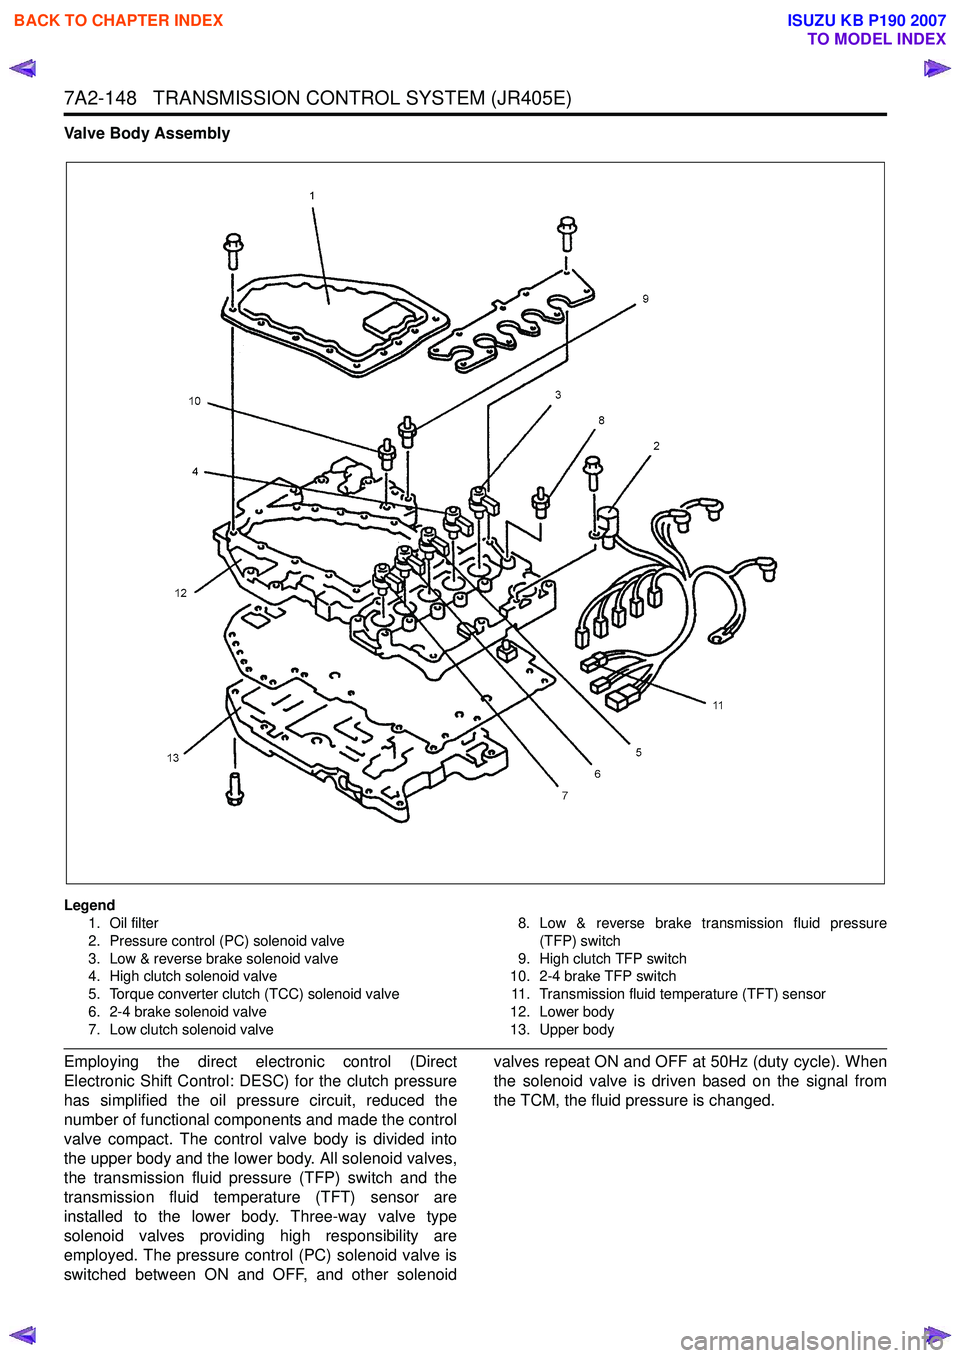
Valve Body Assembly
Legend1. Oil filter
2. Pressure control (PC) solenoid valve
3. Low & reverse brake solenoid valve
4. High clutch solenoid valve
5. Torque converter clutch (TCC) solenoid valve
6. 2-4 brake solenoid valve
7. Low clutch solenoid valve 8. Low & reverse brake transmission fluid pressure
(TFP) switch
9. High clutch TFP switch
10. 2-4 brake TFP switch
11. Transmission fluid temperature (TFT) sensor
12. Lower body
13. Upper body
Employing the direct electronic control (Direct
Electronic Shift Control: DESC) for the clutch pressure
has simplified the oil pressure circuit, reduced the
number of functional components and made the control
valve compact. The control valve body is divided into
the upper body and the lower body. All solenoid valves,
the transmission fluid pressure (TFP) switch and the
transmission fluid temperature (TFT) sensor are
installed to the lower body. Three-way valve type
solenoid valves providing high responsibility are
employed. The pressure control (PC) solenoid valve is
switched between ON and OFF, and other solenoid valves repeat ON and OFF at 50Hz (duty cycle). When
the solenoid valve is driven based on the signal from
the TCM, the fluid pressure is changed.
BACK TO CHAPTER INDEX
TO MODEL INDEX
ISUZU KB P190 2007
Page 4437 of 6020
TRANSMISSION CONTROL SYSTEM (JR405E) 7A2-153
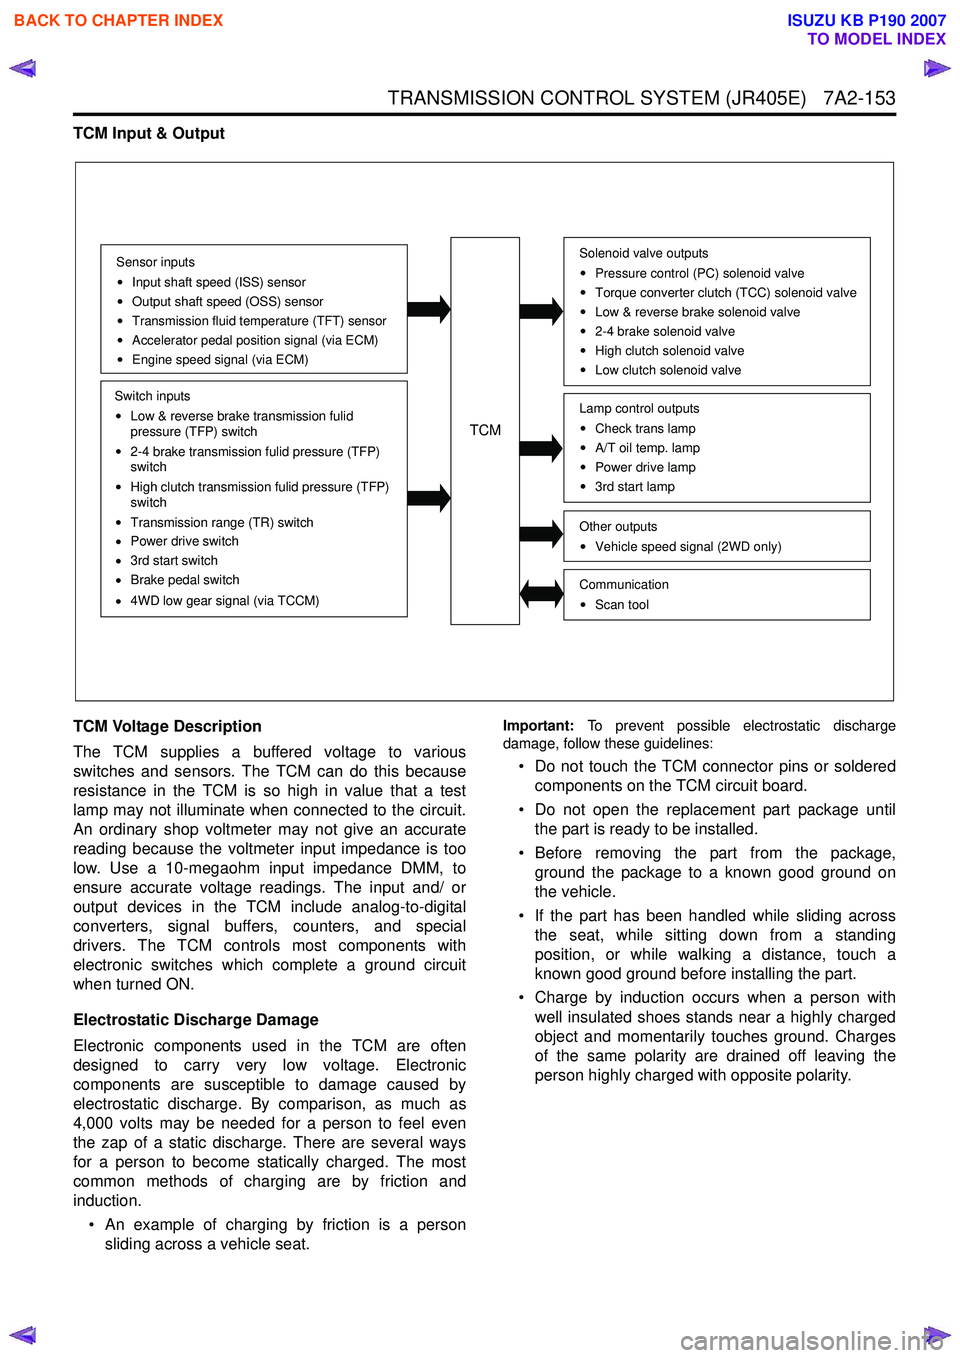
TCM Input & Output
TCM Voltage Description
The TCM supplies a buffered voltage to various
switches and sensors. The TCM can do this because
resistance in the TCM is so high in value that a test
lamp may not illuminate when connected to the circuit.
An ordinary shop voltmeter may not give an accurate
reading because the voltmeter input impedance is too
low. Use a 10-megaohm input impedance DMM, to
ensure accurate voltage readings. The input and/ or
output devices in the TCM include analog-to-digital
converters, signal buffers, counters, and special
drivers. The TCM controls most components with
electronic switches which complete a ground circuit
when turned ON.
Electrostatic Discharge Damage
Electronic components used in the TCM are often
designed to carry very low voltage. Electronic
components are susceptible to damage caused by
electrostatic discharge. By comparison, as much as
4,000 volts may be needed for a person to feel even
the zap of a static discharge. There are several ways
for a person to become statically charged. The most
common methods of charging are by friction and
induction.
• An example of charging by friction is a person sliding across a vehicle seat.
Important: To prevent possible electrostatic discharge
damage, follow these guidelines:
• Do not touch the TCM connector pins or soldered components on the TCM circuit board.
• Do not open the replacement part package until the part is ready to be installed.
• Before removing the part from the package, ground the package to a known good ground on
the vehicle.
• If the part has been handled while sliding across the seat, while sitting down from a standing
position, or while walking a distance, touch a
known good ground before installing the part.
• Charge by induction occurs when a person with well insulated shoes stands near a highly charged
object and momentarily touches ground. Charges
of the same polarity are drained off leaving the
person highly charged with opposite polarity.
Sensor inputs
Input shaft speed (ISS) sensor
Output shaft speed (OSS) sensor
Transmission fluid temperature (TFT) sensor
Accelerator pedal position signal (via ECM)
Engine speed signal (via ECM)
Switch inputs
Low & reverse brake transmission fulid
pressure (TFP) switch
2-4 brake transmission fulid pressure (TFP)
switch
High clutch transmission fulid pressure (TFP)
switch
Transmission range (TR) switch
Power drive switch
3rd start switch
Brake pedal switch
4WD low gear signal (via TCCM)
TCM
Solenoid valve outputs
Pressure control (PC) solenoid valve
Torque converter clutch (TCC) solenoid valve
Low & reverse brake solenoid valve
2-4 brake solenoid valve
High clutch solenoid valve
Low clutch solenoid valve
Other outputsVehicle speed signal (2WD only)
CommunicationScan tool
Lamp control outputsCheck trans lamp
A/T oil temp. lamp
Power drive lamp
3rd start lamp
BACK TO CHAPTER INDEX
TO MODEL INDEX
ISUZU KB P190 2007
Page 4439 of 6020
TRANSMISSION CONTROL SYSTEM (JR405E) 7A2-155
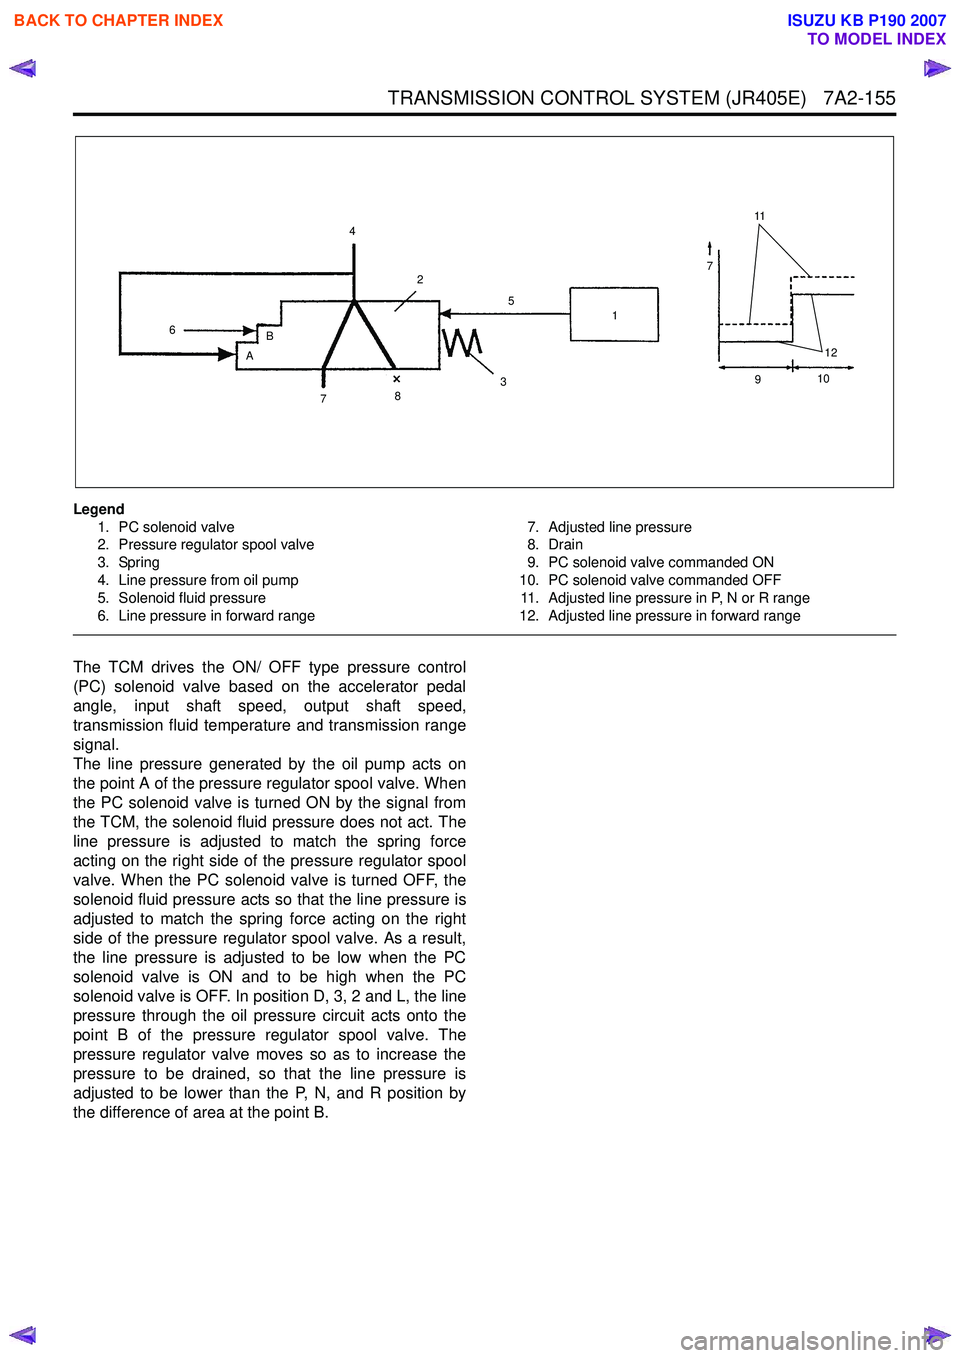
Legend1. PC solenoid valve
2. Pressure regulator spool valve
3. Spring
4. Line pressure from oil pump
5. Solenoid fluid pressure
6. Line pressure in forward range 7. Adjusted line pressure
8. Drain
9. PC solenoid valve commanded ON
10. PC solenoid valve commanded OFF 11. Adjusted line pressure in P, N or R range
12. Adjusted line pressure in forward range
The TCM drives the ON/ OFF type pressure control
(PC) solenoid valve based on the accelerator pedal
angle, input shaft speed, output shaft speed,
transmission fluid temperature and transmission range
signal.
The line pressure generated by the oil pump acts on
the point A of the pressure regulator spool valve. When
the PC solenoid valve is turned ON by the signal from
the TCM, the solenoid fluid pressure does not act. The
line pressure is adjusted to match the spring force
acting on the right side of the pressure regulator spool
valve. When the PC solenoid valve is turned OFF, the
solenoid fluid pressure acts so that the line pressure is
adjusted to match the spring force acting on the right
side of the pressure regulator spool valve. As a result,
the line pressure is adjusted to be low when the PC
solenoid valve is ON and to be high when the PC
solenoid valve is OFF. In position D, 3, 2 and L, the line
pressure through the oil pressure circuit acts onto the
point B of the pressure regulator spool valve. The
pressure regulator valve moves so as to increase the
pressure to be drained, so that the line pressure is
adjusted to be lower than the P, N, and R position by
the difference of area at the point B.
11
7
12
4
6 B
A 2
7 8 3 1
5
910
BACK TO CHAPTER INDEX
TO MODEL INDEX
ISUZU KB P190 2007
Page 4442 of 6020
7A2-158 TRANSMISSION CONTROL SYSTEM (JR405E)
The TCM controls the torque converter clutch (TCC)
solenoid valve based on the accelerator pedal angle,
input shaft speed, output shaft speed and transmission
fluid temperature.
Smooth lock up control is employed to engage or
disengage the TCC smoothly at the time of lock up On
or Off. When the TCM determines the TCC
engagement, the solenoid valve control duty cycle
(pulse width modulation [PWM]) signal is gradually
increased (5% to 95%) and the transmission fluid
between the TCC piston and torque converter front
cover is gradually drained. As a result, the TCC piston
is fitted slowly to the torque converter front cover under
fluid pressure securing smooth lock up engagement. The lock up control does not start when the
transmission fluid temperature is less than 20 °C (68 °F)
even though the vehicle is at the lock up control speed
area. The lock up control disengages when the
accelerator pedal angle is released.
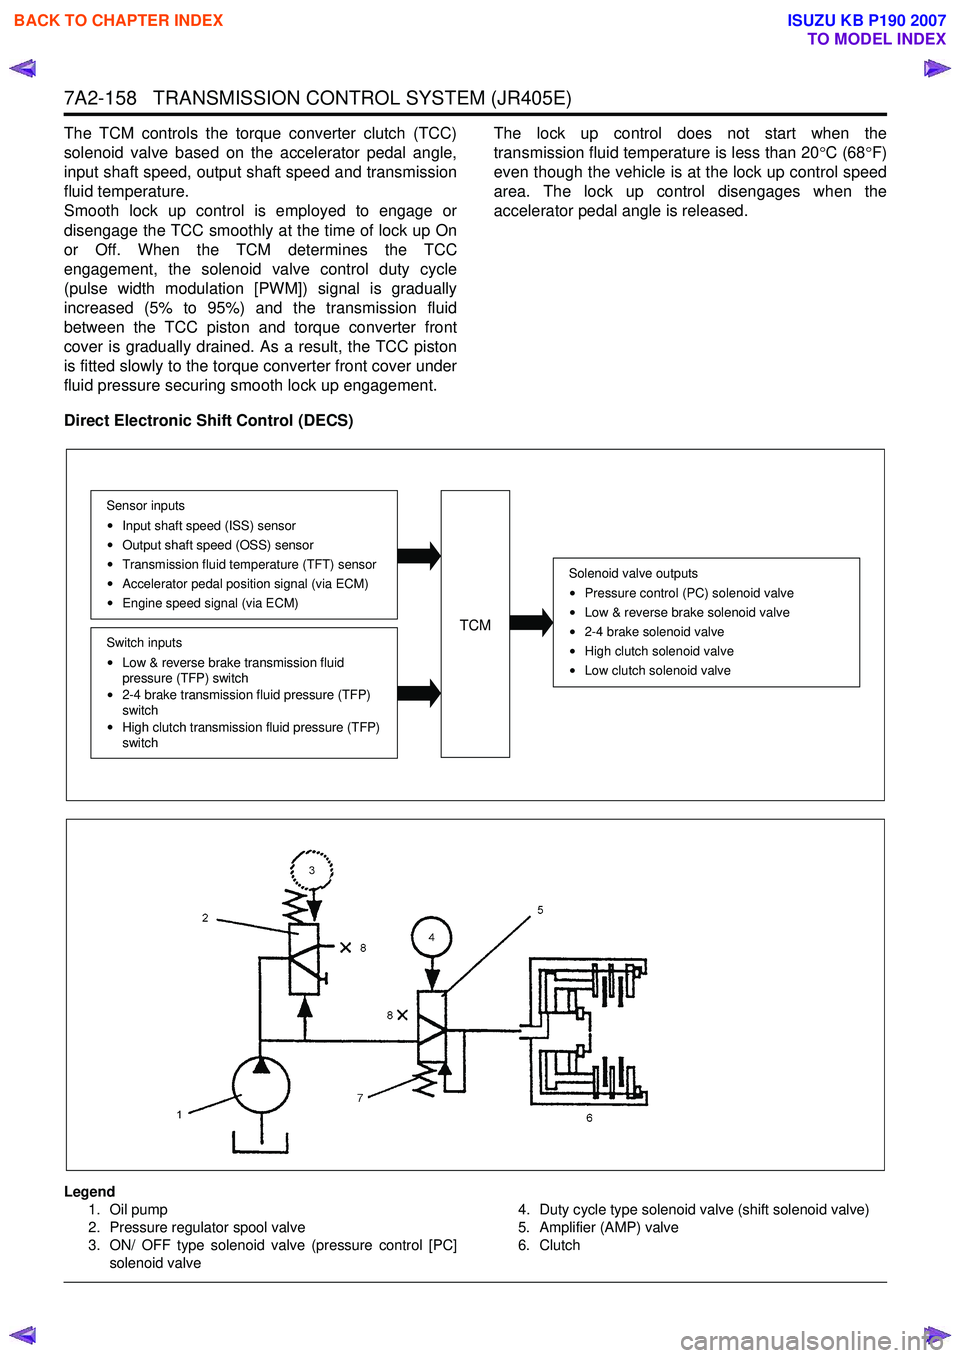
Direct Electronic Shift Control (DECS)
Legend 1. Oil pump
2. Pressure regulator spool valve
3. ON/ OFF type solenoid valve (pressure control [PC]
solenoid valve 4. Duty cycle type solenoid valve (shift solenoid valve)
5. Amplifier (AMP) valve
6. Clutch
Solenoid valve outputs
Pressure control (PC) solenoid valve
Low & reverse brake solenoid valve
2-4 brake solenoid valve
High clutch solenoid valve
Low clutch solenoid valve
TCM
Sensor inputsInput shaft speed (ISS) sensor
Output shaft speed (OSS) sensor
Transmission fluid temperature (TFT) sensor
Accelerator pedal position signal (via ECM)
Engine speed signal (via ECM)
Switch inputs
Low & reverse brake transmission fluid
pressure (TFP) switch
2-4 brake transmission fluid pressure (TFP)
switch
High clutch transmission fluid pressure (TFP)
switch
BACK TO CHAPTER INDEX
TO MODEL INDEX
ISUZU KB P190 2007
Page 4470 of 6020
7A3-16 ON-VEHICLE SERVICE (JR405E)
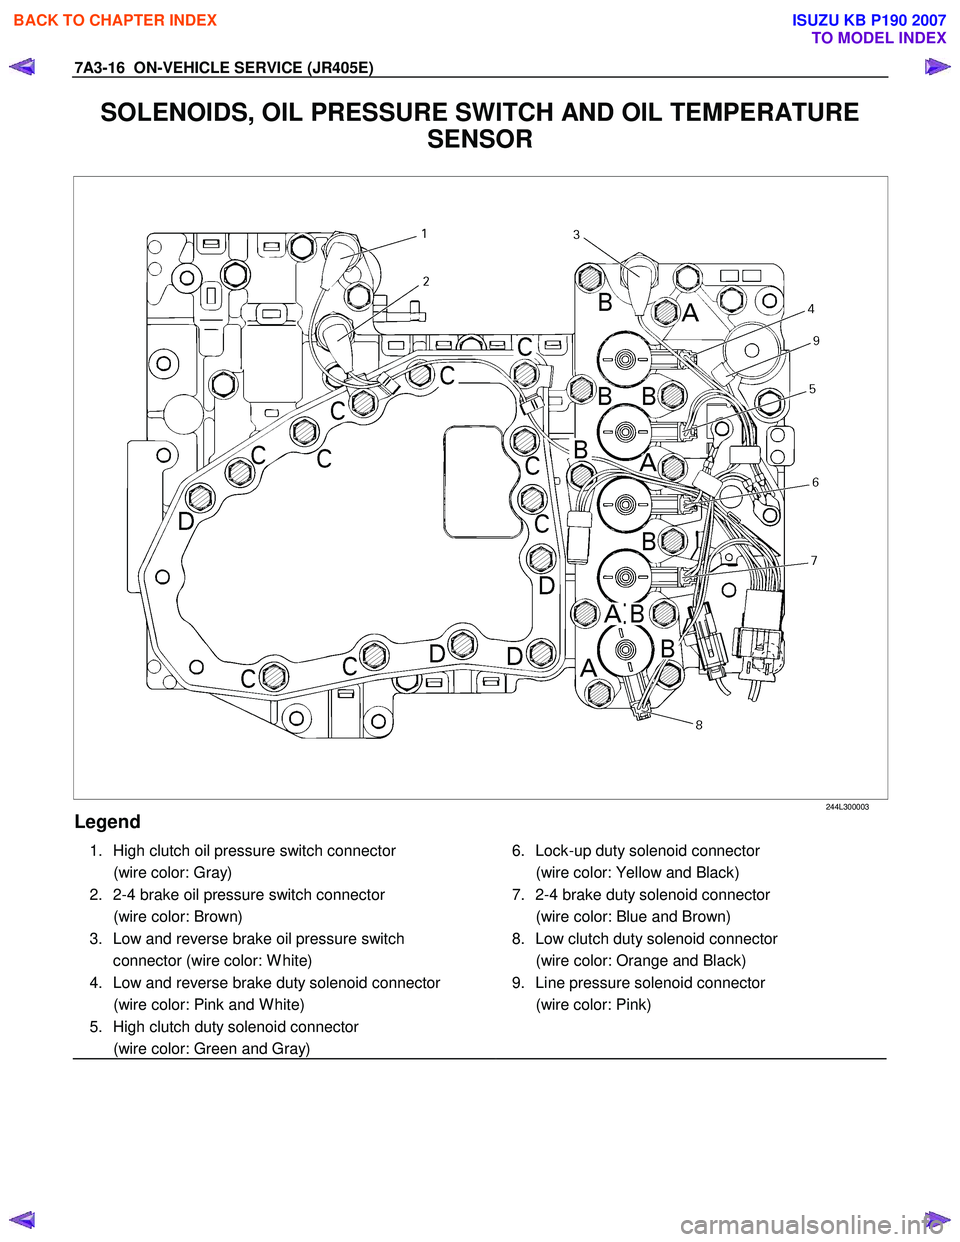
SOLENOIDS, OIL PRESSURE SWITCH AND OIL TEMPERATURE
SENSOR
244L300003
Legend
1. High clutch oil pressure switch connector
(wire color: Gray)
2. 2-4 brake oil pressure switch connector
(wire color: Brown)
3. Low and reverse brake oil pressure switch connector (wire color: W hite)
4. Low and reverse brake duty solenoid connector
(wire color: Pink and W hite)
5. High clutch duty solenoid connector
(wire color: Green and Gray)
6. Lock-up duty solenoid connector
(wire color: Yellow and Black)
7. 2-4 brake duty solenoid connector
(wire color: Blue and Brown)
8. Low clutch duty solenoid connector
(wire color: Orange and Black)
9. Line pressure solenoid connector
(wire color: Pink)
BACK TO CHAPTER INDEX
TO MODEL INDEX
ISUZU KB P190 2007
Page 4473 of 6020
ON-VEHICLE SERVICE (JR405E) 7A3-19
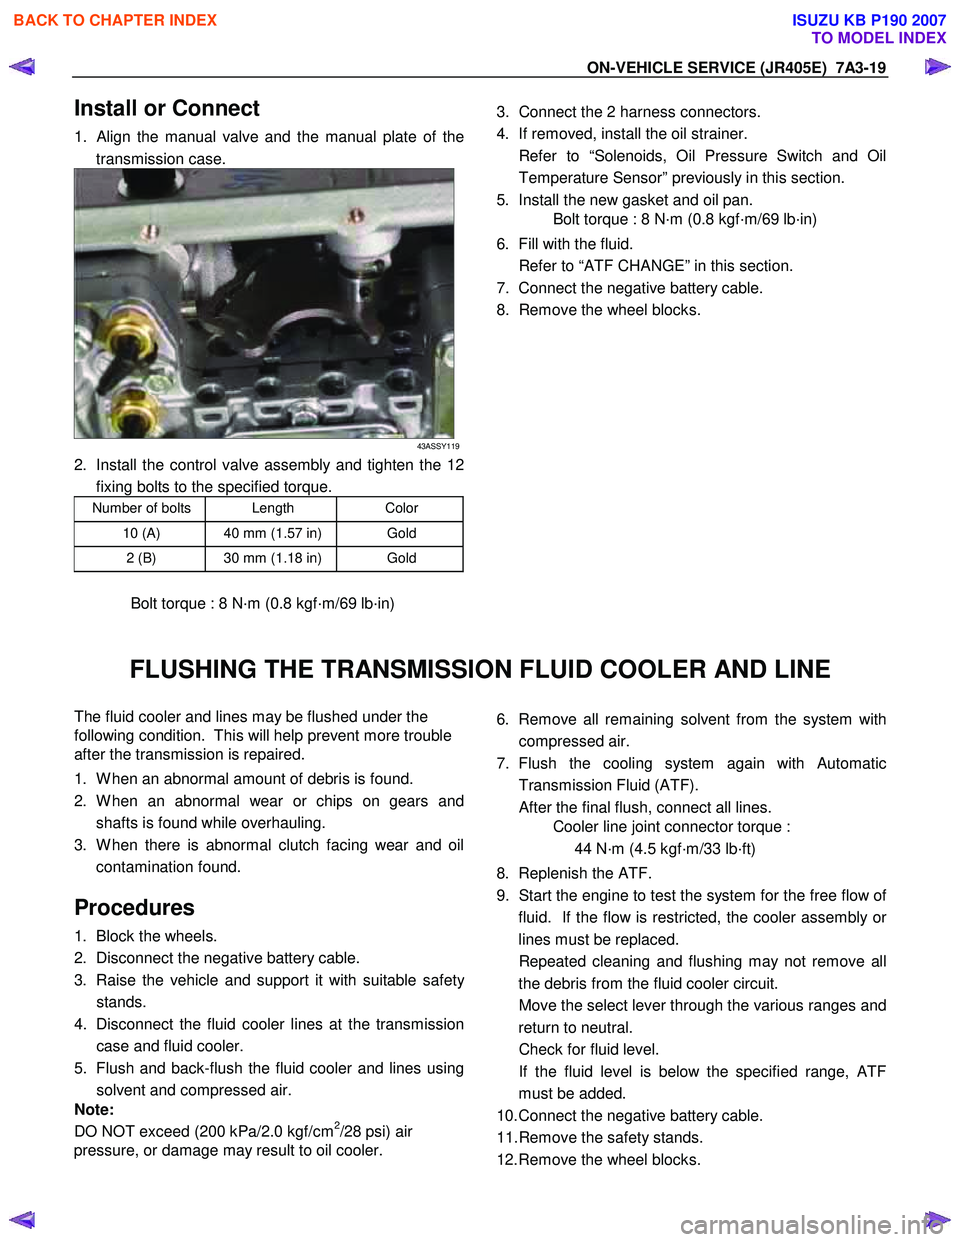
Install or Connect
1. Align the manual valve and the manual plate of the
transmission case.
43ASSY119
2. Install the control valve assembly and tighten the 12 fixing bolts to the specified torque.
Number of bolts Length Color
10 (A) 40 mm (1.57 in) Gold
2 (B) 30 mm (1.18 in) Gold
Bolt torque : 8 N·m (0.8 kgf·m/69 lb·in)
3. Connect the 2 harness connectors.
4. If removed, install the oil strainer.
Refer to “Solenoids, Oil Pressure Switch and Oil Temperature Sensor” previously in this section.
5. Install the new gasket and oil pan.
Bolt torque : 8 N·m (0.8 kgf·m/69 lb·in)
6. Fill with the fluid.
Refer to “ATF CHANGE” in this section.
7. Connect the negative battery cable.
8. Remove the wheel blocks.
FLUSHING THE TRANSMISSION FLUID COOLER AND LINE
The fluid cooler and lines may be flushed under the
following condition. This will help prevent more trouble
after the transmission is repaired.
1. W hen an abnormal amount of debris is found.
2. W hen an abnormal wear or chips on gears and shafts is found while overhauling.
3. W hen there is abnormal clutch facing wear and oil contamination found.
Procedures
1. Block the wheels.
2. Disconnect the negative battery cable.
3. Raise the vehicle and support it with suitable safet
y
stands.
4. Disconnect the fluid cooler lines at the transmission case and fluid cooler.
5. Flush and back-flush the fluid cooler and lines using solvent and compressed air.
Note:
DO NOT exceed (200 kPa/2.0 kgf/cm
2/28 psi) air
pressure, or damage may result to oil cooler.
6. Remove all remaining solvent from the system with
compressed air.
7. Flush the cooling system again with Automatic Transmission Fluid (ATF).
After the final flush, connect all lines.
Cooler line joint connector torque :
44 N·m (4.5 kgf·m/33 lb·ft)
8. Replenish the ATF.
9. Start the engine to test the system for the free flow o
f
fluid. If the flow is restricted, the cooler assembly o
r
lines must be replaced.
Repeated cleaning and flushing may not remove all the debris from the fluid cooler circuit.
Move the select lever through the various ranges and return to neutral.
Check for fluid level.
If the fluid level is below the specified range, ATF must be added.
10. Connect the negative battery cable.
11. Remove the safety stands.
12. Remove the wheel blocks.
BACK TO CHAPTER INDEX
TO MODEL INDEX
ISUZU KB P190 2007