Page 1423 of 6020
ENGINE MECHANICAL (4JK1/4JJ1) 6A-63
LNW 21BSH020501
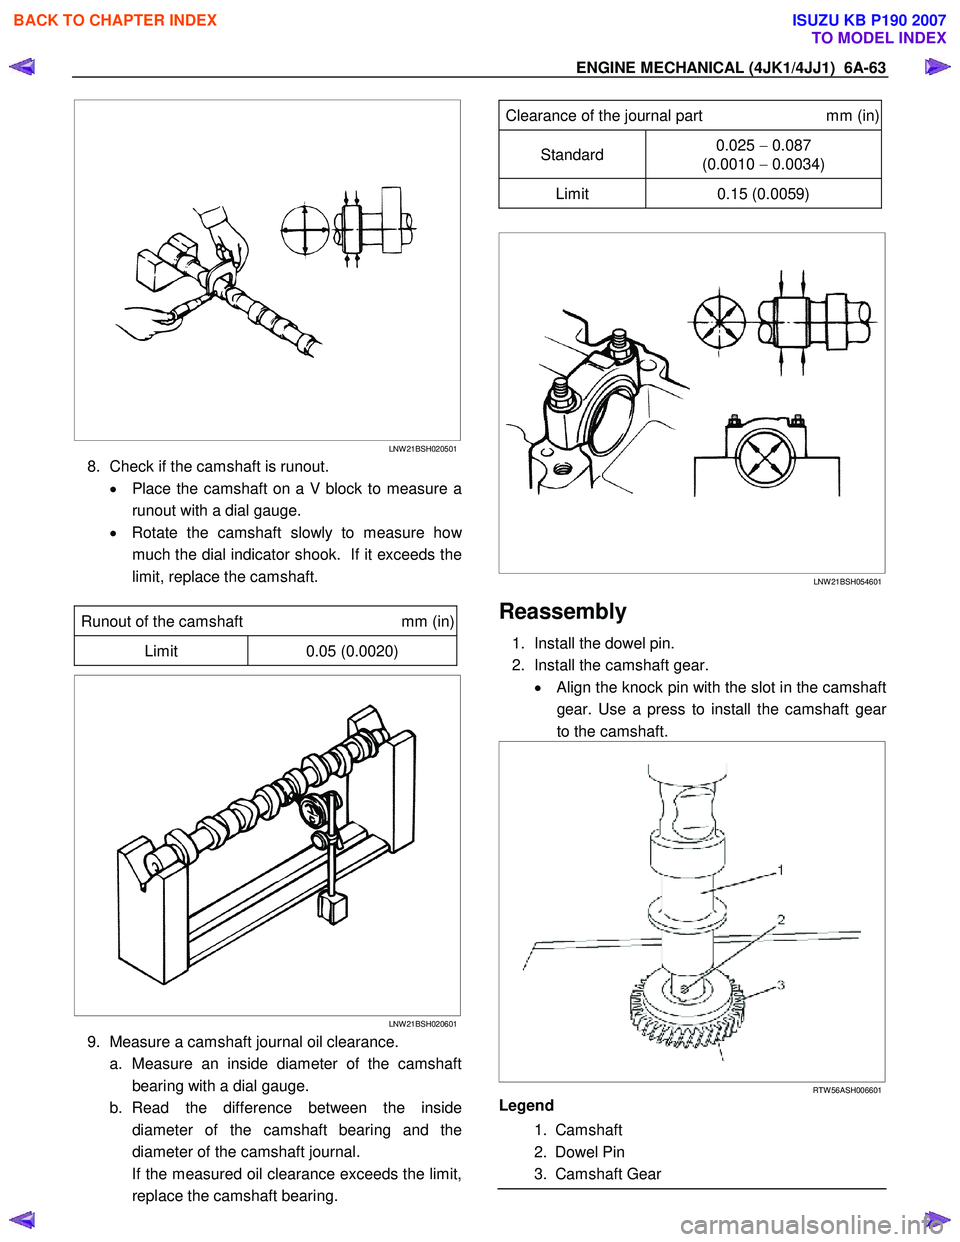
8. Check if the camshaft is runout.
• Place the camshaft on a V block to measure a
runout with a dial gauge.
• Rotate the camshaft slowly to measure ho
w
much the dial indicator shook. If it exceeds the
limit, replace the camshaft.
Runout of the camshaft mm (in)
Limit 0.05 (0.0020)
LNW 21BSH020601
9. Measure a camshaft journal oil clearance.
a. Measure an inside diameter of the camshaft bearing with a dial gauge.
b. Read the difference between the inside diameter of the camshaft bearing and the
diameter of the camshaft journal.
If the measured oil clearance exceeds the limit, replace the camshaft bearing.
Clearance of the journal part mm (in)
Standard 0.025
− 0.087
(0.0010 − 0.0034)
Limit 0.15 (0.0059)
LNW 21BSH054601
Reassembly
1. Install the dowel pin.
2. Install the camshaft gear. • Align the knock pin with the slot in the camshaft
gear. Use a press to install the camshaft gea
r
to the camshaft.
RTW 56ASH006601
Legend
1. Camshaft
2. Dowel Pin
3. Camshaft Gear
BACK TO CHAPTER INDEX
TO MODEL INDEX
ISUZU KB P190 2007
Page 1425 of 6020
ENGINE MECHANICAL (4JK1/4JJ1) 6A-65
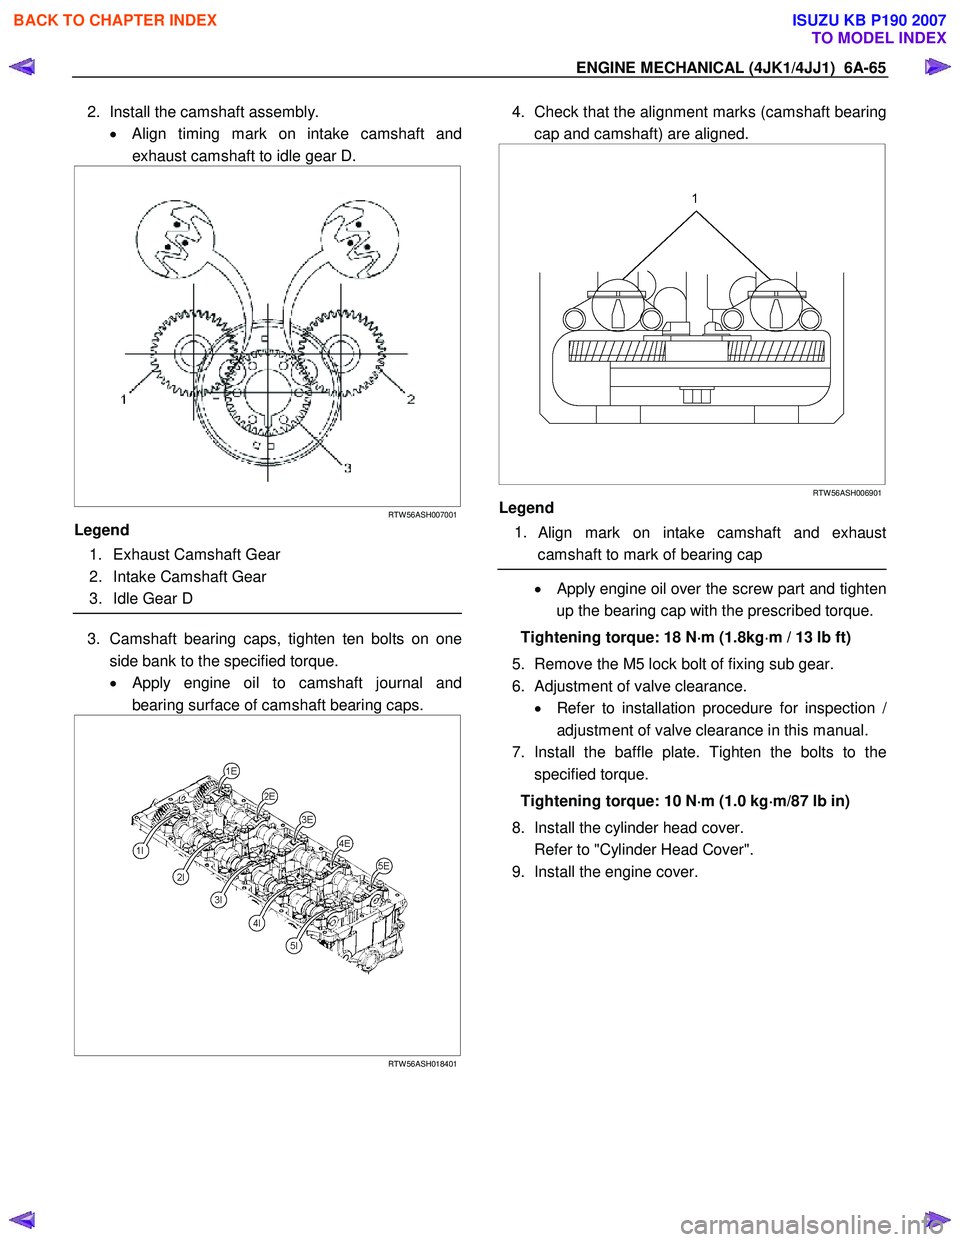
2. Install the camshaft assembly.
• Align timing mark on intake camshaft and
exhaust camshaft to idle gear D.
RTW 56ASH007001
Legend
1. Exhaust Camshaft Gear
2. Intake Camshaft Gear
3. Idle Gear D
3. Camshaft bearing caps, tighten ten bolts on one
side bank to the specified torque.
• Apply engine oil to camshaft journal and
bearing surface of camshaft bearing caps.
RTW 56ASH018401
4. Check that the alignment marks (camshaft bearing
cap and camshaft) are aligned.
RTW 56ASH006901
Legend
1.
Align mark on intake camshaft and exhaust
camshaft to mark of bearing cap
• Apply engine oil over the screw part and tighten
up the bearing cap with the prescribed torque.
Tightening torque: 18 N ⋅
⋅⋅
⋅
m (1.8kg ⋅
⋅⋅
⋅
m / 13 lb ft)
5. Remove the M5 lock bolt of fixing sub gear.
6. Adjustment of valve clearance. • Refer to installation procedure for inspection
/
adjustment of valve clearance in this manual.
7. Install the baffle plate. Tighten the bolts to the specified torque.
Tightening torque: 10 N ⋅
⋅⋅
⋅
m (1.0 kg ⋅
⋅⋅
⋅
m/87 lb in)
8. Install the cylinder head cover.
Refer to "Cylinder Head Cover".
9. Install the engine cover.
BACK TO CHAPTER INDEX
TO MODEL INDEX
ISUZU KB P190 2007
Page 1438 of 6020
6A-78 ENGINE MECHANICAL (4JK1/4JJ1)
36. Remove the timing chain cover lower.
37. Remove the timing chain cover upper.
RTW 56CSH001501
Legend
1. Timing Chain Cover Upper
2. Timing Chain Cover Lower
38. Remove the water by pass pipe (1).
RTW 56ASH008401
39. Remove the glow plug (1).
RTW 56ASH019301
40. Remove the cylinder head cover.
Refer to “Cylinder Head Cover”.
41. Install the lock bolt for camshaft scissor gear.
RTW 56ASH007101
42. Remove the fuel injector assembly.
43. Remove the baffle plate.
BACK TO CHAPTER INDEX
TO MODEL INDEX
ISUZU KB P190 2007
Page 1449 of 6020
ENGINE MECHANICAL (4JK1/4JJ1) 6A-89
Installation
1. Select the cylinder head gasket.
Cylinder Head Gasket Selection
Cylinder head gasket is determined by the piston head
projection from the cylinder body upper surface, in orde
r
to improve engine performance.
Three types of gasket are provided with difference o
f
thickness. Select the appropriate one out of three
grades of
gasket, according to the following procedure.
Before measurement, clear off carbon from the piston
head and cylinder body surface and also clean the
place where the gasket was installed.
011LX011
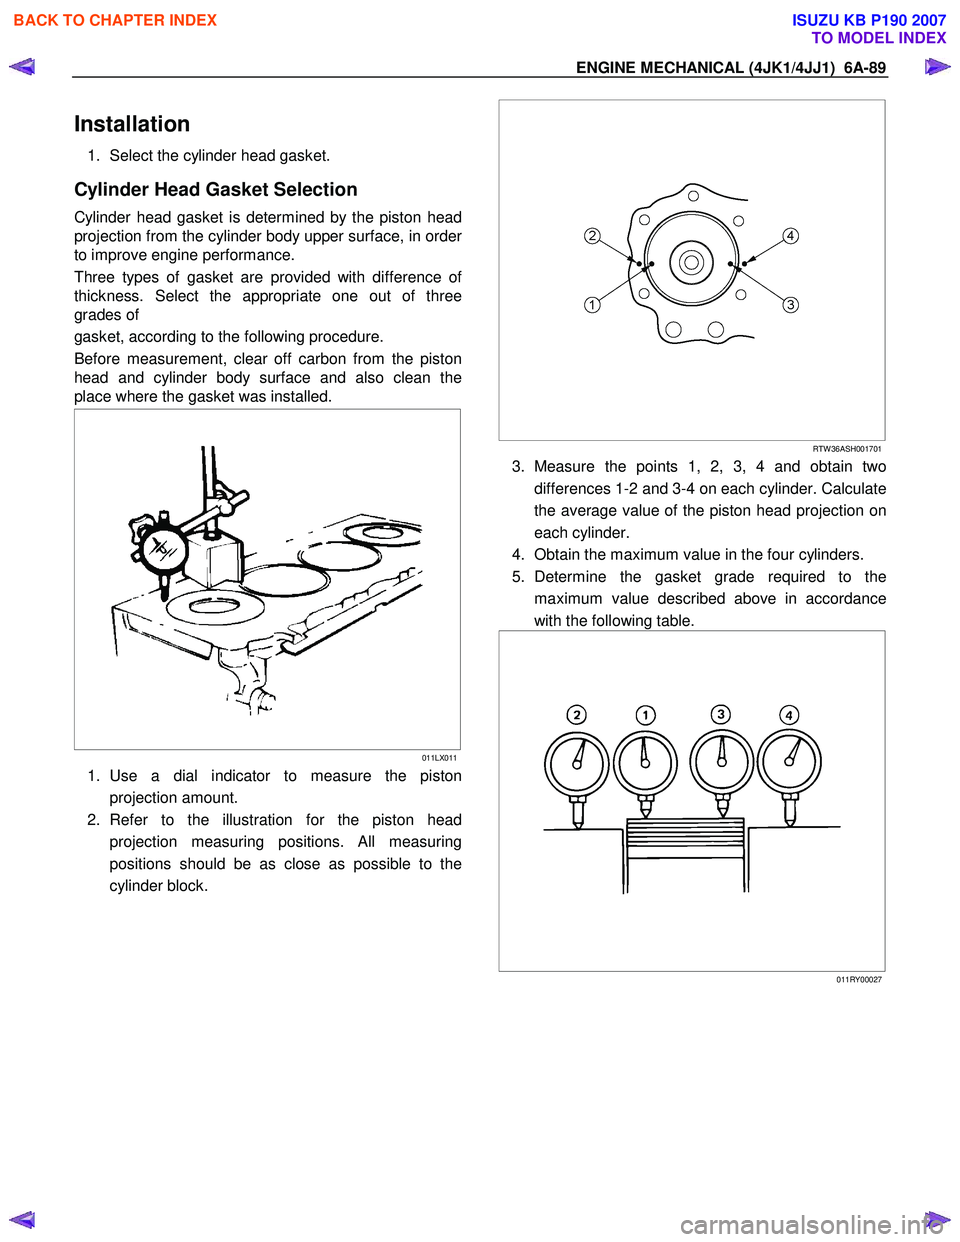
1. Use a dial indicator to measure the piston
projection amount.
2. Refer to the illustration for the piston head projection measuring positions. All measuring
positions should be as close as possible to the
cylinder block.
RTW 36ASH001701
3. Measure the points 1, 2, 3, 4 and obtain two
differences 1-2 and 3-4 on each cylinder. Calculate
the average value of the piston head projection on
each cylinder.
4. Obtain the maximum value in the four cylinders.
5. Determine the gasket grade required to the maximum value described above in accordance
with the following table.
011RY00027
BACK TO CHAPTER INDEX
TO MODEL INDEX
ISUZU KB P190 2007
Page 1450 of 6020
6A-90 ENGINE MECHANICAL (4JK1/4JJ1)
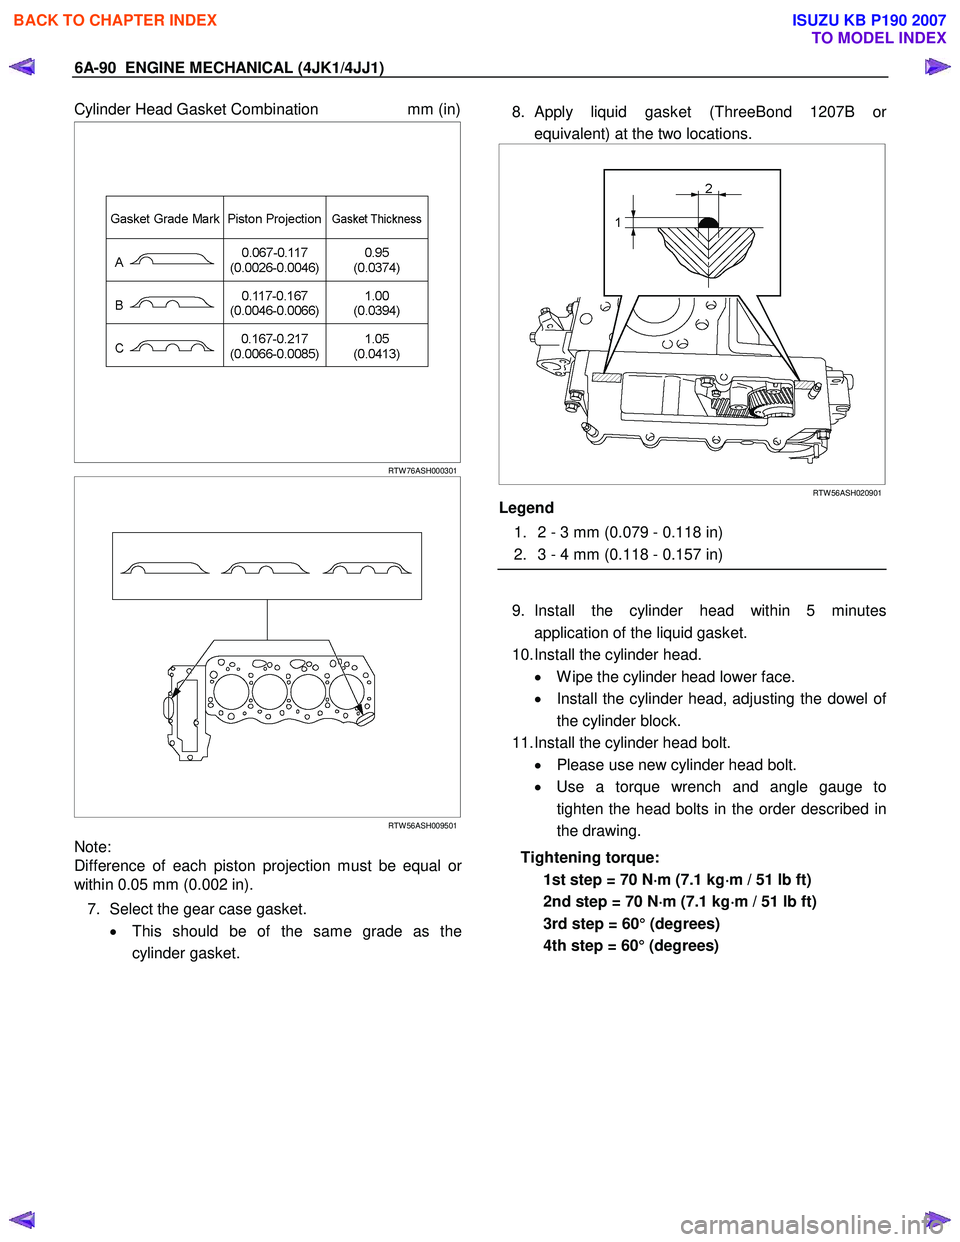
Cylinder Head Gasket Combination mm (in)
RTW 76ASH000301
RTW 56ASH009501
Note:
Difference of each piston projection must be equal o
r
within 0.05 mm (0.002 in).
7. Select the gear case gasket. • This should be of the same grade as the
cylinder gasket.
8. Apply liquid gasket (ThreeBond 1207B o
r
equivalent) at the two locations.
RTW 56ASH020901
Legend
1. 2 - 3 mm (0.079 - 0.118 in)
2. 3 - 4 mm (0.118 - 0.157 in)
9. Install the cylinder head within 5 minutes application of the liquid gasket.
10. Install the cylinder head. • W ipe the cylinder head lower face.
• Install the cylinder head, adjusting the dowel o
f
the cylinder block.
11. Install the cylinder head bolt. • Please use new cylinder head bolt.
• Use a torque wrench and angle gauge to
tighten the head bolts in the order described in
the drawing.
Tightening torque: 1st step = 70 N ⋅
⋅⋅
⋅
m (7.1 kg ⋅
⋅⋅
⋅
m / 51 lb ft)
2nd step = 70 N ⋅
⋅⋅
⋅
m (7.1 kg ⋅
⋅⋅
⋅
m / 51 lb ft)
3rd step = 60° (degrees)
4th step = 60° (degrees)
BACK TO CHAPTER INDEX
TO MODEL INDEX
ISUZU KB P190 2007
Page 1453 of 6020
ENGINE MECHANICAL (4JK1/4JJ1) 6A-93
20. Install the timing chain tension lever pivot.
Tighten the bolt to the specified torque.
Tightening torque: 27 N ⋅
⋅⋅
⋅
m (2.8 kg ⋅
⋅⋅
⋅
m / 20 lb ft)
RTW 56ASH019401
21. Attach the hook of the timing chain tensioner.
• Hold the latch (3) depressed. Insert the plunge
r
(2). Attach the hook (5) to the pin (1) to hold the
plunger in place.
RTW 56CSH004401
22. Install the timing chain tensioner (1) and the
gasket (2).
Tighten the nuts (3) to the specified torque.
Tightening torque: 10 N ⋅
⋅⋅
⋅
m (1.0 kg ⋅
⋅⋅
⋅
m / 87 lb in)
RTW 56CSH001701
23. Unlock the tensioner hook.
• Press the place of the arrow in the figure.
• The hook is opened. The plunger pushes the
tension lever.
RTW 56ASH020401
BACK TO CHAPTER INDEX
TO MODEL INDEX
ISUZU KB P190 2007
Page 1454 of 6020
6A-94 ENGINE MECHANICAL (4JK1/4JJ1)
24. Install the camshaft assembly.
• Align timing mark on intake camshaft and
exhaust camshaft to idle gear D.
RTW 56ASH007001
Legend
1. Exhaust Camshaft Gear
2. Intake Camshaft Gear
3. Idle Gear D
25. Install the camshaft bearing cap.
•
Apply engine oil to all of the cylinder head
journals.
RTW 56ASH013801
Tightening torque: 18 N ⋅
⋅⋅
⋅
m (1.8 kg ⋅
⋅⋅
⋅
m / 13 lb ft)
26. Align mark on camshaft to mark on camshaft
bearing cap.
• Align mark (1) on intake camshaft and exhaust
camshaft to mark of bearing cap.
RTW 56ASH006901
27. Remove the lock bolt from the camshaft gear.
28. Turn the crank pulley two rotation (720 °CA).
• Align mark on camshaft to mark on camshaft
bearing cap.
RTW 56ASH020701
Legend
1. Exhaust Camshaft Gear
2. Intake Camshaft Gear
3. Idle Gear D
BACK TO CHAPTER INDEX
TO MODEL INDEX
ISUZU KB P190 2007
Page 1462 of 6020
6A-102 ENGINE MECHANICAL (4JK1/4JJ1)
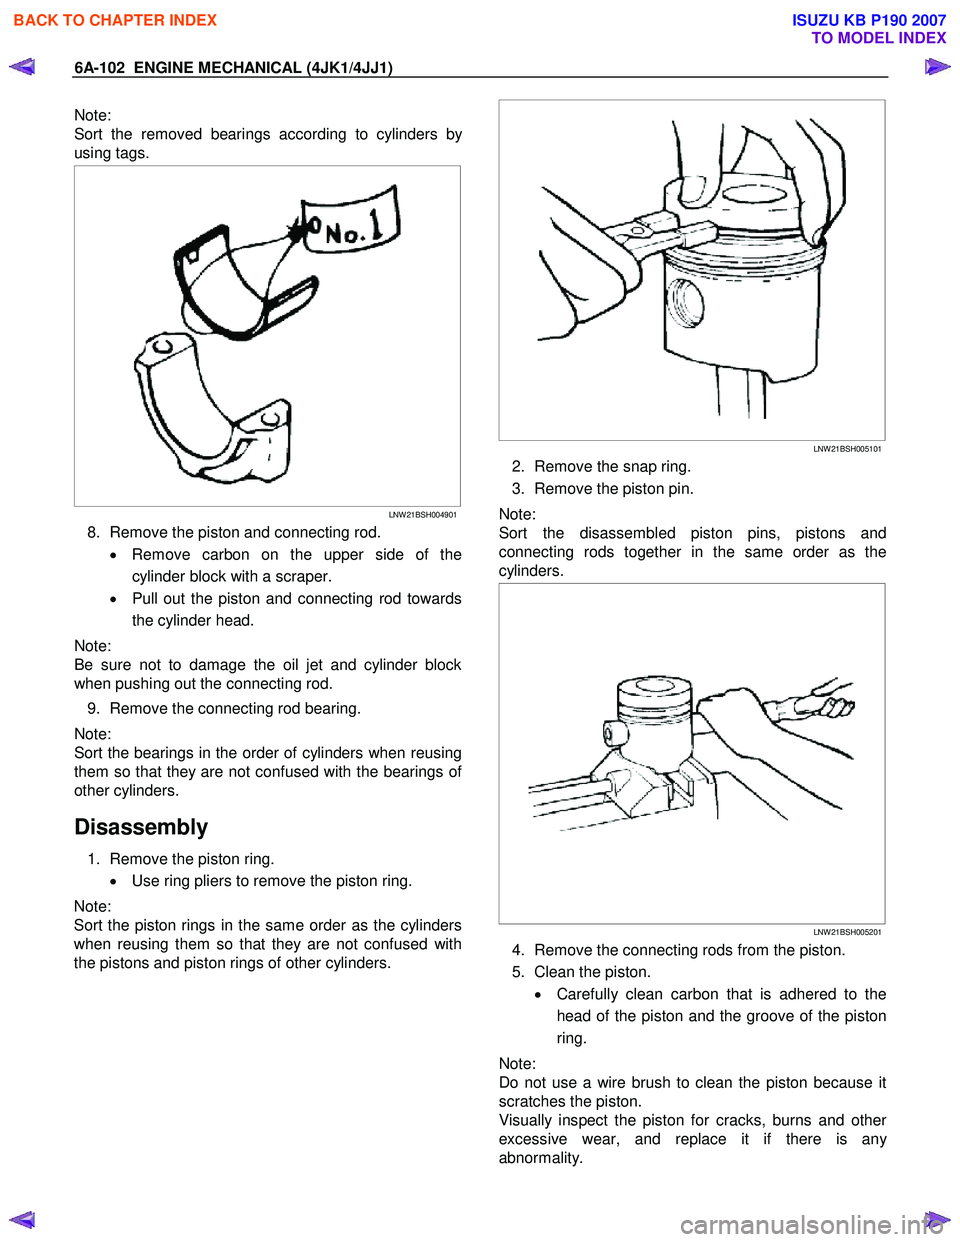
Note:
Sort the removed bearings according to cylinders b
y
using tags.
LNW 21BSH004901
8. Remove the piston and connecting rod.
• Remove carbon on the upper side of the
cylinder block with a scraper.
• Pull out the piston and connecting rod towards
the cylinder head.
Note:
Be sure not to damage the oil jet and cylinder block
when pushing out the connecting rod.
9. Remove the connecting rod bearing.
Note:
Sort the bearings in the order of cylinders when reusing
them so that they are not confused with the bearings o
f
other cylinders.
Disassembly
1. Remove the piston ring.
• Use ring pliers to remove the piston ring.
Note:
Sort the piston rings in the same order as the cylinders
when reusing them so that they are not confused with
the pistons and piston rings of other cylinders.
LNW 21BSH005101
2. Remove the snap ring.
3. Remove the piston pin.
Note:
Sort the disassembled piston pins, pistons and
connecting rods together in the same order as the
cylinders.
LNW 21BSH005201
4. Remove the connecting rods from the piston.
5. Clean the piston. • Carefully clean carbon that is adhered to the
head of the piston and the groove of the piston
ring.
Note:
Do not use a wire brush to clean the piston because it
scratches the piston.
Visually inspect the piston for cracks, burns and othe
r
excessive wear, and replace it if there is an
y
abnormality.
BACK TO CHAPTER INDEX
TO MODEL INDEX
ISUZU KB P190 2007