2007 INFINITI QX56 steering
[x] Cancel search: steeringPage 2518 of 3061
SERVICE DATA AND SPECIFICATIONS (SDS)
PS-27
< SERVICE INFORMATION >
C
D
E
F
H
I
J
K
L
MA
B
PS
N
O
P
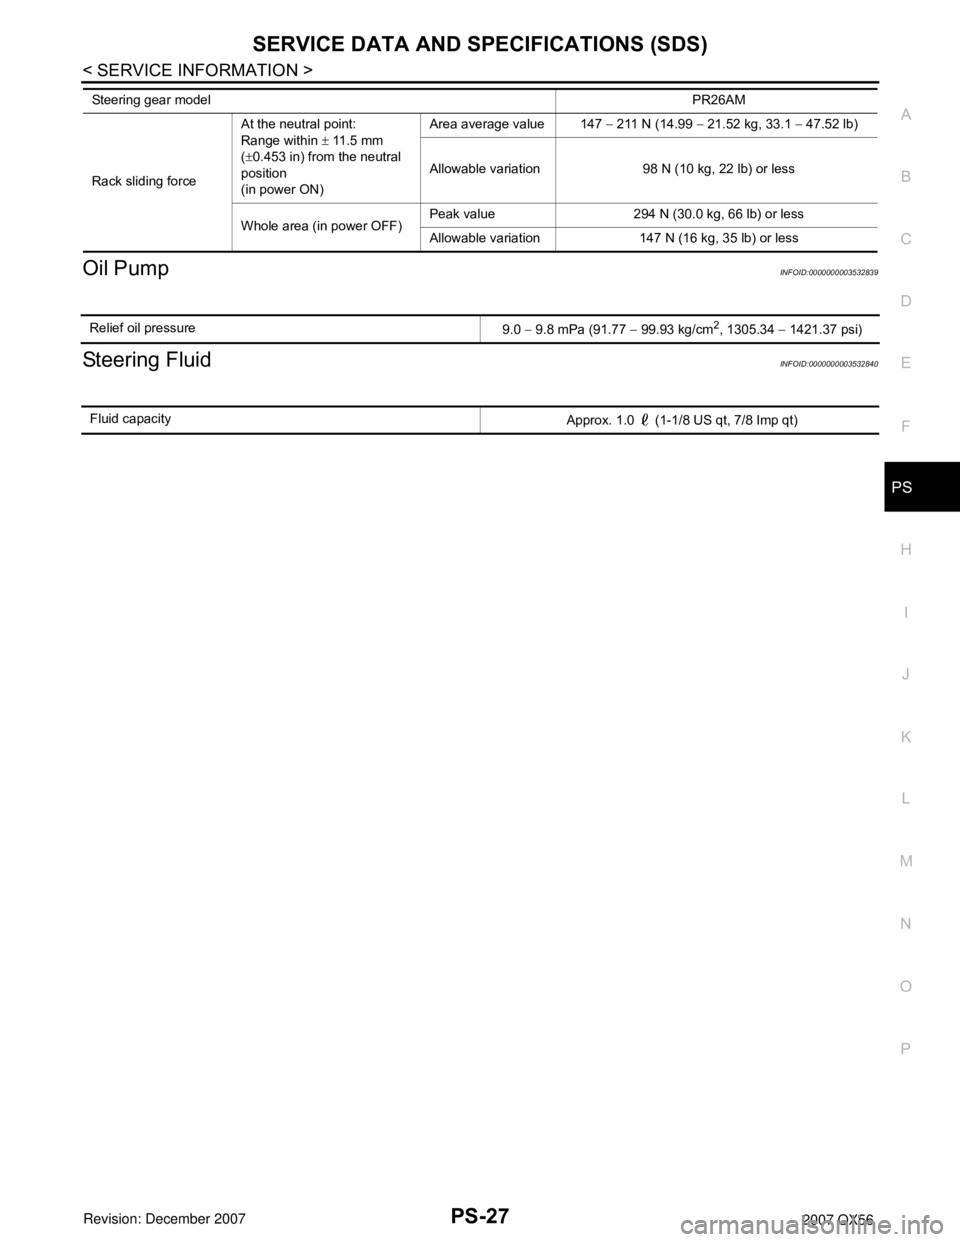
Oil PumpINFOID:0000000003532839
Steering FluidINFOID:0000000003532840
Rack sliding forceAt the neutral point:
Range within ± 11.5 mm
(±0.453 in) from the neutral
position
(in power ON)Area average value 147 − 211 N (14.99 − 21.52 kg, 33.1 − 47.52 lb)
Allowable variation 98 N (10 kg, 22 lb) or less
Whole area (in power OFF)Peak value 294 N (30.0 kg, 66 lb) or less
Allowable variation 147 N (16 kg, 35 lb) or less Steering gear modelPR26AM
Relief oil pressure
9.0 − 9.8 mPa (91.77 − 99.93 kg/cm2, 1305.34 − 1421.37 psi)
Fluid capacity
Approx. 1.0 (1-1/8 US qt, 7/8 Imp qt)
Page 2522 of 3061
RAX-4
< SERVICE INFORMATION >
NOISE, VIBRATION AND HARSHNESS (NVH) TROUBLESHOOTING
NOISE, VIBRATION AND HARSHNESS (NVH) TROUBLESHOOTING
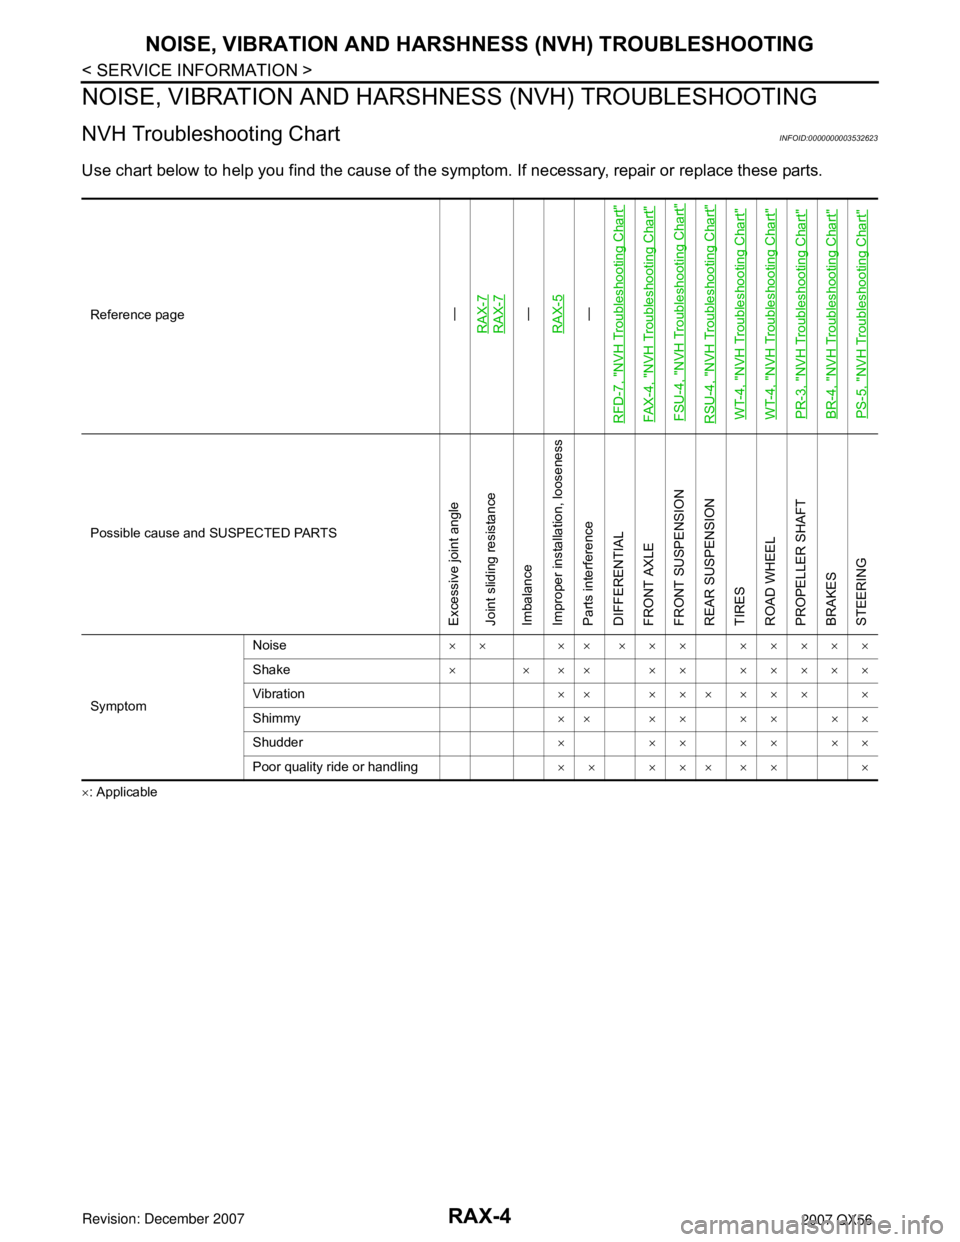
NVH Troubleshooting ChartINFOID:0000000003532623
Use chart below to help you find the cause of the symptom. If necessary, repair or replace these parts.
×: ApplicableReference page
—
RAX-7RAX-7—
RAX-5—
RFD-7, "
NVH Troubleshooting Chart
"
FAX-4, "
NVH Troubleshooting Chart
"
FSU-4, "
NVH Troubleshooting Chart
"
RSU-4, "
NVH Troubleshooting Chart
"
WT-4, "
NVH Troubleshooting Chart
"
WT-4, "
NVH Troubleshooting Chart
"
PR-3, "
NVH Troubleshooting Chart
"
BR-4, "
NVH Troubleshooting Chart
"
PS-5, "
NVH Troubleshooting Chart
"
Possible cause and SUSPECTED PARTS
Excessive joint angle
Joint sliding resistance
Imbalance
Improper installation, looseness
Parts interference
DIFFERENTIAL
FRONT AXLE
FRONT SUSPENSION
REAR SUSPENSION
TIRES
ROAD WHEEL
PROPELLER SHAFT
BRAKES
STEERING
SymptomNoise×× ×× ××× ×××××
Shake× × ×× ×× ×××××
Vibration×× ××× ××× ×
Shimmy×× ×× ×× ××
Shudder×××××××
Poor quality ride or handling×× ××× ×× ×
Page 2542 of 3061
RF-10
< SERVICE INFORMATION >
SUNROOF
SUNROOF
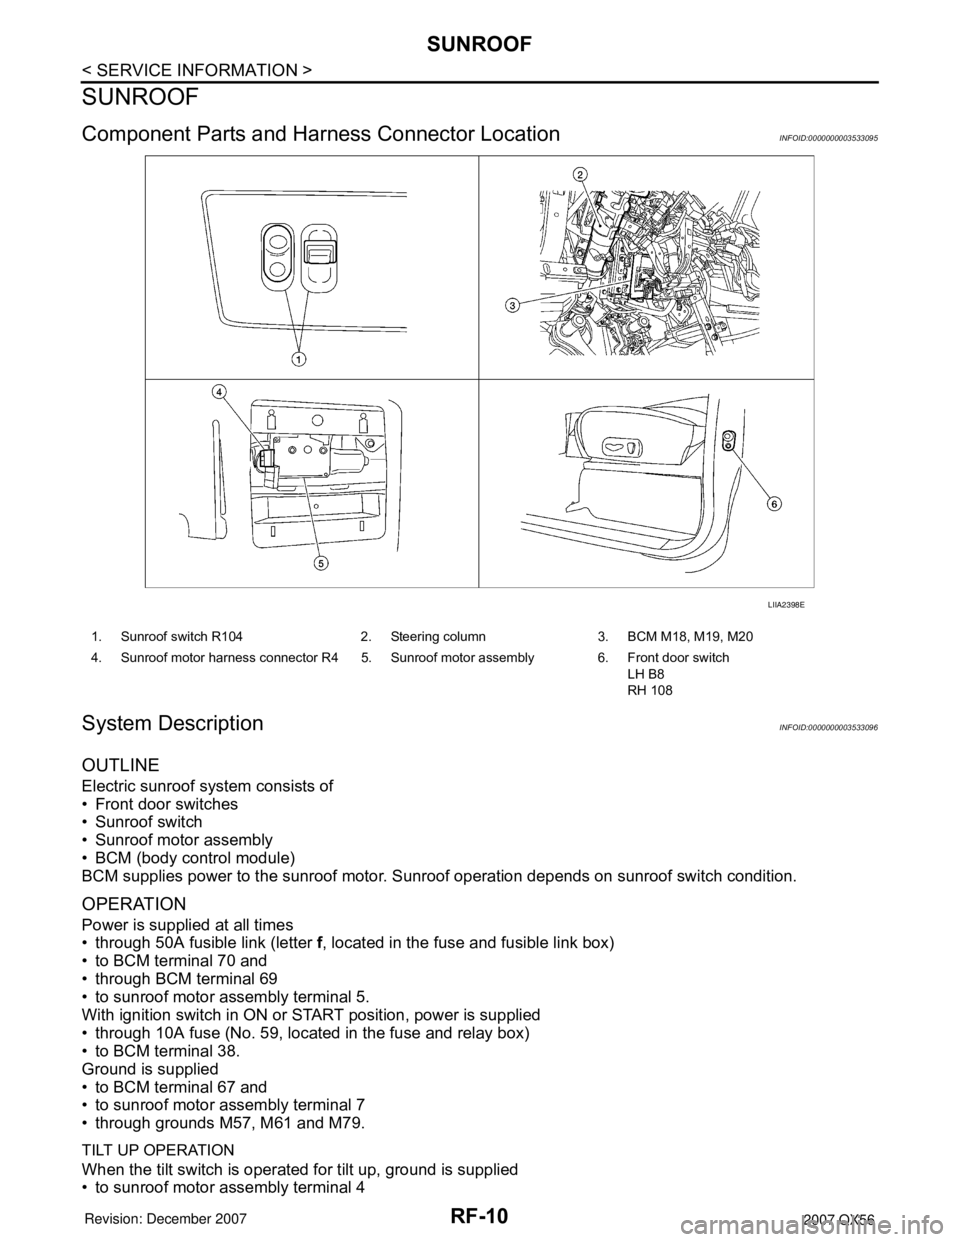
Component Parts and Harness Connector LocationINFOID:0000000003533095
System DescriptionINFOID:0000000003533096
OUTLINE
Electric sunroof system consists of
• Front door switches
• Sunroof switch
• Sunroof motor assembly
• BCM (body control module)
BCM supplies power to the sunroof motor. Sunroof operation depends on sunroof switch condition.
OPERATION
Power is supplied at all times
• through 50A fusible link (letter f, located in the fuse and fusible link box)
• to BCM terminal 70 and
• through BCM terminal 69
• to sunroof motor assembly terminal 5.
With ignition switch in ON or START position, power is supplied
• through 10A fuse (No. 59, located in the fuse and relay box)
• to BCM terminal 38.
Ground is supplied
• to BCM terminal 67 and
• to sunroof motor assembly terminal 7
• through grounds M57, M61 and M79.
TILT UP OPERATION
When the tilt switch is operated for tilt up, ground is supplied
• to sunroof motor assembly terminal 4
LIIA2398E
1. Sunroof switch R104 2. Steering column 3. BCM M18, M19, M20
4. Sunroof motor harness connector R4 5. Sunroof motor assembly 6. Front door switch
LH B8
RH 108
Page 2564 of 3061
NOISE, VIBRATION AND HARSHNESS (NVH) TROUBLESHOOTING
RFD-7
< SERVICE INFORMATION >
C
E
F
G
H
I
J
K
L
MA
B
RFD
N
O
P
NOISE, VIBRATION AND HARSHNESS (NVH) TROUBLESHOOTING
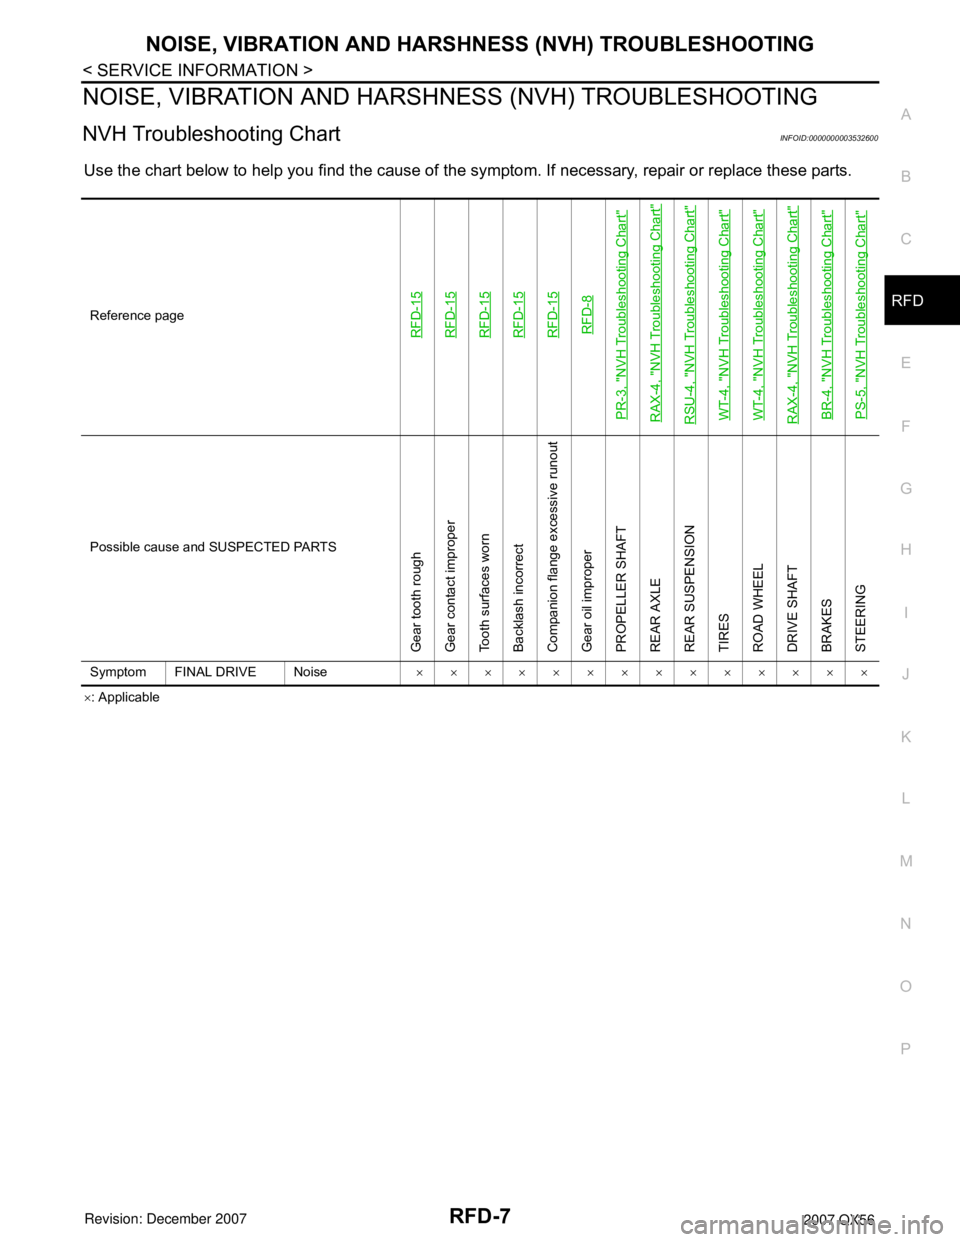
NVH Troubleshooting ChartINFOID:0000000003532600
Use the chart below to help you find the cause of the symptom. If necessary, repair or replace these parts.
×: Applicable Reference page
RFD-15RFD-15RFD-15RFD-15RFD-15RFD-8
PR-3, "
NVH Troubleshooting Chart
"
RAX-4, "
NVH Troubleshooting Chart
"
RSU-4, "
NVH Troubleshooting Chart
"
WT-4, "
NVH Troubleshooting Chart
"
WT-4, "
NVH Troubleshooting Chart
"
RAX-4, "
NVH Troubleshooting Chart
"
BR-4, "
NVH Troubleshooting Chart
"
PS-5, "
NVH Troubleshooting Chart
"
Possible cause and SUSPECTED PARTS
Gear tooth rough
Gear contact improper
Tooth surfaces worn
Backlash incorrect
Companion flange excessive runout
Gear oil improper
PROPELLER SHAFT
REAR AXLE
REAR SUSPENSION
TIRES
ROAD WHEEL
DRIVE SHAFT
BRAKES
STEERING
Symptom FINAL DRIVE Noise××××××××××××××
Page 2594 of 3061
RSU-4
< SERVICE INFORMATION >
NOISE, VIBRATION AND HARSHNESS (NVH) TROUBLESHOOTING
NOISE, VIBRATION AND HARSHNESS (NVH) TROUBLESHOOTING
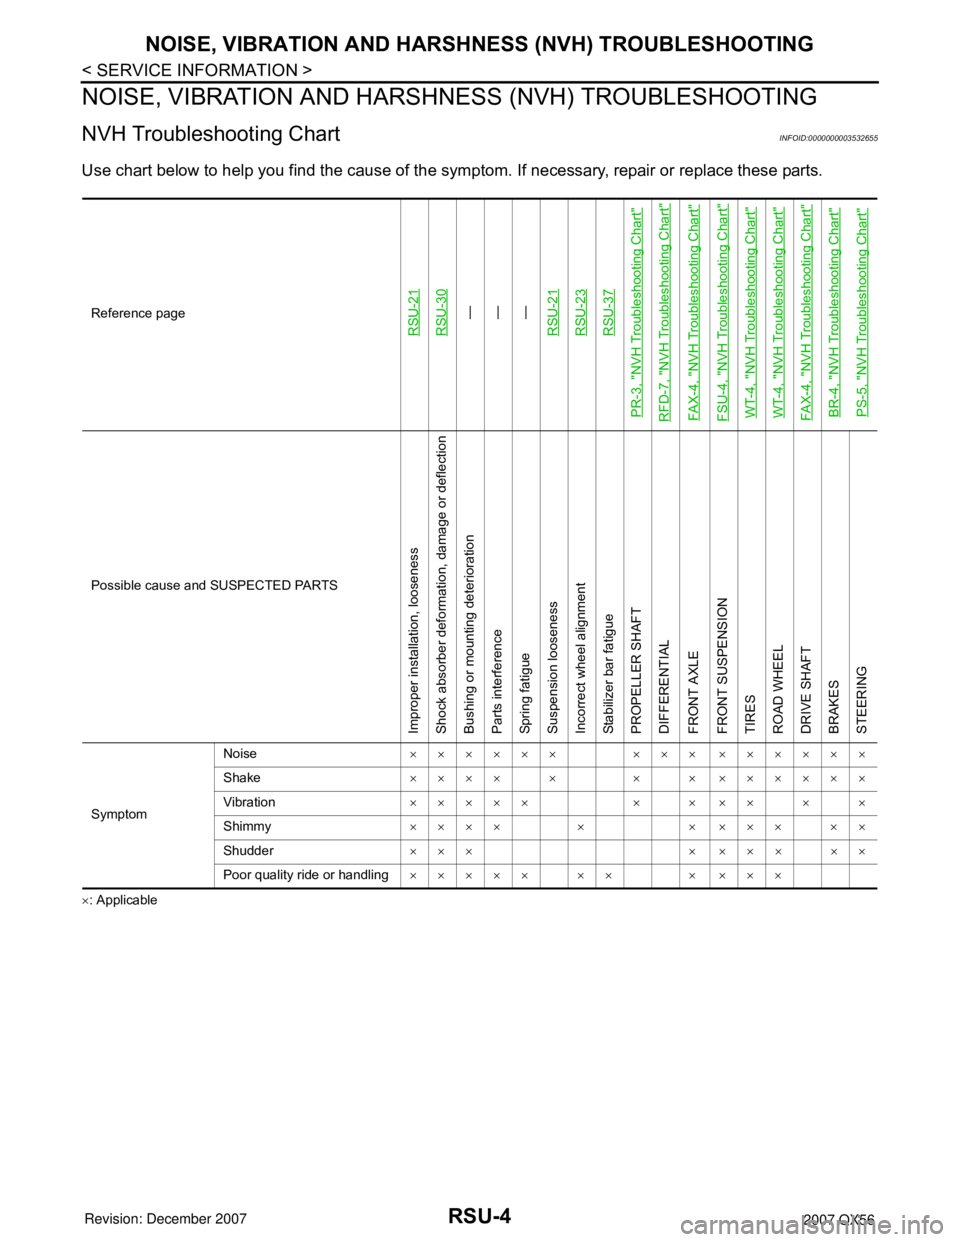
NVH Troubleshooting ChartINFOID:0000000003532655
Use chart below to help you find the cause of the symptom. If necessary, repair or replace these parts.
×: ApplicableReference page
RSU-21RSU-30
—
—
—
RSU-21
RSU-23RSU-37
PR-3, "
NVH Troubleshooting Chart
"
RFD-7, "
NVH Troubleshooting Chart
"
FAX-4, "
NVH Troubleshooting Chart
"
FSU-4, "
NVH Troubleshooting Chart
"
WT-4, "
NVH Troubleshooting Chart
"
WT-4, "
NVH Troubleshooting Chart
"
FAX-4, "
NVH Troubleshooting Chart
"
BR-4, "
NVH Troubleshooting Chart
"
PS-5, "
NVH Troubleshooting Chart
"
Possible cause and SUSPECTED PARTS
Improper installation, looseness
Shock absorber deformation, damage or deflection
Bushing or mounting deterioration
Parts interference
Spring fatigue
Suspension looseness
Incorrect wheel alignment
Stabilizer bar fatigue
PROPELLER SHAFT
DIFFERENTIAL
FRONT AXLE
FRONT SUSPENSION
TIRES
ROAD WHEEL
DRIVE SHAFT
BRAKES
STEERING
SymptomNoise×××××× ××× ××××××
Shake×××× × × × ××××××
Vibration××××× × × ×× × ×
Shimmy×××× × × ××× ××
Shudder ××× × ××× ××
Poor quality ride or handling××××× ×× × ×××
Page 2613 of 3061
REAR SUSPENSION ASSEMBLY
RSU-23
< SERVICE INFORMATION >
C
D
F
G
H
I
J
K
L
MA
B
RSU
N
O
P
Wheel AlignmentInspectionINFOID:0000000003532671
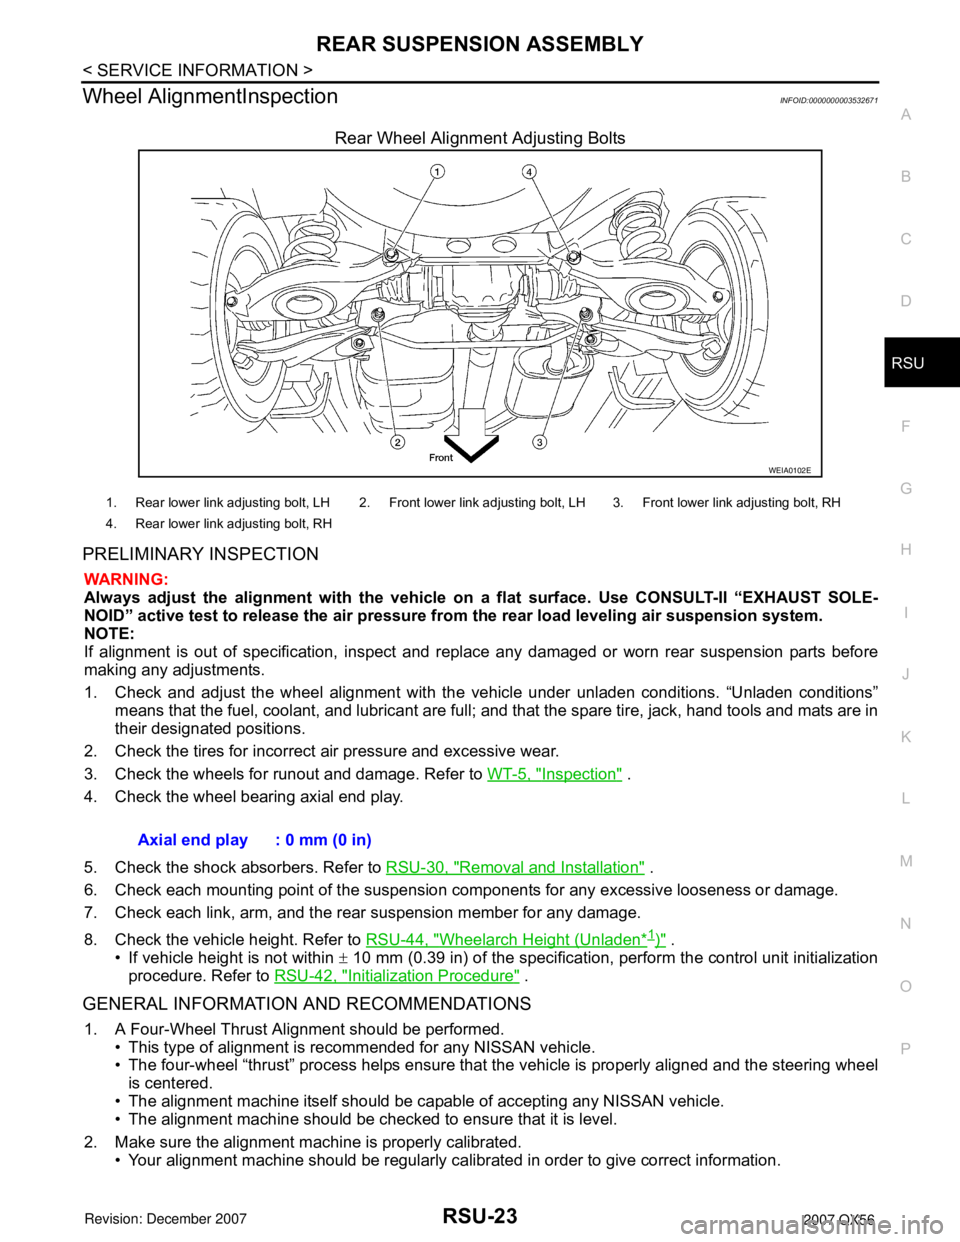
Rear Wheel Alignment Adjusting Bolts
PRELIMINARY INSPECTION
WARNING:
Always adjust the alignment with the vehicle on a flat surface. Use CONSULT-II “EXHAUST SOLE-
NOID” active test to release the air pressure from the rear load leveling air suspension system.
NOTE:
If alignment is out of specification, inspect and replace any damaged or worn rear suspension parts before
making any adjustments.
1. Check and adjust the wheel alignment with the vehicle under unladen conditions. “Unladen conditions”
means that the fuel, coolant, and lubricant are full; and that the spare tire, jack, hand tools and mats are in
their designated positions.
2. Check the tires for incorrect air pressure and excessive wear.
3. Check the wheels for runout and damage. Refer to WT-5, "
Inspection" .
4. Check the wheel bearing axial end play.
5. Check the shock absorbers. Refer to RSU-30, "
Removal and Installation" .
6. Check each mounting point of the suspension components for any excessive looseness or damage.
7. Check each link, arm, and the rear suspension member for any damage.
8. Check the vehicle height. Refer to RSU-44, "
Wheelarch Height (Unladen*1)" .
• If vehicle height is not within ± 10 mm (0.39 in) of the specification, perform the control unit initialization
procedure. Refer to RSU-42, "
Initialization Procedure" .
GENERAL INFORMATION AND RECOMMENDATIONS
1. A Four-Wheel Thrust Alignment should be performed.
• This type of alignment is recommended for any NISSAN vehicle.
• The four-wheel “thrust” process helps ensure that the vehicle is properly aligned and the steering wheel
is centered.
• The alignment machine itself should be capable of accepting any NISSAN vehicle.
• The alignment machine should be checked to ensure that it is level.
2. Make sure the alignment machine is properly calibrated.
• Your alignment machine should be regularly calibrated in order to give correct information.
WEIA0102E
1. Rear lower link adjusting bolt, LH 2. Front lower link adjusting bolt, LH 3. Front lower link adjusting bolt, RH
4. Rear lower link adjusting bolt, RH
Axial end play : 0 mm (0 in)
Page 2673 of 3061
SE-1
BODY
C
D
E
F
G
H
J
K
L
M
SECTION SE
A
B
SE
N
O
P
CONTENTS
SEAT
SERVICE INFORMATION ............................3
PRECAUTIONS ...................................................3
Precaution for Supplemental Restraint System
(SRS) "AIR BAG" and "SEAT BELT PRE-TEN-
SIONER" ...................................................................
3
Precaution for Work ..................................................3
PREPARATION ...................................................4
Special Service Tool .................................................4
Commercial Service Tool ..........................................4
SQUEAK AND RATTLE TROUBLE DIAGNO-
SIS .......................................................................
5
Work Flow .................................................................5
Generic Squeak and Rattle Troubleshooting ............7
Diagnostic Worksheet ...............................................9
AUTOMATIC DRIVE POSITIONER ...................11
Component Parts and Harness Connector Loca-
tion ..........................................................................
11
System Description .................................................11
CAN Communication System Description ...............13
Schematic ...............................................................13
Wiring Diagram - AUT/DP - .....................................15
Terminal and Reference Value for BCM .................24
Driver Seat Control Unit Harness Connector Ter-
minal Layout ............................................................
25
Terminal and Reference Value for Driver Seat
Control Unit .............................................................
25
Automatic Drive Positioner Control Unit Harness
Connector Terminal Layout .....................................
28
Terminal and Reference Value for Automatic
Drive Positioner Control Unit ...................................
28
Work Flow ...............................................................30
Preliminary Check ...................................................30
BCM Power Supply and Ground Circuit Inspection
....
31
Power Supply and Ground Circuit Inspection .........31
CONSULT-II Function (AUTO DRIVE POS.) ..........32
CAN Communication Inspection Using CON-
SULT-II (Self-Diagnosis) ..........................................
35
Symptom Chart ........................................................35
Sliding Motor Circuit Inspection ...............................37
Reclining Motor LH Circuit Inspection .....................38
Lifting Motor (Front) Circuit Inspection ....................39
Lifting Motor (Rear) Circuit Inspection .....................40
Pedal Adjusting Motor Circuit Inspection .................41
Mirror Motor LH Circuit Inspection ...........................42
Mirror Motor RH Circuit Inspection ..........................44
Steering Wheel Tilt Circuit Inspection ......................45
Sliding Sensor Circuit Inspection .............................46
Reclining Sensor Circuit Inspection .........................47
Lifting Sensor (Front) Circuit Inspection ..................48
Lifting Sensor (Rear) Circuit Inspection ...................49
Pedal Adjusting Sensor Circuit Inspection ...............50
Mirror Sensor LH Circuit Inspection .........................51
Mirror Sensor RH Circuit Inspection ........................53
Steering Wheel Tilt Sensor Circuit Inspection .........54
Sliding Switch Circuit Inspection ..............................55
Reclining Switch Inspection .....................................56
Lifting Switch (Front) Circuit Inspection ...................58
Lifting Switch (Rear) Circuit Inspection ....................59
Power Seat Switch Ground Inspection ....................60
Pedal Adjusting Switch Circuit Inspection ...............61
Door Mirror Remote Control Switch (Changeover
Switch) Circuit Inspection ........................................
62
Door Mirror Remote Control Switch (Mirror
Switch) Circuit Inspection ........................................
64
Door Mirror Remote Control Switch Ground Circuit
Inspection ................................................................
65
Seat Memory Switch Circuit Inspection ...................66
Seat Memory Indicator Lamp Circuit Inspection ......67
Door Mirror Sensor Power Supply and Ground
Circuit inspection .....................................................
69
A/T Device (Park Position Switch) Circuit Inspec-
tion ...........................................................................
69
Steering Wheel Tilt Switch Circuit Inspection ..........70
Front Door Switch LH Circuit Inspection ..................72
UART Communication Line Circuit Inspection ........73
Page 2683 of 3061
AUTOMATIC DRIVE POSITIONER
SE-11
< SERVICE INFORMATION >
C
D
E
F
G
H
J
K
L
MA
B
SE
N
O
P
AUTOMATIC DRIVE POSITIONER
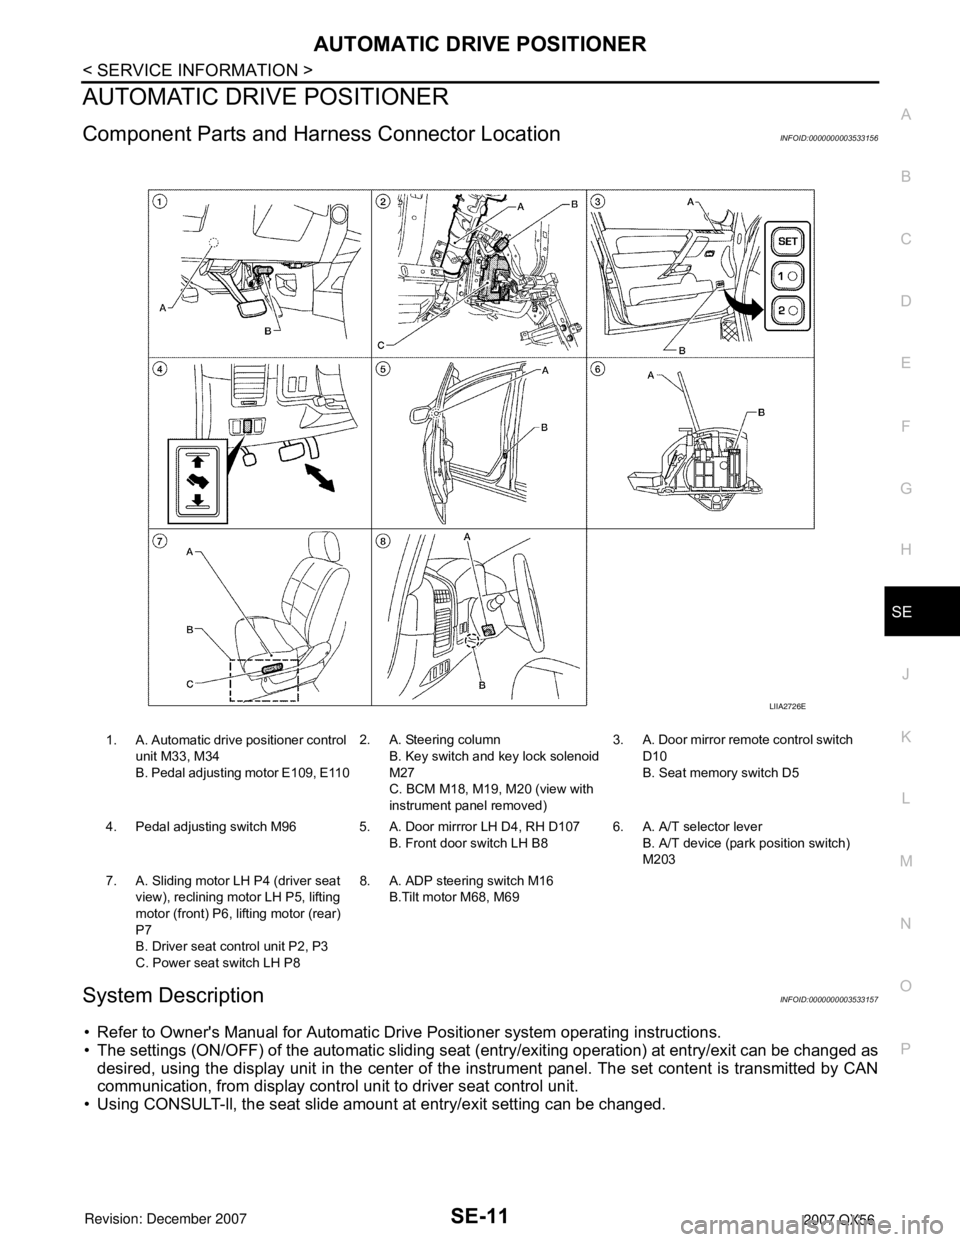
Component Parts and Harness Connector LocationINFOID:0000000003533156
System DescriptionINFOID:0000000003533157
• Refer to Owner's Manual for Automatic Drive Positioner system operating instructions.
• The settings (ON/OFF) of the automatic sliding seat (entry/exiting operation) at entry/exit can be changed as
desired, using the display unit in the center of the instrument panel. The set content is transmitted by CAN
communication, from display control unit to driver seat control unit.
• Using CONSULT-ll, the seat slide amount at entry/exit setting can be changed.
1. A. Automatic drive positioner control
unit M33, M34
B. Pedal adjusting motor E109, E1102. A. Steering column
B. Key switch and key lock solenoid
M27
C. BCM M18, M19, M20 (view with
instrument panel removed)3. A. Door mirror remote control switch
D10
B. Seat memory switch D5
4. Pedal adjusting switch M96 5. A. Door mirrror LH D4, RH D107
B. Front door switch LH B86. A. A/T selector lever
B. A/T device (park position switch)
M203
7. A. Sliding motor LH P4 (driver seat
view), reclining motor LH P5, lifting
motor (front) P6, lifting motor (rear)
P7
B. Driver seat control unit P2, P3
C. Power seat switch LH P88. A. ADP steering switch M16
B.Tilt motor M68, M69
LIIA2726E