Page 1274 of 4366

DI-28
UNIFIED METER AND A/C AMP
Revision: 2006 July 2007 FX35/FX45
UNIFIED METER AND A/C AMPPFP:27760
System DescriptionNKS00300
�For the unified meter and A/C amp., the signal required for controlling the combination meter are inte-
grated in the A/C auto amp.
�The unified meter and A/C amp. corresponds to a CONSULT-II function (self-diagnosis results, CAN diag-
nosis support monitor, data monitor).
COMBINATION METER CONTROL FUNCTION
�Unified meter and A/C amp. receives necessary information for combination meter from each unit by CAN
communication.
�Unified meter and A/C amp. transmits a signals with communication line (TX, RX) between unified meter
and A/C amp. and combination meter.
Input/output signals between unified meter and A/C amp. and combination meter.
NOTE:
Combination meter performs fail-safe operation when unified meter and A/C amp. communication is malfunctioning. Refer to DI-8,
"FAIL-SAFE" . Unit Input Output
Unified meter and A/C amp.
�Seat belt buckle switch signal (Driver's side)
�Parking brake signal
�Illumination control nighttime required signal
�Refuel status signal
�Low-fuel warning lamp condition signal
�Combination meter receive error signal
�Delivery destination data signal
�Combination meter specifications signal
�Vehicle speed signal (8-pulse)
�Engine speed signal
�Engine coolant temperature signal
�Fuel level sensor signal (resistance value)
�Malfunction indicator lamp signal
�ABS warning lamp signal
�Low tire pressure warning lamp signal
�Run-flat tire warning lamp signal
�Brake warning lamp signal
�A/T CHECK warning lamp signal
�ICC warning lamp signal
�Oil pressure switch signal
�Door switch signal
�AWD warning lamp signal
�Key warning lamp signal
�VDC OFF indicator lamp signal
�SLIP indicator lamp signal
�CRUISE indicator lamp signal
�SET indicator lamp signal
�High beam request signal
�Turn indicator signal
�Snow mode switch signal
�ICC system display signal
�Shift position indicator signal
�Manual mode indicator signal
�Manual mode gear position signal
�CAN communication condition signal of A/T
�Position lights request signal
�Buzzer output signal
Page 1294 of 4366

DI-48
WARNING LAMPS
Revision: 2006 July 2007 FX35/FX45
Oil Pressure Warning Lamp Stays Off (Ignition Switch ON)NKS0030E
1. CHECK OIL PRESSURE WARNING LAMP OPERATION
Activate IPDM E/R auto active test. Refer to PG-21, "
Auto Active Test" .
Does oil pressure warning lamp blink?
YES >> GO TO 2.
NO >> GO TO 5.
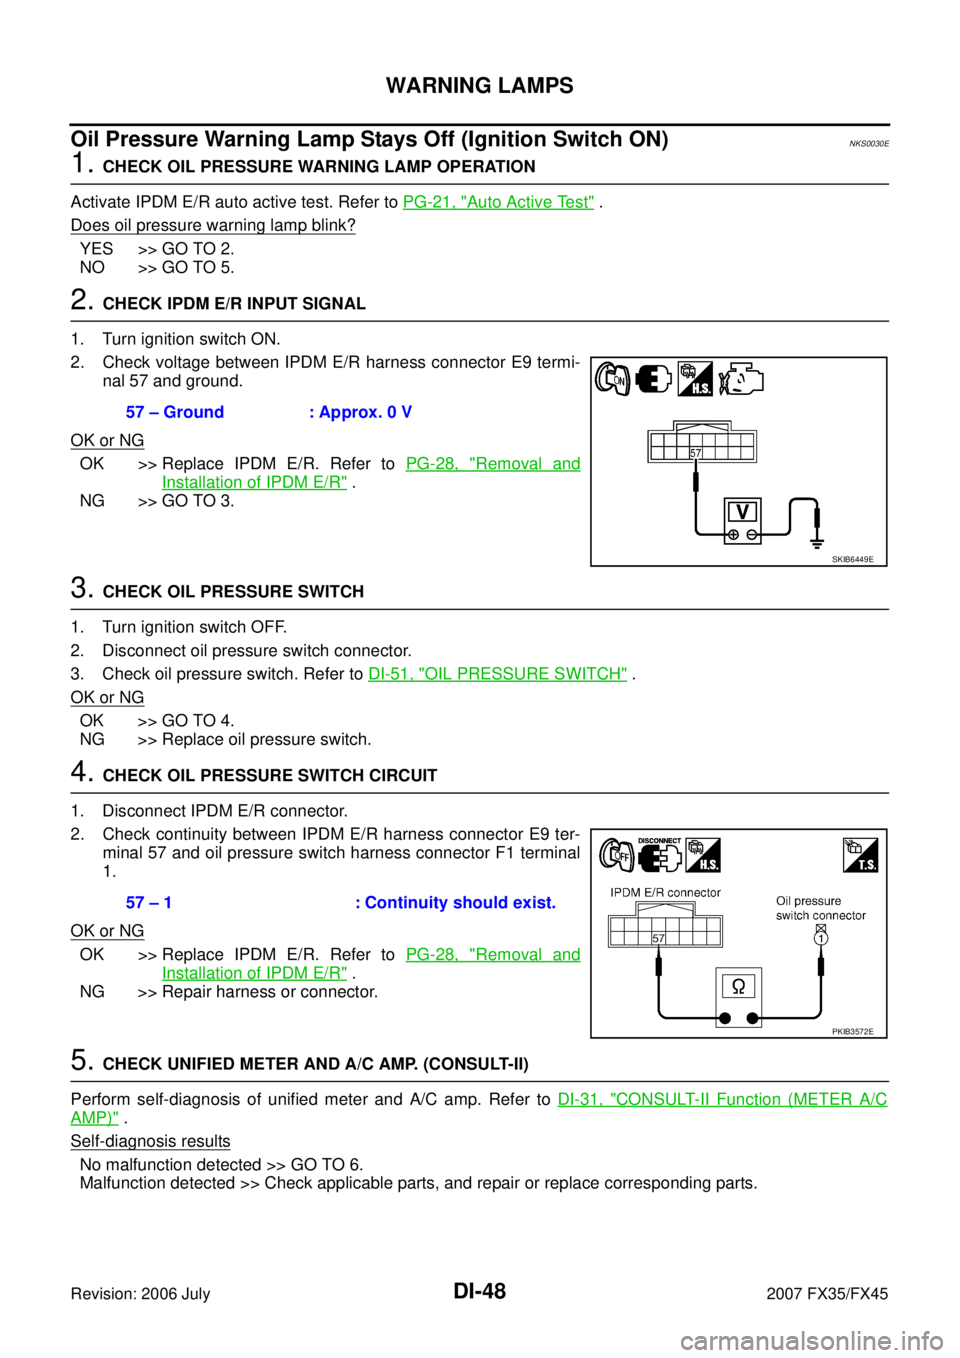
2. CHECK IPDM E/R INPUT SIGNAL
1. Turn ignition switch ON.
2. Check voltage between IPDM E/R harness connector E9 termi- nal 57 and ground.
OK or NG
OK >> Replace IPDM E/R. Refer to PG-28, "Removal and
Installation of IPDM E/R" .
NG >> GO TO 3.
3. CHECK OIL PRESSURE SWITCH
1. Turn ignition switch OFF.
2. Disconnect oil pressure switch connector.
3. Check oil pressure switch. Refer to DI-51, "
OIL PRESSURE SWITCH" .
OK or NG
OK >> GO TO 4.
NG >> Replace oil pressure switch.
4. CHECK OIL PRESSURE SWITCH CIRCUIT
1. Disconnect IPDM E/R connector.
2. Check continuity between IPDM E/R harness connector E9 ter- minal 57 and oil pressure switch harness connector F1 terminal
1.
OK or NG
OK >> Replace IPDM E/R. Refer to PG-28, "Removal and
Installation of IPDM E/R" .
NG >> Repair harness or connector.
5. CHECK UNIFIED METER AND A/C AMP. (CONSULT-II)
Perform self-diagnosis of unified meter and A/C amp. Refer to DI-31, "
CONSULT-II Function (METER A/C
AMP)" .
Self-diagnosis results
No malfunction detected >> GO TO 6.
Malfunction detected >> Check applicable parts, and repair or replace corresponding parts. 57 – Ground : Approx. 0 V
SKIB6449E
57 – 1 : Continuity should exist.
PKIB3572E
Page 1295 of 4366

WARNING LAMPS DI-49
C
D E
F
G H
I
J
L
M A
B
DI
Revision: 2006 July 2007 FX35/FX45
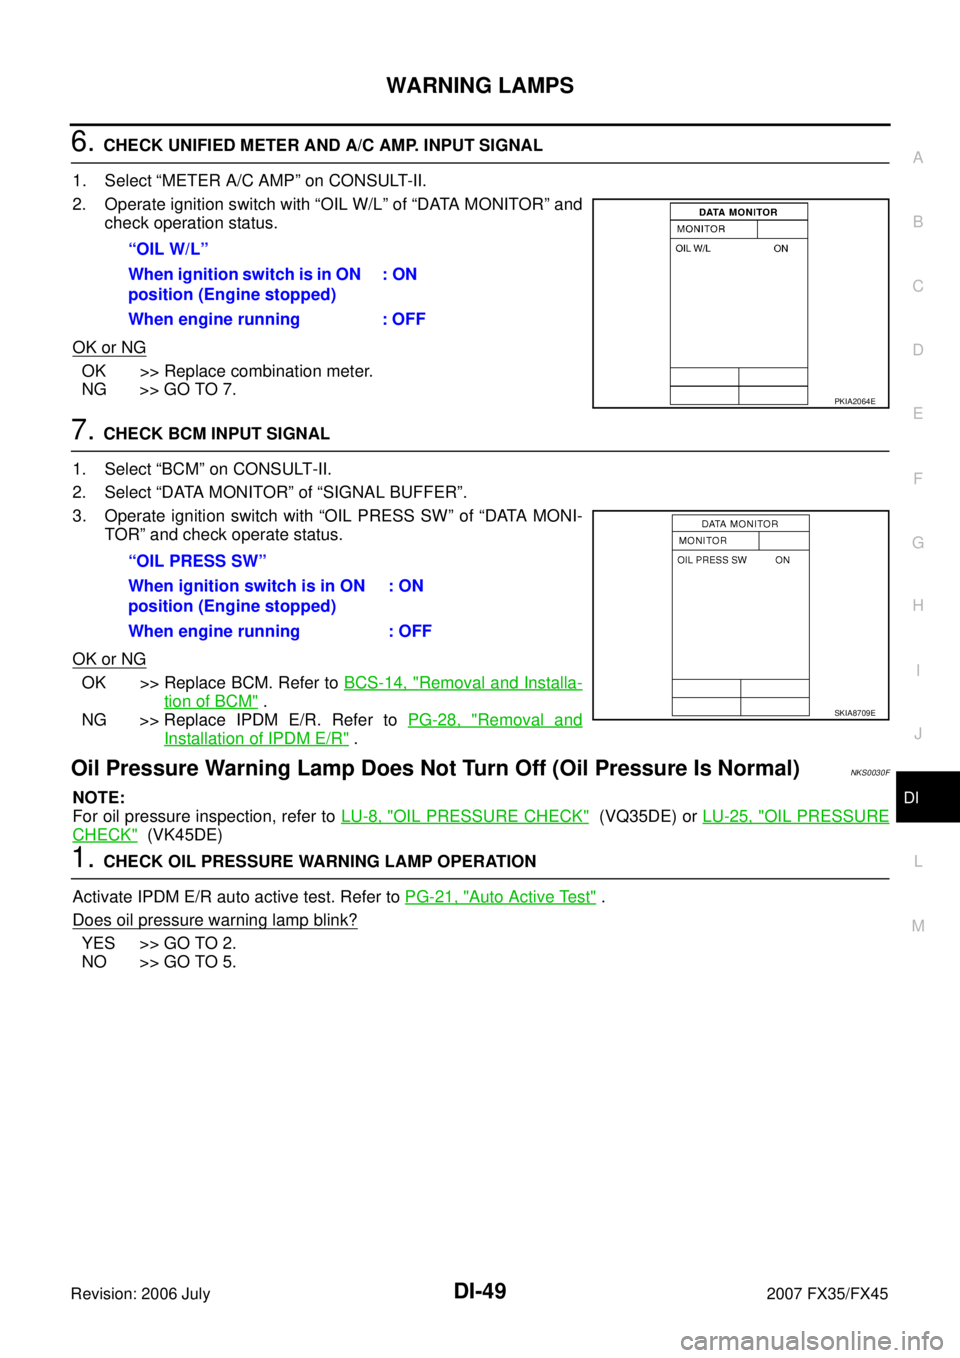
6. CHECK UNIFIED METER AND A/C AMP. INPUT SIGNAL
1. Select “METER A/C AMP” on CONSULT-II.
2. Operate ignition switch with “OIL W/L” of “DATA MONITOR” and check operation status.
OK or NG
OK >> Replace combination meter.
NG >> GO TO 7.
7. CHECK BCM INPUT SIGNAL
1. Select “BCM” on CONSULT-II.
2. Select “DATA MONITOR” of “SIGNAL BUFFER”.
3. Operate ignition switch with “OIL PRESS SW” of “DATA MONI- TOR” and check operate status.
OK or NG
OK >> Replace BCM. Refer to BCS-14, "Removal and Installa-
tion of BCM" .
NG >> Replace IPDM E/R. Refer to PG-28, "
Removal and
Installation of IPDM E/R" .
Oil Pressure Warning Lamp Does Not Turn Off (Oil Pressure Is Normal)NKS0030F
NOTE:
For oil pressure inspection, refer to LU-8, "
OIL PRESSURE CHECK" (VQ35DE) or LU-25, "OIL PRESSURE
CHECK" (VK45DE)
1. CHECK OIL PRESSURE WARNING LAMP OPERATION
Activate IPDM E/R auto active test. Refer to PG-21, "
Auto Active Test" .
Does oil pressure warning lamp blink?
YES >> GO TO 2.
NO >> GO TO 5. “OIL W/L”
When ignition switch is in ON
position (Engine stopped) : ON
When engine running : OFF
PKIA2064E
“OIL PRESS SW”
When ignition switch is in ON
position (Engine stopped) : ON
When engine running : OFF
SKIA8709E
Page 1296 of 4366

DI-50
WARNING LAMPS
Revision: 2006 July 2007 FX35/FX45
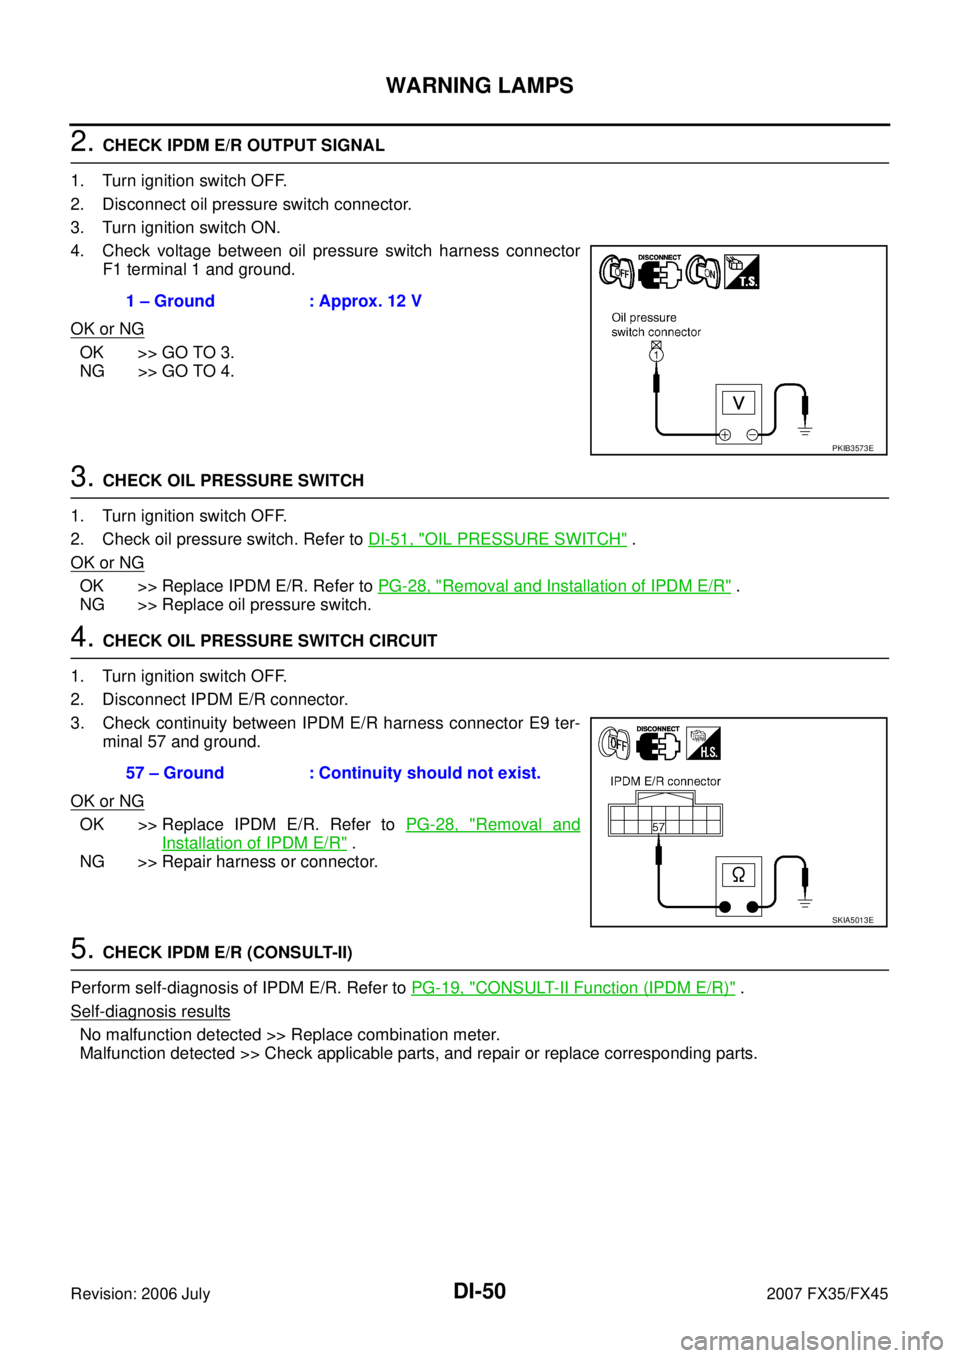
2. CHECK IPDM E/R OUTPUT SIGNAL
1. Turn ignition switch OFF.
2. Disconnect oil pressure switch connector.
3. Turn ignition switch ON.
4. Check voltage between oil pressure switch harness connector F1 terminal 1 and ground.
OK or NG
OK >> GO TO 3.
NG >> GO TO 4.
3. CHECK OIL PRESSURE SWITCH
1. Turn ignition switch OFF.
2. Check oil pressure switch. Refer to DI-51, "
OIL PRESSURE SWITCH" .
OK or NG
OK >> Replace IPDM E/R. Refer to PG-28, "Removal and Installation of IPDM E/R" .
NG >> Replace oil pressure switch.
4. CHECK OIL PRESSURE SWITCH CIRCUIT
1. Turn ignition switch OFF.
2. Disconnect IPDM E/R connector.
3. Check continuity between IPDM E/R harness connector E9 ter- minal 57 and ground.
OK or NG
OK >> Replace IPDM E/R. Refer to PG-28, "Removal and
Installation of IPDM E/R" .
NG >> Repair harness or connector.
5. CHECK IPDM E/R (CONSULT-II)
Perform self-diagnosis of IPDM E/R. Refer to PG-19, "
CONSULT-II Function (IPDM E/R)" .
Self-diagnosis results
No malfunction detected >> Replace combination meter.
Malfunction detected >> Check applicable parts, and repair or replace corresponding parts. 1 – Ground : Approx. 12 V
PKIB3573E
57 – Ground : Continuity should not exist.
SKIA5013E
Page 1297 of 4366
WARNING LAMPS DI-51
C
D E
F
G H
I
J
L
M A
B
DI
Revision: 2006 July 2007 FX35/FX45
Component InspectionNKS0030G
OIL PRESSURE SWITCH
Check continuity between oil pressure switch and ground.
Condition
Oil pressure [kPa (kg/cm2 , psi)] Continuity
Engine stopped Less than 29 (0.3, 4) Yes Engine running More than 29 (0.3, 4) No
ELF0044D
Page 1326 of 4366

DI-80
LANE DEPARTURE WARNING SYSTEM
Revision: 2006 July 2007 FX35/FX45
Action TestNKS00314
LDW SYSTEM RUNNING TEST
WARNING:
�Be careful when performing road test.
�Understand “Precautions” and “System Description” well before the road test. Refer to DI-77,
"Precautions for Lane Departure Warning (LDW) system" and DI-77, "System Description" .
Function Check
Check the LDW system operation according to the condition that the warning function works. Refer to DI-77,
"LDW SYSTEM OPERATION" .
Camera Aiming AdjustmentNKS00315
OUTLINE
Adjust the camera aiming every time the LDW camera unit is removed or installed.
CAUTION:
�Place the vehicle on the level ground when the camera aiming adjustment is operated.
�Follow the CONSULT-II when adjusting the camera aiming. (Camera aiming adjustment cannot be
operated without CONSULT-II.)
PREPARATION
�Keep all tires inflated to correct pressures. Adjust the tire pressure to the specified pressure value.
�There is no-load in vehicle. Check if coolant, engine oil are filled up to correct level and fuel tank is full.
�Shift the gear into “P” position and release the parking brake.
�Clean the windshield.
NOTE:
Do not place anything reflective on the upper surface of instrument panel.
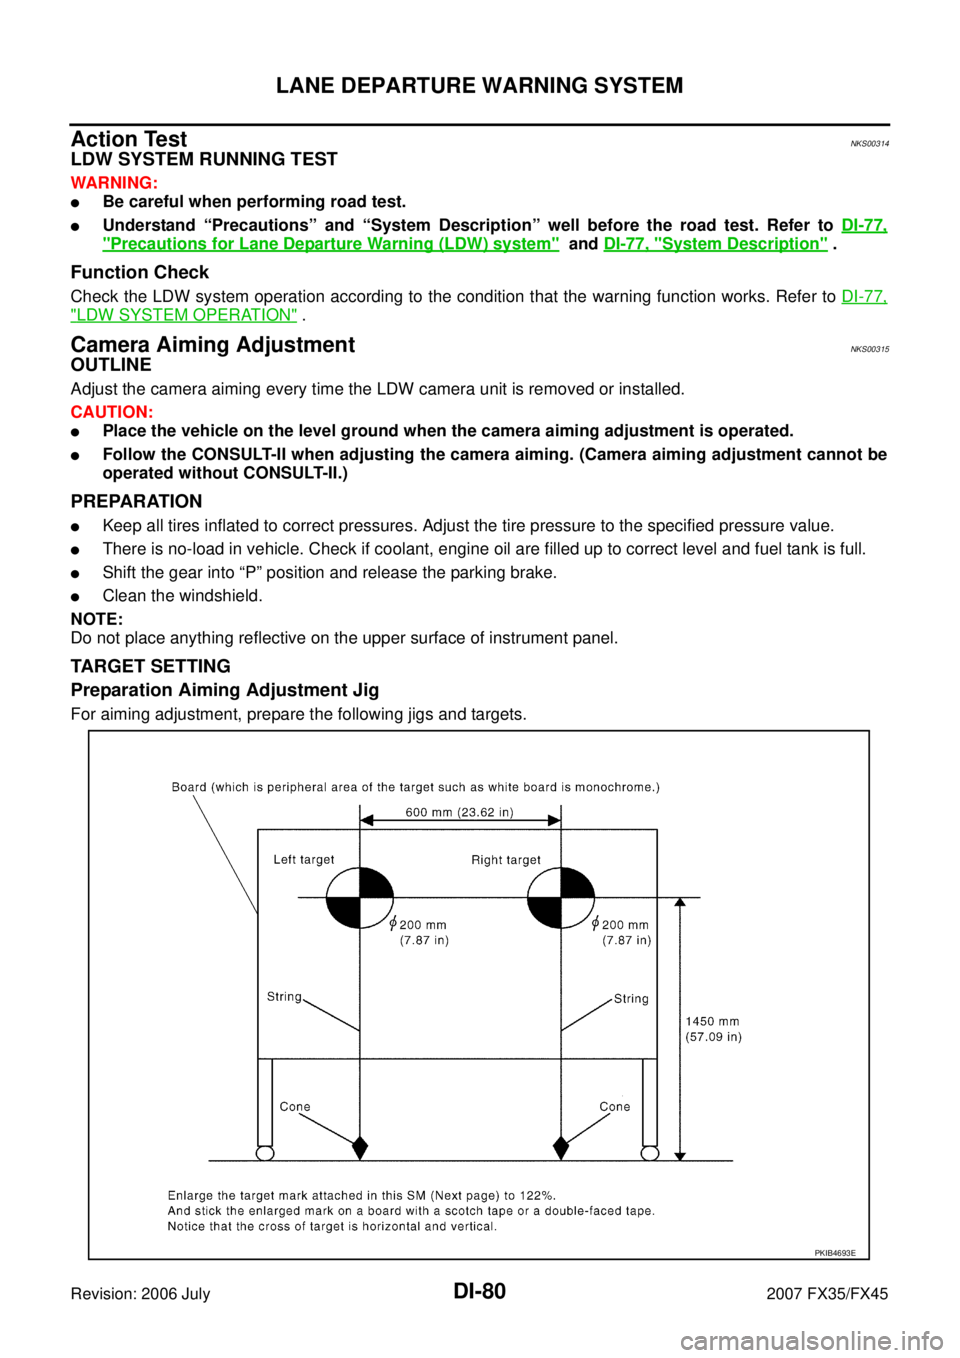
TARGET SETTING
Preparation Aiming Adjustment Jig
For aiming adjustment, prepare the following jigs and targets.
PKIB4693E
Page 1457 of 4366
BASIC SERVICE PROCEDURE EC-81
[VQ35DE]
C
D E
F
G H
I
J
K L
M A
EC
Revision: 2006 July 2007 FX35/FX45
Idle Speed and Ignition Timing CheckNBS003LQ
IDLE SPEED
With CONSULT-II
Check idle speed in “DATA MONITOR” mode with CONSULT-II.
With GST
Check idle speed with Service $01 GST.
IGNITION TIMING
Any of following two methods may be used.
Method A
1. Attach timing light to loop wire as shown.
2. Check ignition timing.
Method B
1. Remove No. 1 ignition coil.
SEF058Y
PBIB1574E
PBIB1602E
PBIB1567E
Page 1458 of 4366
![INFINITI FX35 2007 Service Manual EC-82
[VQ35DE]
BASIC SERVICE PROCEDURE
Revision: 2006 July 2007 FX35/FX45
2. Connect No. 1 ignition coil and No. 1 spark plug with suitable
high-tension wire as shown, and attach timing light clamp t INFINITI FX35 2007 Service Manual EC-82
[VQ35DE]
BASIC SERVICE PROCEDURE
Revision: 2006 July 2007 FX35/FX45
2. Connect No. 1 ignition coil and No. 1 spark plug with suitable
high-tension wire as shown, and attach timing light clamp t](/manual-img/42/57018/w960_57018-1457.png)
EC-82
[VQ35DE]
BASIC SERVICE PROCEDURE
Revision: 2006 July 2007 FX35/FX45
2. Connect No. 1 ignition coil and No. 1 spark plug with suitable
high-tension wire as shown, and attach timing light clamp to this
wire.
3. Check ignition timing.
Procedure After Replacing ECMNBS006SE
When replacing ECM, the following procedure must be performed.
1. Perform initialization of IVIS (NATS) system and registration of all IVIS (NATS) ignition key IDs. Refer to BL-207
.
2. Perform EC-82, "
VIN Registration" .
3. Perform EC-83, "
Accelerator Pedal Released Position Learning" .
4. Perform EC-83, "
Throttle Valve Closed Position Learning" .
5. Perform EC-83, "
Idle Air Volume Learning" .
VIN RegistrationNBS003LS
DESCRIPTION
VIN Registration is an operation to registering VIN in ECM. It must be performed each time ECM is replaced.
NOTE:
Accurate VIN which is registered in ECM may be required for Inspection & Maintenance (I/M).
OPERATION PROCEDURE
With CONSULT-II
1. Check the VIN of the vehicle and note it. Refer to GI-49, "IDENTIFICATION INFORMATION" .
2. Turn ignition switch ON and engine stopped.
PBIB1573E
SEF166Y
PBIB1602E