Page 3810 of 4366

PG-66
HARNESS
Revision: 2006 July 2007 FX35/FX45
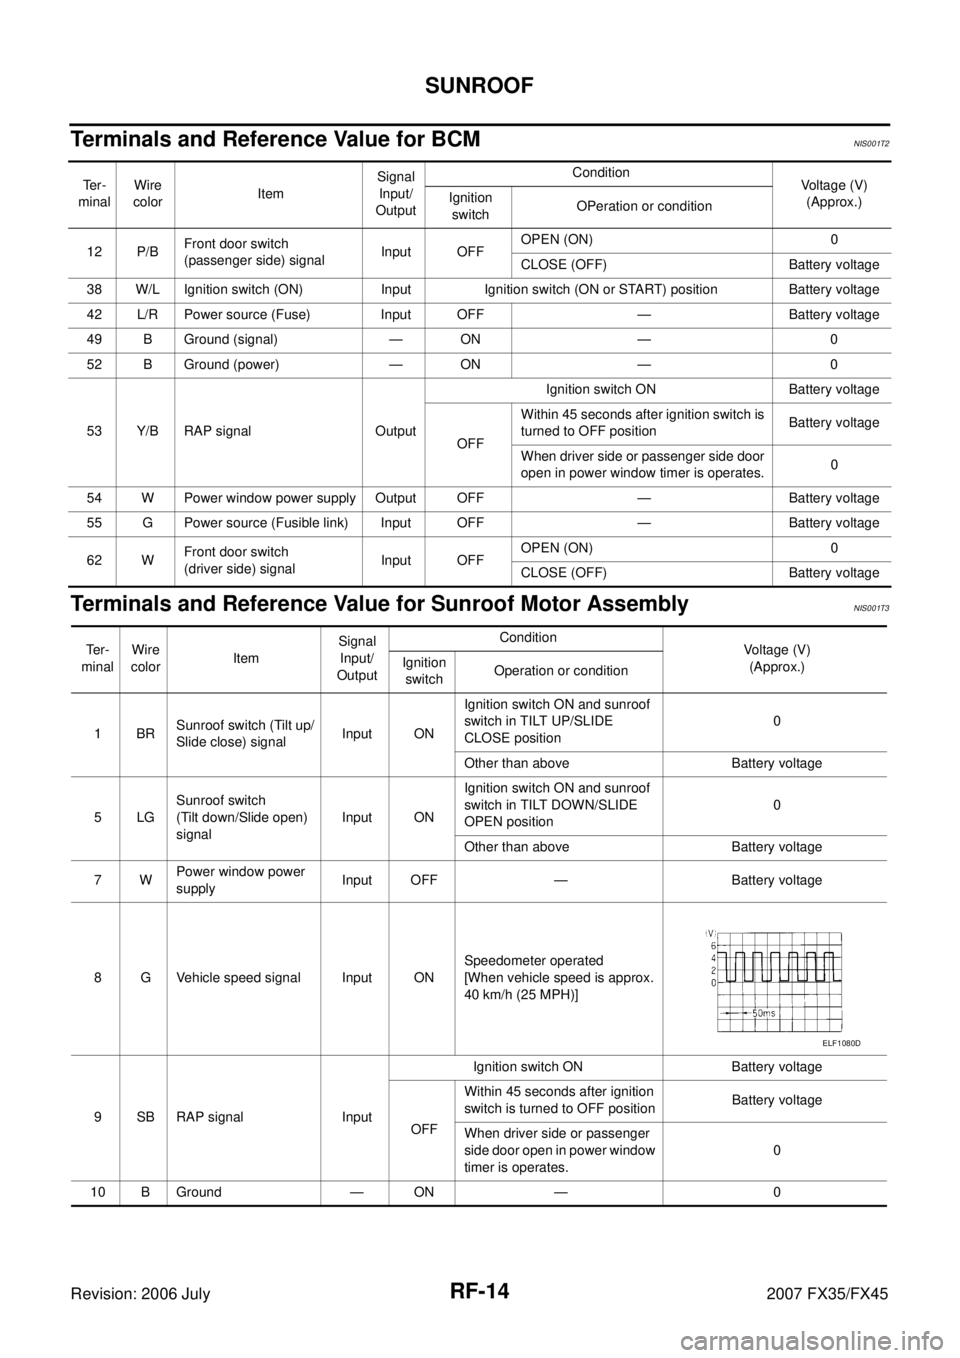
P/SCKT WW Power Socket
PGC/V EC EVAP Canister Purge Volume Control Solenoid Valve
PHASE EC Camshaft Position Sensor (PHASE)
PHSB1 EC Camshaft Position Sensor (PHASE) (Bank 1)
PHSB2 EC Camshaft Position Sensor (PHASE) (Bank 2)
PNP/SW AT Park/Neutral Position Switch
PNP/SW EC Park/Neutral Position Switch
POS EC Crankshaft Position Sensor (CKPS) (POS)
POWER PG Power Supply Routing
PRE/SE EC EVAP Control System Pressure Sensor
PS/SEN EC Power Steering Pressure Sensor
R/VIEW DI Rear View Camera Control System
ROOM/L LT Interior Room Lamp
RP/SEN EC Refrigerant Pressure Sensor
SEAT SE Power Seat
SEN/PW EC Sensor Power Supply
SHIFT AT A/T Shift Lock System
SNOWSW EC Snow Mode Switch
SROOF RF Sunroof
SRS SRS Supplemental Restraint System
START SC Starting System
STOP/L LT Stop Lamp
STSIG AT Start Signal Circuit
T/WARN WT Low Tire Pressure Warning System
TAIL/L LT Parking, License and Tail Lamps
TPS1 EC Throttle Position Sensor (Sensor 1)
TPS2 EC Throttle Position Sensor (Sensor 2)
TPS3 EC Throttle Position Sensor
TRNSCV BL Homelink Universal Transceiver
TURN LT Turn Signal and Hazard Warning Lamp
VDC BRC Vehicle Dynamics Control System
VEHSEC BL Vehicle Security System
VENT/V EC EVAP Canister Vent Control Valve
VIAS EC Variable Induction Air Control System
VIAS/V EC VIAS Control Solenoid Valve
VSSA/T AT Vehicle Speed Sensor A/T (Revolution Sensor)
WARN DI Warning Lamps
WINDOW GW Power Window
WIP/R WW Rear Wiper and Washer
WIPER WW Front Wiper and Washer Code Section Wiring Diagram Name
Page 3916 of 4366

RF-14
SUNROOF
Revision: 2006 July 2007 FX35/FX45
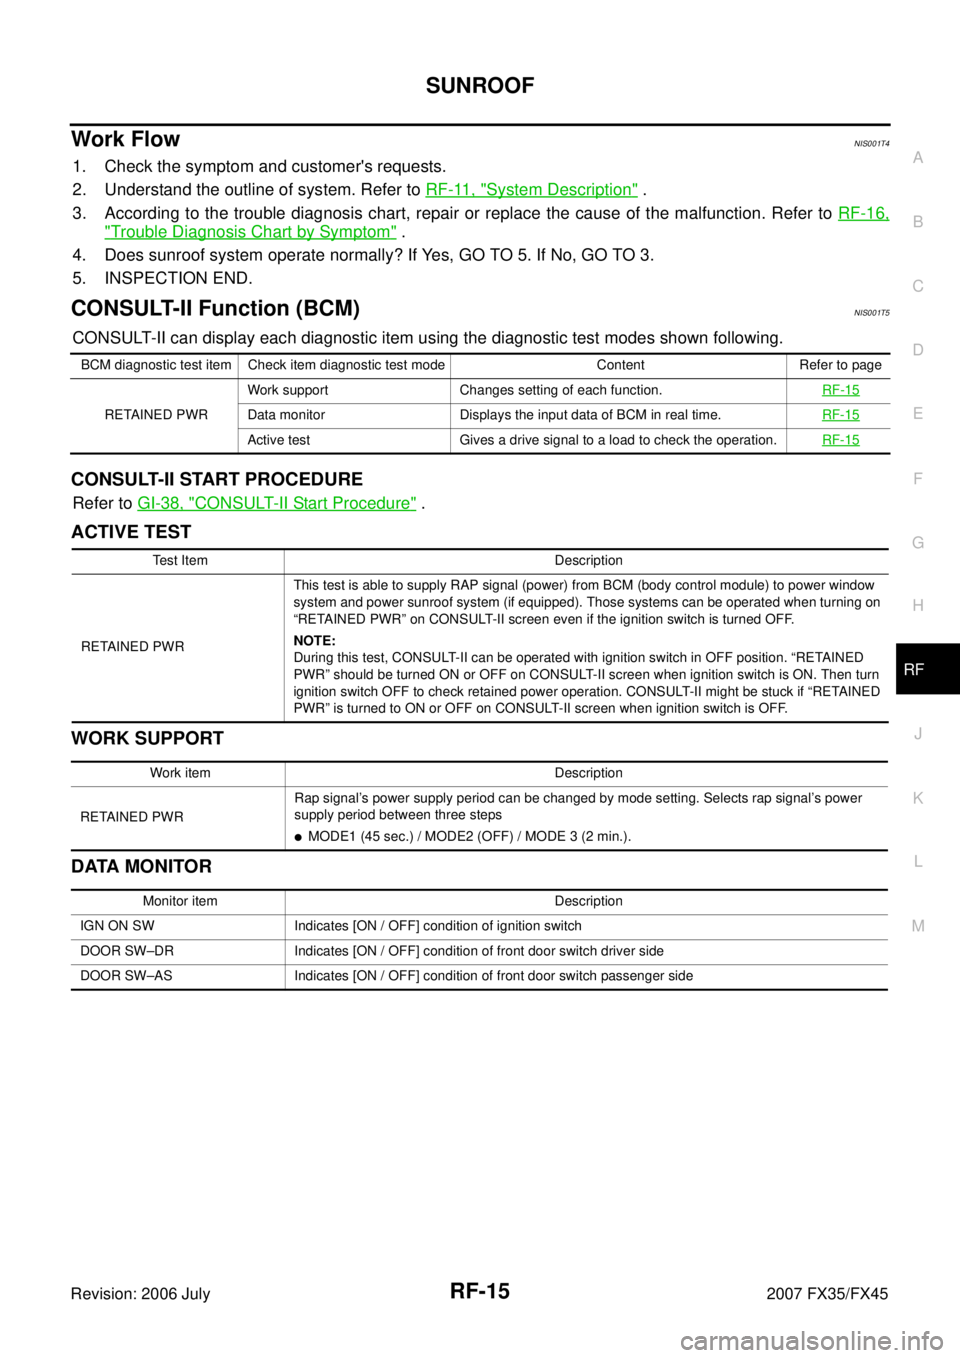
Terminals and Reference Value for BCMNIS001T2
Terminals and Reference Value for Sunroof Motor AssemblyNIS001T3
Te r -
minal Wire
color Item Signal
Input/
Output Condition
Voltage (V)
(Approx.)
Ignition
switch OPeration or condition
12 P/B Front door switch
(passenger side) signal Input OFF OPEN (ON) 0
CLOSE (OFF) Battery voltage
38 W/L Ignition switch (ON) Input Ignition switch (ON or START) position Battery voltage
42 L/R Power source (Fuse) Input OFF — Battery voltage
49 B Ground (signal) — ON — 0
52 B Ground (power) — ON — 0
53 Y/B RAP signal Output Ignition switch ON Battery voltage
OFF Within 45 seconds after ignition switch is
turned to OFF position Battery voltage
When driver side or passenger side door
open in power window timer is operates. 0
54 W Power window power supply Output OFF — Battery voltage
55 G Power source (Fusible link) Input OFF — Battery voltage
62 W Front door switch
(driver side) signal Input OFF OPEN (ON) 0
CLOSE (OFF) Battery voltage
Te r -
minal Wire
color Item Signal
Input/
Output Condition
Voltage (V)
(Approx.)
Ignition
switch Operation or condition
1BR Sunroof switch (Tilt up/
Slide close) signal Input ON Ignition switch ON and sunroof
switch in TILT UP/SLIDE
CLOSE position 0
Other than above Battery voltage
5LG Sunroof switch
(Tilt down/Slide open)
signal Input ON Ignition switch ON and sunroof
switch in TILT DOWN/SLIDE
OPEN position 0
Other than above Battery voltage
7W Power window power
supply Input OFF — Battery voltage
8 G Vehicle speed signal Input ON Speedometer operated
[When vehicle speed is approx.
40 km/h (25 MPH)]
9 SB RAP signal Input Ignition switch ON Battery voltage
OFF Within 45 seconds after ignition
switch is turned to OFF position Battery voltage
When driver side or passenger
side door open in power window
timer is operates. 0
10 B Ground — ON — 0
ELF1080D
Page 3917 of 4366

SUNROOF RF-15
C
D E
F
G H
J
K L
M A
B
RF
Revision: 2006 July 2007 FX35/FX45
Work FlowNIS001T4
1. Check the symptom and customer's requests.
2. Understand the outline of system. Refer to RF-11, "
System Description" .
3. According to the trouble diagnosis chart, repair or replace the cause of the malfunction. Refer to RF-16,
"Trouble Diagnosis Chart by Symptom" .
4. Does sunroof system operate normally? If Yes, GO TO 5. If No, GO TO 3.
5. INSPECTION END.
CONSULT-II Function (BCM)NIS001T5
CONSULT-II can display each diagnostic item using the diagnostic test modes shown following.
CONSULT-II START PROCEDURE
Refer to GI-38, "CONSULT-II Start Procedure" .
ACTIVE TEST
WORK SUPPORT
DATA MONITOR
BCM diagnostic test item Check item diagnostic test mode Content Refer to page RETAINED PWR Work support Changes setting of each function.
RF-15
Data monitor Displays the input data of BCM in real time.RF-15
Active test Gives a drive signal to a load to check the operation.RF-15
Test Item Description
RETAINED PWR This test is able to supply RAP signal (power) from BCM (body control module) to power window
system and power sunroof system (if equipped). Those systems can be operated when turning on
“RETAINED PWR” on CONSULT-II screen even if the ignition switch is turned OFF.
NOTE:
During this test, CONSULT-II can be operated with ignition switch in OFF position. “RETAINED
PWR” should be turned ON or OFF on CONSULT-II screen when ignition switch is ON. Then turn
ignition switch OFF to check retained power operation. CONSULT-II might be stuck if “RETAINED
PWR” is turned to ON or OFF on CONSULT-II screen when ignition switch is OFF.
Work item Description
RETAINED PWR Rap signal’s power supply period can be changed by mode setting. Selects rap signal’s power
supply period between three steps
�MODE1 (45 sec.) / MODE2 (OFF) / MODE 3 (2 min.).
Monitor item Description
IGN ON SW Indicates [ON / OFF] condition of ignition switch
DOOR SW–DR Indicates [ON / OFF] condition of front door switch driver side
DOOR SW–AS Indicates [ON / OFF] condition of front door switch passenger side
Page 4025 of 4366

CHARGING SYSTEM SC-27
C
D E
F
G H
I
J
L
M A
B
SC
Revision: 2006 July 2007 FX35/FX45
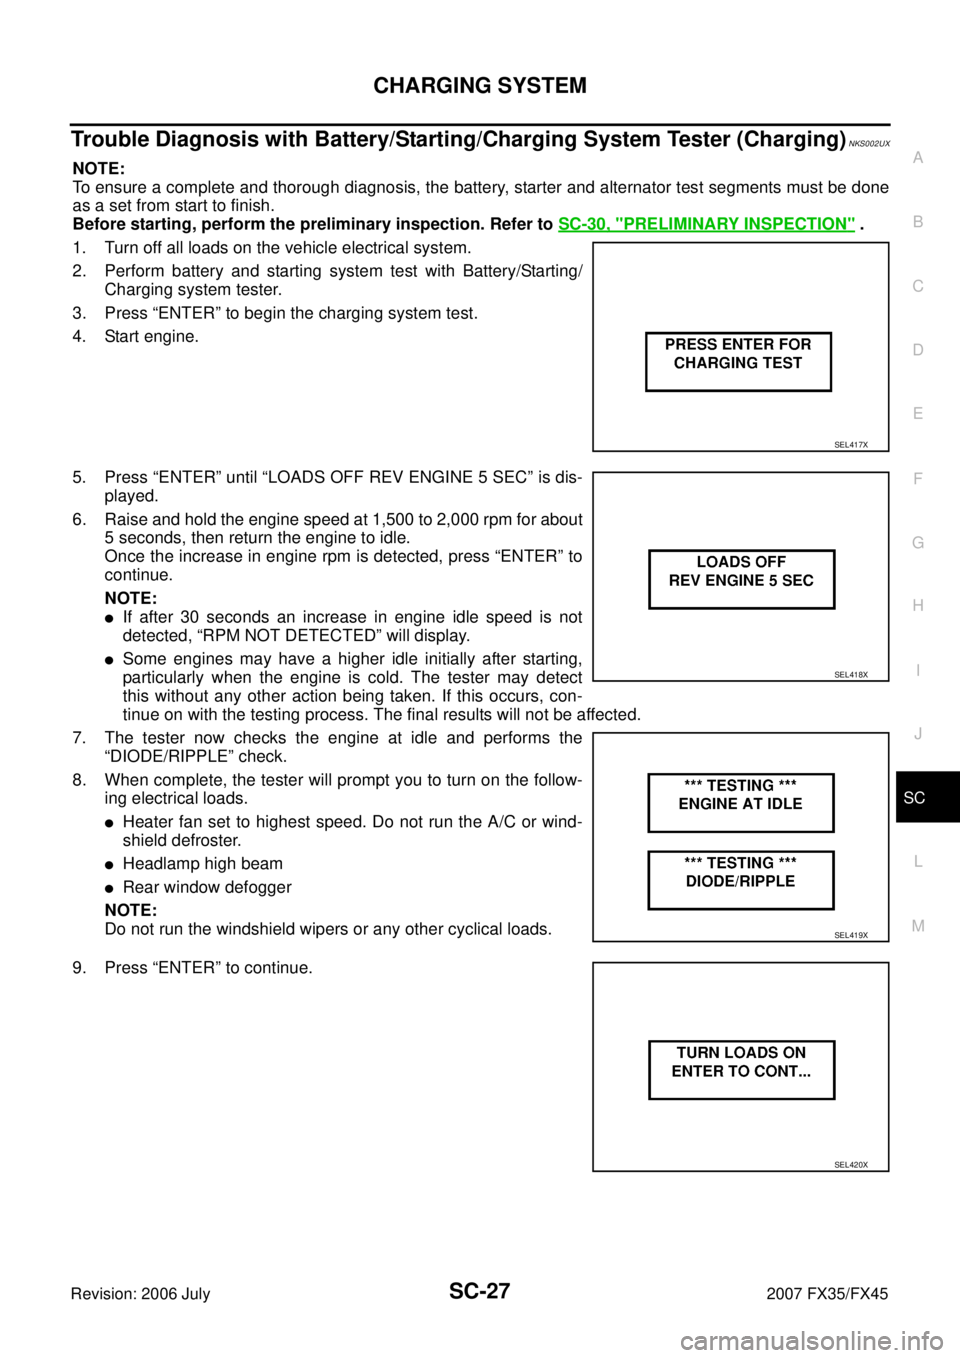
Trouble Diagnosis with Battery/Starting/Charging System Tester (Charging)NKS002UX
NOTE:
To ensure a complete and thorough diagnosis, the battery, starter and alternator test segments must be done
as a set from start to finish.
Before starting, perform the preliminary inspection. Refer to SC-30, "
PRELIMINARY INSPECTION" .
1. Turn off all loads on the vehicle electrical system.
2. Perform battery and starting system test with Battery/Starting/ Charging system tester.
3. Press “ENTER” to begin the charging system test.
4. Start engine.
5. Press “ENTER” until “LOADS OFF REV ENGINE 5 SEC” is dis- played.
6. Raise and hold the engine speed at 1,500 to 2,000 rpm for about 5 seconds, then return the engine to idle.
Once the increase in engine rpm is detected, press “ENTER” to
continue.
NOTE:
�If after 30 seconds an increase in engine idle speed is not
detected, “RPM NOT DETECTED” will display.
�Some engines may have a higher idle initially after starting,
particularly when the engine is cold. The tester may detect
this without any other action being taken. If this occurs, con-
tinue on with the testing process. The final results will not be affected.
7. The tester now checks the engine at idle and performs the “DIODE/RIPPLE” check.
8. When complete, the tester will prompt you to turn on the follow- ing electrical loads.
�Heater fan set to highest speed. Do not run the A/C or wind-
shield defroster.
�Headlamp high beam
�Rear window defogger
NOTE:
Do not run the windshield wipers or any other cyclical loads.
9. Press “ENTER” to continue.
SEL417X
SEL418X
SEL419X
SEL420X
Page 4357 of 4366

REAR WIPER AND WASHER SYSTEM WW-51
C
D E
F
G H
I
J
L
M A
B
WW
Revision: 2006 July 2007 FX35/FX45
Removal and Installation of Rear Wiper Arm, Adjustment of Wiper Arms Stop
Location
NKS004P1
REMOVAL
1. Turn rear wiper switch ON to operate wiper motor, then turn rear wiper switch OFF (auto stop).
2. Remove rear wiper arm cap, and remove rear wiper arm nut.
3. Remove rear wiper arm from the vehicle.
INSTALLATION
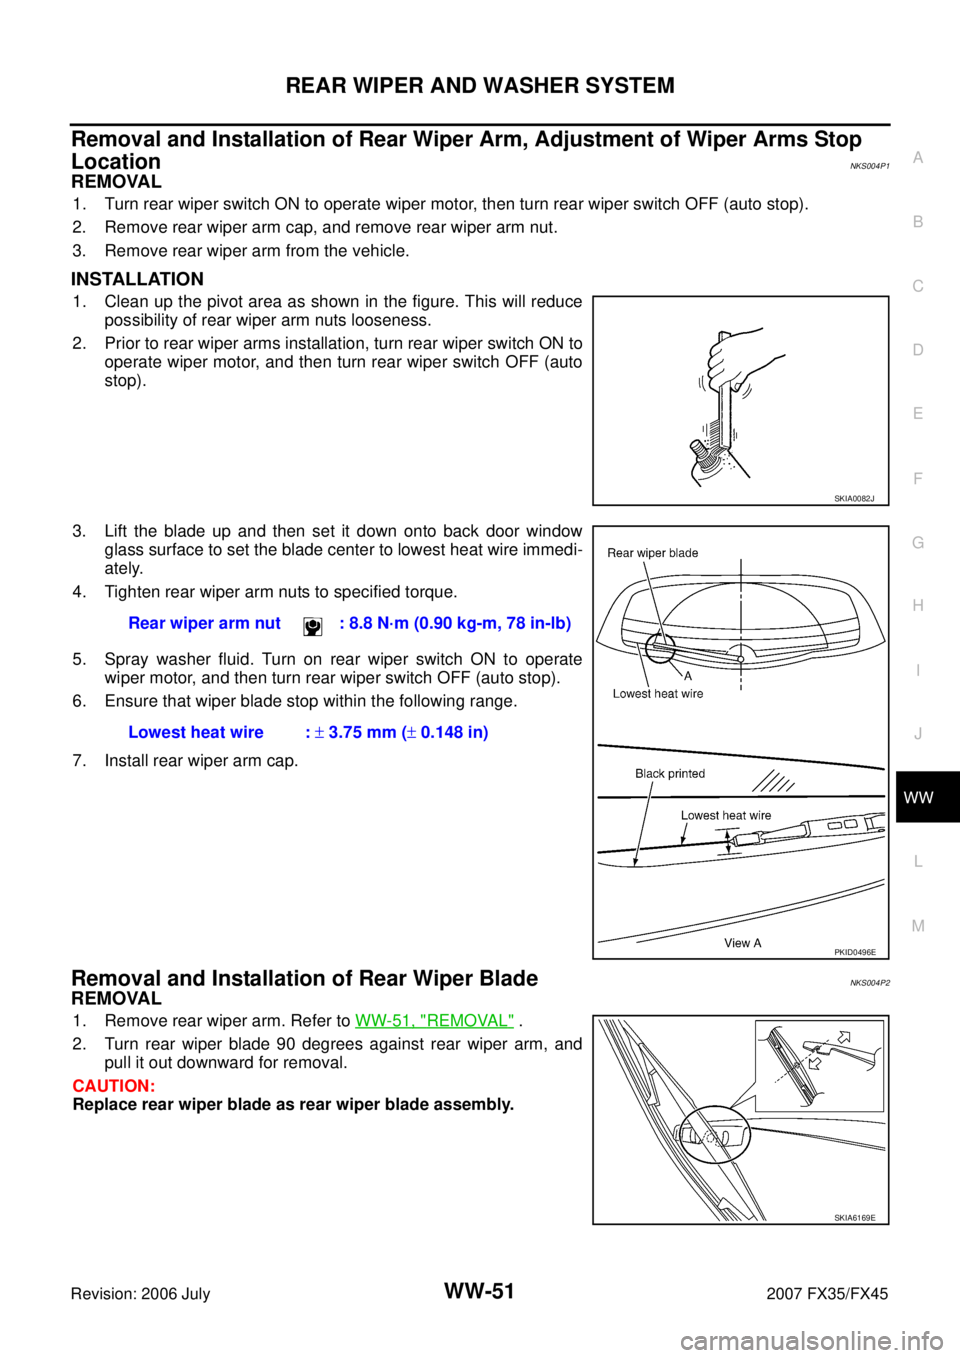
1. Clean up the pivot area as shown in the figure. This will reduce possibility of rear wiper arm nuts looseness.
2. Prior to rear wiper arms installation, turn rear wiper switch ON to operate wiper motor, and then turn rear wiper switch OFF (auto
stop).
3. Lift the blade up and then set it down onto back door window glass surface to set the blade center to lowest heat wire immedi-
ately.
4. Tighten rear wiper arm nuts to specified torque.
5. Spray washer fluid. Turn on rear wiper switch ON to operate wiper motor, and then turn rear wiper switch OFF (auto stop).
6. Ensure that wiper blade stop within the following range.
7. Install rear wiper arm cap.
Removal and Installation of Rear Wiper BladeNKS004P2
REMOVAL
1. Remove rear wiper arm. Refer to WW-51, "REMOVAL" .
2. Turn rear wiper blade 90 degrees against rear wiper arm, and pull it out downward for removal.
CAUTION:
Replace rear wiper blade as rear wiper blade assembly.
SKIA0082J
Rear wiper arm nut : 8.8 N·m (0.90 kg-m, 78 in-lb)
Lowest heat wire : ± 3.75 mm ( ± 0.148 in)
PKID0496E
SKIA6169E