Page 526 of 4366

ATC-80
TROUBLE DIAGNOSIS
Revision: 2006 July 2007 FX35/FX45
1. CHECK POWER SUPPLY FOR BLOWER MOTOR
1. Disconnect blower motor connector.
2. Turn ignition switch ON.
3. Check voltage between blower motor harness connector M78 terminal 1 and ground.
OK or NG
OK >> GO TO 2.
NG >> Check power supply circuit and 15A fuses [Nos. 10 and 11, located in the fuse block (J/B)]. Refer to PG-80,
"FUSE BLOCK - JUNCTION BOX (J/B)" .
�If fuses are OK, check harness for open circuit. Repair or replace if necessary.
�If fuses are NG, check harness for short circuit and replace fuse.
2. CHECK BLOWER MOTOR GROUND CIRCUIT
1. Turn ignition switch OFF.
2. Check continuity between blower motor harness connector M78 terminal 3 and ground.
OK or NG
OK >> GO TO 3.
NG >> Repair harness or connector.
3. CHECK CIRCUIT CONTINUITY BETWEEN BLOWER MOTOR AND UNIFIED METER AND A/C AMP.
1. Disconnect unified meter and A/C amp. connector.
2. Check continuity between blower motor harness connector M78 terminal 2 and unified meter and A/C amp. harness connector
M57 terminal 53.
OK or NG
OK >> GO TO 4.
NG >> Repair harness or connector. 1 – Ground : Battery voltage
RJIA1997E
3 – Ground : Continuity should exist.
RJIA1998E
2 – 53 : Continuity should exist.
RJIA1999E
Page 527 of 4366
TROUBLE DIAGNOSIS ATC-81
C
D E
F
G H
I
K L
M A
B
AT C
Revision: 2006 July 2007 FX35/FX45
4. CHECK UNIFIED METER AND A/C AMP. OUTPUT SIGNAL
1. Reconnect blower motor connector and unified meter and A/C amp. connector.
2. Turn ignition switch ON.
3. Change the fan speed from Lo to Hi, and check the duty ratios between blower motor harness connector M78 terminal 2 and ground using an oscilloscope. Normal terminal 2 drive signal duty ratios are shown in
the table below.
OK or NG
OK >> Replace blower motor after confirming the fan air flow does not change.
NG >> Replace unified meter and A/C amp.
COMPONENT INSPECTION
Blower Motor
Confirm smooth rotation of the blower motor.
�Ensure that there are no foreign particles inside the blower unit.
RJIA2000E
SJIA1802E
RJIA0905E
Page 530 of 4366

ATC-84
TROUBLE DIAGNOSIS
Revision: 2006 July 2007 FX35/FX45
1. CHECK AMBIENT SENSOR AND INTAKE SENSOR CIRCUIT
Check ambient sensor and intake sensor. Refer to AT C - 5 3 , "
FUNCTION CONFIRMATION PROCEDURE" ,
see No. 9 and 11.
OK or NG
OK >> GO TO 2.
NG >>
�Malfunctioning ambient sensor: Refer to ATC-103, "Ambient Sensor Circuit" .
�Malfunctioning intake sensor: Refer to AT C - 11 2 , "Intake Sensor Circuit" .
2. PERFORM AUTO ACTIVE TEST
Refer to PG-21, "
Auto Active Test" .
Does the magnet clutch operate?
YES >>�WITH CONSULT-II: GO TO 5
�WITHOUT CONSULT-II: GO TO 6.
NO >> Check 10A fuse (No. 79, located in IPDM E/R). Refer to PG-25, "
IPDM E/R Terminal Arrange-
ment" , and GO TO 3.
3. CHECK CIRCUIT CONTINUITY BETWEEN IPDM E/R AND COMPRESSOR
1. Turn ignition switch OFF.
2. Disconnect IPDM E/R connector and compressor connector.
3. Check continuity between IPDM E/R harness connector E8 ter- minal 33 and compressor harness connector F2 terminal 1.
OK or NG
OK >> GO TO 4.
NG >> Repair harness or connector.
4. CHECK MAGNET CLUTCH CIRCUIT
Check for operation sound when applying battery voltage direct cur-
rent to terminal.
OK or NG
OK >> 1. Replace IPDM E/R. 2. Go to self-diagnosis procedure AT C - 5 3 , "
FUNCTION
CONFIRMATION PROCEDURE" and perform self-
diagnosis STEP-4. Confirm that magnet clutch opera-
tion normal.
NG >> 1. Replace magnet clutch. 2. Go to self-diagnosis procedure AT C - 5 3 , "
FUNCTION
CONFIRMATION PROCEDURE" and perform self-
diagnosis STEP-4. Confirm that magnet clutch operation normal.
33 – 1 : Continuity should exist.
RJIA2004E
RJIA2005E
Page 531 of 4366
TROUBLE DIAGNOSIS ATC-85
C
D E
F
G H
I
K L
M A
B
AT C
Revision: 2006 July 2007 FX35/FX45
5. CHECK BCM INPUT (COMPRESSOR ON) SIGNAL
Check compressor ON/OFF signal. Refer to AT C - 4 0 , "
CONSULT-II
Function (BCM)" .
OK or NG
OK >> GO TO 8.
NG >> GO TO 6.
6. CHECK CIRCUIT CONTINUITY BETWEEN BCM AND UNIFIED METER AND A/C AMP.
1. Turn ignition switch OFF.
2. Disconnect BCM connector and unified meter and A/C amp. connector.
3. Check continuity between BCM harness connector M3 terminal 27 and unified meter and A/C amp. harness connector M57 ter-
minal 42.
OK or NG
OK >> GO TO 7.
NG >> Repair harness or connector. A/C SW ON : AIR COND SW ON
A/C SW OFF : AIR COND SW OFF
R J I A 1111 E
27 – 42 : Continuity should exist.
RJIA2006E
Page 532 of 4366
ATC-86
TROUBLE DIAGNOSIS
Revision: 2006 July 2007 FX35/FX45
7. CHECK VOLTAGE FOR UNIFIED METER AND A/C AMP. (COMPRESSOR ON SIGNAL)
1. Reconnect BCM connector and unified meter and A/C amp. connector.
2. Turn ignition switch ON.
3. Check voltage between unified meter and A/C amp. harness connector M57 terminal 42 and ground using an oscilloscope.
OK or NG
OK >> GO TO 8.
NG-1 >> If the voltage is approx. 5 V when A/C switch is ON: Replace unified meter and A/C amp.
NG-2 >> If the voltage is approx. 0 V when A/C switch is OFF: Replace BCM.
RJIA2007E
Terminals
Condition Voltage
(+)
( − )
Unified meter
and A/C amp. connector Terminal
No.
M57 42 Ground A/C switch: ON
(Blower motor operates.) Approx. 0 V
OFF switch: ON
(A/C system: OFF)
SJIA1423J
Page 533 of 4366

TROUBLE DIAGNOSIS ATC-87
C
D E
F
G H
I
K L
M A
B
AT C
Revision: 2006 July 2007 FX35/FX45
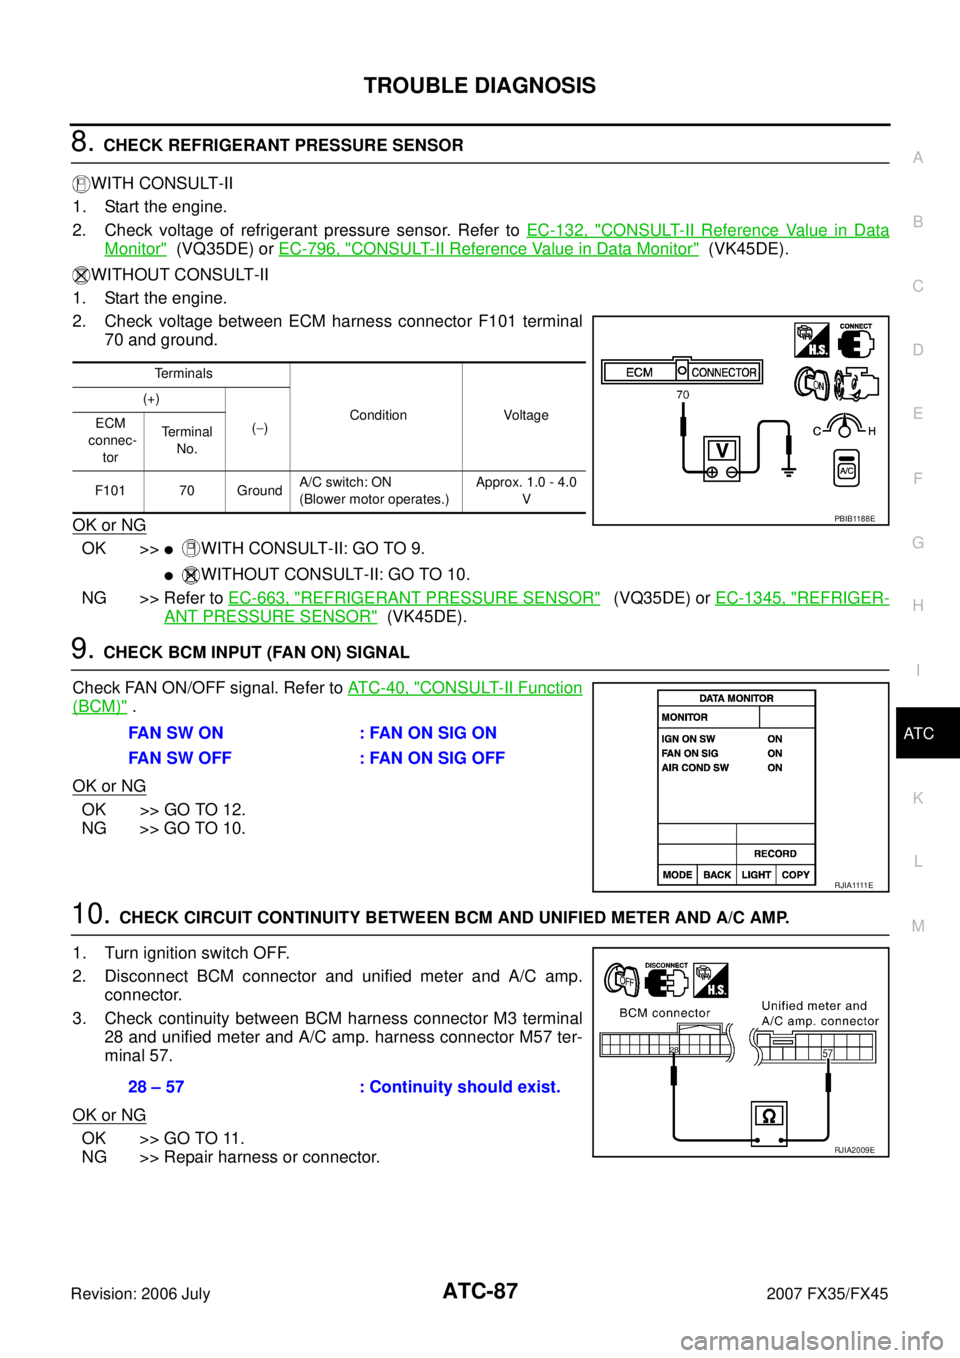
8. CHECK REFRIGERANT PRESSURE SENSOR
WITH CONSULT-II
1. Start the engine.
2. Check voltage of refrigerant pressure sensor. Refer to EC-132, "
CONSULT-II Reference Value in Data
Monitor" (VQ35DE) or EC-796, "CONSULT-II Reference Value in Data Monitor" (VK45DE).
WITHOUT CONSULT-II
1. Start the engine.
2. Check voltage between ECM harness connector F101 terminal 70 and ground.
OK or NG
OK >>�WITH CONSULT-II: GO TO 9.
�WITHOUT CONSULT-II: GO TO 10.
NG >> Refer to EC-663, "
REFRIGERANT PRESSURE SENSOR" (VQ35DE) or EC-1345, "REFRIGER-
ANT PRESSURE SENSOR" (VK45DE).
9. CHECK BCM INPUT (FAN ON) SIGNAL
Check FAN ON/OFF signal. Refer to AT C - 4 0 , "
CONSULT-II Function
(BCM)" .
OK or NG
OK >> GO TO 12.
NG >> GO TO 10.
10. CHECK CIRCUIT CONTINUITY BETWEEN BCM AND UNIFIED METER AND A/C AMP.
1. Turn ignition switch OFF.
2. Disconnect BCM connector and unified meter and A/C amp. connector.
3. Check continuity between BCM harness connector M3 terminal 28 and unified meter and A/C amp. harness connector M57 ter-
minal 57.
OK or NG
OK >> GO TO 11.
NG >> Repair harness or connector.
Terminals
Condition Voltage
(+)
( − )
ECM
connec-
tor Terminal
No.
F101 70 Ground A/C switch: ON
(Blower motor operates.) Approx. 1.0 - 4.0
V
PBIB1188E
FAN SW ON : FAN ON SIG ON
FAN SW OFF : FAN ON SIG OFF
R J I A 1111 E
28 – 57 : Continuity should exist.
RJIA2009E
Page 534 of 4366

ATC-88
TROUBLE DIAGNOSIS
Revision: 2006 July 2007 FX35/FX45
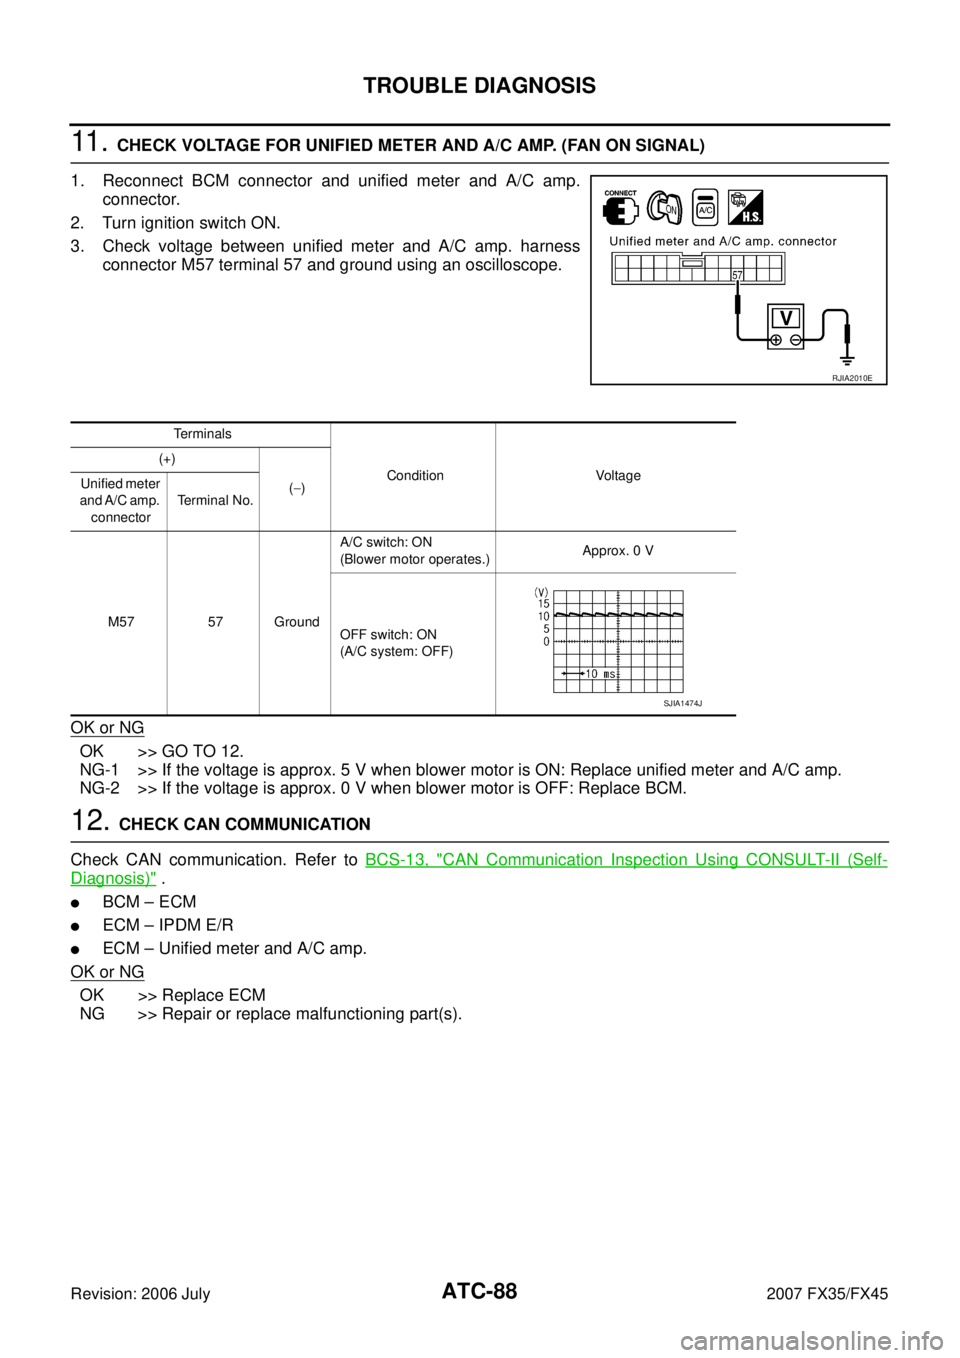
11 . CHECK VOLTAGE FOR UNIFIED METER AND A/C AMP. (FAN ON SIGNAL)
1. Reconnect BCM connector and unified meter and A/C amp. connector.
2. Turn ignition switch ON.
3. Check voltage between unified meter and A/C amp. harness connector M57 terminal 57 and ground using an oscilloscope.
OK or NG
OK >> GO TO 12.
NG-1 >> If the voltage is approx. 5 V when blower motor is ON: Replace unified meter and A/C amp.
NG-2 >> If the voltage is approx. 0 V when blower motor is OFF: Replace BCM.
12. CHECK CAN COMMUNICATION
Check CAN communication. Refer to BCS-13, "
CAN Communication Inspection Using CONSULT-II (Self-
Diagnosis)" .
�BCM – ECM
�ECM – IPDM E/R
�ECM – Unified meter and A/C amp.
OK or NG
OK >> Replace ECM
NG >> Repair or replace malfunctioning part(s).
RJIA2010E
Terminals
Condition Voltage
(+)
( − )
Unified meter
and A/C amp. connector Terminal No.
M57 57 Ground A/C switch: ON
(Blower motor operates.) Approx. 0 V
OFF switch: ON
(A/C system: OFF)
SJIA1474J
Page 543 of 4366

TROUBLE DIAGNOSIS ATC-97
C
D E
F
G H
I
K L
M A
B
AT C
Revision: 2006 July 2007 FX35/FX45
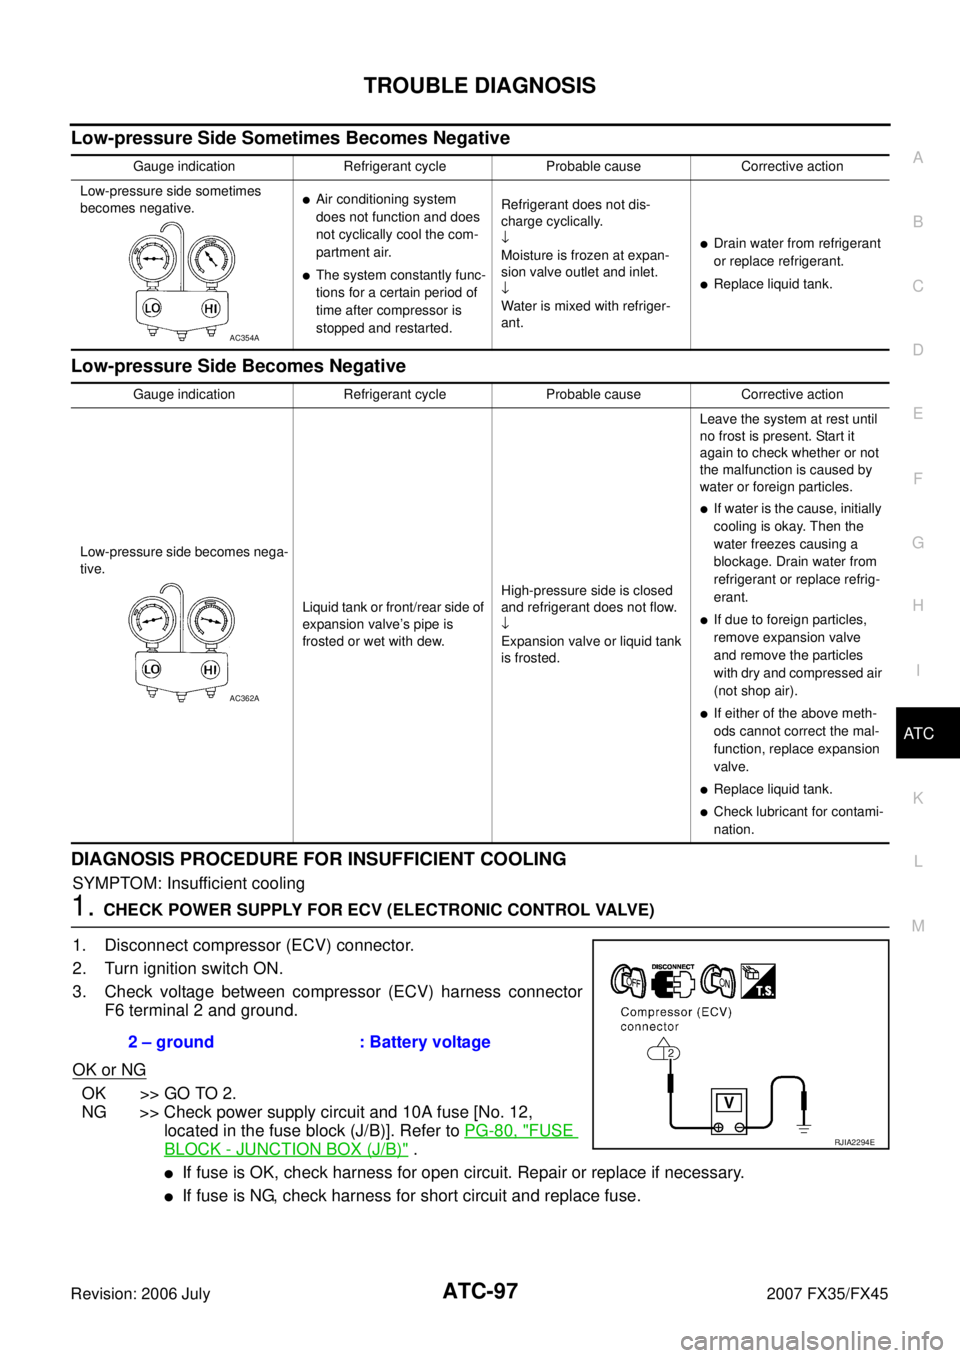
Low-pressure Side Sometimes Becomes Negative
Low-pressure Side Becomes Negative
DIAGNOSIS PROCEDURE FOR INSUFFICIENT COOLING
SYMPTOM: Insufficient cooling
1. CHECK POWER SUPPLY FOR ECV (ELECTRONIC CONTROL VALVE)
1. Disconnect compressor (ECV) connector.
2. Turn ignition switch ON.
3. Check voltage between compressor (ECV) harness connector F6 terminal 2 and ground.
OK or NG
OK >> GO TO 2.
NG >> Check power supply circuit and 10A fuse [No. 12, located in the fuse block (J/B)]. Refer to PG-80, "
FUSE
BLOCK - JUNCTION BOX (J/B)" .
�If fuse is OK, check harness for open circuit. Repair or replace if necessary.
�If fuse is NG, check harness for short circuit and replace fuse.
Gauge indication Refrigerant cycle Probable cause Corrective action
Low-pressure side sometimes
becomes negative.
�Air conditioning system
does not function and does
not cyclically cool the com-
partment air.
�The system constantly func-
tions for a certain period of
time after compressor is
stopped and restarted. Refrigerant does not dis-
charge cyclically.
↓
Moisture is frozen at expan-
sion valve outlet and inlet.
↓
Water is mixed with refriger-
ant.
�Drain water from refrigerant
or replace refrigerant.
�Replace liquid tank.
AC354A
Gauge indication Refrigerant cycle Probable cause Corrective action
Low-pressure side becomes nega-
tive.
Liquid tank or front/rear side of
expansion valve’s pipe is
frosted or wet with dew. High-pressure side is closed
and refrigerant does not flow.
↓
Expansion valve or liquid tank
is frosted. Leave the system at rest until
no frost is present. Start it
again to check whether or not
the malfunction is caused by
water or foreign particles.
�If water is the cause, initially
cooling is okay. Then the
water freezes causing a
blockage. Drain water from
refrigerant or replace refrig-
erant.
�If due to foreign particles,
remove expansion valve
and remove the particles
with dry and compressed air
(not shop air).
�If either of the above meth-
ods cannot correct the mal-
function, replace expansion
valve.
�Replace liquid tank.
�Check lubricant for contami-
nation.
AC362A
2 – ground : Battery voltage
RJIA2294E