2007 HYUNDAI VERACRUZ light
[x] Cancel search: lightPage 196 of 441

Features of your vehicle114 4D280400AENSunvisorUse the sunvisor to shield direct light
through the front or side windows.
To use a sunvisor, pull it downward.
To use a sunvisor for a side window, pull
it downward, unsnap it from the bracket
(1) and swing it to the side (2).
To use the vanity mirror, pull down the
visor and slide the mirror cover (3).
Adjust the sunvisor extension forward or
backward (4).
The ticket holder (5) is provided for hold-
ing a tollgate ticket. (if equipped)
D280500AENPower outlet
OEN046157
CAUTION
- Vanity mirror
lamp
Close the vanity mirror cover
securely and return the sunvisor to
its original position after use. If the
vanity mirror is not closed securely,
the lamp will stay on and could
result in battery discharge and pos-
sible sunvisor damage.
OEN046158OEN046160
FrontCenter (if equipped)
OEN046161
Rear
EN hma 4-84~120.qxd 11/27/2006 5:37 PM Page 114
procarmanuals.com
Page 201 of 441

4 119
Features of your vehicle
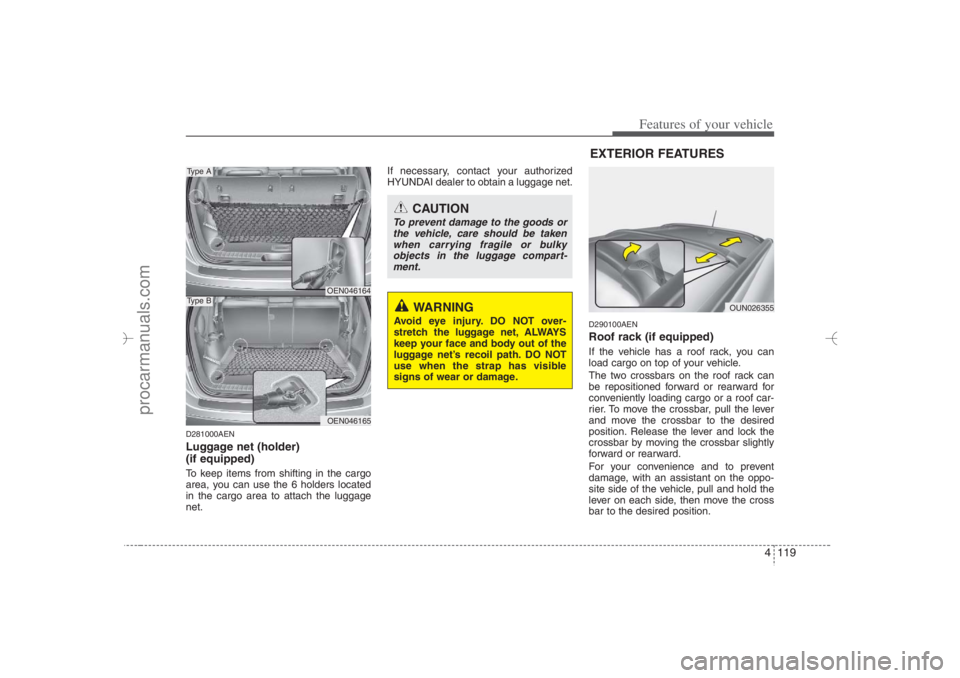
D281000AENLuggage net (holder)
(if equipped)To keep items from shifting in the cargo
area, you can use the 6 holders located
in the cargo area to attach the luggage
net.If necessary, contact your authorized
HYUNDAI dealer to obtain a luggage net.
D290100AENRoof rack (if equipped)If the vehicle has a roof rack, you can
load cargo on top of your vehicle.
The two crossbars on the roof rack can
be repositioned forward or rearward for
conveniently loading cargo or a roof car-
rier. To move the crossbar, pull the lever
and move the crossbar to the desired
position. Release the lever and lock the
crossbar by moving the crossbar slightly
forward or rearward.
For your convenience and to prevent
damage, with an assistant on the oppo-
site side of the vehicle, pull and hold the
lever on each side, then move the cross
bar to the desired position.
OEN046164OEN046165
Type AType B
CAUTION
To prevent damage to the goods or
the vehicle, care should be taken
when carrying fragile or bulky
objects in the luggage compart-
ment.
WARNING
Avoid eye injury. DO NOT over-
stretch the luggage net, ALWAYS
keep your face and body out of the
luggage net’s recoil path. DO NOT
use when the strap has visible
signs of wear or damage.
OUN026355
EXTERIOR FEATURES
EN hma 4-84~120.qxd 11/27/2006 5:38 PM Page 119
procarmanuals.com
Page 218 of 441

Features of your vehicle136 41. CD Selector The system will start playing the CD
when you press this button while radio
or XM is on. (If no CD is found, the LCD
will display "NO DISC" for 3 seconds.)
If the ignition switch of the automobile
is set to ACC (1st notch) or ON (2nd
notch), the system will be turned on
and automatically play the CD from the
last played part when you press this
button even if the power of the audio
system is off. (However, only when the
disc is placed inside the system)2. Disc DeckThis is the place you insert or eject the
CD. When the ignition switch of the auto-
mobile is set to ACC (1st notch) or ON
(2nd notch), if you push the disc in, the
power will be turned on and the CD will
be played. The CD player can play both
12cm and 8cm audio discs. if you insert
a video CD or Data CD then the LCD will
display "ERROR7" and it will turn to the
previous mode (radio or XM).✽ ✽
NOTICEMake sure the printed side of the disk
faces upward when you insert the disk.
3. LCD (Liquid Crystal Display)It displays the state of the song currently
played as well as the information of the
disc including the track, number, CD,
RPT, RDM, SCAN, runtime, and EQ
mode (CLASSIC, POP, ROCK, JAZZ).4. Disc Eject ButtonPress this button to eject the disk when
the disk is in the deck. If no CD is in the
deck, LCD will display “NO DISK” for 3
seconds. (The disk will be ejected when
you press this button even when the igni-
tion switch (ACC) of the automobile is set
to OFF or when the power of the audio
system is off.)✽ ✽
NOTICEForced Eject: When you press and hold
this button for more than 3 seconds, the
disk will be ejected by all means. (Use
this function only when the disk is not
ejected in the abnormal state.)
5. CD IndicatorThis indicator light will be on if the CD is
inside the deck whether the audio sys-
tem is on or off if the ignition switch of the
automobile is set to ACC (1st notch) or
ON (2nd notch). This light will go off
when the CD is ejected.6. SCAN ButtonWhen you press this button, the player
will play 10 seconds of each track (LCD
will display “SCAN”). Press it again to
cancel scanning.7. Search / Selection ButtonTurn the search control to the left or right
while playing CD then the track number
on the LCD will change correspondingly.
When you find the track you want to lis-
ten to, press the button to play the select-
ed song. (The search will be canceled
when you do not select the track within 5
seconds after searching the track.)8. RDM(Random) ButtonPress this button to play the songs in ran-
dom order regardless of the order of
tracks (LCD will display “RDM”). Press it
again to cancel random play.
EN hma 4-121~(Audio).qxd 11/28/2006 3:07 PM Page 136
procarmanuals.com
Page 232 of 441
![HYUNDAI VERACRUZ 2007 Owners Manual Features of your vehicle150 415. Disc Load /All Load ButtonWhen you press [LOAD] button, one of
the empty slots of the CD changer will be
opened in the order of (1), (2), (3), (4), (5)
Insert the CD w HYUNDAI VERACRUZ 2007 Owners Manual Features of your vehicle150 415. Disc Load /All Load ButtonWhen you press [LOAD] button, one of
the empty slots of the CD changer will be
opened in the order of (1), (2), (3), (4), (5)
Insert the CD w](/manual-img/35/57928/w960_57928-231.png)
Features of your vehicle150 415. Disc Load /All Load ButtonWhen you press [LOAD] button, one of
the empty slots of the CD changer will be
opened in the order of (1), (2), (3), (4), (5)
Insert the CD when the word "INSERT"
on LCD and the light of the deck flicker
then the deck will be closed you will be
able to play and listen to the correspon-
ding CD. Also, you can load all 6 CDs to
all empty slots of the changer when you
press the [LOAD] button for more than 0.8
seconds in respective order. In this case
the CD you loaded last will be played. If
you do not load CD for 10 seconds after
pressing the [LOAD] button, or press the
[LOAD] button once again, the loading
will be canceled. In this case, the display
for empty disc slots will go off, and it will
be displayed again when the slot is
loaded with a disc.
✽ ✽
NOTICEInsert a CD only when the word
"INSERT" is on the LCD and the
light of the deck flickers. (Insert CDs
one by one in respective order.)If the word "INSERT" does not
appear on the LCD, the CD will not be
able to be inserted (CD DOOR will be
closed), and if you try to insert a CD by
force it may cause damage to the audio
system.
• Do not insert 2 or more discs at once.16. Mute ButtonPress this button to mute the sound (LCD
will disply “MUTE”). Press the button once
again to cancel muting.17. Scroll ButtonOnly M466 without XM(satellite radio)Press [3] button while playing an MP3 file
then the screen will scroll the file name in
case the file name is longer than 8 char-
acters in Korean language or 16 chalac-
ters in English language.
EN hma 4-121~(Audio).qxd 11/28/2006 3:08 PM Page 150
procarmanuals.com
Page 244 of 441

Features of your vehicle162 414. Mark / Memory ButtonYou can choose only the songs you want
to listen to and play them in respective
order. (Refer to the operation method.)
Press again to cancel.15. Disc Load /All Load ButtonWhen you press [LOAD] button, one of
the empty slots of the CD changer will be
opened in the order of (1), (2), (3), (4), (5)
Insert the CD when the word "INSERT"
on LCD and the light of the deck flicker
then the deck will be closed you will be
able to play and listen to the correspon-
ding CD. Also, you can load all 6 CDs to
all empty slots of the changer when you
press the [LOAD] button for more than 0.8
seconds in respective order. In this case
the CD you loaded last will be played. If
you do not load CD for 10 seconds after
pressing the [LOAD] button, or press the
[LOAD] button once again, the loading
will be canceled. In this case, the display
for empty disc slots will go off, and it will
be displayed again when the slot is
loaded with a disc.
✽ ✽
NOTICEInsert a CD only when the word
"INSERT" is on the LCD and the
light of the deck flickers. (Insert CDs
one by one in respective order.)If the word "INSERT" does not
appear on the LCD, the CD will not be
able to be inserted (CD DOOR will be
closed), and if you try to insert a CD by
force it may cause damage to the audio
system.
• Do not insert 2 or more discs at once.16. RSE Hold and RSE Power OffIf you press and hold this button for less
than 0.8 seconds, the LED of the button
will light and RSE unit will be locked. If
you press and hold this button for more
than 0.8 seconds, RSE unit will be turned
off with a beep and [RSE] will disappear
from LCD.
17. RSE ButtonOnly M466 RSE without XM (satellite
radio) Press this button to switch to RSE
Mode, In RSE Mode, you can listen the
sound from RSE unit. (When RSE unit
has no disc, the LCD will display “NO
DISC IN RSE” for 3 seconds.)
If you press this button when the igni-
tion switch of the automobile is set to
ACC(1st notch) or ON(2nd notch), then
it will turn on the power even if the
audio is off. (However, this works only
when RSE unit have disc.)18. Scroll ButtonOnly M466 RSE without XM (satellite
radio)Press [3] button while playing an MP3 file
then the screen will scroll the file name in
case the file name is longer than 8 char-
acters in Korean language or 16 chalac-
ters in English language.
EN hma 4-121~(Audio).qxd 11/28/2006 3:10 PM Page 162
procarmanuals.com
Page 248 of 441

Features of your vehicle166 4D320000AENImportant Safety InformationIt is always important to operate your
vehicle in a safe manner and to avoid dis-
traction while driving. This manual pro-
vides information that will help you safely
operate your Rear Seat Entertainment
System (RSE). Please read it completely
before using the system.
This device complies with part 15 of
the FCC rules.
Operation is subject to the following two
conditions:
1. This device may not cause harmful
interference, and
2. This device must accept any interfer-
ence received, including interference
that may cause undesired operation.
WelcomeThe Rear Seat Entertainment System is
a compact, built-in, easy-to-use enter-
tainment system designed to provide
family fun while you are on the road.
Enjoy great quality sound from the vehi-
cle speakers, or have a private, quiet lis-
tening with the wireless headphones.
The overhead display unit is mounted to
the ceiling in the rear passenger area of
the vehicle, allowing rear-seat passen-
gers to play DVD movies, video CDs or
music CDs. Users may also plug in a
game platform or VHS player into an aux-
iliary input to show the programs through
the RSE display. The RSE can also
access to the vehicle's front radio pro-
grams.
System OverviewConnections / SetupYour Rear Seat Entertainment system
will play DVD movies, video CDs, music
CDs or music MP3 discs and Mix CD
(Regarding Mix CD, only the CD track
can be played by system.), and is
designed to make your time on the road
more enjoyable. Please follow these
instructions carefully to get the most out
of your RSE.
REAR SEAT ENTERTAINMENT SYSTEM (RSE) (IF EQUIPPED)
CAUTION
Avoid having food or drinks near,
in or on the RSE, the wireless
headphones or the remote con-
troller.
Direct sunlight may interfere with
the headphone's operation and
performance.
Normal RSE operation cannot be
guaranteed with unofficially
duplicated discs.
(Continued)
WARNING
Changes or modifications not
expressly approved by the party
responsible for compliance could
void the user's authority to operate
the equipment.
EN hma 4-121~(Audio).qxd 11/28/2006 3:10 PM Page 166
procarmanuals.com
Page 257 of 441

4175
Features of your vehicle
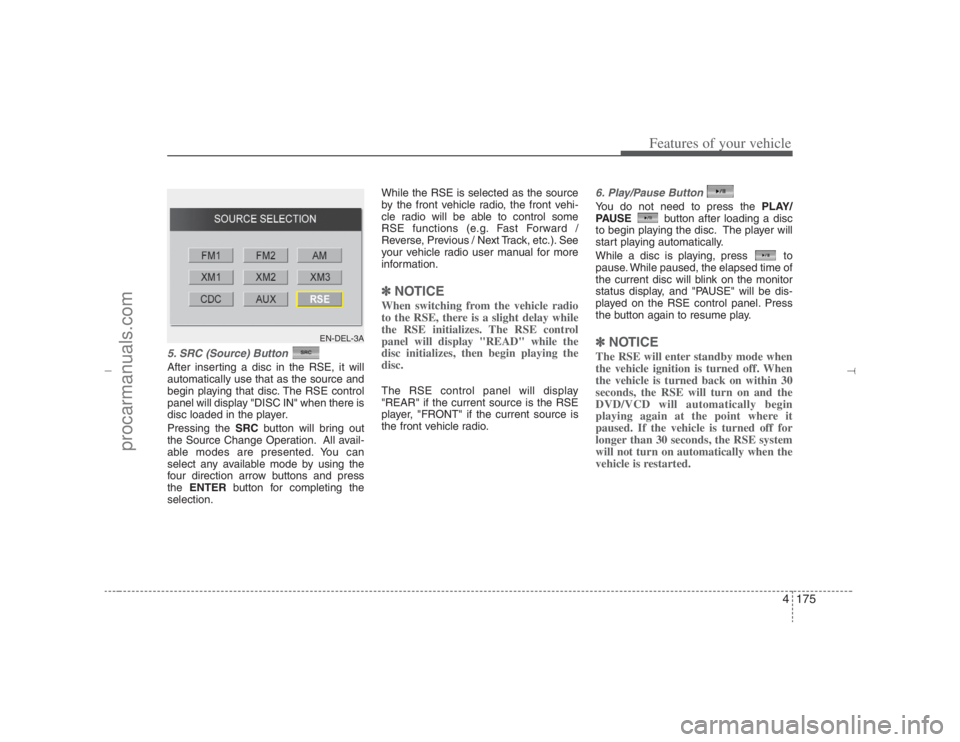
5. SRC (Source) Button After inserting a disc in the RSE, it will
automatically use that as the source and
begin playing that disc. The RSE control
panel will display "DISC IN" when there is
disc loaded in the player.
Pressing the SRCbutton will bring out
the Source Change Operation. All avail-
able modes are presented. You can
select any available mode by using the
four direction arrow buttons and press
the ENTERbutton for completing the
selection.While the RSE is selected as the source
by the front vehicle radio, the front vehi-
cle radio will be able to control some
RSE functions (e.g. Fast Forward /
Reverse, Previous / Next Track, etc.). See
your vehicle radio user manual for more
information.
✽ ✽
NOTICEWhen switching from the vehicle radio
to the RSE, there is a slight delay while
the RSE initializes. The RSE control
panel will display "READ" while the
disc initializes, then begin playing the
disc. The RSE control panel will display
"REAR" if the current source is the RSE
player, "FRONT" if the current source is
the front vehicle radio.
6. Play/Pause ButtonYou do not need to press the PLAY/
PAUSEbutton after loading a disc
to begin playing the disc. The player will
start playing automatically.
While a disc is playing, press to
pause. While paused, the elapsed time of
the current disc will blink on the monitor
status display, and "PAUSE" will be dis-
played on the RSE control panel. Press
the button again to resume play.✽ ✽
NOTICEThe RSE will enter standby mode when
the vehicle ignition is turned off. When
the vehicle is turned back on within 30
seconds, the RSE will turn on and the
DVD/VCD will automatically begin
playing again at the point where it
paused. If the vehicle is turned off for
longer than 30 seconds, the RSE system
will not turn on automatically when the
vehicle is restarted.
EN-DEL-3A
EN hma 4-121~(Audio).qxd 11/28/2006 3:11 PM Page 175
procarmanuals.com
Page 263 of 441

4181
Features of your vehicle
Using the MP3 PlayerMost RSE functions work the same for
audio CDs and MP3 discs. The major dif-
ference is that audio CDs are organized
by "tracks," while MP3 discs are organ-
ized using folders and files. Therefore,
the navigation functions are somewhat
different for MP3 discs. If the discs
including CD and MP3 file, the system
only will play the CD track, not the MP3
data file.✽ ✽
NOTICEWhile the player will accept DVD ROM
and CD ROM discs, the RSE cannot
play discs in these formats.
Pause/Play When an MP3 disc is inserted, the RSE
will automatically begin playing the first
file in the disc. Press the PLAY/PAUSE
button to pause the file. Press the
button again to resume play. While
paused, the elapsed time in the status
display at the top of the monitor will blink.
The RSE control panel will display
"PAUSE."
At the end of the disc, the player will
automatically return to the first file and
continue playing.Fast Forward/ReversePress and hold the FF >or < REWbut-
ton and the player will fast forward or
reverse at 10 times the normal speed.
Release the button to return to normal
speed play.
The audio is muted while the player fast
forwards or fast reverses.
Song List : Navigating Folders and
FilesMP3 discs are organized by named fold-
ers, with each folder containing a collec-
tion of named music files. You can quick-
ly navigate through the folders and files
using the Song List function.
Press the MENUbutton on the RSE con-
trol panel or remote control to display the
song list. The focused song will be high-
lighted. And the music note icon appears
to left of the song currently playing.
To navigate through the folders, press
the < REWor FF >button to highlight the
FOLDER UP, FOLDER DOWN,or
HOMEbuttons on the monitor, the press
ENTERto move up or down the folders.
Press ENTERrepeatedly to move
through all the folders.
When you reach the desired folder, press
the PREVor NEXTbuttons to
scroll through the list of files in that folder
and press ENTERto select the desired
file. The player will switch to the selected
folder and begin playing the desired file.
EN hma 4-121~(Audio).qxd 11/28/2006 3:11 PM Page 181
procarmanuals.com