2007 HYUNDAI TUCSON check engine
[x] Cancel search: check enginePage 203 of 306
3
WHAT TO DO IN AN EMERGENCY
3
JUMP STARTING!
o If you should accidentally get acid on your
skin or in your eyes, immediately remove
any contaminated clothing and flush the area
with clear water for at least 15 minutes. Then
promptly obtain medical attention. If you
must be transported to an emergency facil-
ity, continue to apply water to the affected
area with a sponge or cloth.
o The gas produced by the battery during the
jump-start operation is highly explosive. Do
not smoke or allow a spark or an open flame
in the vicinity.
o The battery being used to provide the jump
start must be 12-volt. If you cannot deter-
mine that it is a 12-volt battery, do not attempt
to use it for the jump start.
o To jump start a car with a discharged battery,
follow this procedure exactly:
1. If the booster battery is installed in another
vehicle, be sure the two vehicles are not
touching.
2. Turn off all unnecessary lights and acces-
sories in both vehicles.
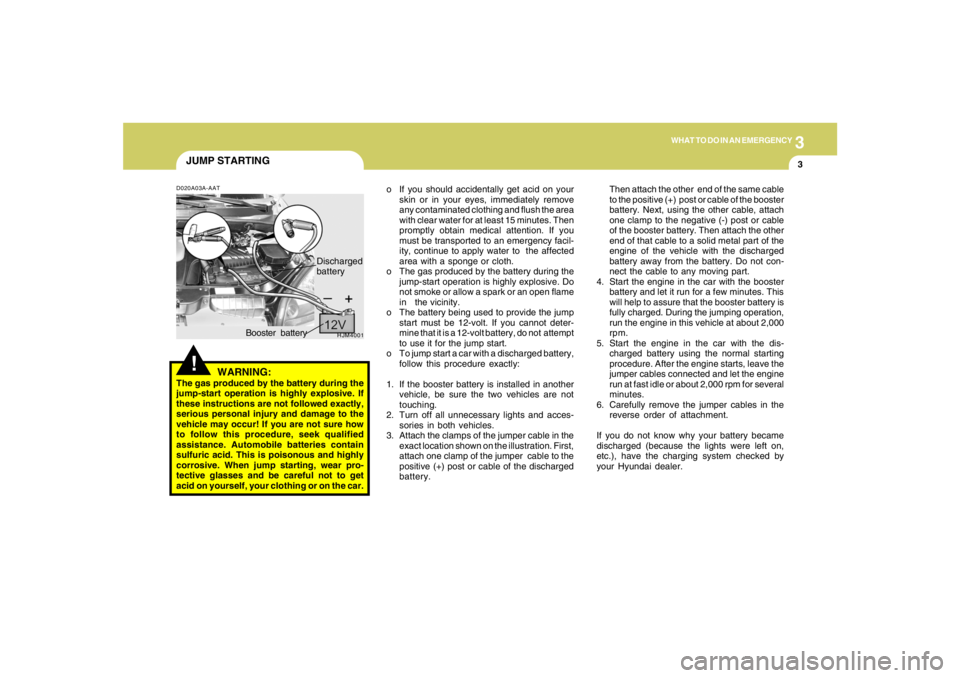
3. Attach the clamps of the jumper cable in the
exact location shown on the illustration. First,
attach one clamp of the jumper cable to the
positive (+) post or cable of the discharged
battery.Then attach the other end of the same cable
to the positive (+) post or cable of the booster
battery. Next, using the other cable, attach
one clamp to the negative (-) post or cable
of the booster battery. Then attach the other
end of that cable to a solid metal part of the
engine of the vehicle with the discharged
battery away from the battery. Do not con-
nect the cable to any moving part.
4. Start the engine in the car with the booster
battery and let it run for a few minutes. This
will help to assure that the booster battery is
fully charged. During the jumping operation,
run the engine in this vehicle at about 2,000
rpm.
5. Start the engine in the car with the dis-
charged battery using the normal starting
procedure. After the engine starts, leave the
jumper cables connected and let the engine
run at fast idle or about 2,000 rpm for several
minutes.
6. Carefully remove the jumper cables in the
reverse order of attachment.
If you do not know why your battery became
discharged (because the lights were left on,
etc.), have the charging system checked by
your Hyundai dealer.
D020A03A-AAT
WARNING:
The gas produced by the battery during the
jump-start operation is highly explosive. If
these instructions are not followed exactly,
serious personal injury and damage to the
vehicle may occur! If you are not sure how
to follow this procedure, seek qualified
assistance. Automobile batteries contain
sulfuric acid. This is poisonous and highly
corrosive. When jump starting, wear pro-
tective glasses and be careful not to get
acid on yourself, your clothing or on the car.
HJM4001
Booster batteryDischarged
battery
Page 204 of 306
34WHAT TO DO IN AN EMERGENCY
IF THE ENGINE OVERHEATS
!!
!
WARNING:
While the engine is running, keep hair,
hands and clothing away from moving parts
such as the fan and drive belts to prevent
injury.
5. If the water pump drive belt is broken or
engine coolant is leaking out, stop the engine
immediately and call the nearest Hyundai
dealer for assistance.
WARNING:
Do not remove the radiator cap when the
engine is hot. This can allow coolant to be
blown out of the opening and cause seri-
ous burns.6. If you cannot find the cause of the overheat-
ing, wait until the engine temperature has
returned to normal. Then, if coolant has been
lost, carefully add coolant to the reservoir
(page 6-9) to bring the fluid level in the
reservoir up to the halfway mark.
7. Proceed with caution, keeping alert for fur-
ther signs of overheating. If overheating
happens again, call a Hyundai dealer for
assistance.
CAUTION:
Serious loss of coolant indicates there is a
leak in the cooling system and this should
be checked as soon as possible by a Hyundai
dealer.
D030A02A-AATIf your temperature gauge indicates overheat-
ing, you experience a loss of power, or hear loud
pinging or knocking, the engine is probably too
hot. If this happens, you should:
1. Pull off the road and stop as soon as it is safe
to do so.
2. Place the gear selector lever in "P" (auto-
matic), or neutral (manual transaxle) and set
the parking brake. If the air conditioning is on,
turn it off.
3. If engine coolant is running out under the car
or steam is coming out from the hood, stop
the engine. Do not open the hood until the
coolant has stopped running or the steaming
has stopped. If there is no visible loss of
engine coolant and no steam, leave the
engine running and check to be sure the
engine cooling fan is operating. If the fan is
not running, turn the engine off.
4. Check to see if the water pump drive belt is
missing. If it is not missing, check to see that
it is tight. If the drive belt seems to be
satisfactory, check for coolant leaking from
the radiator, hoses or under the car. (If the
air conditioning had been in use, it is normal
for cold water to be draining from it when you
stop).
Page 227 of 306
5
VEHICLE MAINTENANCE REQUIREMENTS2
F010C01A-AATSpecified Scheduled ProceduresThese are the procedures such as inspections,
adjustments and replacements that are listed in
the maintenance charts starting on page 5-4.
These procedures must be performed at the
intervals shown in the maintenance schedule to
assure that your warranty remains in effect.
Although it is strongly recommended that they
be performed by the trained technicians at your
Hyundai dealer, these procedures may be per-
formed at any qualified service facility.
It is suggested that genuine Hyundai service
parts be used for any required repairs or re-
placements. Other parts of equivalent quality
such as engine oil, engine coolant, manual or
auto transaxle oil, brake fluid and so on which
are not supplied by Hyundai Motor Company or
its distributor may be used without affecting
your warranty coverage but you should always
be sure these are equivalent to the quality of the
original Hyundai parts. Your Owner's Hand-
book provides further information about your
warranty coverage.
F010A01A-AATService RequirementsTo ensure that you receive the greatest number
of miles of satisfying operation from your Hyundai,
certain maintenance procedures must be per-
formed. Although careful design and engineer-
ing have reduced these to a minimum, those that
are required are of the utmost importance.
It is your responsibility to have these mainte-
nance procedures performed to comply with
the terms of the warranties covering your new
Hyundai. The Owner's Handbook supplied with
your new vehicle provides further information
about these warranties.
F010B01A-AATMaintenance RequirementsThe maintenance required for your Hyundai
can be divided into three main areas:
o Specified scheduled procedures
o General checks
o Do-it-yourself maintenance
MAINTENANCE INTERVALS
Page 232 of 306
5
VEHICLE MAINTENANCE REQUIREMENTS
7
F060D01A-AATo Fuel Lines, Fuel Hoses and Connec-
tionsCheck the fuel lines, fuel hoses and connec-
tions for leakage and damage. Have a trained
technician replace any damaged or leaking
parts immediately.
F060A01A-AAT F060B01A-AAT
o Drive BeltsInspect all drive belts for evidence of cuts,
cracks, excessive wear or oil saturation and
replace if necessary. Drive belts should be
checked periodically for proper tension and
adjusted as necessary.
F060M01A-AATo Engine Oil and FilterThe engine oil and filter should be changed at the
intervals specified in the maintenance sched-
ule. If the car is being driven in severe condi-
tions, more frequent oil and filter changes are
required.F060C01A-AATo Fuel FilterA clogged filter can limit the speed at which the
vehicle may be driven, damage the emission
system and cause hard starting. If an exces-
sive amount of foreign matter accumulates in
the fuel tank, the filter may require replacement
more frequently.
After installing a new filter, run the engine for
several minutes, and check for leaks at the
connections. Fuel filters should be installed by
trained technicians.
F060F01O-AATo Vacuum HosesInspect the surface of hoses for evidence of
heat and/or mechanical damage. Hard and
brittle rubber, cracking, tears, cuts, abrasions,
and excessive swelling indicate deterioration.
Particular attention should be paid to examine
those hose surfaces nearest to high heat
sources, such as the exhaust manifold.
Inspect the hose routing to assure that the
hoses do not come in contact with any heat
source, sharp edges or moving component
which might cause heat damage or mechanical
wear. Inspect all hose connections, such as
clamps and couplings, to make sure they are
secure, and that no leaks are present. Hoses
should be replaced immediately if there is any
evidence of deterioration or damage.
EXPLANATION OF SCHEDULED MAINTENANCE ITEMS
Page 233 of 306
5
VEHICLE MAINTENANCE REQUIREMENTS8
F070D01A-AATo Manual Transaxle OilInspect the manual transaxle oil according to
the maintenance schedule.NOTE:If the oil level is low, check for possible leaks
before adding oil. Do not overfill.F070F01A-AATo Brake Hoses and LinesVisually check for proper installation, chafing,
cracks, deterioration and any leakage. Replace
any deteriorated or damaged parts immedi-
ately.
F070C01A-AATo CoolantThe coolant should be changed at the intervals
specified in the maintenance schedule.F060E01A-AATo Timing BeltInspect all parts related to the timing belt for
damage and deformation. Replace any dam-
aged parts immediately.F060J01A-AATo Spark PlugsMake sure to install new spark plugs of the
correct heat range.F060H01A-AATo Air Cleaner FilterA Genuine Hyundai air cleaner filter is recom-
mended when the filter is replaced.
F060G01A-AATo Vapor Hose and Fuel Filler CapThe vapor hose and fuel filler cap should be
inspected at those intervals specified in the
maintenance schedule. Make sure that a new
vapor hose or fuel filler cap is correctly re-
placed.F065F01O-AATo Crankcase Ventilation HoseInspect the surface of hose for evidence of heat
and/or mechanical damage. Hard and brittle
rubber, cracking, tears, cuts, abrasions, and
excessive swelling indicate deterioration. Par-
ticular attention should be paid to examine that
hose surface nearest to high heat sources,
such as the exhaust manifold.
Inspect the hose routing to assure that the hose
does not come in contact with any heat source,
sharp edges or moving component which might
cause heat damage or mechanical wear. In-
spect all hose connections, such as clamps and
couplings, to make sure they are secure, and
that no leaks are present. Hose should be
replaced immediately if there is any evidence of
deterioration or damage.
F070E06A-AATo Automatic Transaxle FluidThe fluid level should be in the “HOT” range of
the dipstick, after the engine and transaxle are
at normal operating temperature. Check the
automatic transaxle fluid level with the engine
running and the transaxle in neutral, with the
parking brake properly applied. Use HYUNDAI
GENUINE ATF SP III, DIAMOND ATF SP III, SK
ATF SP III or other brands meeting the SP III
specification approved by Hyundai Motor Co.
when adding or changing fluid. Using the wrong
ATF may result in damage to the ATM.
Page 234 of 306
5
VEHICLE MAINTENANCE REQUIREMENTS
9
F070L01A-AATo Suspension Mounting BoltsCheck the suspension connections for loose-
ness or damage. Retighten to the specified
torque.
F070G02A-AATo Brake FluidCheck brake fluid level in the brake fluid reser-
voir. The level should be between "MIN" and
"MAX" marks on the side of the reservoir. Use
only hydraulic brake fluid conforming to DOT 3
or DOT 4.
F070K01A-AATo Exhaust Pipe and MufflerVisually inspect the exhaust pipes, muffler and
hangers for cracks, deterioration, or damage.
Start the engine and listen carefully for any
exhaust gas leakage. Tighten connections or
replace parts as necessary.
F070J01A-AATo Brake Pads, Calipers and RotorsCheck the pads for excessive wear, discs for
run out and wear, and calipers for fluid leakage.F070H01O-AATo Rear Brake Discs and Linings/
Parking BrakeCheck the rear brake discs and linings for
scoring, burning, leaking fluid, broken parts,
and excessive wear. Inspect the parking brake
system including the parking brake lever and
cables. For detailed service procedures, refer
to the Shop Manual.
F070M01A-AATo Steering Gear Box, Linkage & Boots/
Lower Arm Ball JointWith the vehicle stopped and engine off, check
for excessive free-play in the steering wheel.
Check the linkage for bends or damage. Check
the dust boots and ball joints for deterioration,
cracks, or damage. Replace any damaged
parts.
F070Q01A-AATo Air Conditioning RefrigerantCheck the air conditioning lines and connec-
tions for leakage and damage. Check air con-
ditioning performance according to the relevant
shop manual if necessary.F070P01A-AATo Driveshafts and BootsCheck the drive shafts, boots and clamps for
cracks, deterioration, or damage. Replace any
damaged parts and, if necessary, repack the
grease.F070N01A-AATo Power Steering Pump, Belt and HosesCheck the power steering pump and hoses for
leakage and damage. Replace any damaged or
leaking parts immediately. Inspect the power
steering belt for evidence of cuts, cracks, ex-
cessive wear, oiliness and proper tension.
Replace or adjust it if necessary.
Page 236 of 306
6
Engine Compartment .................................................... 6-2
General Checks ............................................................ 6-4
Checking the Engine Oil ............................................... 6-5
Changing the Oil and Filter ............................................ 6-6
Checking and Changing the Engine Coolant ................ 6-8
Changing the Air Cleaner Filter ...................................6-10
Checking the Transaxle Oil (Manual) .........................6-11
Checking the Transaxle Fluid (Automatic)..................6-12
Checking the Brakes ..................................................6-14
Checking the Clutch Fluid...........................................6-16
Air Conditioning Care..................................................6-16
Changing the Climate Control Air Filter .......................6-17
Checking the Free-play...............................................6-19
Checking Drive Belts ..................................................6-20
Checking and Replacing Fuses..................................6-21
Checking the Battery..................................................6-23
Power Steering Fluid Level .........................................6-24
Replacement of Light Bulbs ........................................6-27
Bulb Wattage ...............................................................6-34
Fuse Panel Description...............................................6-35
6
DO-IT-YOURSELF MAINTENANCE
Page 239 of 306
6
DO-IT-YOURSELF MAINTENANCE
4
GENERAL CHECKS
G020C01A-AATVehicle InteriorThe following should be checked each time
when the vehicle is driven:
o Lights operation
o Windshield wiper operation
o Horn operation
o Defroster, heating system operation (and air
conditioning, if installed)
o Steering operation and condition
o Mirror condition and operation
o Turn signal operation
o Accelerator pedal operation
o Brake operation, including parking brake
o Manual transaxle operation, including clutch
operation
o Automatic transaxle operation, including
"Park" mechanism operation
o Seat control condition and operation
o Seat belt condition and operation
o Sunvisor operation
If you notice anything that does not operate
correctly or appears to be functioning correctly,
inspect it carefully and seek assistance from
your Hyundai dealer if service is needed.
G020B01A-AATVehicle ExteriorThe following should be checked monthly:
o Overall appearance and condition
o Wheel condition and wheel nut torque
o Exhaust system condition
o Light condition and operation
o Windshield glass condition
o Wiper blade condition
o Paint condition and body corrosion
o Fluid leaks
o Door and hood lock condition
o Tire pressure and condition
(including spare tire)
G020A01A-AATEngine CompartmentThe following should be checked regularly:
o Engine oil level and condition
o Transaxle fluid level and condition
o Brake fluid level
o Clutch fluid level
o Engine coolant level
o Windshield washer fluid level
o Accessory drive belt condition
o Engine coolant hose condition
o Fluid leaks (on or below components)
o Power steering fluid level
o Battery condition
o Air filter condition