2007 HYUNDAI TUCSON audio
[x] Cancel search: audioPage 156 of 306
1FEATURES OF YOUR HYUNDAI
144
CAUTION:
o Do not insert warped or poor quality
discs into the CD player as damage to the
unit may occur.
o Do not insert anything like coins into the
player slot as damage to the unit may
occur.
o Do not place beverages close to the
audio system. The playback mechanism
may be damaged if you spill them.
o Do not impact on the audio system, or
the playback mechanism could be dam-
aged.
o Driving off-road or other vibrations may
skip your compact disc.
Do not use the audio system off-roads
as the discs could be scratched and
damaged.
o Do not grip or pull out the disc with your
hand while the disc is being pulled into
the unit by the self loading mechanism.
These can cause disc scratching to oc-
cur or trouble in the compact disc player.
o Avoid using CD-Recordable or CD-
Rewritable to ensure proper operation.
When using the compact disc player,
genuine CDs are recommended.
!
Page 157 of 306
1
FEATURES OF YOUR HYUNDAI
145145145145145
INDICATION
Er2
Er3
Er6
Er8
HHH
no CD
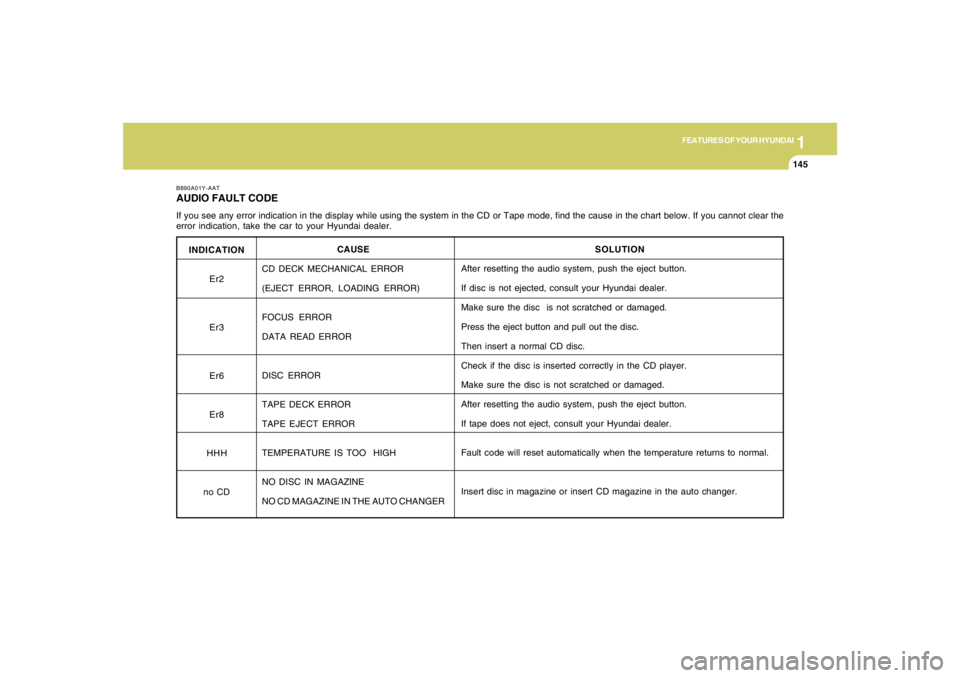
B890A01Y-AATAUDIO FAULT CODEIf you see any error indication in the display while using the system in the CD or Tape mode, find the cause in the chart below. If you cannot clear the
error indication, take the car to your Hyundai dealer.
SOLUTION
After resetting the audio system, push the eject button.
If disc is not ejected, consult your Hyundai dealer.
Make sure the disc is not scratched or damaged.
Press the eject button and pull out the disc.
Then insert a normal CD disc.
Check if the disc is inserted correctly in the CD player.
Make sure the disc is not scratched or damaged.
After resetting the audio system, push the eject button.
If tape does not eject, consult your Hyundai dealer.
Fault code will reset automatically when the temperature returns to normal.
Insert disc in magazine or insert CD magazine in the auto changer. CAUSE
CD DECK MECHANICAL ERROR
(EJECT ERROR, LOADING ERROR)
FOCUS ERROR
DATA READ ERROR
DISC ERROR
TAPE DECK ERROR
TAPE EJECT ERROR
TEMPERATURE IS TOO HIGH
NO DISC IN MAGAZINE
NO CD MAGAZINE IN THE AUTO CHANGER
Page 159 of 306

1
FEATURES OF YOUR HYUNDAI
147147147147147
J295B01JM-GAT1. Power Button (POWER ON)Press this button when the ignition switch of the
automobile is set to ACC (1st notch) or ON (2nd
notch) to turn on the power and the audio
system. Press once again when the audio
system is on to turn off the power.2. Volume Control (VOLUME)Turn the volume control clockwise to increase
volume and counterclockwise to reduce. The
volume level will be displayed on the screen
when you adjust the volume.3. Radio Band Selection Button (FM/AM)o Press this button to listen to either FM or AM.
o The radio will be set to each of the following
modes each time you press the button.
FM1 ➟ FM2 ➟ AMNOTE:Push this button when the power is off to
turn on the power automatically.4. SCAN ButtonPress this button to automatically select chan-
nels starting from the current channel and play
each channel for 5 seconds. Press again to
keep listening to the channel currently selected.
5. Automatic Channel Selection Button
(SEEK)Press the [SEEK
] button to automatically
increase frequency and press the [TRACK
]
button to automatically decrease frequency to
select and play the next available channel. If the
received channel is memorized in the preset
buttons then the screen will display the memo-
rized channel.
6. Manual Channel Selection Control
(TUNE)Turn the TUNE control clockwise to increase
frequency and counterclockwise to reduce fre-
quency by 1 step for each click.
o FM: Increases/Decreases by 0.2MHz
(87.5➟87.7➟87.9…87.9➟87.7➟87.5)
o AM: Increases/Decreases by 10MHz
(530➟540➟550…550➟540➟530)7. Preset Button (1~6)Press this button to listen to the channels
memorized to each button. If you want to memo-
rize the current channel to the preset button,
press the button for more than 1.5 seconds then
the channel will be memorized to the button with
a beep.
8. Information Display Screen (LCD)A variety of information will be displayed on the
screen including the radio bands (FM1/FM2/
AM) while listening to the radio, frequency of
each channel, the number of preset channel
and "ST" for FM stereo broadcasting.9. BASS, MIDDLE, TREBLE Tone Control
/ FADE, BALANCE ControlPress this button to control tone. Each time you
press the button, the mode will switch from
BASS➟MIDDLE➟TREBLE➟FADER➟BALANCE
and the mode will be displayed on the screen.
Page 160 of 306
1FEATURES OF YOUR HYUNDAI
148
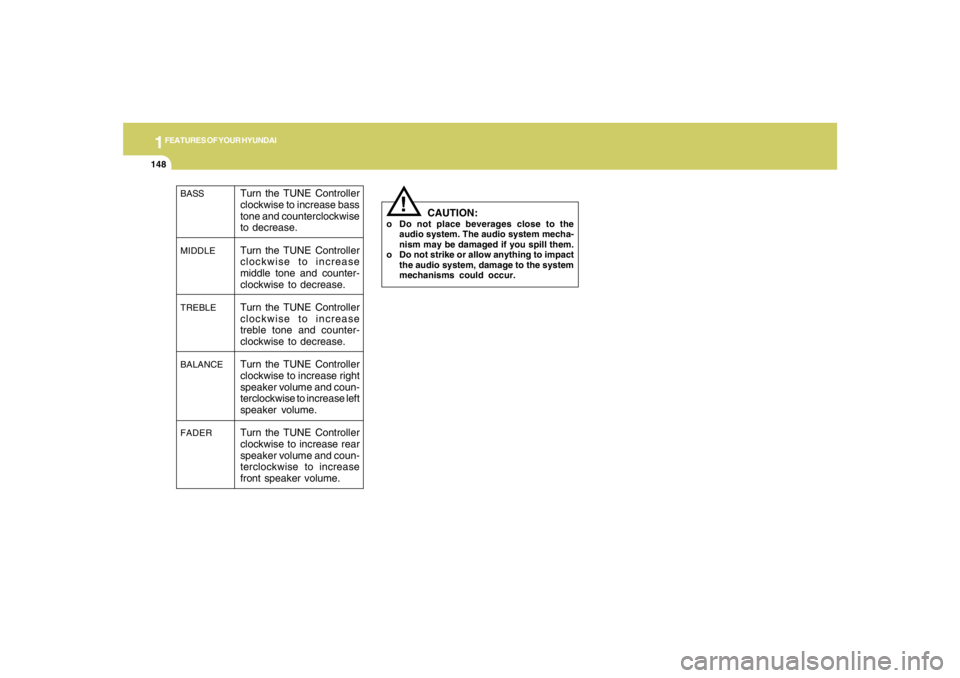
BASS
MIDDLE
TREBLE
BALANCE
FADER
Turn the TUNE Controller
clockwise to increase bass
tone and counterclockwise
to decrease.
Turn the TUNE Controller
clockwise to increase
middle tone and counter-
clockwise to decrease.
Turn the TUNE Controller
clockwise to increase
treble tone and counter-
clockwise to decrease.
Turn the TUNE Controller
clockwise to increase right
speaker volume and coun-
terclockwise to increase left
speaker volume.
Turn the TUNE Controller
clockwise to increase rear
speaker volume and coun-
terclockwise to increase
front speaker volume.
!
CAUTION:
o Do not place beverages close to the
audio system. The audio system mecha-
nism may be damaged if you spill them.
o Do not strike or allow anything to impact
the audio system, damage to the system
mechanisms could occur.
Page 163 of 306
![HYUNDAI TUCSON 2007 Owners Manual 1
FEATURES OF YOUR HYUNDAI
151151151151151
11. Section Repeat Button (RPT)Press [5 RPT] button to repeat the song you are
listening to. Press this button again to cancel
repetition.12. SCAN ButtonIf y HYUNDAI TUCSON 2007 Owners Manual 1
FEATURES OF YOUR HYUNDAI
151151151151151
11. Section Repeat Button (RPT)Press [5 RPT] button to repeat the song you are
listening to. Press this button again to cancel
repetition.12. SCAN ButtonIf y](/manual-img/35/56210/w960_56210-162.png)
1
FEATURES OF YOUR HYUNDAI
151151151151151
11. Section Repeat Button (RPT)Press [5 RPT] button to repeat the song you are
listening to. Press this button again to cancel
repetition.12. SCAN ButtonIf you press this button, the player will play 10
seconds of each track. Press it again to cancel
scanning.13. EQ ButtonEach time you press this button the sound
equalizer setting will switch from
POP➟JAZZ➟ROCK➟CLASSIC➟OFF (Not
displayed).14. Bookmark ButtonThis button lets you select the songs you want
to listen to in the CD. Move to the track and press
(6 MARK) for more than 1 second then the
screen will display " M " and select the track.
Press the button less than 1 second to play the
songs you selected and the system will display
" M "15. Random ButtonPress this button to play the songs in random
order regardless of the order of tracks.
NOTE:When you use CD-R or CD-RW, the CD may
not be played due to the manufacturing
method of CD makers and the recording
method of the user. In this case, change CD
unless the continuous use of such CDs
may cause damage to the system.16. File Search KnobTurn this knob to the left and right while listening
to CD to change track number. If you press the
button within 5 seconds then the selected track
will be played. If you do not press the button
within 5 seconds then it will display the currently
played track.17. Scroll ButtonIf the title of MP3 or WMA file is too long, press
this button to scroll the entire song title on the
LCD screen.18. Directory Search ButtonIn case the MP3/WMA CD contains more than
2 folders, press this button up and down to
search each directory. You can move to the
directory and turn the search knob to search
through the tracks. If you do not press the knob
within 5 seconds after you select a track then
the system will automatically return to the cur-
rent track.
!
CAUTION:
o Do not insert warped or poor quality
discs into the CD player as damage to the
unit may occur.
o Do not insert anything like coins into the
player slot as damage to the unit may
occur.
o Do not place beverages close to the
audio system. The playback mechanism
may be damaged if you spill them.
o Do not strike or allow anything to impact
the audio system, damage to the system
mechanisms could occur.
o Off-road or rough surface driving may
cause the compact disc to skip. Do not
use the compact disc when driving in
such conditions as damage to the com-
pact disc face could occur.
o Do not attempt to grab or pull the com-
pact disc out while the disc is being
pulled into the audio unit by the self-
loading mechanism. Damage to the
audio unit and compact disc could oc-
cur.
o Avoid using recorded compact discs in
your audio unit. Original compact discs
are recommended.
Page 165 of 306
1
FEATURES OF YOUR HYUNDAI
153153153153153
o Be sure that the cassette label is not loose
or peeling off or tape ejection may be difficult.
o Never touch or soil the actual audio tape
surfaces.
o Keep all magnetized objects, such as elec-
tric motors, speakers or transformers away
from your cassette tapes and tape player
unit.Head
Cotton applicator
B860A01JM
B860A02L
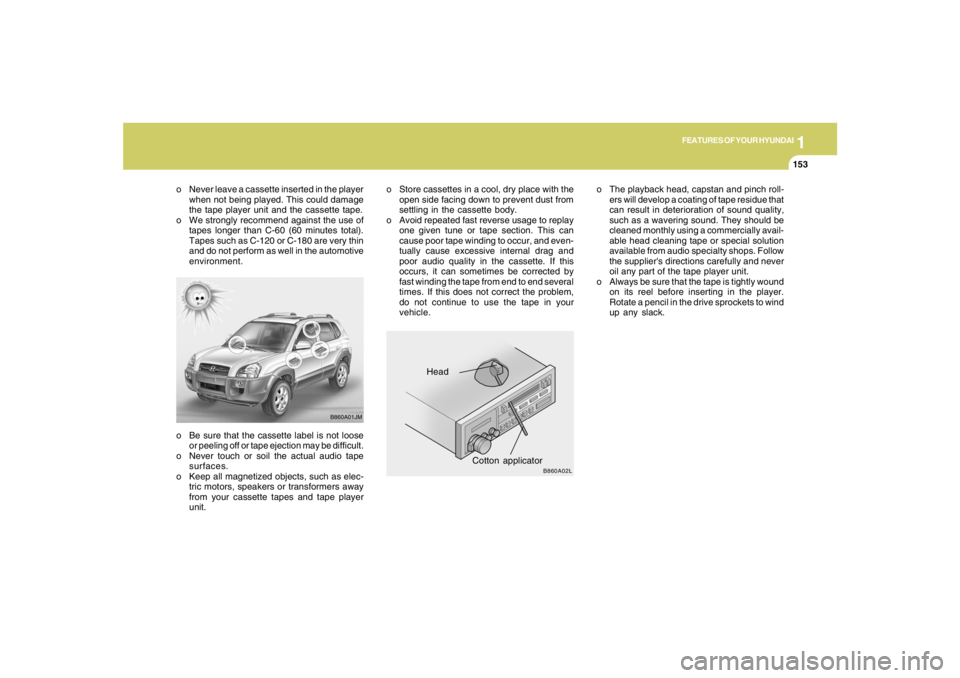
o The playback head, capstan and pinch roll-
ers will develop a coating of tape residue that
can result in deterioration of sound quality,
such as a wavering sound. They should be
cleaned monthly using a commercially avail-
able head cleaning tape or special solution
available from audio specialty shops. Follow
the supplier's directions carefully and never
oil any part of the tape player unit.
o Always be sure that the tape is tightly wound
on its reel before inserting in the player.
Rotate a pencil in the drive sprockets to wind
up any slack. o Never leave a cassette inserted in the player
when not being played. This could damage
the tape player unit and the cassette tape.
o We strongly recommend against the use of
tapes longer than C-60 (60 minutes total).
Tapes such as C-120 or C-180 are very thin
and do not perform as well in the automotive
environment.o Store cassettes in a cool, dry place with the
open side facing down to prevent dust from
settling in the cassette body.
o Avoid repeated fast reverse usage to replay
one given tune or tape section. This can
cause poor tape winding to occur, and even-
tually cause excessive internal drag and
poor audio quality in the cassette. If this
occurs, it can sometimes be corrected by
fast winding the tape from end to end several
times. If this does not correct the problem,
do not continue to use the tape in your
vehicle.
Page 272 of 306
6
DO-IT-YOURSELF MAINTENANCE
37
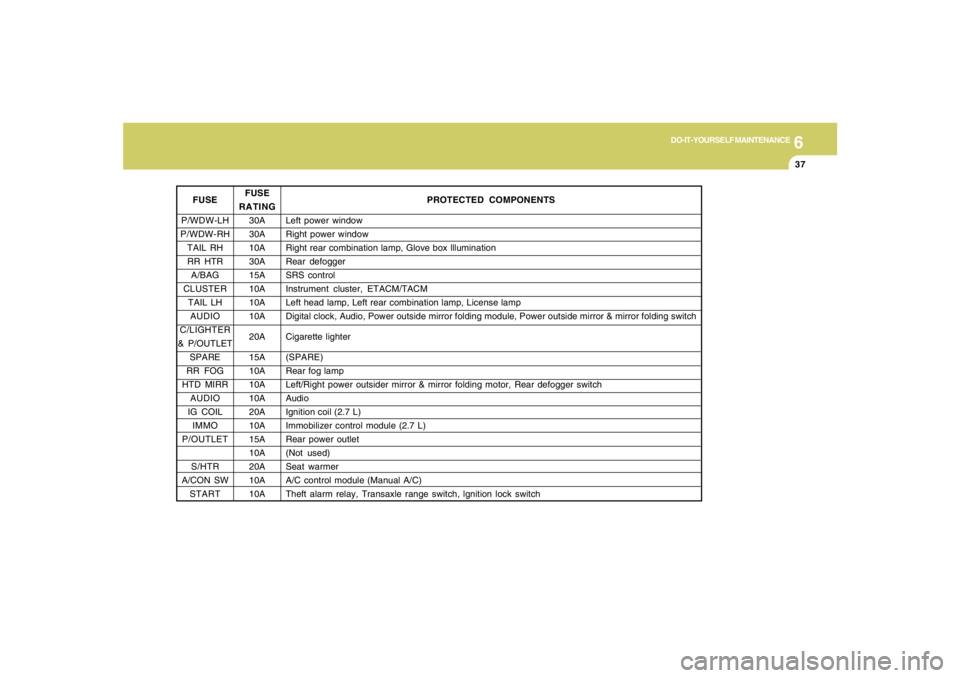
FUSE
P/WDW-LH
P/WDW-RH
TAIL RH
RR HTR
A/BAG
CLUSTER
TAIL LH
AUDIO
C/LIGHTER
& P/OUTLET
SPARE
RR FOG
HTD MIRR
AUDIO
IG COIL
IMMO
P/OUTLET
S/HTR
A/CON SW
STARTPROTECTED COMPONENTS
Left power window
Right power window
Right rear combination lamp, Glove box lllumination
Rear defogger
SRS control
Instrument cluster, ETACM/TACM
Left head lamp, Left rear combination lamp, License lamp
Digital clock, Audio, Power outside mirror folding module, Power outside mirror & mirror folding switch
Cigarette lighter
(SPARE)
Rear fog lamp
Left/Right power outsider mirror & mirror folding motor, Rear defogger switch
Audio
Ignition coil (2.7 L)
Immobilizer control module (2.7 L)
Rear power outlet
(Not used)
Seat warmer
A/C control module (Manual A/C)
Theft alarm relay, Transaxle range switch, lgnition lock switch
FUSE
RATING
30A
30A
10A
30A
15A
10A
10A
10A
20A
15A
10A
10A
10A
20A
10A
15A
10A
20A
10A
10A
Page 273 of 306
6
DO-IT-YOURSELF MAINTENANCE
38
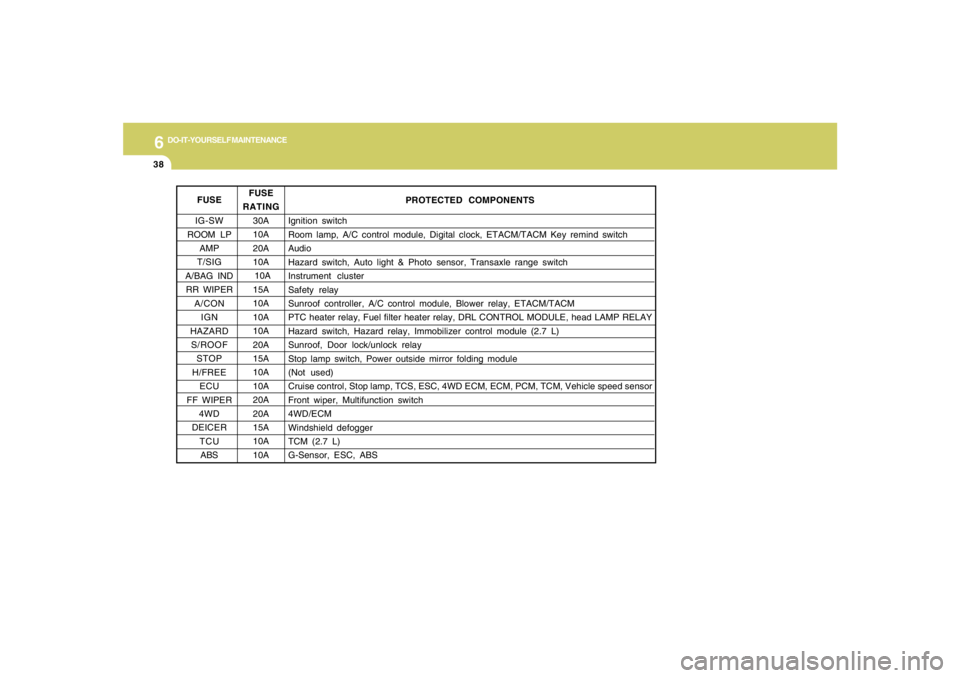
FUSE
IG-SW
ROOM LP
AMP
T/SIG
A/BAG IND
RR WIPER
A/CON
IGN
HAZARD
S/ROOF
STOP
H/FREE
ECU
FF WIPER
4WD
DEICER
TCU
ABS
PROTECTED COMPONENTS
Ignition switch
Room lamp, A/C control module, Digital clock, ETACM/TACM Key remind switch
Audio
Hazard switch, Auto light & Photo sensor, Transaxle range switch
Instrument cluster
Safety relay
Sunroof controller, A/C control module, Blower relay, ETACM/TACM
PTC heater relay, Fuel filter heater relay, DRL CONTROL MODULE, head LAMP RELAY
Hazard switch, Hazard relay, Immobilizer control module (2.7 L)
Sunroof, Door lock/unlock relay
Stop lamp switch, Power outside mirror folding module
(Not used)
Cruise control, Stop lamp, TCS, ESC, 4WD ECM, ECM, PCM, TCM, Vehicle speed sensor
Front wiper, Multifunction switch
4WD/ECM
Windshield defogger
TCM (2.7 L)
G-Sensor, ESC, ABS FUSE
RATING
30A
10A
20A
10A
10A
15A
10A
10A
10A
20A
15A
10A
10A
20A
20A
15A
10A
10A