Page 151 of 306
1
FEATURES OF YOUR HYUNDAI
139139139139139
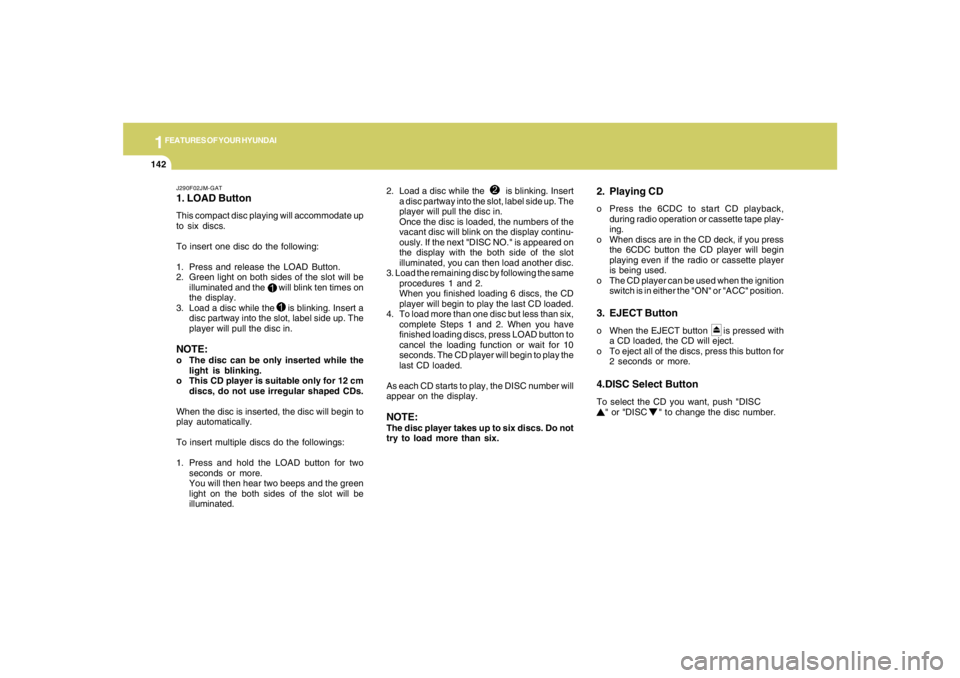
J290C01JM-GATCASSETTE TAPE PLAYER OPERATION (J290) (If installed)
J290C01JM
1.TAPE PROGRAM Button
3. DOLBY Button4.REPEAT Button5.AUTO MUSIC Select Button6.FF/REW Button2.EJECT Button
Page 152 of 306

1FEATURES OF YOUR HYUNDAI
140
J290D01JM-GAT1. TAPE PROGRAM ButtonThis allows you to play the reverse side of the
tape by merely pressing the program button.
The PLAY and an arrow will appear in the display
to show tape direction.2. EJECT Buttono When the EJECT button is pressed with a
cassette loaded, the cassette will eject.
o When the EJECT button is pressed during
FF/REW mode, the cassette will eject.3. DOLBY ButtonIf you get background noise during tape PLAY,
you can reduce this considerably by merely
pressing the DOLBY button. If you want to
cancel the DOLBY feature, press the button
again.4. REPEAT Buttono To repeat the track you are currently listen-
ing to, press the RPT button. To cancel,
press again.
o If you do not release RPT operation when the
track ends, it will automatically be replayed.
This process will be continued until you push
the button again.
5. AUTO MUSIC Select ButtonPress the button to find the starting point of each
song in a prerecorded music tape. The quiet
space between songs (must have at least a 4
sec. gap) can be identified by the AUTO MUSIC
Select button.
o Pressing the will play the begin-ning of
the next music segment.
o Pressing the will start replay at the
beginning of the music just listened to.
o To stop FF or REW action, press the button
again.6. FF/REW Buttono Fast forward tape winding starts when the
FF button is pressed during PLAY or REW
mode.
o PLAY starts when the FF button is pressed
again during FF mode.
o Tape rewinding starts when the REW button
is pressed during PLAY or FF mode.
o PLAY starts when the REW button pressed
again during REW mode.
CAUTION:
o Do not insert anything like coins into the
player slot as damage to the unit may
occur.
o Do not place beverages close to the
audio system. The playback mechanism
may be damaged if you spill them.
o Do not impact on the audio system, or
the playback mechanism could be dam-
aged.
!
Page 153 of 306
1
FEATURES OF YOUR HYUNDAI
141141141141141
1.LOAD Button
J290E01JM-GATCOMPACT DISC PLAYER / CD AUTO CHANGER OPERATION (J290) (If installed)
J290E01JM
2.Playing CD
3.EJECT Button
4. DISC Select
Button
5.RANDOM Play Button6.REPEAT Button7.TRACK UP/DOWN8.FF/REW Button9.SCAN Button 10.EQ Button
Page 154 of 306

1FEATURES OF YOUR HYUNDAI
142
J290F02JM-GAT1. LOAD ButtonThis compact disc playing will accommodate up
to six discs.
To insert one disc do the following:
1. Press and release the LOAD Button.
2. Green light on both sides of the slot will be
illuminated and the will blink ten times on
the display.
3. Load a disc while the is blinking. Insert a
disc partway into the slot, label side up. The
player will pull the disc in.NOTE:o The disc can be only inserted while the
light is blinking.
o This CD player is suitable only for 12 cm
discs, do not use irregular shaped CDs.
When the disc is inserted, the disc will begin to
play automatically.
To insert multiple discs do the followings:
1. Press and hold the LOAD button for two
seconds or more.
You will then hear two beeps and the green
light on the both sides of the slot will be
illuminated.2. Load a disc while the is blinking. Insert
a disc partway into the slot, label side up. The
player will pull the disc in.
Once the disc is loaded, the numbers of the
vacant disc will blink on the display continu-
ously. If the next "DISC NO." is appeared on
the display with the both side of the slot
illuminated, you can then load another disc.
3. Load the remaining disc by following the same
procedures 1 and 2.
When you finished loading 6 discs, the CD
player will begin to play the last CD loaded.
4. To load more than one disc but less than six,
complete Steps 1 and 2. When you have
finished loading discs, press LOAD button to
cancel the loading function or wait for 10
seconds. The CD player will begin to play the
last CD loaded.
As each CD starts to play, the DISC number will
appear on the display.
NOTE:The disc player takes up to six discs. Do not
try to load more than six.
2. Playing CDo Press the 6CDC to start CD playback,
during radio operation or cassette tape play-
ing.
o When discs are in the CD deck, if you press
the 6CDC button the CD player will begin
playing even if the radio or cassette player
is being used.
o The CD player can be used when the ignition
switch is in either the "ON" or "ACC" position.3. EJECT Buttono When the EJECT button is pressed with
a CD loaded, the CD will eject.
o To eject all of the discs, press this button for
2 seconds or more.4.DISC Select ButtonTo select the CD you want, push "DISC
" or "DISC " to change the disc number.
Page 156 of 306
1FEATURES OF YOUR HYUNDAI
144
CAUTION:
o Do not insert warped or poor quality
discs into the CD player as damage to the
unit may occur.
o Do not insert anything like coins into the
player slot as damage to the unit may
occur.
o Do not place beverages close to the
audio system. The playback mechanism
may be damaged if you spill them.
o Do not impact on the audio system, or
the playback mechanism could be dam-
aged.
o Driving off-road or other vibrations may
skip your compact disc.
Do not use the audio system off-roads
as the discs could be scratched and
damaged.
o Do not grip or pull out the disc with your
hand while the disc is being pulled into
the unit by the self loading mechanism.
These can cause disc scratching to oc-
cur or trouble in the compact disc player.
o Avoid using CD-Recordable or CD-
Rewritable to ensure proper operation.
When using the compact disc player,
genuine CDs are recommended.
!
Page 157 of 306

1
FEATURES OF YOUR HYUNDAI
145145145145145
INDICATION
Er2
Er3
Er6
Er8
HHH
no CD
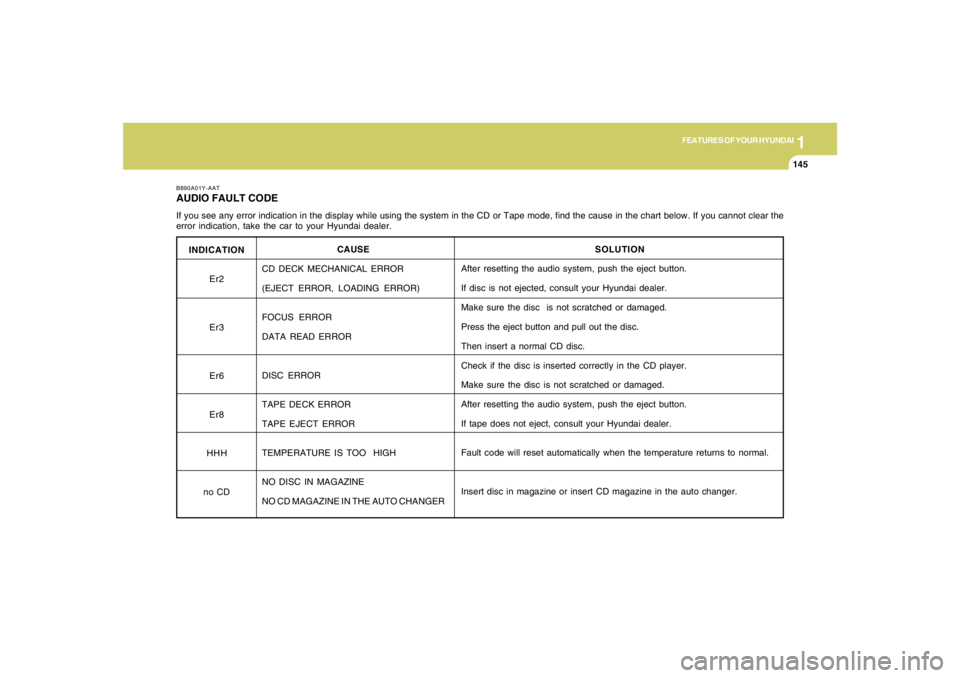
B890A01Y-AATAUDIO FAULT CODEIf you see any error indication in the display while using the system in the CD or Tape mode, find the cause in the chart below. If you cannot clear the
error indication, take the car to your Hyundai dealer.
SOLUTION
After resetting the audio system, push the eject button.
If disc is not ejected, consult your Hyundai dealer.
Make sure the disc is not scratched or damaged.
Press the eject button and pull out the disc.
Then insert a normal CD disc.
Check if the disc is inserted correctly in the CD player.
Make sure the disc is not scratched or damaged.
After resetting the audio system, push the eject button.
If tape does not eject, consult your Hyundai dealer.
Fault code will reset automatically when the temperature returns to normal.
Insert disc in magazine or insert CD magazine in the auto changer. CAUSE
CD DECK MECHANICAL ERROR
(EJECT ERROR, LOADING ERROR)
FOCUS ERROR
DATA READ ERROR
DISC ERROR
TAPE DECK ERROR
TAPE EJECT ERROR
TEMPERATURE IS TOO HIGH
NO DISC IN MAGAZINE
NO CD MAGAZINE IN THE AUTO CHANGER
Page 161 of 306
1
FEATURES OF YOUR HYUNDAI
149149149149149
J295C01JM-GATCOMPACT DISC PLAYER / CD AUTO CHANGER OPERATION (COMPATIBLE WITH MP3/WMA) (J295) (If installed)
JM_465_NA
10
91
81. CD Deck
2. CD Load
3. CD Eject
4. Disc Display
5. CD Changer Selection Button
6. Disc Selection Button
7. 8. Fast Backward / Fast Forward
9. Automatic Previous Track Selection Button
10. Automatic Next Track Selection Button
11. Repeat Button
12. SCAN Button
13. EQ Button
14. MARK Button
15. RDM Button
16. File Search Knob
17. Scroll Button
18. Directory Search Button5
71117
21218
14
15
3
13416
6
Page 162 of 306
![HYUNDAI TUCSON 2007 Owners Manual 1FEATURES OF YOUR HYUNDAI
150
J295D01JM-GAT1. CD DeckThe deck will open only when you press [LOAD]
button. Make sure the printed side of the disk
faces upward when you insert the disk. The CD
changer HYUNDAI TUCSON 2007 Owners Manual 1FEATURES OF YOUR HYUNDAI
150
J295D01JM-GAT1. CD DeckThe deck will open only when you press [LOAD]
button. Make sure the printed side of the disk
faces upward when you insert the disk. The CD
changer](/manual-img/35/56210/w960_56210-161.png)
1FEATURES OF YOUR HYUNDAI
150
J295D01JM-GAT1. CD DeckThe deck will open only when you press [LOAD]
button. Make sure the printed side of the disk
faces upward when you insert the disk. The CD
changer can only play 12cm disks. If you insert
video CD or DATA CD, then the screen will
display "ERROR DISC," eject the disk and
return to the previous mode.2. CD Load ButtonWhen you press [LOAD] button, the empty lots
of the CD Changer will be opened in the order
of 1, 2, 3, 4, 5 and 6. When you insert CD, you
can listen to the corresponding CD. In this case,
the last CD you inserted will be played. If you do
not take any actions after pressing (LOAD) then
the (LOAD) will be cancelled.3. CD Ejection ButtonWhen you press [
] button, the currently
played CD will be ejected. If you press the button
for more than 2 seconds, you will be able to eject
all CDs. If currently played CD is in the 3rd slot,
the ejection order will be 3, 4, 5, 6, 1 and 2.
4. DISC DisplayThis shows the location of disk inside the CD
Changer and the corresponding CD deck num-
ber will flicker when you load or eject the CD.5. CD Changer Selection ButtonIf the power was turned off when the CD is inside
the CD changer or if you press "CD" button
when radio was on, the system will play CD. If
you press (CD/MP3) when there is no CD in the
changer then the system will display "NO DISK"
for 2 seconds and return to the previous mode.NOTE:If you press this button when the power is
off and CD is inside the deck, the power will
be automatically turned on.6. Disc Selection ButtonIf you press [DISC
] button while using CD
Changer, the next disc will be played (If you
press the button when you are listening to CD
1, the CD 2 will be played).
If you wish to listen to the previous CD, then
press [DISC
] button then the previous disc
will be played (If you press the button when you
are listening to CD 2, the CD 1 will be played).
If the CD Changer is not fully loaded, this will
move to the next available deck. When the
player moves from deck to deck, the screen will
display the selected deck number.
7. Fast Backward ButtonPress and hold [4 REW] button while playing CD
then the player will play the disk backwards 5
times the regular speed for first 5 seconds and
15 times faster after that. The sound will be
reduced by 12dB while you are holding the
button.8. Fast Forward ButtonPress and hold [1 FF] button while playing CD
then the player will play the disk forward 5 times
the regular speed for first 5 seconds and 15
times faster after that. The sound will be re-
duced by 12dB while you are holding the button.9. Automatic Previous Track Selection
ButtonPress [TRACK
] button to go to the beginning
of the song you are listening to while playing the
CD. Press the button again to go to the beginning
of the song before the song you were listening
to.
10. Automatic Next Track Selection
ButtonPress [SEEK
] button to go to the beginning
of the song next to the song you are listening to
while playing the CD.