2007 HYUNDAI TUCSON instrument panel
[x] Cancel search: instrument panelPage 56 of 306

1FEATURES OF YOUR HYUNDAI44
!
o If your car was flooded and has soaked
carpeting or water on the floor, don't try
to start the engine; have the car towed to
an authorized Hyundai dealer.
o Do not replace the bumper or the bumper
guard with the one other than the Hyundai
genuine parts. Otherwise, it can ad-
versely affect SRS performance and lead
to an increased risk of injury.
WARNING:
o For cleaning the airbag pad covers, use
only a soft, dry cloth or one which has
been moistened with plain water. Sol-
vents or cleaners could adversely affect
the airbag covers and proper deploy-
ment of the system.
o No objects should be placed over or near
the airbag modules on the steering
wheel, instrument panel, and the front
passenger's panel above the glove box,
because any such object could cause
harm if the vehicle is in a crash severe
enough to cause the airbags to inflate.
o If the airbags inflate, they must be re-
placed by an authorized Hyundai dealer.
o Do not tamper with or disconnect SRS
wiring, or other components of the SRS
system. Doing so could result in injury,
due to accidental inflation of the airbags
or by rendering the SRS inoperative.
o If components of the airbag system must
be discarded, or if the vehicle must be
scrapped, certain safety precautions
must be observed. Your Hyundai dealer
knows these precautions and can give
you the necessary information. Failure
to follow these precautions and proce-
dures could increase the risk of personal
injury.
!
WARNING:
!
WARNING:
o Do not install a child restraint system in
the front passenger seat position.
A child restraint system must never be
placed in the front seat. The infant or
child could be severely injured or killed
by an airbag deployment in case of an
accident.
o Modification to SRS components or wir-
ing, including the addition of any kind of
badges to the pad covers or modifica-
tions to the body structure, can ad-
versely affect SRS performance and lead
to possible injury.B240C02JM-AATSRS Careo The SRS is virtually maintenance free and
there are no parts you can safely service by
yourself. If the SRS SRI (Service Reminder
Indicator) does not illuminate, or continu-
ously remains on, have your vehicle imme-
diately inspected by your Hyundai dealer.
o Any work on the SRS system, such as
removing, installing, repairing, or any work
on the steering wheel must be performed by
a qualified Hyundai technician. Improper
handling of the airbag system may result in
serious personal injury.
Page 60 of 306

1FEATURES OF YOUR HYUNDAI48
WARNING AND INDICATOR LIGHTSB260B01JM-AAT
SRS (Airbag) Service
Reminder Indicator (SRI)
The SRS service reminder indicator (SRI) comes
on for about 6 seconds after the ignition key is
turned to the "ON" position or after the engine
is started, after which it will go out.
This light also comes on when the SRS is not
working properly. If the SRI does not come on,
or continuously remains on after coming on for
about 6 seconds when you turned the ignition
key to the "ON" position or started the engine,
or if it comes on while driving, have the SRS
inspected by an authorized Hyundai Dealer.B260D01A-AAT
Turn Signal Indicator Lights
The blinking green arrows on the instrument
panel show the direction indicated by the turn
signals. If the arrow comes on but does not blink,
blinks more rapidly than normal, or does not
illuminate at all, a malfunction in the turn signal
system is indicated. Your dealer should be
consulted for repairs.
B260E02O-AAT
Seat Belt Reminder Light
and Chime
The seat belt reminder light blinks until your seat
belt is fastened when the ignition key is turned
from the "OFF" position to "ON" or "START" and
the warning chime will sound for 6 seconds.B260F01A-AAT
High Beam Indicator Light
The high beam indicator light comes on when-
ever the headlights are switched to the high
beam or flash position.
B260G01A-AAT
Low Oil Pressure Warning Light
CAUTION:
If the low oil pressure warning light stays on
while the engine is running, serious engine
damage may result. The oil pressure warn-
ing light comes on whenever there is insuf-
ficient oil pressure. In normal operation, it
should come on when the ignition switch
is turned on, then go out when the engine
is started. If the oil pressure warning light
stays on while the engine is running, there
is a serious malfunction.
If this happens, stop the car as soon as it is
safe to do so, turn off the engine and check
the oil level. If the oil level is low, fill the
engine oil to the proper level and start the
engine again. If the light stays on with the
engine running, turn the engine off imme-
diately. In any instance where the oil light
stays on when the engine is running, the
engine should be checked by a Hyundai
dealer before the car is driven again.
!
Page 71 of 306

1
FEATURES OF YOUR HYUNDAI
59
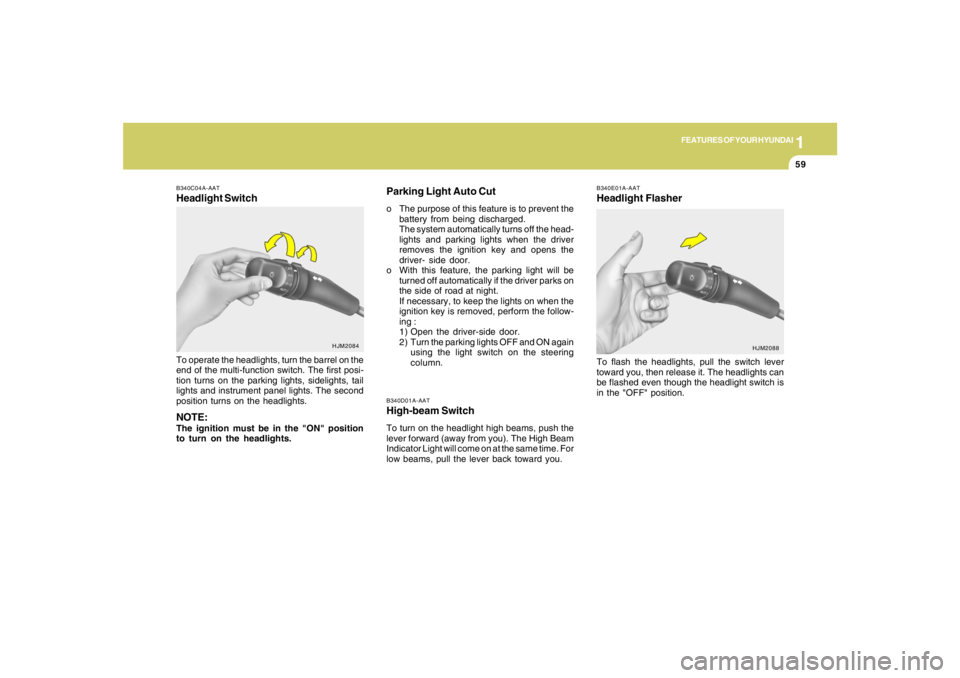
B340D01A-AATHigh-beam SwitchTo turn on the headlight high beams, push the
lever forward (away from you). The High Beam
Indicator Light will come on at the same time. For
low beams, pull the lever back toward you.
B340E01A-AATHeadlight FlasherTo flash the headlights, pull the switch lever
toward you, then release it. The headlights can
be flashed even though the headlight switch is
in the "OFF" position.
B340C04A-AATHeadlight SwitchTo operate the headlights, turn the barrel on the
end of the multi-function switch. The first posi-
tion turns on the parking lights, sidelights, tail
lights and instrument panel lights. The second
position turns on the headlights.NOTE:The ignition must be in the "ON" position
to turn on the headlights.
HJM2084
HJM2088
Parking Light Auto Cuto The purpose of this feature is to prevent the
battery from being discharged.
The system automatically turns off the head-
lights and parking lights when the driver
removes the ignition key and opens the
driver- side door.
o With this feature, the parking light will be
turned off automatically if the driver parks on
the side of road at night.
If necessary, to keep the lights on when the
ignition key is removed, perform the follow-
ing :
1) Open the driver-side door.
2) Turn the parking lights OFF and ON again
using the light switch on the steering
column.
Page 76 of 306

1FEATURES OF YOUR HYUNDAI64
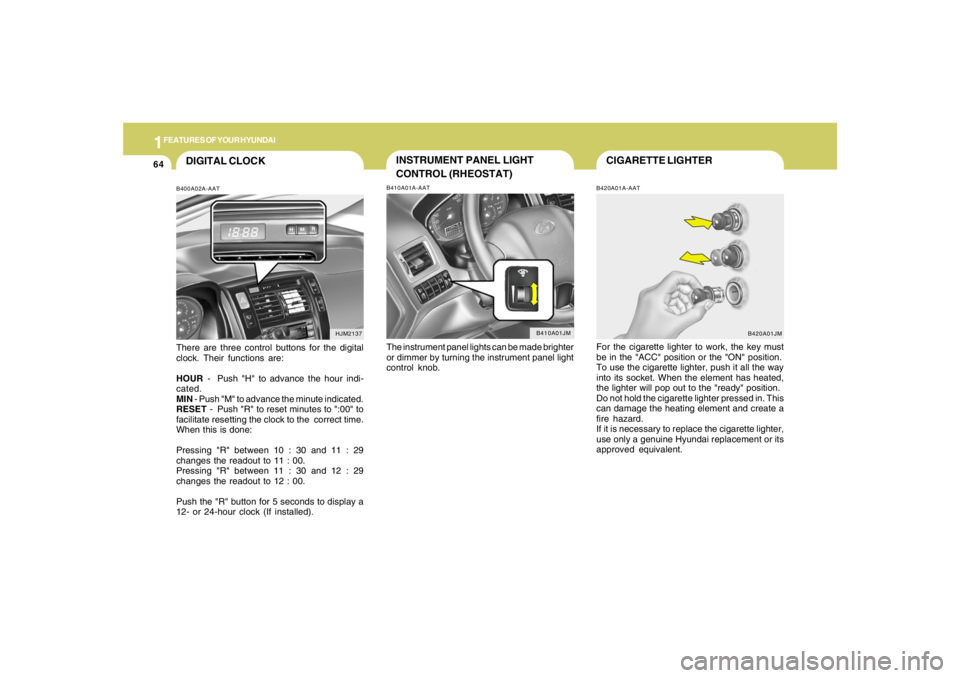
CIGARETTE LIGHTERB420A01A-AATFor the cigarette lighter to work, the key must
be in the "ACC" position or the "ON" position.
To use the cigarette lighter, push it all the way
into its socket. When the element has heated,
the lighter will pop out to the "ready" position.
Do not hold the cigarette lighter pressed in. This
can damage the heating element and create a
fire hazard.
If it is necessary to replace the cigarette lighter,
use only a genuine Hyundai replacement or its
approved equivalent.
B420A01JM
DIGITAL CLOCKB400A02A-AATThere are three control buttons for the digital
clock. Their functions are:
HOUR - Push "H" to advance the hour indi-
cated.
MIN - Push "M" to advance the minute indicated.
RESET - Push "R" to reset minutes to ":00" to
facilitate resetting the clock to the correct time.
When this is done:
Pressing "R" between 10 : 30 and 11 : 29
changes the readout to 11 : 00.
Pressing "R" between 11 : 30 and 12 : 29
changes the readout to 12 : 00.
Push the "R" button for 5 seconds to display a
12- or 24-hour clock (If installed).
HJM2137
INSTRUMENT PANEL LIGHT
CONTROL (RHEOSTAT)B410A01A-AATThe instrument panel lights can be made brighter
or dimmer by turning the instrument panel light
control knob.
B410A01JM
Page 111 of 306

1
FEATURES OF YOUR HYUNDAI
9999999999
Photo sensor
HJM2086
NOTE:o If the battery has been discharged or
disconnected, the temperature mode will
reset to Centigrade degrees.
This is a normal condition and you can
change the temperature mode from Cen-
tigrade to Farenheit as follows;
Press the "TEMP" down button and
"AUTO" button simultaneously for 3
secs. The display shows that the unit of
temperature is adjusted to Centigrade or
Fahrenheit.
(°C
→ →→ →
→°F or °F
→ →→ →
→°C)
o Never place anything covering the sen-
sor which is located on the instrument
panel to ensure better control of the
heating and cooling system.
B970C01JM-AATAutomatic OperationThe FATC (Full Automatic Temperature Con-
trol) system automatically controls heating and
cooling by doing as follows:
1. Push the "AUTO" button. The indicator light
will illuminate confirming that the Face, Floor
and/or Bi-Level modes as well as the blower
speed and air conditioner will be controlled
automatically.2. Push the "TEMP" button to set the desired
temperature.
The temperature will increase to the maxi-
mum 90°F(32°C) by pushing the " " button.
Each push of the button will cause the tem-
perature to increase by 1°F(0.5°C).
The temperature will decrease to the mini-
mum 62°F(17°C) by pushing the " " button.
Each push of the button will cause the tem-
perature to decrease by 1°F(0.5°C).
HJM2124HJM2126
Page 278 of 306

8
CONSUMER INFORMATION, REPORTING SAFETY DEFECTS & BINDING ARBITRATION OF WARRANTY CLAIMS2
ENGINE NUMBER
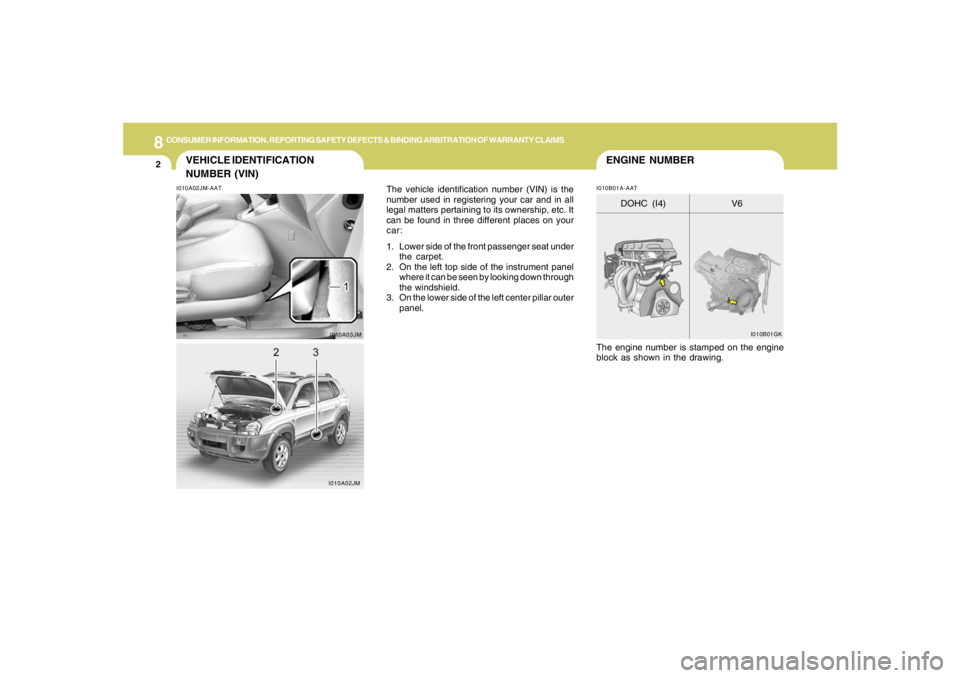
VEHICLE IDENTIFICATION
NUMBER (VIN)
I010B01A-AAT I010A02JM-AAT
The vehicle identification number (VIN) is the
number used in registering your car and in all
legal matters pertaining to its ownership, etc. It
can be found in three different places on your
car:
1. Lower side of the front passenger seat under
the carpet.
2. On the left top side of the instrument panel
where it can be seen by looking down through
the windshield.
3. On the lower side of the left center pillar outer
panel.
The engine number is stamped on the engine
block as shown in the drawing.
I010A03JMI010B01GK
V6 DOHC (I4)
I010A02JM
Page 302 of 306

10
INDEX
4
H
Hazard Warning System ..................................................................1-62
Heating and Cooling Control .............................................................1-88
Heating and Ventilation
Air flow control..............................................................................1-90
Air intake control switch ...............................................................1-89
Bi-level heating.............................................................................1-94
Defrosting / Defogging .................................................................1-94
Fan speed control (Blower control) .............................................1-89
Temperature control....................................................................1-93
High-Mounted Rear Stop Light .........................................................1-80
Hood Release....................................................................................1-82
Horn.................................................................................................1-85
How to Use Luggage Room.............................................................1-77
I
Ignition Switch ...................................................................................... 2-5
Instrument Cluster and Indicator Lights...........................................1-46
Instrument Panel Light Control (Rheostat).......................................1-64
Interior Light.......................................................................................1-69
J
Jump Starting...................................................................................... 3-3
K
Keys................................................................................................... 1-3
If you lose your keys ...................................................................3-19
Positions......................................................................................... 2-5L
Light Bulbs Replacement..................................................................6-27
Luggage Compartment Light ............................................................1-77
Luggage Net ......................................................................................1-79
M
Maintenance Intervals
Explanation of scheduled maintenance items ............................... 5-7
Maintenance under severe usage conditions............................... 5-6
Scheduled maintenance................................................................ 5-4
Service requirements.................................................................... 5-2
Mirrors
Automatic Dimming Rear View Mirror With Compass ................1-73
Day-night inside rearview mirror .................................................1-73
Outside rearview mirror ...............................................................1-71
Outside rearview mirror Heater ..................................................
1-72
O
Odometer / Trip Odometer ...............................................................1-54
Occupant Classification System ......................................................1-38
P
Parking Brake....................................................................................1-75
Power Outlet......................................................................................1-65
Power Steering Fluid Level ...............................................................6-24