2007 Hyundai Terracan tow
[x] Cancel search: towPage 108 of 291
1FEATURES OF YOUR HYUNDAI
94ROOF RACK
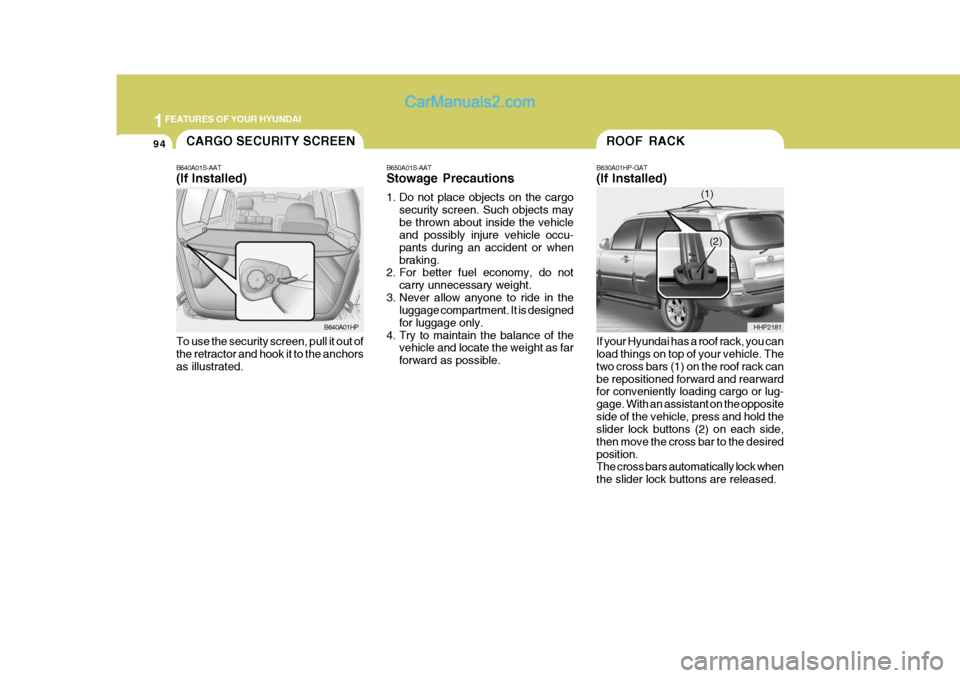
B630A01HP-GAT (If Installed) If your Hyundai has a roof rack, you can load things on top of your vehicle. The two cross bars (1) on the roof rack canbe repositioned forward and rearward for conveniently loading cargo or lug- gage. With an assistant on the oppositeside of the vehicle, press and hold the slider lock buttons (2) on each side, then move the cross bar to the desiredposition. The cross bars automatically lock when the slider lock buttons are released. HHP2181
(1)
(2)
B650A01S-AAT Stowage Precautions
1. Do not place objects on the cargo
security screen. Such objects may be thrown about inside the vehicle and possibly injure vehicle occu- pants during an accident or whenbraking.
2. For better fuel economy, do not
carry unnecessary weight.
3. Never allow anyone to ride in the luggage compartment. It is designedfor luggage only.
4. Try to maintain the balance of the vehicle and locate the weight as farforward as possible.
CARGO SECURITY SCREEN
B640A01S-AAT (If Installed) To use the security screen, pull it out of the retractor and hook it to the anchors as illustrated. B640A01HP
Page 114 of 291
1FEATURES OF YOUR HYUNDAI
100
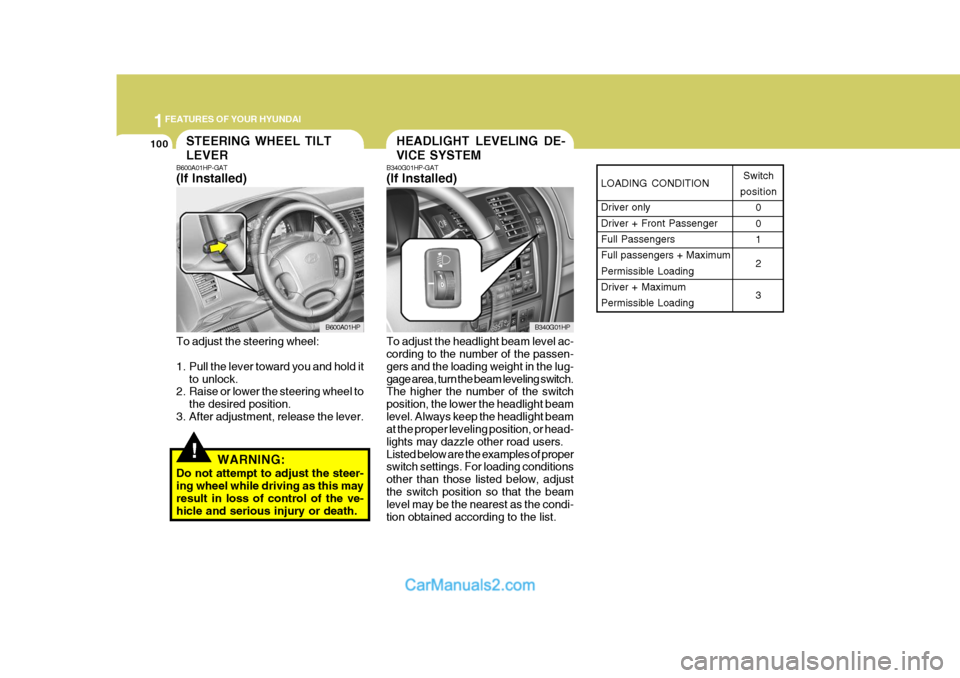
LOADING CONDITION Driver only Driver + Front PassengerFull Passengers Full passengers + Maximum Permissible LoadingDriver + Maximum Permissible LoadingSwitch
position 0 01 2 3
HEADLIGHT LEVELING DE- VICE SYSTEMSTEERING WHEEL TILT LEVER
!
B600A01HP-GAT (If Installed) To adjust the steering wheel:
1. Pull the lever toward you and hold itto unlock.
2. Raise or lower the steering wheel to
the desired position.
3. After adjustment, release the lever.
WARNING:
Do not attempt to adjust the steer- ing wheel while driving as this may result in loss of control of the ve- hicle and serious injury or death. B340G01HP-GAT (If Installed) To adjust the headlight beam level ac- cording to the number of the passen- gers and the loading weight in the lug-gage area, turn the beam leveling switch. The higher the number of the switch position, the lower the headlight beamlevel. Always keep the headlight beam at the proper leveling position, or head- lights may dazzle other road users.Listed below are the examples of proper switch settings. For loading conditions other than those listed below, adjustthe switch position so that the beam level may be the nearest as the condi- tion obtained according to the list.
B600A01HP
B340G01HP
Page 126 of 291
1FEATURES OF YOUR HYUNDAI
112
o Set the temperature control to "Cool".
("Cool" provides maximum cooling. The temperature may be moderated by moving the control toward "Warm".)
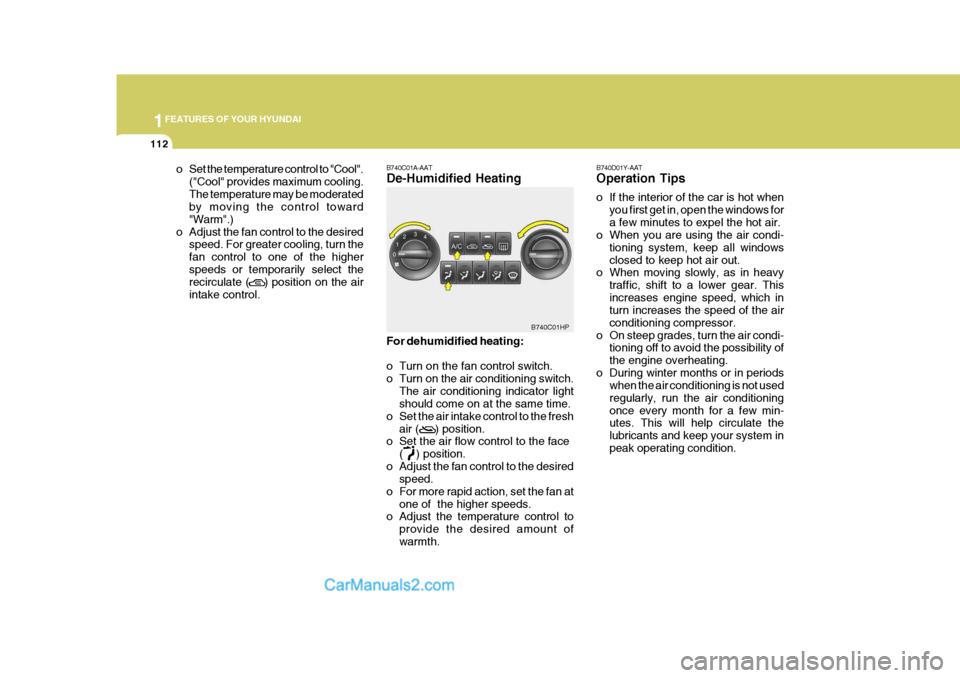
o Adjust the fan control to the desired speed. For greater cooling, turn thefan control to one of the higherspeeds or temporarily select the recirculate ( ) position on the air intake control. B740C01A-AAT De-Humidified Heating For dehumidified heating:
o Turn on the fan control switch.
o Turn on the air conditioning switch.
The air conditioning indicator light should come on at the same time.
o Set the air intake control to the fresh
air ( ) position.
o Set the air flow control to the face
( ) position.
o Adjust the fan control to the desired speed.
o For more rapid action, set the fan at
one of the higher speeds.
o Adjust the temperature control to
provide the desired amount of warmth.
B740C01HP
B740D01Y-AAT Operation Tips
o If the interior of the car is hot when
you first get in, open the windows for a few minutes to expel the hot air.
o When you are using the air condi-
tioning system, keep all windowsclosed to keep hot air out.
o When moving slowly, as in heavy
traffic, shift to a lower gear. Thisincreases engine speed, which in turn increases the speed of the air conditioning compressor.
o On steep grades, turn the air condi- tioning off to avoid the possibility ofthe engine overheating.
o During winter months or in periods when the air conditioning is not usedregularly, run the air conditioningonce every month for a few min- utes. This will help circulate the lubricants and keep your system inpeak operating condition.
Page 134 of 291
1FEATURES OF YOUR HYUNDAI
120STEREO SOUND SYSTEM
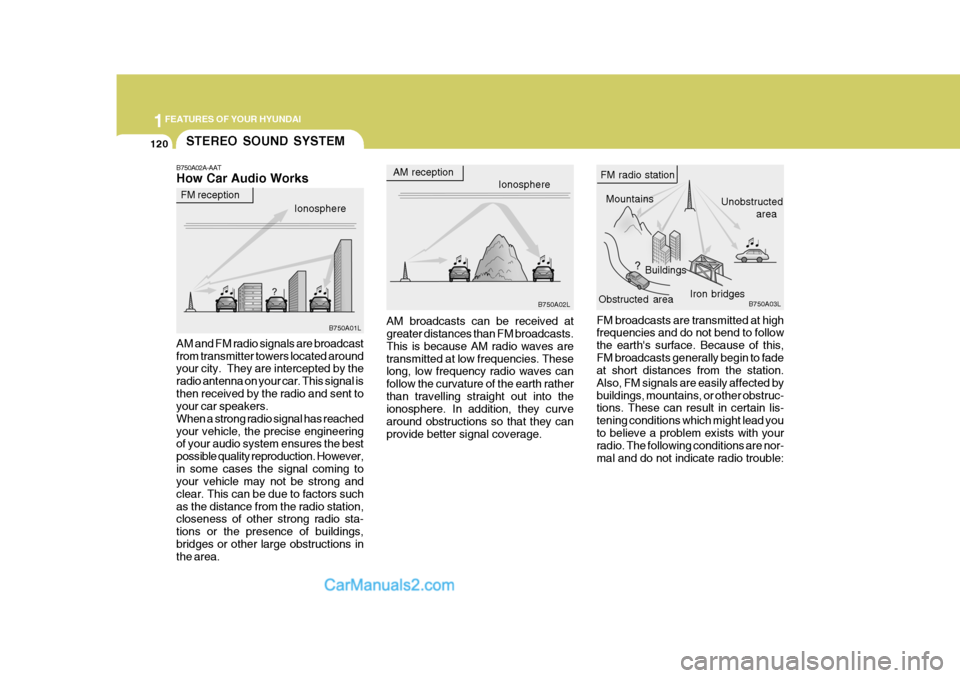
B750A02A-AAT How Car Audio Works AM and FM radio signals are broadcast from transmitter towers located around your city. They are intercepted by the radio antenna on your car. This signal isthen received by the radio and sent to your car speakers. When a strong radio signal has reachedyour vehicle, the precise engineering of your audio system ensures the best possible quality reproduction. However,in some cases the signal coming to your vehicle may not be strong and clear. This can be due to factors suchas the distance from the radio station, closeness of other strong radio sta- tions or the presence of buildings,bridges or other large obstructions in the area. AM reception
Ionosphere
FM reception
B750A01L Ionosphere
B750A02L Mountains
Buildings Unobstructed
area
FM radio station
B750A03L
Obstructed area Iron bridges
AM broadcasts can be received at greater distances than FM broadcasts. This is because AM radio waves aretransmitted at low frequencies. These long, low frequency radio waves can follow the curvature of the earth ratherthan travelling straight out into the ionosphere. In addition, they curve around obstructions so that they canprovide better signal coverage. FM broadcasts are transmitted at high frequencies and do not bend to follow the earth's surface. Because of this,FM broadcasts generally begin to fade at short distances from the station. Also, FM signals are easily affected bybuildings, mountains, or other obstruc- tions. These can result in certain lis- tening conditions which might lead youto believe a problem exists with your radio. The following conditions are nor- mal and do not indicate radio trouble:
Page 157 of 291
2
Engine Exhaust Can Be Dangerous! ........................... 2-2
Before Starting the Engine ........................................... 2-3
Key Positions ................................................................ 2-4Starting......................................................................... 2-5
Operating the Manual Transmission ............................ 2-7
Automatic Transmission ............................................... 2-9
Four-Wheel Drive (4WD) ............................................ 2-14
Anti-Lock Brake System (ABS) .................................. 2-21
Limited-Slip Differential (LSD) .................................... 2-22
Good Braking Practices ............................................. 2-22
Driving for Economy ................................................... 2-23
Smooth Cornering ...................................................... 2-25
Winter Driving ............................................................. 2-25
Trailer or Vehicle Towing ........................................... 2-28
DRIVING YOUR HYUNDAI
2
Page 170 of 291
2 DRIVING YOUR HYUNDAI
14
!
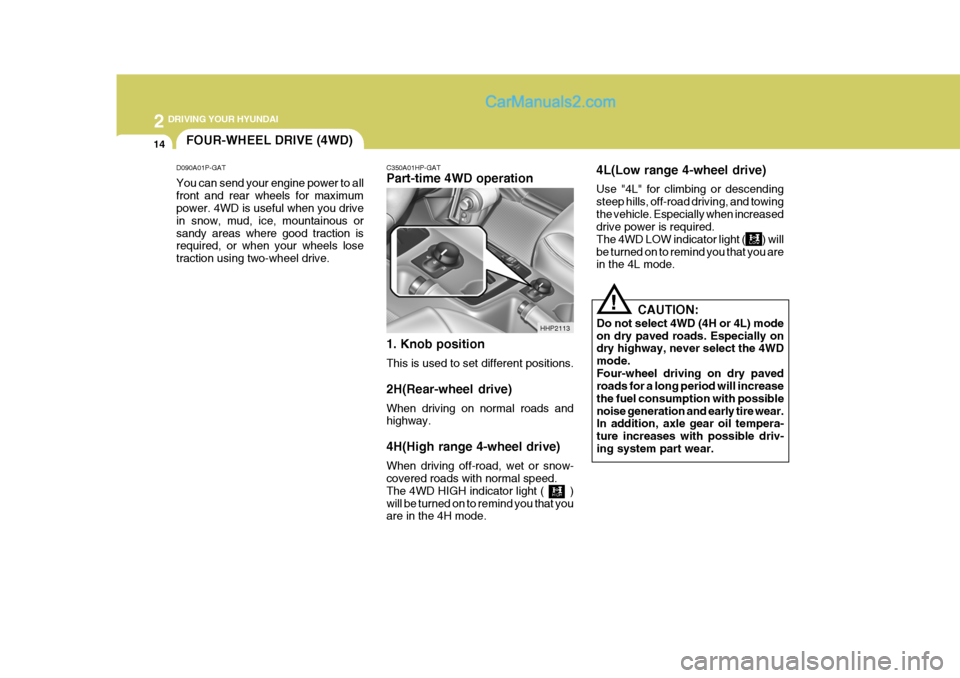
C350A01HP-GAT Part-time 4WD operation 1. Knob position This is used to set different positions. 2H(Rear-wheel drive) When driving on normal roads and highway. 4H(High range 4-wheel drive) When driving off-road, wet or snow- covered roads with normal speed. The 4WD HIGH indicator light ( )will be turned on to remind you that you are in the 4H mode. 4L(Low range 4-wheel drive) Use "4L" for climbing or descending steep hills, off-road driving, and towingthe vehicle. Especially when increased drive power is required. The 4WD LOW indicator light ( ) willbe turned on to remind you that you are in the 4L mode.
CAUTION:
Do not select 4WD (4H or 4L) mode on dry paved roads. Especially on dry highway, never select the 4WD mode.Four-wheel driving on dry paved roads for a long period will increase the fuel consumption with possiblenoise generation and early tire wear. In addition, axle gear oil tempera- ture increases with possible driv-ing system part wear.
HHP2113
FOUR-WHEEL DRIVE (4WD)
D090A01P-GAT You can send your engine power to all front and rear wheels for maximum power. 4WD is useful when you drive in snow, mud, ice, mountainous orsandy areas where good traction is required, or when your wheels lose traction using two-wheel drive.
Page 174 of 291
2 DRIVING YOUR HYUNDAI
18
!
When driving on a snow-covered road or a slippery, muddy surface,make sure that you keep a suffi- cient distance between your ve- hicle and the one ahead of you.
(6) Since the driving torque is always applied to the 4 wheels, the perfor-mance of the full-time 4WD vehicleis greatly affected by the condition of the tires. Be sure to equip it with all four tires of the same size andtype.
o When replacement of any of the
tires or disc wheels is neces-sary, replace all of them.
o Rotate the tires and check the
tire pressure at regular inter-vals. (7)The full-time 4WD vehicle can-
not be towed by an ordinary towtruck. Make sure that the vehicle is towed with its four wheels raised off the ground.
o If the vehicle is towed with its only two wheels raised off theground, the 4WD system could be damaged.
o In unavoidable case, if the ve-
hicle is being towed with all fourwheels on the ground, it should be towed only forward directionwith rope.
WARNING:
Your vehicle is equipped with tiresdesigned to provide for safe rideand handling capability. Do not use a size and type of tire and wheel that is different from theone that was originally installed on your vehicle. It can affect the safety and performance of your vehicle,which could lead to handling fail-ure or rollover and serious injury. When replacing the tires, be sure to equip all four tires with the tire andwheel of the same size, type, tread, brand and load-carrying capacity. If you nevertheless decide to equipyour vehicle with any tire/wheel combination not recommended by Hyundai for off-road driving, youshould not use these tires for high- way driving.
LOW
��
��
� AUTO
1. Stop the vehicle.
2. Depress the clutch pedal (Manual Transmission) or put the shift lever into "N (neutral)" position (Automatic Transmission).
3. Turn the transfer shift knob to
"AUTO" mode.
Driving 4WD Safely
(1) Be sure to wear the seat belt.
(2) Drive at lower speeds in strong crosswinds. Because of yourvehicle's high center of gravity, its stability will be affected in cross- winds. Slower speeds ensure bet-ter vehicle control.
(3) Check the brake condition after
driving in wet or muddy conditions.Press the brake several times as you move slowly until you feel nor- mal braking forces return.
(4) Do not drive the vehicle through water. (i.e. streams, rivers, lakes,etc.)
(5) The stopping distance of the full- time 4WD vehicle differs very littlefrom that of the 2WD vehicle.
Page 175 of 291
2
DRIVING YOUR HYUNDAI
19
!
Roll tester (Speedometer)
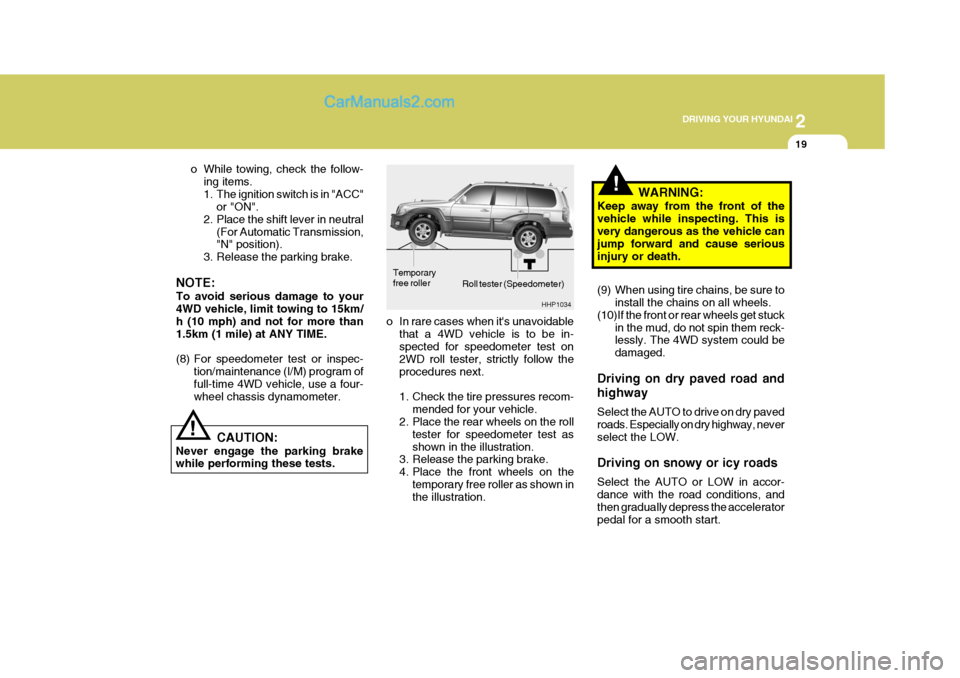
o In rare cases when it's unavoidable that a 4WD vehicle is to be in- spected for speedometer test on 2WD roll tester, strictly follow theprocedures next.
1. Check the tire pressures recom- mended for your vehicle.
2. Place the rear wheels on the roll
tester for speedometer test as shown in the illustration.
3. Release the parking brake.
4. Place the front wheels on the
temporary free roller as shown in the illustration. WARNING:
Keep away from the front of the vehicle while inspecting. This is very dangerous as the vehicle can jump forward and cause seriousinjury or death.
(9) When using tire chains, be sure to install the chains on all wheels.
(10)If the front or rear wheels get stuck in the mud, do not spin them reck- lessly. The 4WD system could be damaged.
Driving on dry paved road and highway Select the AUTO to drive on dry paved roads. Especially on dry highway, neverselect the LOW. Driving on snowy or icy roads Select the AUTO or LOW in accor- dance with the road conditions, and then gradually depress the accelerator pedal for a smooth start.
! CAUTION:
Never engage the parking brake while performing these tests. o While towing, check the follow-
ing items.
1. The ignition switch is in "ACC" or "ON".
2. Place the shift lever in neutral
(For Automatic Transmission, "N" position).
3. Release the parking brake.
NOTE: To avoid serious damage to your 4WD vehicle, limit towing to 15km/ h (10 mph) and not for more than1.5km (1 mile) at ANY TIME.
(8) For speedometer test or inspec- tion/maintenance (I/M) program of full-time 4WD vehicle, use a four- wheel chassis dynamometer. HHP1034
Temporary free roller