2007 Hyundai Santa Fe jump start
[x] Cancel search: jump startPage 201 of 355

1
FEATURES OF YOUR HYUNDAI
189
FEATURES OF YOUR HYUNDAI
189189189189
Playing a DVD/VCD
You can control your DVD or VCD by using
the buttons on the RSE control panel or by
using the remote controller. Instructions
for the controls listed below are the same
whether using the RSE control panel or the
remote controller. However, there are some
additional functions that are only available
from the remote controller. These buttons
and their functions are discussed in the
"Remote Controller" section of this manual.
1. Play/Pause Button
You do not need to press the PLAY/PAUSE
button after loading a disc to begin playing
the disc. The player will start playing auto-
matically.
While a disc is playing, press PLAY/PAUSE
to pause. While paused, the elapsed time
of the current disc, track or file will blink on
the LCD display, and "PAUSE" will be
displayed on the RSE control panel. Press
the button again to resume play.
NOTE:The RSE will enter standby mode when
the vehicle ignition is turned off. When
the vehicle is turned back on within 30
seconds, the RSE will turn on and the CD
will automatically begin playing again at
the point where it paused. If the vehicle
is turned off for longer than 30 seconds,
the RSE system will not turn on auto-
matically when the vehicle is restarted.
2. Fast Forward/Reverse
Press and hold the FF > or < REW button
and the player will fast forward or reverse
at 32 times the normal speed. Release the
FWD or < REW button to return to normal
speed play.3. Previous/Next Chapter
While a DVD/VCD is playing, press the
∧ ∧∧ ∧
∧
NEXT button to skip to the next chapter.
Press the
∨ ∨∨ ∨
∨ PREV button to jump to the
beginning of the current chapter. Press
∨ ∨ ∨ ∨
∨
PREV again to go move through earlier
chapters. Press the button repeatedly to
move quickly through chapters.NOTE:Some VCDs do not have track informa-
tion. If the VCD has no chapter informa-
tion, pressing either of these buttons will
restart the VCD.
While pressing the
∧ ∧∧ ∧
∧ NEXT or
∨ ∨∨ ∨
∨ PREV
buttons, the Status Display, including the
current medium (DVD or VCD), chapter
and title information is displayed. It will
automatically disappear after five seconds.
Page 231 of 355

2
DRIVING YOUR HYUNDAI
20
!
CAUTION:
If one of the front or rear wheels begins
to spin in mud, snow, etc., the vehicle can
sometimes be driven out by depressing
the accelerator pedal further; however,
avoid running the engine continuously at
high rpm because doing so could dam-
age the AWD system. (10)When using tire chains, always at-
tach them to the four wheels. In some
unavoidable circumstances, install
them on only the front wheels, not the
rear wheels.
(11) If the front or rear wheels get stuck in
the mud, do not spin them recklessly.
The AWD system could be damaged.
!
WARNING:
o Avoid high cornering speeds.
o Do not make quick steering wheel
movements, such as sharp lane
charges or fast, sharp turns.
o The risk of rollover is greatly in-
creased if you lose control of your
vehicle at highway speeds.
o While the full-time AWD vehicle is
being raised on a jack, never start the
engine or cause the tires to rotate.
There is danger that rotating tires
touching the ground could cause the
vehicle to go off the jack and to jump
forward.
o In a collision, an unbelted person is
signicantly more likely to be seriously
injured or killed than a person wearing
a seat belt.
o Loss of control may occurs if two or
more wheels drop off the roadway
and the driver oversteers to reenter
the roadway.
o In the event your vehicle leaves the
roadway, do not steer sharply. Instead,
slow down before pulling back into the
travel lanes.
AWD LOCK SYSTEMC360A01CM-AAT(With Electronic Control AWD)
(If installed)
OCM051045COCM051046N
Type AType B
Page 249 of 355

If the Engine will not Start .............................................. 3-2
Jump Starting ................................................................ 3-3
If the Engine Overheats ................................................ 3-4
Tire Pressure Monitoring System (TPMS) .................... 3-5
Spare Tire...................................................................3-10
If You Have a Flat Tire ................................................3-12
Changing a Flat Tire ....................................................3-12
If Your Car Must be Towed.........................................3-18
Emergency Towing.....................................................3-20
If You Lose Your Keys................................................3-21
3
3
WHAT TO DO IN AN EMERGENCY
Cmhma-3.p653/20/2006, 5:02 PM 1
Page 250 of 355

32WHAT TO DO IN AN EMERGENCY
IF THE ENGINE WILL NOT
START!
D010A01A-AAT D010B02A-AAT
If Engine Doesn't Turn Over or Turns
Over Slowly
D010C02Y-AATIf Engine Turns Over Normally but
Does Not Start1. Check fuel level.
2. With the key in the "OFF" position, check
all connectors at ignition, coil and spark
plugs. Reconnect any that may be dis-
connected or loose.
3. Check the fuel line in the engine com-
partment.
4. If the engine still does not start, call a
Hyundai dealer or seek other qualified
assistance.D010D01A-AATIf Engine Stalls While Driving1. Reduce your speed gradually, keeping
a straight line. Move cautiously off the
road to a safe place.
2. Turn on your emergency flashers.
3. Try to start the engine again. If your
vehicle will not start, contact a Hyundai
dealer or seek other qualified assis-
tance.
WARNING:
If the engine will not start, do not push or
pull the car to start it. This could result in
a collision or cause other damage. In
addition, push or pull starting may cause
the catalytic converter to be overloaded
and create a fire hazard.
1. If your car has an automatic transaxle,
be sure the gear selector lever is in "N"
or "P" and the emergency brake is set.
2. Check the battery connections to be
sure they are clean and tight.
3. Turn on the interior light. If the light dims
or goes out when you operate the starter,
the battery is discharged.
4. Check the starter connections to be
sure they are securely tightened.
5. Do not push or pull the vehicle to start it.
See instructions for "Jump Starting".
OCM055016
Cmhma-3.p653/20/2006, 5:02 PM 2
Page 251 of 355

3
WHAT TO DO IN AN EMERGENCY
3
JUMP STARTING!
o If you should accidentally get acid on
your skin or in your eyes, immediately
remove any contaminated clothing and
flush the area with clear water for at
least 15 minutes. Then promptly obtain
medical attention. If you must be trans-
ported to an emergency facility, con-
tinue to apply water to the affected area
with a sponge or cloth.
o The gas produced by the battery during
the jump-start operation is highly explo-
sive. Do not smoke or allow a spark or
an open flame in the vicinity.
o The battery being used to provide the
jump start must be 12-volt. If you cannot
determine that it is a 12-volt battery, do
not attempt to use it for the jump start.
o To jump start a car with a discharged
battery, follow this procedure exactly:
1. If the booster battery is installed in an-
other vehicle, be sure the two vehicles
are not touching.
2. Turn off all unnecessary lights and ac-
cessories in both vehicles.
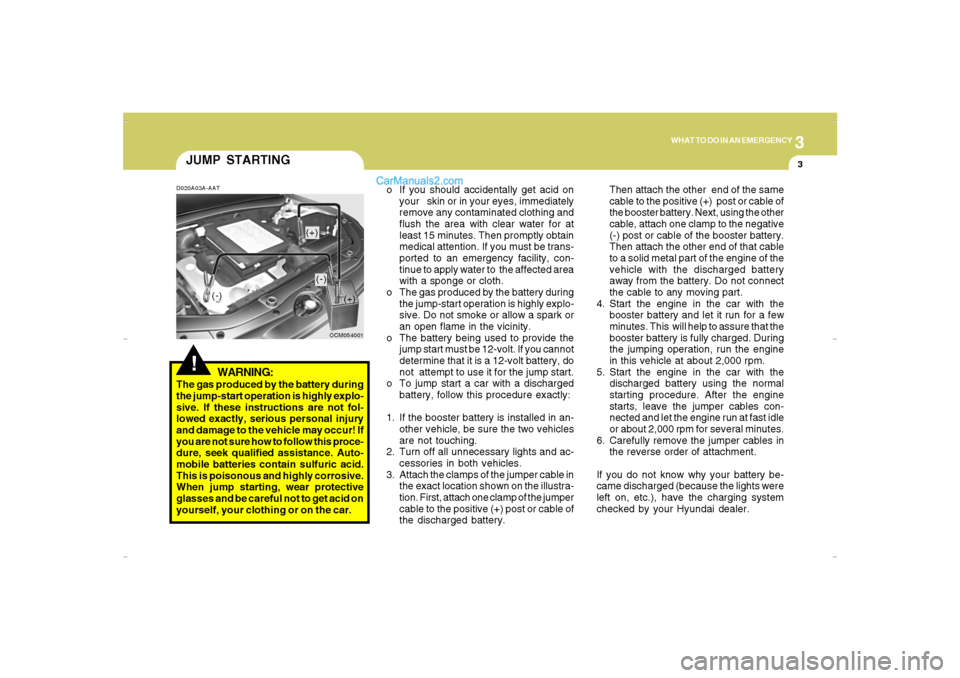
3. Attach the clamps of the jumper cable in
the exact location shown on the illustra-
tion. First, attach one clamp of the jumper
cable to the positive (+) post or cable of
the discharged battery.Then attach the other end of the same
cable to the positive (+) post or cable of
the booster battery. Next, using the other
cable, attach one clamp to the negative
(-) post or cable of the booster battery.
Then attach the other end of that cable
to a solid metal part of the engine of the
vehicle with the discharged battery
away from the battery. Do not connect
the cable to any moving part.
4. Start the engine in the car with the
booster battery and let it run for a few
minutes. This will help to assure that the
booster battery is fully charged. During
the jumping operation, run the engine
in this vehicle at about 2,000 rpm.
5. Start the engine in the car with the
discharged battery using the normal
starting procedure. After the engine
starts, leave the jumper cables con-
nected and let the engine run at fast idle
or about 2,000 rpm for several minutes.
6. Carefully remove the jumper cables in
the reverse order of attachment.
If you do not know why your battery be-
came discharged (because the lights were
left on, etc.), have the charging system
checked by your Hyundai dealer.
D020A03A-AAT
WARNING:
The gas produced by the battery during
the jump-start operation is highly explo-
sive. If these instructions are not fol-
lowed exactly, serious personal injury
and damage to the vehicle may occur! If
you are not sure how to follow this proce-
dure, seek qualified assistance. Auto-
mobile batteries contain sulfuric acid.
This is poisonous and highly corrosive.
When jump starting, wear protective
glasses and be careful not to get acid on
yourself, your clothing or on the car.
OCM054001
(-)
(+)
(+)(-)
Cmhma-3.p653/20/2006, 5:02 PM 3
Page 351 of 355

10
INDEX
4
Air intake control switch ............................................................1-126
Bi-level heating..........................................................................1-128
Defrosting / Defogging ..............................................................1-133
Fan speed control (Blower control)..........................................1-126
Temperature control.................................................................1-130
High-Mounted Rear Stop Light ......................................................1-112
Hood Release.................................................................................1-115
Horn..............................................................................................1-119
I
Ignition Switch ...................................................................................... 2-5
Instrument Cluster and Indicator Lights...........................................1-62
Instrument Panel Light Control (Rheostat).......................................1-84
Interior Light.......................................................................................1-93
J
Jump Starting...................................................................................... 3-3
K
Keys................................................................................................... 1-3
If you lose your keys ...................................................................3-21
Positions......................................................................................... 2-5
L
Light Bulbs Replacement ..................................................................6-24
Luggage Compartment ..................................................................1-109
Cargo security screen ..............................................................1-109
Luggage Net ..............................................................................1-110
Luggage under tray ...................................................................1-111M
Maintenance Intervals
Explanation of scheduled maintenance items ............................... 5-7
Maintenance under severe usage conditions............................... 5-6
Scheduled maintenance................................................................ 5-4
Service requirements.................................................................... 5-2
Mirrors
Automatic Dimming Rear View Mirror With Compass ................1-99
Day-night inside rearview mirror .................................................1-99
Homelink mirror.........................................................................1-102
Outside rearview mirror ...............................................................1-98
Outside rearview mirror Heater ..................................................1-98
O
Odometer / Trip Odometer ...............................................................1-72
Occupant Classification System ......................................................1-52
P
Parking Brake.................................................................................
1-108
Power Outlet......................................................................................1-86
Power Steering Fluid Level ...............................................................6-23
R
Rear Seat
Adjusting seatback angle .............................................................1-22
Folding rear seatback ..................................................................1-23
Rear Window Defroster Switch ........................................................1-88
Reporting Safety Defects .................................................................8-17
Risk of Rollover................................................................................... 2-3
Roof Rack......................................................................................1-111