2007 Hyundai Santa Fe warning light
[x] Cancel search: warning lightPage 232 of 355
2
DRIVING YOUR HYUNDAI
21
GOOD BRAKING PRACTICESC130A02A-AAT
WARNING:
o Whenever leaving vehicle or parking,
always set the parking brake as far as
possible and fully engage the vehicle's
transaxle into the park position. Ve-
hicles not fully engaged in park with
the parking brake set are at risk for
moving inadvertently and injuring
yourself or others.
o All vehicles should always have the
parking brake fully engaged when
parking to avoid inadvertent move-
ment of the car which can injure occu-
pants or pedestrians.
o Nothing should be carried on top of
the shelf panel behind the rear seat. If
there were an accident or a sudden
stop, such objects could move for-
ward and cause damage to the ve-
hicle or injure the occupants.
!
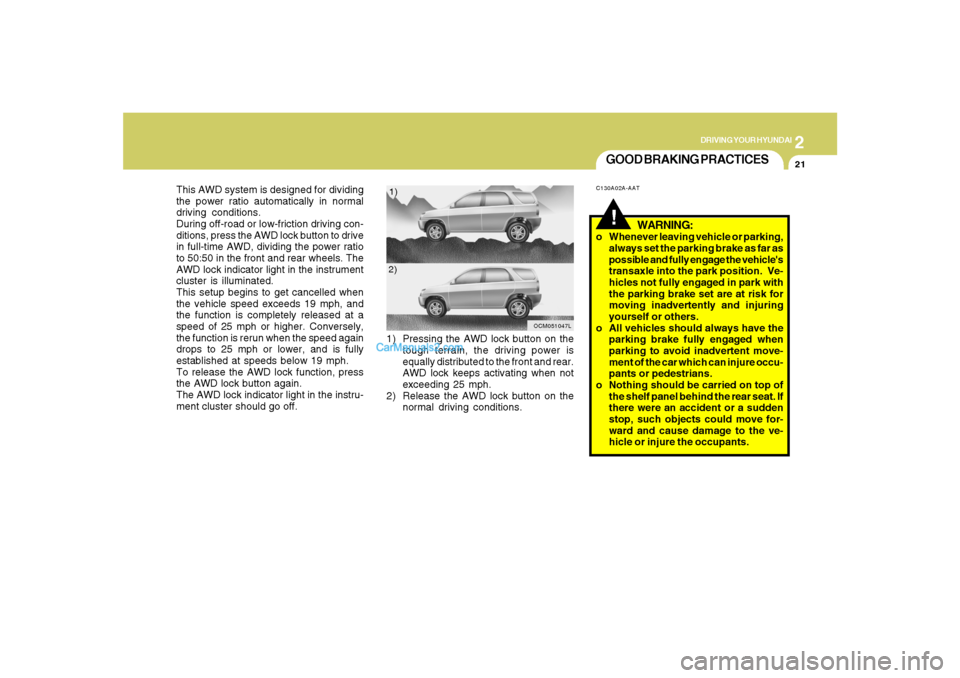
This AWD system is designed for dividing
the power ratio automatically in normal
driving conditions.
During off-road or low-friction driving con-
ditions, press the AWD lock button to drive
in full-time AWD, dividing the power ratio
to 50:50 in the front and rear wheels. The
AWD lock indicator light in the instrument
cluster is illuminated.
This setup begins to get cancelled when
the vehicle speed exceeds 19 mph, and
the function is completely released at a
speed of 25 mph or higher. Conversely,
the function is rerun when the speed again
drops to 25 mph or lower, and is fully
established at speeds below 19 mph.
To release the AWD lock function, press
the AWD lock button again.
The AWD lock indicator light in the instru-
ment cluster should go off.1) Pressing the AWD lock button on the
tough terrain, the driving power is
equally distributed to the front and rear.
AWD lock keeps activating when not
exceeding 25 mph.
2) Release the AWD lock button on the
normal driving conditions.
OCM051047L
1)
2)
Page 237 of 355

2
DRIVING YOUR HYUNDAI
26
!HIGHER SPEED MOTORINGC170A02A-AATPre-Trip Inspections1. Tires:
Adjust the tire inflation pressures to speci-
fication. Low tire inflation pressures will
result in overheating and possible failure
of the tires.
Avoid using worn or damaged tires which
may result in reduced traction or tire fail-
ure.NOTE:Never exceed the maximum tire infla-
tion pressure shown on the tires.
C160K01A-AATCarry Emergency EquipmentDepending on the severity of the weather
where you drive your car, you should carry
appropriate emergency equipment. Some
of the items you may want to carry include
tire chains, tow straps or chains, flashlight,
emergency flares, sand, a shovel, jumper
cables, a window scraper, gloves, ground
cloth, coveralls, a blanket, etc.C160J01A-AATDon't Let Ice and Snow Accumulate
UnderneathUnder some conditions, snow and ice can
build up under the fenders and interfere
with the steering. When driving in severe
winter conditions where this may happen,
you should periodically check underneath
the car to be sure the movement of the front
wheels and the steering components is
not obstructed.
WARNING:
o Underinflated or overinflated tires can
cause poor handling, loss of vehicle
control, and sudden tire failure lead-
ing to accidents, injuries, and even
death. Always check tires are prop-
erly inflated before driving. Refer to
pages 2-31 and 8-3 for proper tire
pressures and further information.
C160H02A-AATUse Approved Window Washer Anti-
Freeze in SystemTo keep the water in the window washer
system from freezing, add an approved
window washer anti-freeze solution in
accordance with instructions on the con-
tainer. Window washer anti-freeze is avail-
able from Hyundai dealers and most auto
parts outlets. Do not use engine coolant or
other types of anti-freeze as these may
damage the paint finish.C160I01A-AATDon't Let Your Parking Brake FreezeUnder some conditions your parking brake
can freeze in the engaged position. This is
most likely to happen when there is an
accumulation of snow or ice around or
near the rear brakes or if the brakes are
wet. If there is a risk the parking brake may
freeze, apply it only temporarily while you
put the gear selector lever in "P" (auto-
matic) or in first or reverse gear (manual
transaxle) and block the rear wheels so the
car cannot roll. Then release the parking
brake.
Page 238 of 355
2
DRIVING YOUR HYUNDAI
27
TRAILER OR VEHICLE TOWING!
C190A01S-AATIf you are considering towing with your car,
you should first check with your State's
Department of Motor Vehicles to deter-
mine their legal requirements.
Since laws vary from State to State the
requirements for towing trailers, cars, or
other types of vehicles or apparatus may
differ. Ask your Hyundai dealer for further
details before towing.
CAUTION:
Do not do any towing with your car during
its first 1,200 miles (2,000 km) in order to
allow the engine to properly break in.
Failure to heed this caution may result in
serious engine or transaxle damage.
USE OF LIGHTSC180A01A-AATCheck your lights regularly for correct op-
eration and always keep them clean. When
driving during the day in conditions of poor
visibility, it is helpful to drive with head-
lights on low beam. This enables you to be
seen as well as to see.
!
o Driving on tires with no or insufficient
tread is dangerous. Worn-out tires
can result in loss of vehicle control,
collisions, injury, and even death.
Worn-out tires should be replaced as
soon as possible and should never be
used for driving. Always check tire
tread before driving your car. Refer to
8-12 for further information and tread
limits.
WARNING:
2. Fuel, engine coolant and engine oil:
High speed travel consumes more fuel
than urban motoring. Do not forget to check
both engine coolant and engine oil.
3. Drive belt:
A loose or damaged drive belt may result
in overheating of the engine.
Page 241 of 355
2
DRIVING YOUR HYUNDAI
30
C190F01CM-AATTrailer or Vehicle Towing Tips1. Before towing, check hitch and safety
chain connections as well as proper
operation of the trailer running lights,
brake lights, and turn signals.
2. Trailer towing requires more fuel than
normal conditions.
3. To maintain engine braking efficiency,
do not tow a trailer with the transaxle in
fifth gear (manual transaxle).
4. Always secure items in the trailer to
prevent load shift while driving.
5. Check the condition and air pressure of
all tires on the trailer and your car. Low
tire pressure can seriously affect the
handling. Also check the spare tire.
6. The vehicle/trailer combination is more
affected by crosswind and buffeting.
When being passed by a large vehicle,
keep a constant speed and steer straight
ahead. If there is too much wind buffet-
ing, slow down to get out of the other
vehicle's air turbulence.7. When parking your car and trailer, es-
pecially on a hill, be sure to follow all the
normal precautions. Turn your front
wheel into the curb, set the parking
brake firmly, and put the transaxle in 1st
or Reverse (manual) or Park (automatic).
In addition, place wheel chocks at each
of the trailer's tires.
8. If the trailer has electric brakes, start
your vehicle and trailer moving, and
then apply the trailer brake controller by
hand to be sure the brakes are working.
This lets you check your electrical con-
nection at the same time.
9. During your trip, check occasionally to
be sure that the load is secure, and that
the lights and any trailer brakes are still
working.
10. Avoid jerky starts, sudden accelera-
tion or sudden stops.
11. Avoid sharp turns and rapid lane
changes.
12. Avoid holding the brake pedal down
too long or too frequently. This could
cause the brakes to overheat, resulting
in reduced braking efficiency.
!
WARNING:
o Improperly loading your vehicle and
trailer can seriously affect its steer-
ing and braking performance causing
a crash which could cause serious
injury or death.
o Towing a trailer affects vehicle han-
dling and braking.
o Drive more slowly when towing a trailer
and allow more distance when brak-
ing.
o Be careful when driving in slippery
and windy conditions.
o Be careful when turning and while
driving up and down hills.
Page 250 of 355

32WHAT TO DO IN AN EMERGENCY
IF THE ENGINE WILL NOT
START!
D010A01A-AAT D010B02A-AAT
If Engine Doesn't Turn Over or Turns
Over Slowly
D010C02Y-AATIf Engine Turns Over Normally but
Does Not Start1. Check fuel level.
2. With the key in the "OFF" position, check
all connectors at ignition, coil and spark
plugs. Reconnect any that may be dis-
connected or loose.
3. Check the fuel line in the engine com-
partment.
4. If the engine still does not start, call a
Hyundai dealer or seek other qualified
assistance.D010D01A-AATIf Engine Stalls While Driving1. Reduce your speed gradually, keeping
a straight line. Move cautiously off the
road to a safe place.
2. Turn on your emergency flashers.
3. Try to start the engine again. If your
vehicle will not start, contact a Hyundai
dealer or seek other qualified assis-
tance.
WARNING:
If the engine will not start, do not push or
pull the car to start it. This could result in
a collision or cause other damage. In
addition, push or pull starting may cause
the catalytic converter to be overloaded
and create a fire hazard.
1. If your car has an automatic transaxle,
be sure the gear selector lever is in "N"
or "P" and the emergency brake is set.
2. Check the battery connections to be
sure they are clean and tight.
3. Turn on the interior light. If the light dims
or goes out when you operate the starter,
the battery is discharged.
4. Check the starter connections to be
sure they are securely tightened.
5. Do not push or pull the vehicle to start it.
See instructions for "Jump Starting".
OCM055016
Cmhma-3.p653/20/2006, 5:02 PM 2
Page 251 of 355
3
WHAT TO DO IN AN EMERGENCY
3
JUMP STARTING!
o If you should accidentally get acid on
your skin or in your eyes, immediately
remove any contaminated clothing and
flush the area with clear water for at
least 15 minutes. Then promptly obtain
medical attention. If you must be trans-
ported to an emergency facility, con-
tinue to apply water to the affected area
with a sponge or cloth.
o The gas produced by the battery during
the jump-start operation is highly explo-
sive. Do not smoke or allow a spark or
an open flame in the vicinity.
o The battery being used to provide the
jump start must be 12-volt. If you cannot
determine that it is a 12-volt battery, do
not attempt to use it for the jump start.
o To jump start a car with a discharged
battery, follow this procedure exactly:
1. If the booster battery is installed in an-
other vehicle, be sure the two vehicles
are not touching.
2. Turn off all unnecessary lights and ac-
cessories in both vehicles.
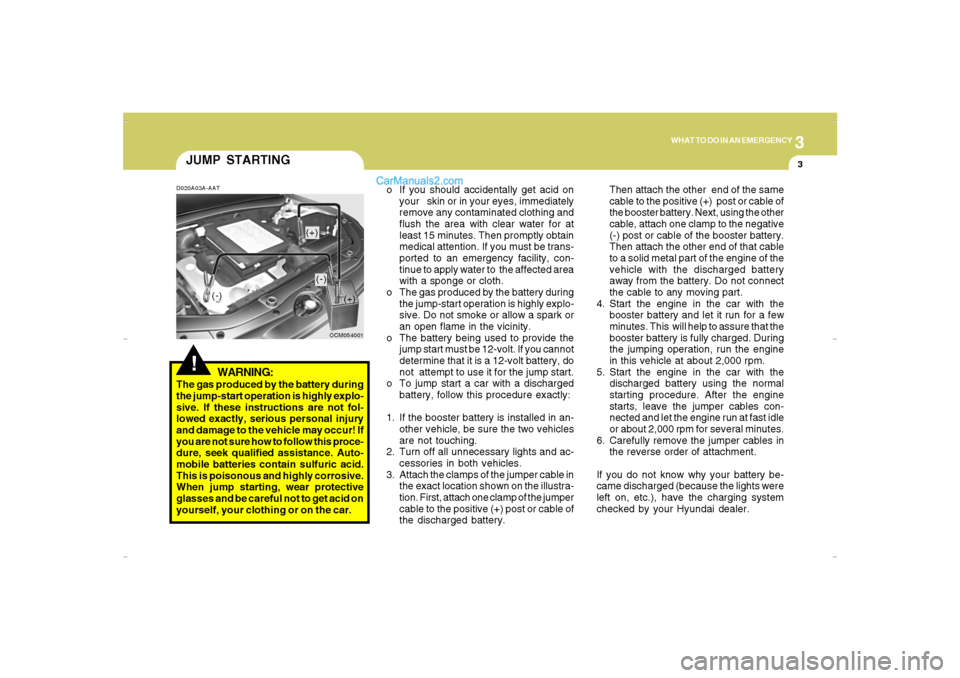
3. Attach the clamps of the jumper cable in
the exact location shown on the illustra-
tion. First, attach one clamp of the jumper
cable to the positive (+) post or cable of
the discharged battery.Then attach the other end of the same
cable to the positive (+) post or cable of
the booster battery. Next, using the other
cable, attach one clamp to the negative
(-) post or cable of the booster battery.
Then attach the other end of that cable
to a solid metal part of the engine of the
vehicle with the discharged battery
away from the battery. Do not connect
the cable to any moving part.
4. Start the engine in the car with the
booster battery and let it run for a few
minutes. This will help to assure that the
booster battery is fully charged. During
the jumping operation, run the engine
in this vehicle at about 2,000 rpm.
5. Start the engine in the car with the
discharged battery using the normal
starting procedure. After the engine
starts, leave the jumper cables con-
nected and let the engine run at fast idle
or about 2,000 rpm for several minutes.
6. Carefully remove the jumper cables in
the reverse order of attachment.
If you do not know why your battery be-
came discharged (because the lights were
left on, etc.), have the charging system
checked by your Hyundai dealer.
D020A03A-AAT
WARNING:
The gas produced by the battery during
the jump-start operation is highly explo-
sive. If these instructions are not fol-
lowed exactly, serious personal injury
and damage to the vehicle may occur! If
you are not sure how to follow this proce-
dure, seek qualified assistance. Auto-
mobile batteries contain sulfuric acid.
This is poisonous and highly corrosive.
When jump starting, wear protective
glasses and be careful not to get acid on
yourself, your clothing or on the car.
OCM054001
(-)
(+)
(+)(-)
Cmhma-3.p653/20/2006, 5:02 PM 3
Page 254 of 355

36WHAT TO DO IN AN EMERGENCY
Low tire pressure telltale
Low tire pressure position
telltale
When the tire pressure monitoring sys-
tem warning indicators are illuminated,
one or more of your tires is significantly
under-inflated. The low tire pressure
position telltale light will indicate which
tire is significantly under-inflated by
illuminating the corresponding position
light.
If either telltale illuminates, immedi-
ately reduce your speed, avoid hard
cornering and anticipate increased stop-
ping distances. You should stop and
check your tires as soon as possible.
Inflate the tires to the proper pressure
as indicated on the vehicle’s placard or
tire inflation pressure label located on
the driver’s side center pillar outer panel.
If you cannot reach a service station or
if the tire cannot hold the newly added
air, replace the low pressure tire with
the temporary spare tire.
The Low Tire Pressure and Position
telltales will remain on until you have
the low pressure tire repaired and re-
placed on the vehicle.
NOTE:
The temporary spare tire is not
equipped with a tire pressure sen-
sor.
NOTE
If the TPMS, Low Tire Pressure and
Position indicators does not illumi-
nate for 3 seconds when the ignition
key is turned to the “ON” position or
engine is running, if it remains illu-
minated after coming on for approxi-
mately 3 seconds, take your car to
your nearest authorized HYUNDAI
dealer and have the system checked.
Cmhma-3.p653/20/2006, 5:02 PM 6
Page 263 of 355
3
WHAT TO DO IN AN EMERGENCY
15
!
Wheels and wheel covers may have
sharp edges. Handle them carefully
to avoid possible severe injury. Be-
fore putting the wheel into place, be
sure that there is nothing on the hub
or wheel (such as mud, tar, gravel,
etc.) that interferes with the wheel
from fitting solidly against the hub. If
there is, remove it. If there is not
good contact on the mounting sur-
face between the wheel and hub, the
wheel nuts could come loose and
cause the loss of a wheel. Loss of a
wheel may result in loss of control of
the vehicle. This may cause serious
injury or death.WARNING:
!
WARNING:
If the vehicle has been driven re-
cently, some pieces may be very hot.
Use caution.
OCM053104L
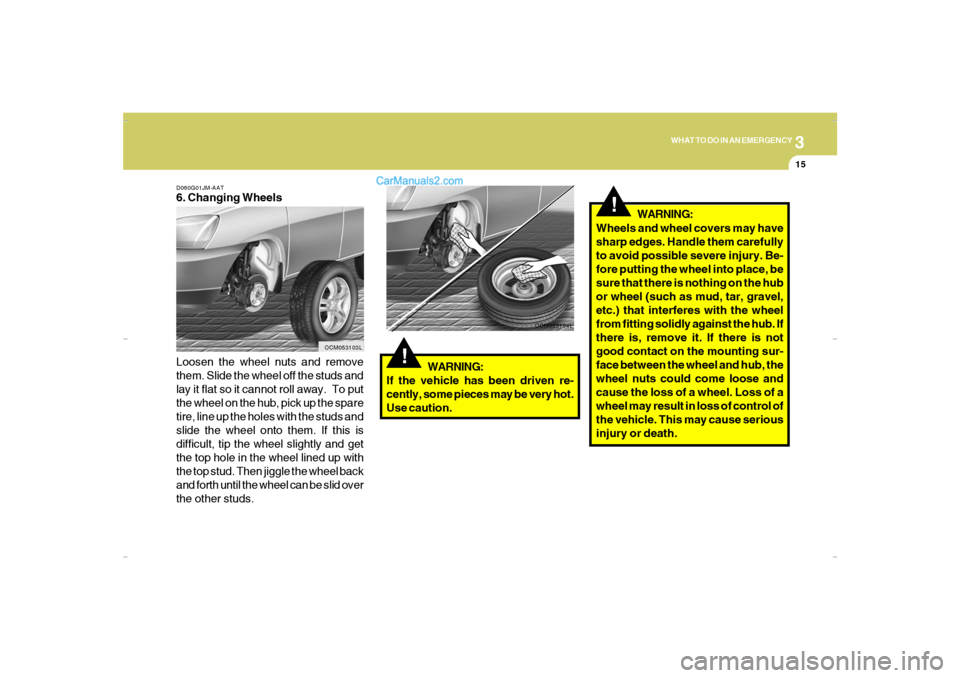
D060G01JM-AAT6. Changing Wheels
Loosen the wheel nuts and remove
them. Slide the wheel off the studs and
lay it flat so it cannot roll away. To put
the wheel on the hub, pick up the spare
tire, line up the holes with the studs and
slide the wheel onto them. If this is
difficult, tip the wheel slightly and get
the top hole in the wheel lined up with
the top stud. Then jiggle the wheel back
and forth until the wheel can be slid over
the other studs.
OCM053103L
Cmhma-3.p653/20/2006, 5:02 PM 15