2007 Hyundai Santa Fe oil
[x] Cancel search: oilPage 295 of 355
6
DO-IT-YOURSELF MAINTENANCE
9
WINDSHIELD WIPER
BLADESG080A02A-AATThe wiper blades should be carefully in-
spected from time to time and cleaned to
remove accumulations of road film or other
debris. To clean the wiper blades and
arms, use a clean sponge or cloth with a
mild soap or detergent and water. If the
wipers continue to streak or smear the
glass, replace them with genuine Hyundai
replacement parts or their equivalent.
!
CAUTION:
o Do not operate the wipers on dry glass.
This can result in more rapid wear of the
wiper blades and may scratch the glass.
o Keep the blade rubber out of contact
with petroleum products such as en-
gine oil, gasoline, etc.
OCM055005N
G080B02CM-AATReplacing the Wiper Blades
Front window windshield wiper
blades
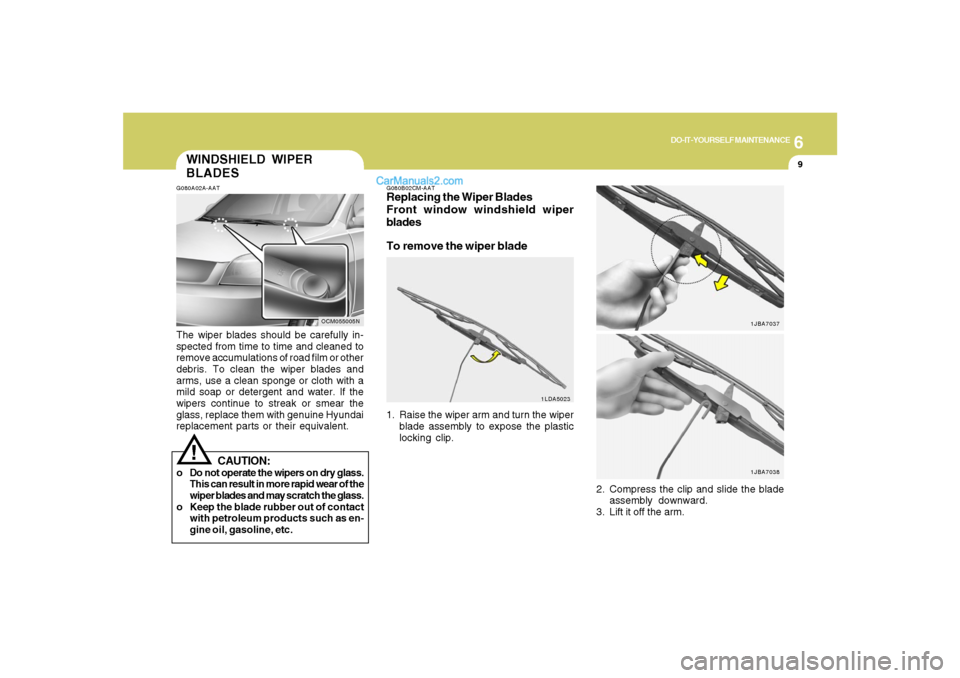
To remove the wiper blade1. Raise the wiper arm and turn the wiper
blade assembly to expose the plastic
locking clip.
1LDA5023
2. Compress the clip and slide the blade
assembly downward.
3. Lift it off the arm.
1JBA70371JBA7038
Page 297 of 355
6
DO-IT-YOURSELF MAINTENANCE
11
OCM055028L
FILLING THE WASHER
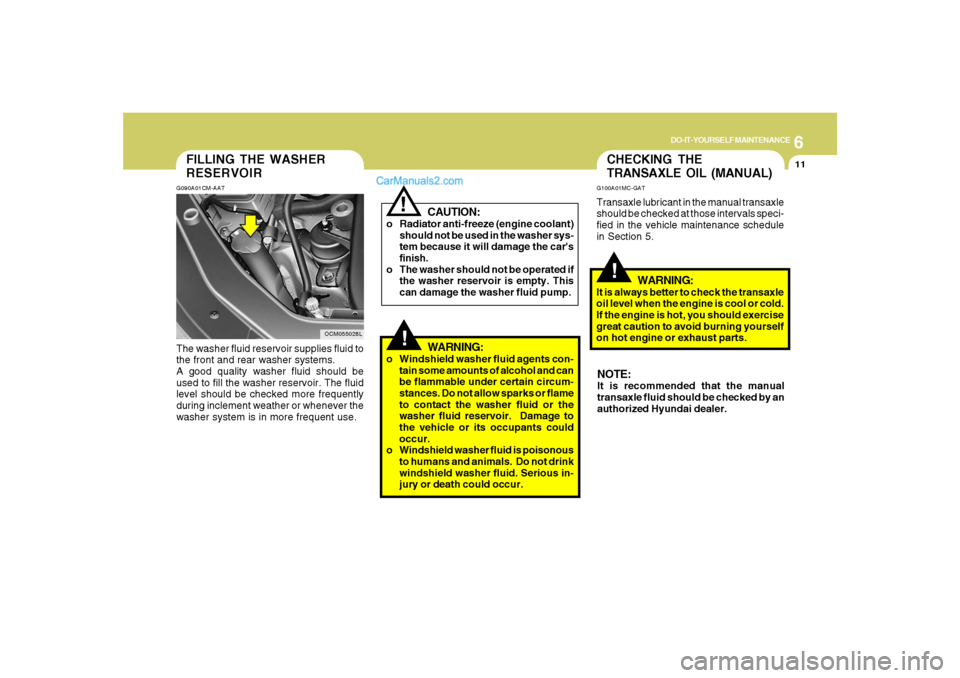
RESERVOIRG090A01CM-AATThe washer fluid reservoir supplies fluid to
the front and rear washer systems.
A good quality washer fluid should be
used to fill the washer reservoir. The fluid
level should be checked more frequently
during inclement weather or whenever the
washer system is in more frequent use.
CAUTION:
o Radiator anti-freeze (engine coolant)
should not be used in the washer sys-
tem because it will damage the car's
finish.
o The washer should not be operated if
the washer reservoir is empty. This
can damage the washer fluid pump.
!!
WARNING:
o Windshield washer fluid agents con-
tain some amounts of alcohol and can
be flammable under certain circum-
stances. Do not allow sparks or flame
to contact the washer fluid or the
washer fluid reservoir. Damage to
the vehicle or its occupants could
occur.
o Windshield washer fluid is poisonous
to humans and animals. Do not drink
windshield washer fluid. Serious in-
jury or death could occur.
CHECKING THE
TRANSAXLE OIL (MANUAL)G100A01MC-GATTransaxle lubricant in the manual transaxle
should be checked at those intervals speci-
fied in the vehicle maintenance schedule
in Section 5.
!
WARNING:
It is always better to check the transaxle
oil level when the engine is cool or cold.
If the engine is hot, you should exercise
great caution to avoid burning yourself
on hot engine or exhaust parts.NOTE:It is recommended that the manual
transaxle fluid should be checked by an
authorized Hyundai dealer.
Page 307 of 355
6
DO-IT-YOURSELF MAINTENANCE
21
o If battery fluid is on your skin, flush the
affected areas with water for at least 15
minutes and then seek medical assis-
tance.
o If battery fluid is in your eyes, rinse out
your eyes with water and get medical
assistance as soon as possible. While
you are being driven to get medical
assistance, continue to rinse your eyes
by using a sponge or soft cloth satu-
rated with water.
o If you swallow battery fluid, drink a large
quantity of water or milk followed by milk
of magnesia, eat a raw egg or drink
vegetable oil. Get medical assistance
as soon as possible.
While batteries are being charged (either
by a battery charger or by the vehicle's
generator), they produce explosive gases.
Always observe these warnings to prevent
injuries from occurring:
o Charge batteries only in a well venti-
lated area.
o Do not permit flames, sparks or smok-
ing in the area.
o Keep children away from the area.
!
G210B04A-AATChecking the BatteryKeep the battery clean. Any evidence of
corrosion around the battery posts or ter-
minals should be removed using a solu-
tion of household baking soda and warm
water. After the battery terminals are dry,
cover them with a light coating of grease.
WARNING:Always read the following in-
structions carefully when han-
dling a battery.
Keep lighted cigarettes and all
other flames or sparks away
from the battery.
Hydrogen, which is a highly
combustible gas, is always
present in battery cells and
may explode if ignited.
Keep batteries out of the reach
of children because batteries
contain highly corrosive SUL-
FURIC ACID. Do not allow bat-
tery acid to contact your skin,
eyes, clothing or paint finish.
If any electrolyte gets into your
eyes, flush your eyes with
clean water for at least 15 min-
utes and get immediate medi-
cal attention. If possible, con-
tinue to apply water with a
sponge or cloth until medical
attention is received.
!
PROPOSITION 65 WARNING:
Battery posts, terminals, and related
accessories contain lead and lead com-
pounds, chemicals known to the state of
California to cause cancer and repro-
ductive harm.
Batteries also contain other chemicals
known to the state of California to cause
cancer. Wash hands after handling.
Page 309 of 355
6
DO-IT-YOURSELF MAINTENANCE
23
G240A01A-AATPower Steering HosesIt is suggested that you check the power
steering hose connections for fluid leak-
age at those intervals specified in the ve-
hicle maintenance schedule in Section 5.
The power steering hoses should be re-
placed if there is severe surface cracking,
pulling, scuffing or worn spots. Deteriora-
tion of the hose could cause premature
failure.NOTE:o Grinding noise from the power steer-
ing pump may be heard immediately
after the engine is started in extremely
cold conditions (below - 4°F). If the
noise stops during warm up, there is
no abnormal function in the system. It
is due to a power steering fluid char-
acteristic in extremely cold condi-
tions.
oDo not start the engine when the power
steering oil reservoir is empty.
POWER STEERING FLUID
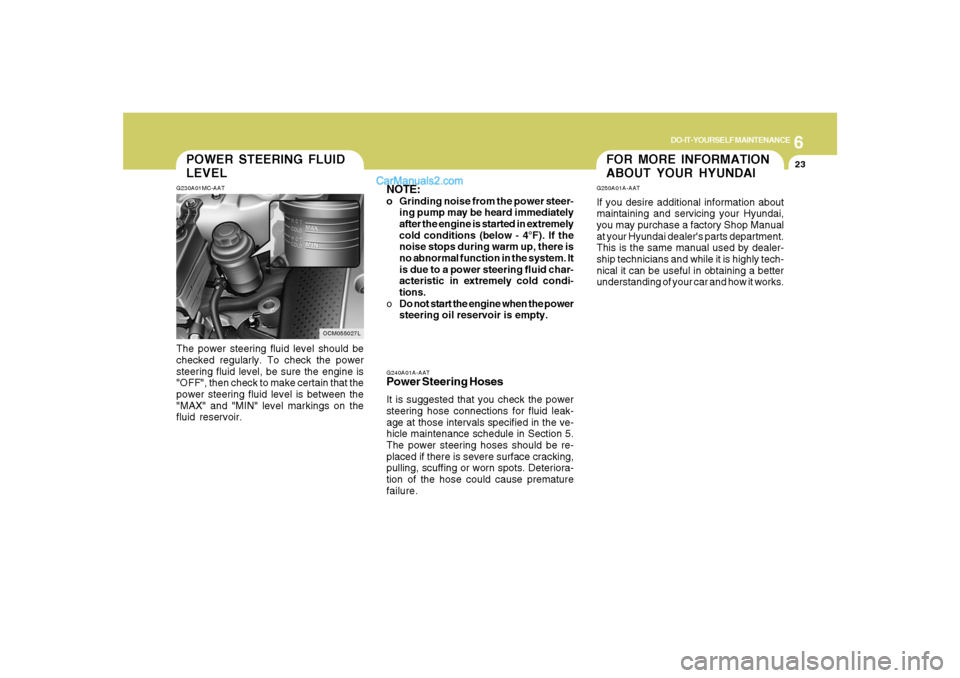
LEVELG230A01MC-AATThe power steering fluid level should be
checked regularly. To check the power
steering fluid level, be sure the engine is
"OFF", then check to make certain that the
power steering fluid level is between the
"MAX" and "MIN" level markings on the
fluid reservoir.
OCM055027L
FOR MORE INFORMATION
ABOUT YOUR HYUNDAIG250A01A-AATIf you desire additional information about
maintaining and servicing your Hyundai,
you may purchase a factory Shop Manual
at your Hyundai dealer's parts department.
This is the same manual used by dealer-
ship technicians and while it is highly tech-
nical it can be useful in obtaining a better
understanding of your car and how it works.
Page 310 of 355
6
DO-IT-YOURSELF MAINTENANCE
24
REPLACEMENT OF LIGHT
BULBSG260A01CM-AATBefore attempting to replace a light bulb,
be sure the switch is turned to the "OFF"
position.
The next paragraph shows how to reach
the light bulbs so they may be changed. Be
sure to replace the burned-out bulb with
one of the same number and wattage
rating.
CAUTION:
o Keep the lamps out of contact with
petroleum products, such as oil, gaso-
line, etc.
o After heavy, driving rain or washing,
headlight and taillight lenses could
appear frosty. This condition is
caused by the temperature difference
between the lamp inside and outside.
This is similar to the condensation on
your windows inside your vehicle
during the rain and doesn’t indicate a
problem with your vehicle. If the water
leaks into the lamp bulb circuitry, have
the vehicle checked by an Authorized
Hyundai Dealer.
!
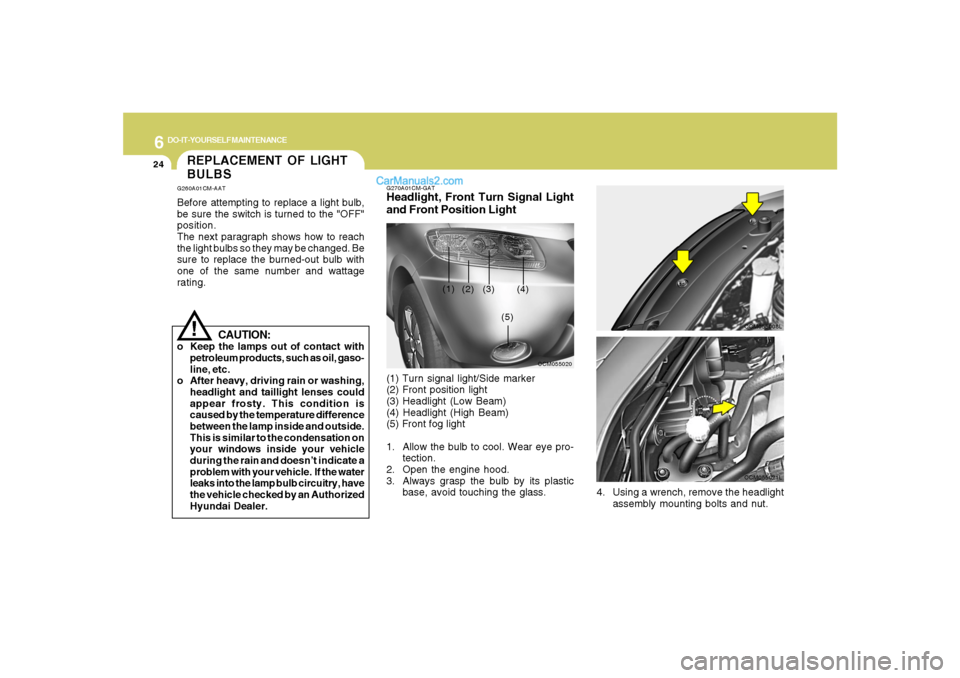
G270A01CM-GATHeadlight, Front Turn Signal Light
and Front Position Light(1) Turn signal light/Side marker
(2) Front position light
(3) Headlight (Low Beam)
(4) Headlight (High Beam)
(5) Front fog light
1. Allow the bulb to cool. Wear eye pro-
tection.
2. Open the engine hood.
3. Always grasp the bulb by its plastic
base, avoid touching the glass.
OCM055020
(1)
(2) (3) (4)
(5)
OCM055008L
4. Using a wrench, remove the headlight
assembly mounting bolts and nut.
OCM055021L
Page 318 of 355

6
DO-IT-YOURSELF MAINTENANCE
32
FUSE PANEL DESCRIPTIONG200C01CM-AATEngine Compartment
OCM055023N
Note:Not all fuse panel descriptions in this manual may be applicable to your vehicle. It is accurate at the time of printing. When you
inspect the fuse box on your vehicle, refer to the fuse box label.
FUSE RATING
150A
10A
30A
40A
50A
40A
40A
20A
15A
40A
15A
20A
15A
40A
30A
15A
10ACIRCUIT PROTECTED
GENERATOR
A/CON RELAY
RR HTD RELAY
I/PJUNCTION BOX
I/PJUNCTION BOX
I/PJUNCTION BOX
ABS CONTROL MODULE, ESC CONTROL MODULE, MULTIPURPOSE CHECK
CONNECTOR
ABS CONTROL MODULE, ESC CONTROL MODULE, MULTIPURPOSE CHECK
CONNECTOR
DEICER RELAY
ENGINE CONTROL RELAY
HORN RELAY
IGNITION COIL #1~#6(GASOLINE), CONDENSOR(GASOLINE)
PURGE CONTROL SOLENOID VALVE(GASOLINE), VARIABLE INTAKE MANIFOLD
VALVE(GASOLINE), PCM(GASOLINE), OIL CONTROL VALVE(GASOLINE)
RAD FAN RELAY
CON FAN #1 RELAY, CON FAN #2 RELAY
MASS AIR FLOW SENSOR(GASOLINE), OXYGEN SENSOR #1~#4(GASOLINE),
PCM(GASOLINE)
IMMOBILIZER MODULE, INJECTOR #1~#6(GASOLINE), PCM(GASOLINE), A/
CON RELAY, FUEL PUMP RELAY
ALT
A/CON
RR HTD
BLR
BATT
P/WDW
ESC #1
ESC #2
DEICER
ECU MAIN
HORN
IG COIL
SENSOR #3
RAD FAN
CON FAN
SENSOR #2
SENSOR #1FUSE
Page 320 of 355

6
DO-IT-YOURSELF MAINTENANCE
34
G200E01CM-AATInner Panel
OCM055024N
FUSE RATING
15A
25A
15A
10A
15A
10A
10A
10A
30A
10A
15A
10A
10A
10A
10A
10A
10ACIRCUIT PROTECTED
CIGARETTE LIGHTER
FRONT POWER OUTLET, REAR POWER OUTLET
CENTER POWER OUTLET
POWER OUTSIDE MIRROR SWITCH, AUDIO, ATM KEY LOCK CONTROL MODULE,
DIGITAL CLOCK
MULTIFUNCTION SWITCH, REAR WIPER CONTROL MODULE,REAR WIPER
MOTOR
RAIN SENSOR
RHEOSTAT, BCM, INSTRUMENT CLUSTER
A/C CONTROL MODULE, INCAR & HUMIDITY SENSOR, HIGH BLOWER RELAY,
REAR A/CON SWITCH, ICM RELAY BOX, AQS SENSOR, SUNROOF MOTOR,
BLOWER BELAY, ELECTRO CHROMIC MIRROR
BLOWER RELAY, BLOWER MOTOR, A/C CONTROL MODULE
A/C CONTROL MODULE
SRS CONTROL MODULE
PAB ON/OFF SWITCH, INSTRUMENT CLUSTER
HAZARD SWITCH
MULTIFUNTION SWITCH, STEERING ANGLE SENSOR, ESC SWITCH, ATM KEY
LOCK CONTROL MODULE SEAT WARMER MODULE
OIL LEVEL SENSOR MODULE, BCM
INSTRUMENT CLUSTER, PRE-EXCITATION RESISTOR, BCM, GENERATOR, SEMI
ACTIVE CONTROL MODULE (GASOLINE)
BURGLAR ALARM RELAY
C/LIGHTER
P/OUTLET
P/OUTLET
CTR
AUDIO #2
RR WIPER
IMS
BCM #2
A/CON 2
BLOWER
A/CON 1
A/BAG #1
A/BAG IND
T/SIG
ATM LOCK
BCM #1
CLUSTER
STARTFUSE
Page 333 of 355
8
CONSUMER INFORMATION, REPORTING SAFETY DEFECTS & BINDING ARBITRATION OF WARRANTY CLAIMS8
Intended Outboard Sidewall: The side
of an asymmetrical tire, that must al-
ways face outward when mounted on a
vehicle.
Kilopascal (kPa): The metric unit for
air pressure.
Load Index: An assigned number rang-
ing from 1 to 279 that corresponds to
the load carrying capacity of a tire.
Maximum Inflation Pressure: The
maximum air pressure to which a cold
tire may be inflated. The maximum air
pressure is molded onto the sidewall.
Maximum Load Rating: The load rat-
ing for a tire at the maximum permis-
sible inflation pressure for that tire.
Maximum Loaded Vehicle Weight:
The sum of curb weight; accessory
weight; vehicle capacity weight; and
production options weight.
Normal Occupant Weight: The num-
ber of occupants a vehicle is designed
to seat multiplied by 150 pounds (68
kg). Cold Tire Pressure: The amount of air
pressure in a tire, measured in pounds
per square inch (psi) or kilopascals
(kPa) before a tire has built up heat from
driving.
Curb Weight: This means the weight of
a motor vehicle with standard and op-
tional equipment including the maxi-
mum capacity of fuel, oil and coolant,
but without passengers and cargo.
DOT Markings: A code molded into the
sidewall of a tire signifying that the tire
is in compliance with the U.S. Depart-
ment of Transportation motor vehicle
safety standards. The DOT code in-
cludes the Tire Identification Number
(TIN), an alphanumeric designator which
can also identify the tire manufacturer,
production plant, brand and date of
production.
GVWR: Gross Vehicle Weight Rating
GAWR FRT: Gross Axle Weight Rating
for the front Axle.
GAWR RR: Gross Axle Weight Rating
for the rear axle.
I030D01JM-AATTire Terminology And Definitions
Air Pressure: The amount of air inside
the tire pressing outward on the tire. Air
pressure is expressed in pounds per
square inch (psi) or kilopascal (kPa).
Accessory Weight: This means the
combined weight of optional accesso-
ries. Some examples of optional ac-
cessories are, automatic transmission,
power seats, and air conditioning.
Aspect Ratio: The relationship of a
tire's height to its width.
Belt: A rubber coated layer of cords that
is located between the plies and the
tread. Cords may be made from steel or
other reinforcing materials.
Bead: The tire bead contains steel
wires wrapped by steel cords that hold
the tire onto the rim.
Bias Ply Tire: A pneumatic tire in which
the plies are laid at alternate angles
less than 90 degrees to the centerline of
the tread.