Page 257 of 355

3
WHAT TO DO IN AN EMERGENCY
9
!
!
!
WARNING
o The TPMS cannot alert you to se-
vere and sudden tire damage
caused by external factors.
o If you feel any vehicle instability,
immediately take your foot off the
accelerator and slowly move to a
safe position off the road.
WARNING:
Tampering with, modifying, or dis-
abling the Tire Pressure Monitoring
System (TPMS) components may
interfere with the system's ability to
warn the driver of low tire pressure
conditions and/or TPMS malfunc-
tions. Tampering with, modifying,
or disabling the Tire Pressure Moni-
toring System (TPMS) components
may void the warranty for that por-
tion of the vehicle.This device complies with Part 15 of
the FCC rules.
Operation is subject to the following two
conditions:
1. This device may not cause harmful
interference, and
2. This device must accept any interfer-
ence received, including interference
that may cause undesired operation.
WARNING:
Changes or modifications not ex-
pressly approved by the party re-
sponsible for compliance could void
the user's authority to operate the
equipment. Allow the tire to cool before measuring
the inflation pressure. Always be sure
the tire is cold before inflating to the
recommended pressure.
A cold tire means the vehicle has been
sitting for 3 hours and driven for less
than 1 mile (1.6km) in that 3 hour period.
NOTE:
Do not use any tire sealant if your
vehicle is equipped with a Tire Pres-
sure Monitoring System. The liquid
sealant can damage the tire pressure
sensors.
Cmhma-3.p653/20/2006, 5:02 PM 9
Page 258 of 355

310
WHAT TO DO IN AN EMERGENCY
!
!
4. As the temporary spare tire is spe-
cifically designed for your vehicle, it
should not be used on any other
vehicle.
5. The temporary spare tire should not
be used on any other wheels, nor
should standard tires, snow tires,
wheel covers or trim rings be used
with the temporary spare wheel. If
such use is attempted, damage to
these items or other car components
may occur.
6. The temporary spare tire pressure
should be checked once a month
while the tire is stored.
SPARE TIRE2. The spare tire should only be used
temporarily and should be returned
to the spare tire carrier as soon as
the original tire can be repaired or
replaced.
3. Continuous use at speeds of over 50
mph (80 km/h) is not recommended.D040A01CM-AATTemporary Spare Tire
The following instructions for the tem-
porary spare tire should be observed:
1. Check inflation pressure as soon as
practical after installing the spare
tire, and adjust to the specified pres-
sure. The tire pressure should be
periodically checked and maintained
at the specified pressure while the
tire is stored.
Spare Tire Pressure
CAUTION:
o Do not use snow chains with your
temporary spare tire.
o Do not use more than one tempo-
rary spare tire at a time.
o Do not tow a trailer while the tem-
porary spare tire is installed.Tire Size
Inflation PressureT165/90R17
60 psi (420 kPa)
WARNING:
The temporary spare tire is for emer-
gency use only. Do not operate your
vehicle on this temporary spare at
speeds over 50 mph (80 km/h). The
original tire should be repaired or
replaced as soon as is possible to
avoid failure of the spare possibly
leading to personal injury or death.
Cmhma-3.p653/20/2006, 5:02 PM 10
Page 261 of 355
3
WHAT TO DO IN AN EMERGENCY
13
D060D01A-AAT3. Loosen Wheel Nuts
The wheel nuts should be loosened
slightly before raising the car. To loosen
the nuts, turn the wrench handle coun-
terclockwise. When doing this, be sure
that the socket is seated completely
over the nut so it cannot slip off. For
maximum leverage, position the wrench
so the handle is to the left as shown in
the drawing. Then, while holding the
wrench near the end of the handle, push
down on it with steady pressure. Do not
remove the nuts at this time. Just
loosen them about one-half turn.
OCM054011
D060C02A-AAT2. Block the Wheel
Block the wheel that is diagonally oppo-
site from the flat to keep the vehicle
from rolling when the vehicle is raised
on the jack.
1VQA4023Flat tire
Remove the spare tire and remove the
jack and tool bag from the luggage
compartment.
NOTE:
The spare tire is located underneath
the car.D060B02O-AAT1. Obtain Spare Tire and Tool
OCM054008
Cmhma-3.p653/20/2006, 5:02 PM 13
Page 265 of 355
3
WHAT TO DO IN AN EMERGENCY
17
D060J01CM-AATAfter Changing Wheels
If you have a tire gauge, remove the
valve cap and check the air pressure. If
the pressure is lower than recom-
mended, drive slowly to the nearest
service station and inflate to the correct
pressure. If it is too high, adjust it until
it is correct. Always reinstall the valve
cap after checking or adjusting tire
pressure. If the cap is not replaced, dirt
and moisture could get into the valve
core and cause air leakage. If you lose
a valve cap, buy another and install it as
soon as possible.
1VQA3015
After you have changed wheels, al-
ways secure the flat tire in its place and
return the jack and tools to their proper
storage locations. Wheel nut tightening torque:
Steel wheel & aluminium alloy wheel:
65-80 lb.ft (900-1,100 kg.cm)
Cmhma-3.p653/20/2006, 5:03 PM 17
Page 290 of 355

6
DO-IT-YOURSELF MAINTENANCE
4
GENERAL CHECKS
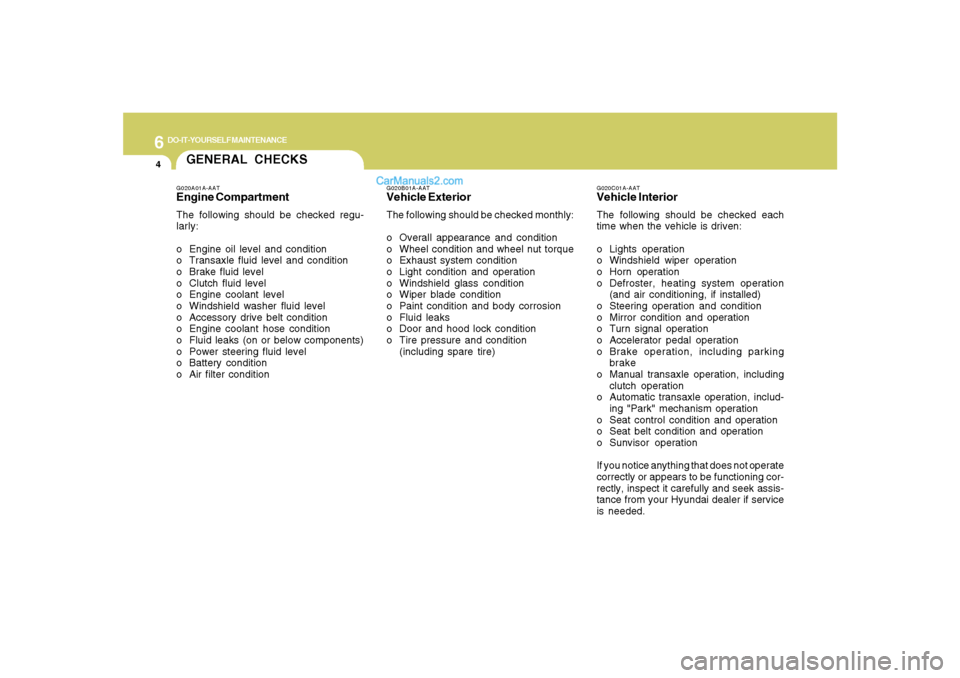
G020C01A-AATVehicle InteriorThe following should be checked each
time when the vehicle is driven:
o Lights operation
o Windshield wiper operation
o Horn operation
o Defroster, heating system operation
(and air conditioning, if installed)
o Steering operation and condition
o Mirror condition and operation
o Turn signal operation
o Accelerator pedal operation
o Brake operation, including parking
brake
o Manual transaxle operation, including
clutch operation
o Automatic transaxle operation, includ-
ing "Park" mechanism operation
o Seat control condition and operation
o Seat belt condition and operation
o Sunvisor operation
If you notice anything that does not operate
correctly or appears to be functioning cor-
rectly, inspect it carefully and seek assis-
tance from your Hyundai dealer if service
is needed.
G020B01A-AATVehicle ExteriorThe following should be checked monthly:
o Overall appearance and condition
o Wheel condition and wheel nut torque
o Exhaust system condition
o Light condition and operation
o Windshield glass condition
o Wiper blade condition
o Paint condition and body corrosion
o Fluid leaks
o Door and hood lock condition
o Tire pressure and condition
(including spare tire)
G020A01A-AATEngine CompartmentThe following should be checked regu-
larly:
o Engine oil level and condition
o Transaxle fluid level and condition
o Brake fluid level
o Clutch fluid level
o Engine coolant level
o Windshield washer fluid level
o Accessory drive belt condition
o Engine coolant hose condition
o Fluid leaks (on or below components)
o Power steering fluid level
o Battery condition
o Air filter condition
Page 321 of 355

6
DO-IT-YOURSELF MAINTENANCE
35
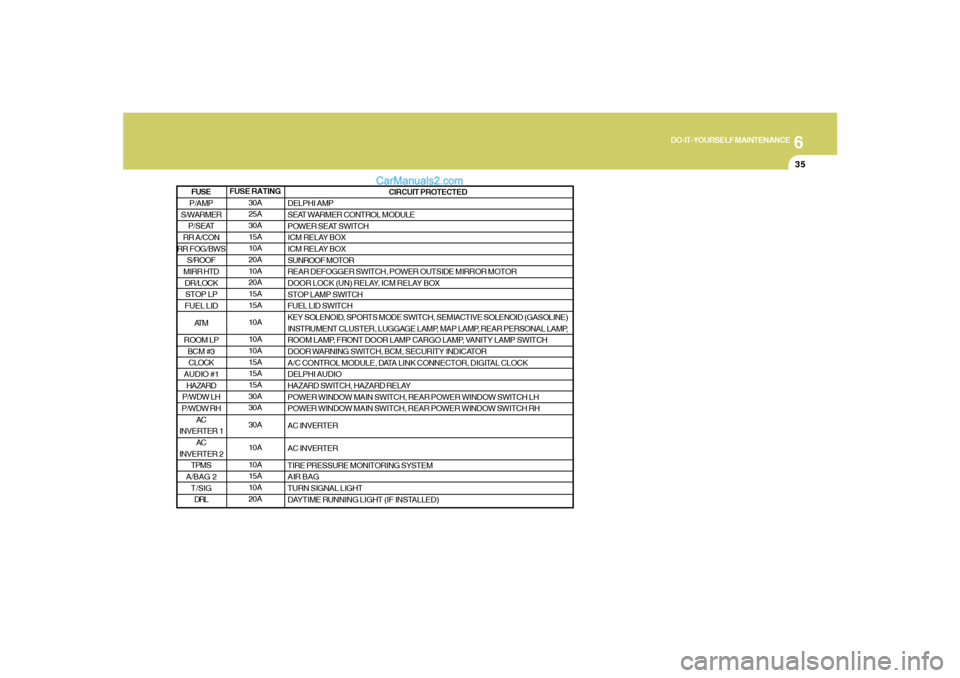
FUSE RATING
30A
25A
30A
15A
10A
20A
10A
20A
15A
15A
10A
10A
10A
15A
15A
15A
30A
30A
30A
10A
10A
15A
10A
20ACIRCUIT PROTECTED
DELPHI AMP
SEAT WARMER CONTROL MODULE
POWER SEAT SWITCH
ICM RELAY BOX
ICM RELAY BOX
SUNROOF MOTOR
REAR DEFOGGER SWITCH, POWER OUTSIDE MIRROR MOTOR
DOOR LOCK (UN) RELAY, ICM RELAY BOX
STOP LAMP SWITCH
FUEL LID SWITCH
KEY SOLENOID, SPORTS MODE SWITCH, SEMIACTIVE SOLENOID (GASOLINE)
INSTRUMENT CLUSTER, LUGGAGE LAMP, MAP LAMP, REAR PERSONAL LAMP,
ROOM LAMP, FRONT DOOR LAMP CARGO LAMP, VANITY LAMP SWITCH
DOOR WARNING SWITCH, BCM, SECURITY INDICATOR
A/C CONTROL MODULE, DATA LINK CONNECTOR, DIGITAL CLOCK
DELPHI AUDIO
HAZARD SWITCH, HAZARD RELAY
POWER WINDOW MAIN SWITCH, REAR POWER WINDOW SWITCH LH
POWER WINDOW MAIN SWITCH, REAR POWER WINDOW SWITCH RH
AC INVERTER
AC INVERTER
TIRE PRESSURE MONITORING SYSTEM
AIR BAG
TURN SIGNAL LIGHT
DAYTIME RUNNING LIGHT (IF INSTALLED)
P/AMP
S/WARMER
P/SEAT
RR A/CON
RR FOG/BWS
S/ROOF
MIRR HTD
DR/LOCK
STOP LP
FUEL LID
AT M
ROOM LP
BCM #3
CLOCK
AUDIO #1
HAZARD
P/WDW LH
P/WDW RH
AC
INVERTER 1
AC
INVERTER 2
TPMS
A/BAG 2
T/SIG
DRLFUSE
Page 326 of 355

Vehicle Identification Number (VIN) .............................. 8-2
Engine Number ............................................................. 8-2
Tire Information ............................................................. 8-3
Recommended Inflation Pressures ............................... 8-3
Tire Sidewall Labeling ................................................... 8-6
Tire Terminology and Definitions ................................... 8-8
Snow Tires..................................................................8-10
Tire Chains ..................................................................8-10
Tire Rotation................................................................8-11
Tire Balancing.............................................................8-12
Tire Traction................................................................8-12
When to Replace Tires ...............................................8-12
Tire Aging....................................................................8-13
Tire Maintenance........................................................8-13
Spare Tire and Tools ...................................................8-14
Warranties for Your Hyundai Vehicle..........................8-15
Consumer Information.................................................8-15
Reporting Safety Defects............................................8-17
Binding Arbitration of Warranty Claims (U.S.A Only) .. 8-18
CONSUMER INFORMATION, REPORTING
SAFETY DEFECTS & BINDING
ARBITRATION OF WARRANTY CLAIMS
8
8
Page 328 of 355
8
CONSUMER INFORMATION, REPORTING SAFETY DEFECTS & BINDING ARBITRATION OF WARRANTY CLAIMS
3
TIRES
I030A04JM-AATRecommended Cold Tire Inflation
Pressures
I020A02A-AATTire Information
The tires supplied on your new Hyundai
are chosen to provide the best perfor-
mance for normal driving.
If you ever have questions about your
tire warranty and where to obtain ser-
vice, see the tire manufacture's booklet
included with your vehicle's Owner's
Manual Literature Kit.
Tire label located on the driver's side of
the center pillar outer panel gives the
cold tire pressures recommended for
your vehicle with the original tire size,
the number of people that can be in your
vehicle and vehicle capacity weight.
OCM055019L
I030A02CM
Type B
I030A01CM
Type A