2007 Hyundai Santa Fe Cycle
[x] Cancel search: CyclePage 18 of 355

1FEATURES OF YOUR HYUNDAI6
!
If the immobilizer warning indicator blinks
for five seconds when the ignition key is
turned to the "ON" position, this indicates
the immobilizer system requires service.
The engine cannot be started without us-
ing the procedure below.
The following procedure describes how to
start the engine using the limp home func-
tion (0, 1, 2, 3 as a sample password).
CAUTION:
o If the password is entered incorrectly
three consecutive times, wait for about
one hour to perform the limp home
activation procedure again.
o If you cannot start your engine using
the limp home activation procedure,
have your vehicle towed by an autho-
rized Hyundai dealer.
B880D01CM-AAT"Limp Home" Mode and Related
Procedures
HNF2011
Immobillizer warning
indicator
NOTE:You can get a limp home password when
the vehicle is first delivered to you. If you
do not have a password, consult your
authorized Hyundai dealer.
1. To activate the password, turn the igni-
tion key "ON" and "OFF" according to
the digit numbers. The immobilizer indi-
cator will blink along with the operation
of the ignition key. For example, turn the
ignition key once for digit number "1",
and twice for "2", and so on. For the digit
number "0", you must cycle the ignition
key 10 times.
2. Wait for 3~10 seconds.
3. You may set the remaining number of
digits by following steps 1 and 2.
4. If all of the four password digits have
been successfully entered, turn the ig-
nition key "ON" and check that the im-
mobilizer indicator illuminates. From
this time, you have to start your engine
within 30 seconds. If you try to start your
engine after 30 seconds, your engine
will not start.
NOTE:If the engine stalls while driving in the
"limp home" mode, you can start your
engine within 2.5 seconds without re-
entering the password.
If the immobilizer indicator blinks for five
seconds, you must re-enter the password
(steps 1~4).
After performing the limp home activation
procedure, consult with your authorized
Hyundai dealer as soon as possible.
Page 95 of 355

1
FEATURES OF YOUR HYUNDAI
83
OCM052075N
HAZARD WARNING SYSTEMB370A01A-AATThe hazard warning system should be
used whenever you find it necessary to
stop the car in a hazardous location. When
you must make such an emergency stop,
always pull off the road as far as possible.
The hazard warning lights are turned on by
pushing in the hazard switch. This causes
all turn signal lights to blink. The hazard
warning lights will operate even though
the key is not in the ignition.
To turn the hazard warning lights off, push
the switch a second time.
REAR WINDOW DEFROSTER
SWITCHB380A01CM-AATThe rear window defroster and heated
outside rear view mirrors are turned on by
pushing in the switch when the engine is
running. At the same time, the rear window
defroster indicator light on the switch is
turned on. To turn the defroster off, push
the switch a second time. The rear window
defroster automatically turns itself off after
about 20 minutes. To restart the defroster
cycle, push in on the switch again after it
has turned itself off.
OCM052080N
Front Windshield Deicer
(If Installed)If your vehicle is installed with the front
windshield deicer, it will be operating at
the same time when you operate the rear
window defroster.
This function helps release stuck wind-
shield wipers, especially in winter time
and cold regions.Outside Rearview Mirror Heater
(If Installed)If your vehicle is installed with the outside
rearview mirror heater, it will operate at the
same time when you operate the rear
window defroster.
Page 115 of 355

1
FEATURES OF YOUR HYUNDAI
103
Automatic-Dimming Night Vision
Safety™ (NVS
®) Mirror
The NVS
® Mirror in your vehicle is the most
advanced way to reduce glare in the rear-
view mirror during any driving situation.
For more information regarding NVS
® mir-
rors and other applications, please refer to
the Gentex website:
www.gentex.com.
CAUTION:
Too close the NVS
® Mirror automatically
reduces glare during driving conditions
based upon light levels monitored in front
of the vehicle and from the rear of the
vehicle. These light sensors are visible
through openings in the front and rear of
the mirror case. Any object that would
obstruct either light sensor will degrade
the automatic dimming control feature.
!
Automatic-Dimming Function
Your mirror will automatically dim upon
detecting glare from the vehicles traveling
behind you. The auto-dimming function
can be controlled by the Dimming ON/OFF
Button:
1. Pressing the
button turns the auto-
dimming function OFF which is indi-
cated by the green Status Indicator LED
turning off.
2. Pressing the button again turns the
auto-dimming function ON which is in-
dicated by the green Status Indicator
LED turning on.
NOTE:The mirror defaults to the "ON" position
each time the vehicle is started.Compass Function
The Compass can be turned ON and OFF
and will remember the last state when the
ignition is cycled. To turn the display fea-
ture ON/OFF:
1. Press and release the
button to turn
the display feature OFF.
2. Press and release the button again
to turn the display back ON.
Additional options can be set with press
and hold sequences of the button and
are detailed below.
There is a difference between magnetic
north and true north. The compass in the
mirror can compensate for this difference
when it knows the Magnetic Zone in which
it is operating. This is set either by the
dealer or by the user. The operating Zone
Numbers for North America are shown in
the figure on the following section.
Z-Nav™ Compass DisplayThe NVS™ Mirror in your vehicle is also
equipped with a Z-Nav™ Compass that
shows the vehicle Compass heading in
the Display Window using the 8 basic
cardinal headings (N, NE, E, SE, etc.).
Page 119 of 355
1
FEATURES OF YOUR HYUNDAI
107
4. Press and hold the just-trained
HomeLink
® button and observe the red
Status Indicator LED. If the indicator
light stays on constantly, programming
is complete and your device should
activate.
5. To program the remaining two
HomeLink® buttons, follow either steps
1 through 4 above for other Rolling
Code devices or steps 2 through 5 in
Standard Programming for standard
devices.
Gate Operator & Canadian Programming
During programming, your handheld trans-
mitter may automatically stop transmitting.
Continue to press the Integrated
HomeLink
® Wireless Control System but-
ton (note steps 2 through 4 in the Standard
Programming portion of this document)
while you press and re-press ("cycle") your
handheld transmitter every two seconds
until the frequency signal has been learned.
The indicator light will flash slowly and
then rapidly after several seconds upon
successful training.Operating HomeLink
®
To operate, simply press and release the
programmed HomeLink
® button. Activa-
tion will now occur for the trained device
(i.e. garage door opener, gate operator,
security system, entry door lock, home/
office lighting, etc.). For convenience, the
hand-held transmitter of the device may
also be used at any time.
Reprogramming a Single HomeLink
®
Button
To program a new device to a previously
trained HomeLink
® button, follow these
steps:
1. Press and hold the desired HomeLink
®
button. Do NOT release until step 4 has
been completed.
2. When the indicator light begins to flash
slowly (after 20 seconds), position the
handheld transmitter 1 to 3 inches away
from the HomeLink
® surface.
3. Press and hold the handheld transmit-
ter button. The HomeLink
® indicator light
will flash, first slowly and then rapidly.
4. When the indicator light begins to flash
rapidly, release both buttons.5. Press and hold the just-trained
HomeLink
® button and observe the red
Status Indicator LED. If the indicator
light stays on constantly, programming
is complete and your new device should
activate.
Erasing HomeLink
® Buttons
Individual buttons cannot be erased. How-
ever, to erase all three programmed but-
tons:
1. Press and hold the two outer HomeLink
®
buttons until the indicator light begins to
flash-after 20 seconds.
2. Release both buttons. Do not hold for
longer than 30 seconds.
The Integrated HomeLink
® Wireless Con-
trol System is now in the training (learn)
mode and can be programmed at any time
following the appropriate steps in the Pro-
gramming sections above.
Page 193 of 355
1
FEATURES OF YOUR HYUNDAI
181
FEATURES OF YOUR HYUNDAI
181181181181
Adjusting the LCD Display
Press the DISP button on the RSE control
panel to adjust the LCD display. To adjust
the brightness, select Brightness, then,
press the < REW (dimmer) or FWD >
(brighter) buttons. The next time the RSE
is turned on, the LCD display will return to
the brightness level it was adjusted to
when last used. Brightness can be ad-
justed regardless of whether the RSE is
playing an audio or video source.
While the RSE is playing a video signal,
press DISP and then press the
∧ ∧∧ ∧
∧ NEXT or
∨ ∨∨ ∨
∨ PREV buttons to cycle through other
LCD display adjustments including
SCREEN SIZE, CONTRAST, CHROMA
and HUE. With any of these settings dis-
played, press the < REW or FF > buttons to
adjust the settings.
To close the LCD display, pull the bottom
edge towards you and push it up until it
clicks and locks into the stow-away posi-
tion.
Cleaning the LCD Display
If the LCD display becomes dusty or dirty,
clean it by wiping gently with a soft, dry,
clean cloth. Do not use chemical cleanser
to clean the screen.Loading a Disc
To load a disc in the player, insert it part
way into the loading slot. The player will
automatically grip the disc and pull it the
rest of the way in.
Disc Protection
The player has an Auto-Reload Disc Pro-
tection feature to protect discs from acci-
dental damage. If a disc is not removed
within 12 seconds after being ejected, it
will be pulled back into the player. The disc
will not begin playing.
Audio via Vehicle Speakers
To hear the audio from the RSE through
the vehicle's speakers, the RSE must be
selected by the radio CD/AUX button in the
front of the vehicle. Regardless of whether
RSE audio is selected for the vehicle
speakers or not, when the RSE audio is
playing it can be heard in the headphones.Volume Control
You can adjust the volume of the audio
heard in the vehicle speakers from the
RSE control panel or the remote controller.
From the RSE control panel, rotate the
POWER/VOLUME knob. From the remote
controller, press "VOL +" to increase the
volume and "VOL -" to decrease the vol-
ume.
Adjusting the volume in this way will not
affect the wireless headphone volume. To
adjust the headphones, turn the VOL con-
trol wheel on the headphones.
Page 200 of 355
1FEATURES OF YOUR HYUNDAI
188
DVD/VCD PLAYER OPERATION
Disc/Format CompatibilityYour RSE player accepts and plays all
DVDs in 4:3 (normal) and 16:9 (widescreen)
video formats. With DVDs that offer mul-
tiple formats, the default format is 16:9 and
will stay that way unless changed by the
user. See "Adjusting the LCD display" to
learn how to adjust the format.
The DVD player has the capability to play
DVD-video, DVD-R, DVD-RW, CD-DA, CD-
R, CD-RW, VCD.
The DVD player was factory programmed
with a region code for the assigned market
or country. If a DVD is inserted for a region
code that doesn’t match with the player, the
RSE player will eject the disc. An error
message will be shown on the overhead
LCD display and the RSE control panel
display.
NOTE:Because there is no universal standard
for DVD/VCD programming, your disc
may behave differently. Some DVDs may
present warning messages about unau-
thorized duplication, some will go directly
to a menu, some may have different on-
disc menu and start playing the movie
immediately, and some may be unread-
able or damaged and will be ejected.NOTE:While the player will accept DVD ROM
and CD ROM discs, the RSE cannot play
discs in these formats and will eject
them.
The player is only capable of reading the
bottom side of a disc. When inserting a
single-sided disc, the label side should be
up. When inserting a two-sided disc, the
desired play side should be down.
Press DISP on the RSE control panel or the
remote controller, then press the
∧ ∧∧ ∧
∧ NEXT
or
∨ ∨∨ ∨
∨ PREV buttons to cycle through LCD
display adjustments (SCREEN SIZE,
BRIGHTNESS, CONTRAST, CHROMA,
HUE). To adjust the SCREEN SIZE, use
the < REW or FF > buttons to select the
preferred size.1. Menu
DVDs can be controlled, and any special
programming or features accessed, by
using the menu. To access the menu while
playing a DVD, press the MENU button.
Press the button a second time to exit the
menu and return to the DVD program at the
point it was being viewed. The menu is not
available during disc initialization, the be-
ginning credits or any copyright and FBI
warnings.
While viewing the menu, press the
∧ ∧∧ ∧
∧ NEXT
button to move the cursor up and the
∨ ∨∨ ∨
∨
PREV button to move the cursor down the
menu. Press the > FWD button to move the
cursor to the right, and the < REW button to
move the cursor to the left.NOTE:You must repeatedly push any button to
move through several items. Pressing
and holding a button will not advance the
cursor beyond the first item.
Press ENTER or Play/Pause to select the
desired menu choice.
B470D01CM-AAT
Page 210 of 355
1FEATURES OF YOUR HYUNDAI
198
6. A.LANG-Alternate
Language Folder
Where alternate languages are available
on a DVD, pressing the A.LANG button will
allow you to select your preferred lan-
guage. Press the button repeatedly to cycle
through the available languages. When
the desired language is displayed, press
ENTER.
Pressing the A.LANG (or FOLD-) button
during MP3 mode will immediately bring
the player to the first file of the previous
folder.
Pressing the A.LANG (or FOLD-) button
during CD or VCD play will do nothing.
7. S.Title – Subtitles,
Folders +
The S.TITLE button allows you to display
or remove language subtitles while play-
ing DVDs. If no language subtitles are
available, the display will show an invalid
icon. Press the S. TITLE button repeatedly
to cycle through all of the available lan-
guages.
Pressing the S. TITLE (or FOLD+) button
during MP3 mode will immediately bring
the player to the first file of the NEXT folder.
Pressing the S. TITLE (or FOLD+) button
during CD or VCD play will do nothing.8. Menu
Pressing the MENU button during DVD
play will present the DVD menu.
Pressing the MENU button during MP3
disc play will display the Song List on the
LCD display.
Pressing the MENU button during CD or
VCD play has no effect.
Press the button again to return to the
program. After five seconds with no button
press, the menu will automatically close
and the program will begin playing.
9. Title/PBC
While viewing a DVD, press the TITLE
button on the remote controller to jump to
the top menu. Press the < REW / FF > or
∨ ∨∨ ∨
∨PREV/
∧ ∧∧ ∧
∧NEXT buttons to highlight the
desired selection, then press ENTER to
make your selection.
Press TITLE again to return to the DVD.
While viewing a PBC function included
VCD, pressing the TITLE/PBC button will
switch the PBC function on and off.10. Return
While view any operation, pressing the
RETURN button will return to previous
operation status.
11. Speaker Volume "VOL +" and "VOL –"
If the audio from the RSE is being played
through the vehicle speakers, you can
adjust the volume of the speakers with the
"VOL +" and "VOL –" buttons. Adjusting the
volume in this way will not adjust the wire-
less headphone volume. To adjust the
headphones, roll the VOL control wheel.
Batteries
The remote controller requires a CR2025
battery (included).
Page 221 of 355
2
DRIVING YOUR HYUNDAI
10
CAUTION:
Never shift into "R" or "P" position while
the vehicle is moving.
!
The indicator lights in the instrument clus-
ter indicate the selector lever position when
the ignition is switched "ON". During sports
mode operation, the gear currently in use
displays in the numeral indicator.
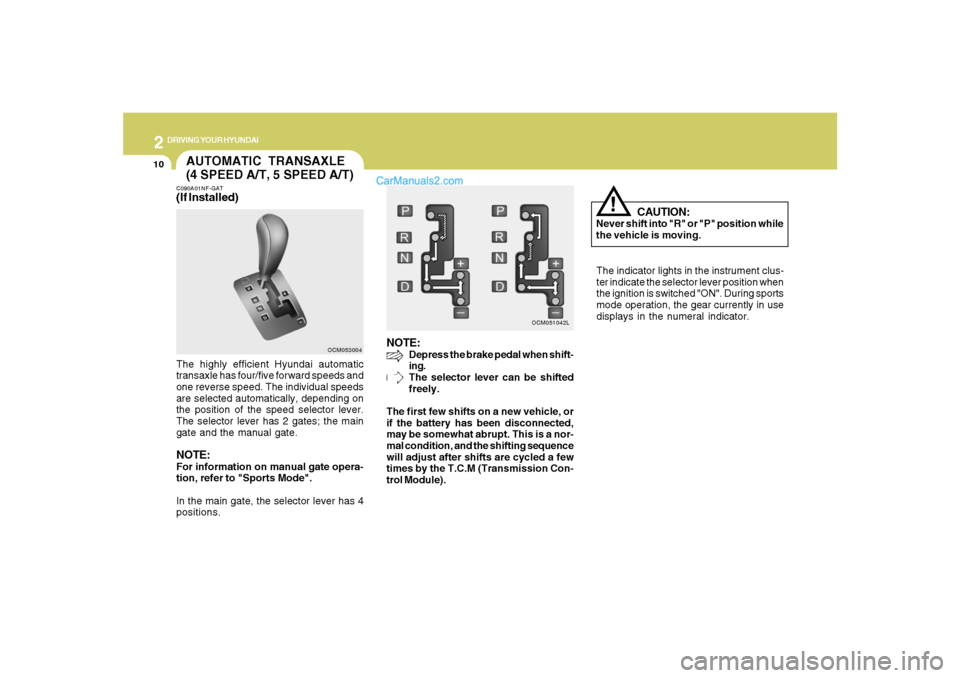
AUTOMATIC TRANSAXLE
(4 SPEED A/T, 5 SPEED A/T)C090A01NF-GAT(If Installed)The highly efficient Hyundai automatic
transaxle has four/five forward speeds and
one reverse speed. The individual speeds
are selected automatically, depending on
the position of the speed selector lever.
The selector lever has 2 gates; the main
gate and the manual gate.NOTE:For information on manual gate opera-
tion, refer to "Sports Mode".
In the main gate, the selector lever has 4
positions.
NOTE:
Depress the brake pedal when shift-
ing.
The selector lever can be shifted
freely.
The first few shifts on a new vehicle, or
if the battery has been disconnected,
may be somewhat abrupt. This is a nor-
mal condition, and the shifting sequence
will adjust after shifts are cycled a few
times by the T.C.M (Transmission Con-
trol Module).
OCM053004OCM051042L