2007 Hyundai H-1 (Grand Starex) maintenance
[x] Cancel search: maintenancePage 267 of 284
8
DO-IT YOURSELF MAINTENANCE
23TAIL GATE WINDOW WASHER FLUID
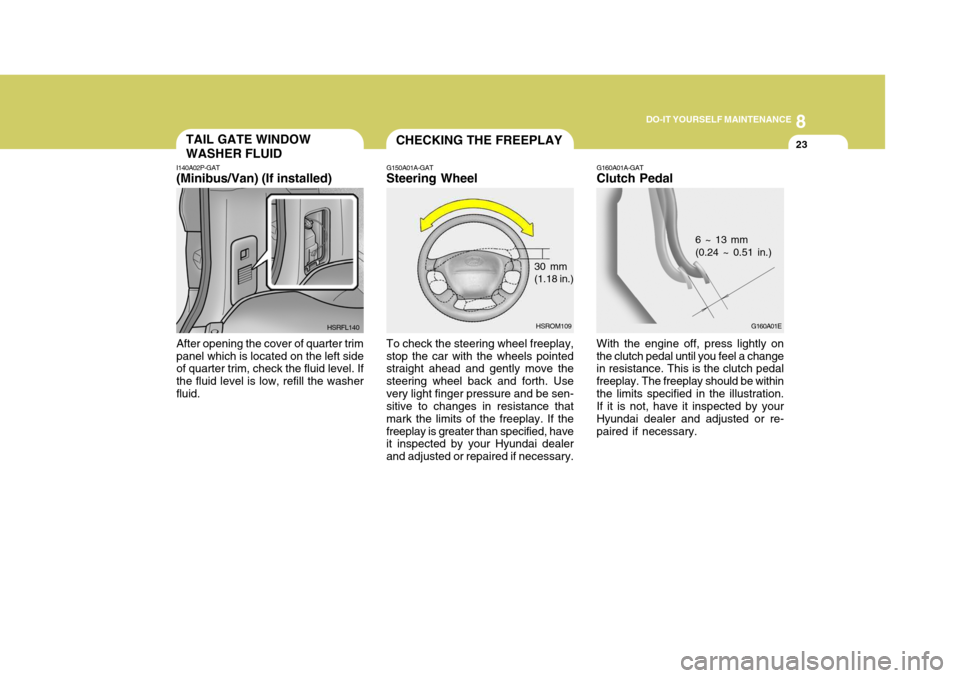
I140A02P-GAT (Minibus/Van) (If installed) After opening the cover of quarter trim panel which is located on the left side of quarter trim, check the fluid level. If the fluid level is low, refill the washerfluid. HSRFL140CHECKING THE FREEPLAY
G150A01A-GAT Steering Wheel To check the steering wheel freeplay, stop the car with the wheels pointed straight ahead and gently move the steering wheel back and forth. Usevery light finger pressure and be sen- sitive to changes in resistance that mark the limits of the freeplay. If thefreeplay is greater than specified, have it inspected by your Hyundai dealer and adjusted or repaired if necessary. 30 mm (1.18 in.)
G160A01A-GAT Clutch Pedal With the engine off, press lightly on the clutch pedal until you feel a change in resistance. This is the clutch pedal freeplay. The freeplay should be withinthe limits specified in the illustration. If it is not, have it inspected by your Hyundai dealer and adjusted or re-paired if necessary. 6 ~ 13 mm (0.24 ~ 0.51 in.)
HSROM109 G160A01E
Page 268 of 284
8DO-IT YOURSELF MAINTENANCE
24CHECKING DRIVE BELTS
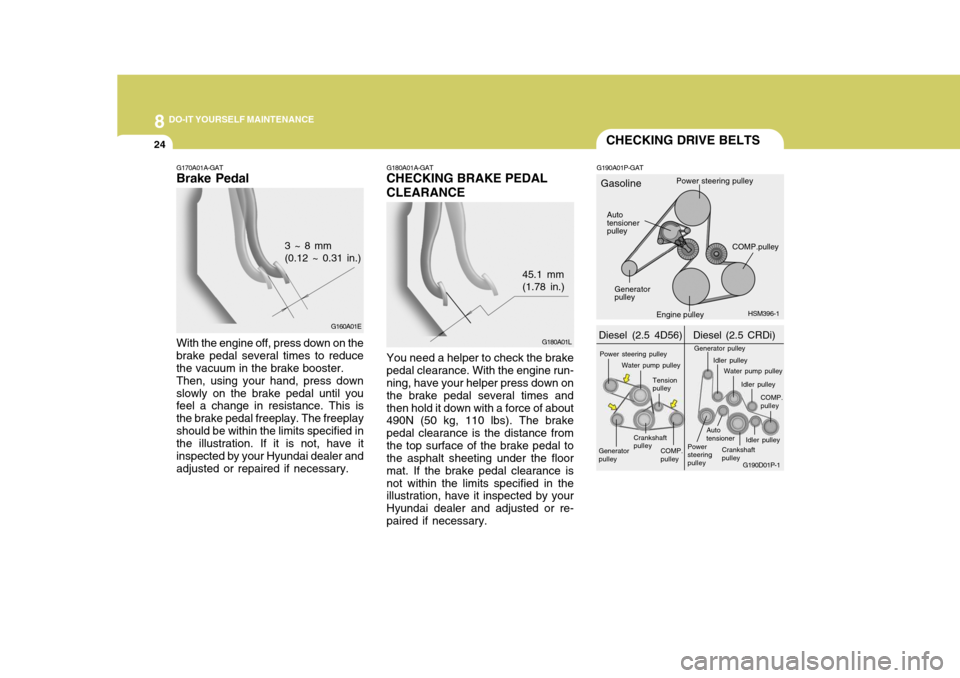
G180A01A-GAT CHECKING BRAKE PEDAL CLEARANCE
G180A01L
45.1 mm (1.78 in.)
You need a helper to check the brake pedal clearance. With the engine run- ning, have your helper press down on the brake pedal several times andthen hold it down with a force of about 490N (50 kg, 110 lbs). The brake pedal clearance is the distance fromthe top surface of the brake pedal to the asphalt sheeting under the floor mat. If the brake pedal clearance isnot within the limits specified in the illustration, have it inspected by your Hyundai dealer and adjusted or re-paired if necessary.
G170A01A-GAT Brake Pedal With the engine off, press down on the brake pedal several times to reducethe vacuum in the brake booster.Then, using your hand, press downslowly on the brake pedal until you feel a change in resistance. This is the brake pedal freeplay. The freeplayshould be within the limits specified in the illustration. If it is not, have it inspected by your Hyundai dealer andadjusted or repaired if necessary.
3 ~ 8 mm (0.12 ~ 0.31 in.)
G160A01E G190A01P-GAT
G190D01P-1
Diesel (2.5 CRDi)
Diesel (2.5 4D56)
HSM396-1
Gasoline
Auto tensioner pulley COMP.pulley
Engine pulley
Power steering pulley
Generator pulley
Generator pulley Crankshaftpulley
COMP.pulley
Tensionpulley
Water pump pulley
Power steering pulley
Generator pulley
Idler pulleyWater pump pulley
Idler pulley COMP.pulley
Powersteeringpulley Autotensioner
Crankshaft pulley Idler pulley
Page 269 of 284
8
DO-IT YOURSELF MAINTENANCE
25
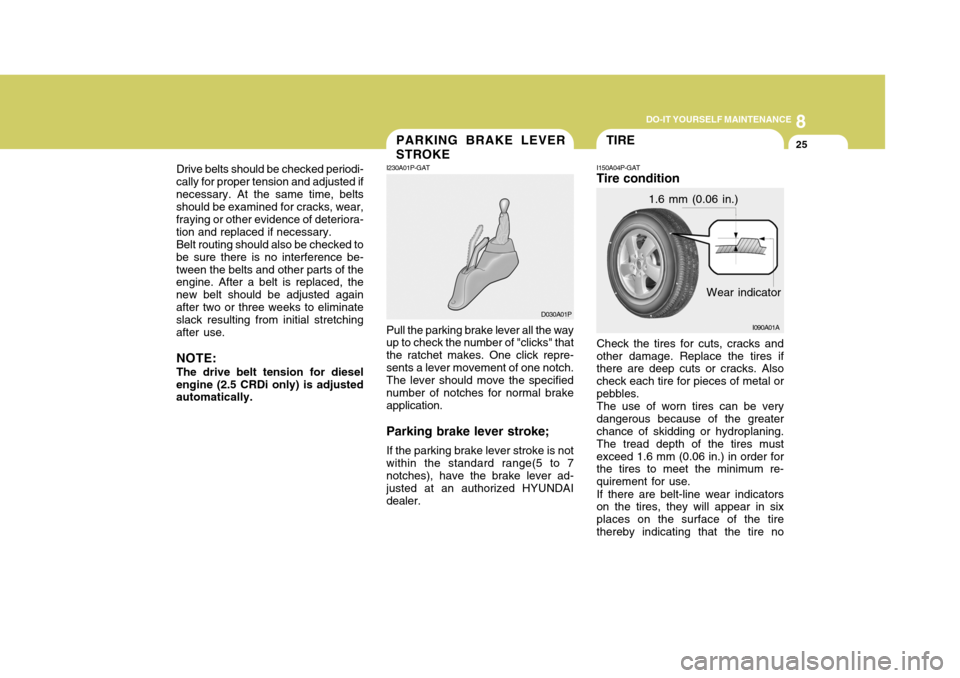
Pull the parking brake lever all the way up to check the number of "clicks" that the ratchet makes. One click repre-sents a lever movement of one notch. The lever should move the specified number of notches for normal brakeapplication. Parking brake lever stroke; If the parking brake lever stroke is not within the standard range(5 to 7notches), have the brake lever ad- justed at an authorized HYUNDAI dealer. D030A01P
TIRE
I150A04P-GAT Tire condition Check the tires for cuts, cracks and other damage. Replace the tires if there are deep cuts or cracks. Also check each tire for pieces of metal orpebbles.The use of worn tires can be verydangerous because of the greater chance of skidding or hydroplaning. The tread depth of the tires mustexceed 1.6 mm (0.06 in.) in order for the tires to meet the minimum re- quirement for use. If there are belt-line wear indicators on the tires, they will appear in six places on the surface of the tirethereby indicating that the tire no 1.6 mm (0.06 in.)
I090A01A
Wear indicator
Drive belts should be checked periodi-
cally for proper tension and adjusted ifnecessary. At the same time, belts should be examined for cracks, wear, fraying or other evidence of deteriora-tion and replaced if necessary. Belt routing should also be checked to
be sure there is no interference be-tween the belts and other parts of the engine. After a belt is replaced, the new belt should be adjusted againafter two or three weeks to eliminate slack resulting from initial stretching after use.
NOTE: The drive belt tension for diesel
engine (2.5 CRDi only) is adjusted automatically.PARKING BRAKE LEVER STROKE
I230A01P-GAT
Page 270 of 284

8DO-IT YOURSELF MAINTENANCE
26
Vehicle
MINIBUS
longer meets the minimum require- ment for use. When these wear indi-cators appear, the tires must be re- placed with new one. Confirm that the wheel nuts are tightened sufficiently.Refer to the section of this manual entitled "In case of emergency" for information concerning care of thetires.
!WARNING:
o Driving on worn-out tires is dan- gerous! Worn-out tires can cause loss of braking effectiveness, steering control and traction. When replacing tires, never mixradial and bias-ply tires on the same car. If you replace radial tires with bias-ply tires, they mustbe installed in sets of four.
o Your vehicle is equipped with
tires designed to provide for saferide and handling capability.Do not use a size and type of tireand wheel that is different from the one that is originally installed on your vehicle. I160A03P-GAT Tire inflation pressure
kg/cm² (psi)
Tire size
205/70R 15 215/80R 15205/70R 15C-6PR205/70R 15C-8PR Rear
2.8(40)2.2(32)2.8(40)4.5(65)
Front
2.8(40)2.2(32)2.8(40)2.8(40)
Vehicle VAN
TRUCK Tire size
205/70R 15C-8PR 195R 14C-6PR 195R 13C-8PR Rear
4.5(65) -
3.5(50)
Front
2.8(40)2.8(40) -
kg/cm² (psi)
Check the tire inflation pressure of all the tires while they are cold; if insuf- ficient or excessive, adjust to the specified value. After the tire inflationpressure has been adjusted, check the tires for damage and air leaks. Be sure to put rubber caps on the valves.
I160A02P
It can affect the safety and perfor- mance of your vehicle, whichcould lead to handling failure or rollover and serious injury. When replacing the tires, be sure to equip all four tires with the tire and wheel of the same size, type,tread, brand and load-carrying ca- pacity. If you nevertheless decide to equip your vehicle with anytire/wheel combination not rec- ommended by Hyundai for off- road driving, you should not usethese tires for highway driving.
o Tires degrade over time, even
when they are not being used.Regardless of the remaining tread, it is recommended that tires tread, It is recommended that tires gen-erally be replaced after six (6) years of normal service. Heat caused by not climates or fre-quent high loading conditions can
accelerate the aging process. Fail- ure to follow this Warning canresult in sudden tire failure, which could lead to a loss of control and an accident involving seri-ous injury or death.
Page 271 of 284
8
DO-IT YOURSELF MAINTENANCE
27
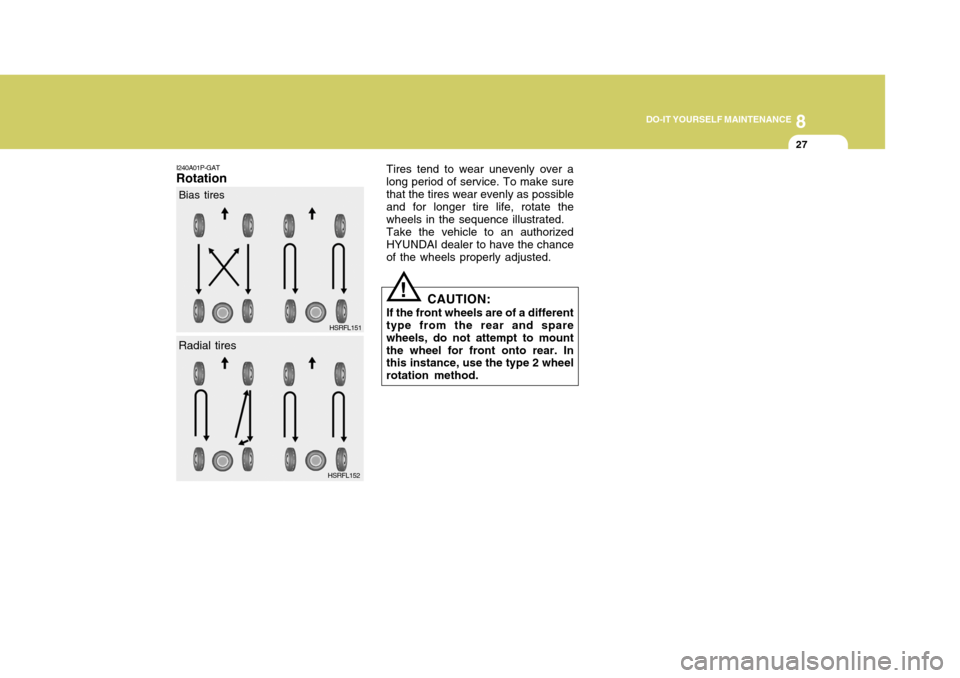
Tires tend to wear unevenly over a long period of service. To make surethat the tires wear evenly as possible and for longer tire life, rotate the wheels in the sequence illustrated. Take the vehicle to an authorized HYUNDAI dealer to have the chance of the wheels properly adjusted.
CAUTION:
If the front wheels are of a different type from the rear and spare wheels, do not attempt to mountthe wheel for front onto rear. In this instance, use the type 2 wheel rotation method.
!
I240A01P-GAT
Rotation
Bias tires
Radial tires HSRFL151
HSRFL152
Page 279 of 284

10
INDEX
3
D DAY/NIGHT INSIDE REARVIEW MIRROR ................2-34
DEFROSTING/DEFOGGING ......................................2-43
DIGITAL CLOCK ........................................................ 2-37
DOOR LOCKS ............................................................ 1-13
DRINK HOLDER ......................................................... 2-35
DRIVING FOR ECONOMY .........................................3-26
DRIVING WITH ELECTRONIC DUAL-RANGE AUTOMATIC TRANSMISSION ...............................3-14
EEMISSION CONTROL SYSTEM ................................. 7-2
ENGINE ....................................................................... 9-3
ENGINE COMPARTMENT . ......................................... 8-2
ENGINE COOLANT .................................................... 8-10
ENGINE COOLANT TEMPERATURE GAUGE ..........2-12
ENGINE EXHAUST CAN BE DANGEROUS! ............. 3-2
ENGINE NUMBER ...................................................... 1-6
ENGINE OIL ................................................................ 8-7ENGINE RPM ADJUSTMENT KNOB ........................2-24
EXPLANATION OF SCHEDULED
MAINTENANCE ITEMS .............. ...........................6-12
FFOUR-WHEEL DRIVE (4WD) .....................................3-16
FRONT DOOR EDGE WARNING LIGHT ................... 2-25
FRONT DOOR WINDOW GLASS ..............................1-28FRONT FOG LI
GHT SWITCH .................................... 2-25
FRONT/REAR WINDOW DEFROSTER SWITCH ......2-26
FUEL GAUGE ............................................................ 2-12
FUEL RECOMMENDATIONS ...................................... 1-2
FUEL TANK CAPACITY .............................................. 9-2
FUSE PANEL DESC RIPTION .................................... 4-40
GGENERAL CHECKS .................................................... 8-6
GOOD BRAKING PRAC TICE .................................... 3-23
HHAZARD WARNING SYSTEM ................................... 2-26
HEADLIGHT AIMING ADJUSTMENT ........................ 4-29
HEADLIGHT LEVELING DEVICE SYSTEM ..............2-23
HEADREST ................................................................ 1-39
HEATING AND COOLING CONTROL ........................2-38
HEATING CONTROLS ............................................... 2-42
HEIGHT ADJUSTABLE FRONT SEAT SHOULDER BELT ....................................................................... 1-43
HIGH-MOUNTED REAR STOP LIGHT .......................2-25
HOLD OPEN LOCK SYSTEM .................................... 1-14
HOOD RELEASE ....................................................... 1-25
HORN ......................................................................... 2-37
Page 280 of 284
10INDEX
4
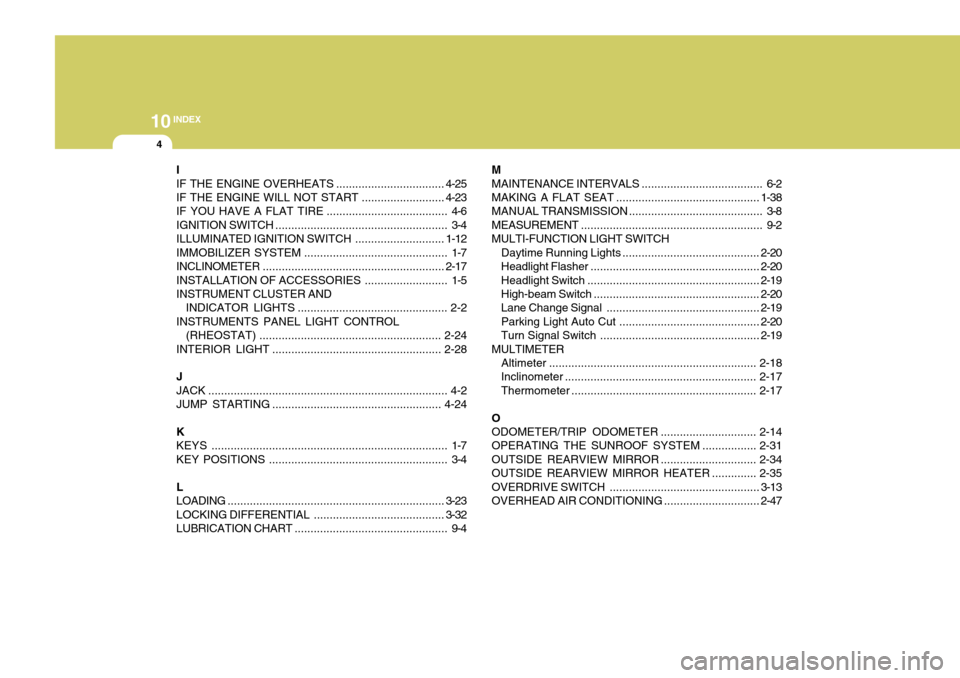
I IF THE ENGINE OVERHEATS .................................. 4-25
IF THE ENGINE WILL NOT START ..........................4-23
IF YOU HAVE A FLAT TIRE ...................................... 4-6
IGNITION SWITCH ...................................................... 3-4
ILLUMINATED IGNITION SWITCH ............................1-12
IMMOBILIZER SYSTEM ............................................. 1-7
INCLINOMETER ......................................................... 2-17
INSTALLATION OF ACCESSORIES .......................... 1-5
INSTRUMENT CLUSTER AND
INDICATOR LIGHTS ............................................... 2-2
INSTRUMENTS PANEL LIGHT CONTROL (RHEOSTAT) ......................................................... 2-24
INTERIOR LIGHT ..................................................... 2-28
J
JACK ........................................................................... 4-2JUMP STARTING ..................................................... 4-24
K KEYS .......................................................................... 1-7
KEY POSITIONS ........................................................ 3-4
L LOADING .................................................................... 3-23
LOCKING DIFFERENTI AL ......................................... 3-32
LUBRICATION CHART ................................................ 9-4 MMAINTENANCE INTERVALS
...................................... 6-2
MAKING A FLAT SEAT ............................................. 1-38
MANUAL TRANSMISSION ..... ..................................... 3-8
MEASUREMENT ......................................................... 9-2
MULTI-FUNCTION LIGHT SWITCH Daytime Running Lights ..... ......................................2-20
Headlight Flasher ..................................................... 2-20
Headlight Switch ...................................................... 2-19
High-beam Switch .................................................... 2-20
Lane Change Signal ................................................ 2-19
Parking Light Auto Cut ............................................ 2-20
Turn Signal Switch .................................................. 2-19
MULTIMETER Altimeter ................................................................. 2-18
Inclinometer ............................................................ 2-17
Thermometer .......................................................... 2-17
OODOMETER/TRIP ODOMETER ..............................2-14
OPERATING THE SUNROOF SYSTEM .................2-31
OUTSIDE REARVIEW MIRROR ..............................2-34
OUTSIDE REARVIEW MIRROR HEATER ..............2-35
OVERDRIVE SWITCH ............................................... 3-13
OVERHEAD AIR COND ITIONING .............................. 2-47
Page 281 of 284
10
INDEX
5
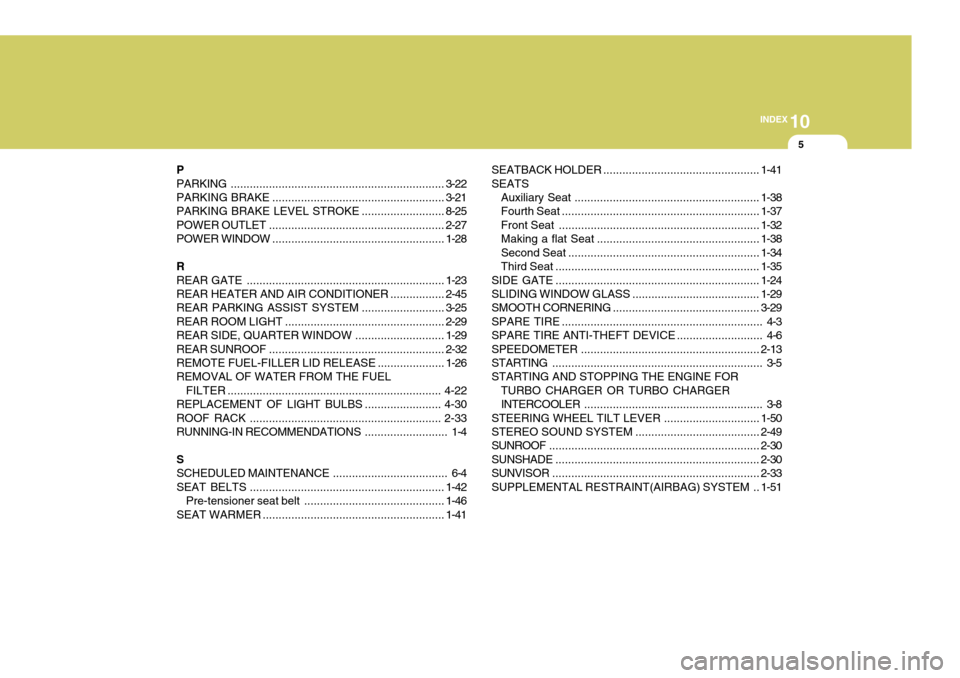
P PARKING ................................................................... 3-22
PARKING BRAKE ...................................................... 3-21
PARKING BRAKE LEVEL STROKE..........................8-25
POWER OUTLET ....................................................... 2-27
POWER WINDOW ...................................................... 1-28
RREAR GATE .............................................................. 1-23
REAR HEATER AND AIR CONDITIONER .................2-45
REAR PARKING ASSIST SYSTEM ..........................3-25
REAR ROOM LIGHT .................................................. 2-29
REAR SIDE, QUARTER WINDOW ............................ 1-29
REAR SUNROOF ....................................................... 2-32
REMOTE FUEL-FILLER LID RELEASE .....................1-26
REMOVAL OF WATER FROM THE FUEL
FILTER ................................................................... 4-22
REPLACEMENT OF LIGHT BULBS ........................4-30
ROOF RACK ............................................................ 2-33
RUNNING-IN RECOMMENDATIONS .......................... 1-4
SSCHEDULED MAINTENANCE .................................... 6-4
SEAT BELTS ............................................................. 1-42
Pre-tensioner seat belt ............................................ 1-46
SEAT WARMER ......................................................... 1-41SEATBACK HOLDER
................................................. 1-41
SEATS Auxiliary Seat .......................................................... 1-38
Fourth Seat .............................................................. 1-37
Front Seat ............................................................... 1-32
Making a flat Seat ................................................... 1-38
Second Seat ............................................................ 1-34
Third Seat ................................................................ 1-35
SIDE GATE ................................................................ 1-24
SLIDING WINDOW GLASS ........................................ 1-29
SMOOTH CORNERING .............................................. 3-29
SPARE TIRE ............................................................... 4-3
SPARE TIRE ANTI-THEFT DEVICE ........................... 4-6
SPEEDOMETER ........................................................ 2-13
STARTING .................................................................. 3-5
STARTING AND STOPPING THE ENGINE FOR TURBO CHARGER OR TURBO CHARGERINTERCOOLER ........................................................ 3-8
STEERING WHEEL TILT LEVER ..............................1-50
STEREO SOUND SYSTEM ....................................... 2-49
SUNROOF .................................................................. 2-30
SUNSHADE ................................................................ 2-30
SUNVISOR ................................................................. 2-33
SUPPLEMENTAL RESTRAINT(AIRBAG) SYSTEM .. 1-51