2007 Hyundai Getz air condition
[x] Cancel search: air conditionPage 428 of 463

DO-IT-YOURSELF MAINTENANCE 6- 17
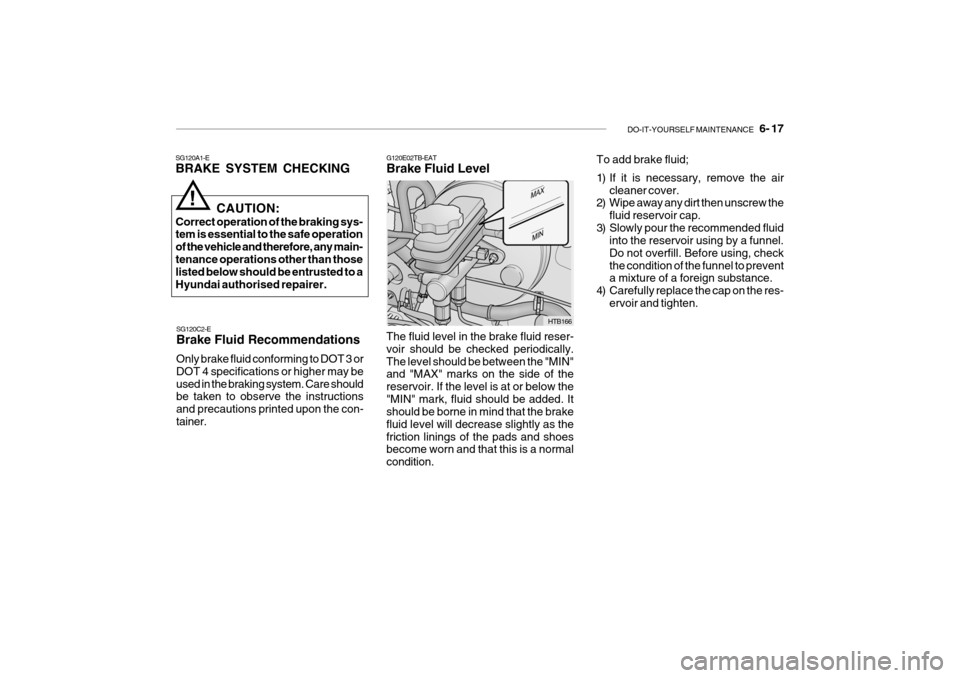
G120E02TB-EAT Brake Fluid Level
SG120A1-EBRAKE SYSTEM CHECKING
SG120C2-E Brake Fluid Recommendations Only brake fluid conforming to DOT 3 or DOT 4 specifications or higher may beused in the braking system. Care should be taken to observe the instructions and precautions printed upon the con-tainer.
!
CAUTION:
Correct operation of the braking sys- tem is essential to the safe operation of the vehicle and therefore, any main-tenance operations other than those listed below should be entrusted to a Hyundai authorised repairer.
The fluid level in the brake fluid reser-voir should be checked periodically.The level should be between the "MIN" and "MAX" marks on the side of the reservoir. If the level is at or below the"MIN" mark, fluid should be added. It should be borne in mind that the brake fluid level will decrease slightly as thefriction linings of the pads and shoes become worn and that this is a normal condition.
HTB166To add brake fluid;
1) If it is necessary, remove the air
cleaner cover.
2) Wipe away any dirt then unscrew the
fluid reservoir cap.
3) Slowly pour the recommended fluid into the reservoir using by a funnel. Do not overfill. Before using, checkthe condition of the funnel to prevent a mixture of a foreign substance.
4) Carefully replace the cap on the res- ervoir and tighten.
Page 429 of 463

6- 18 DO-IT-YOURSELF MAINTENANCE
SG140C1-E Checking the Refrigerant
1. Start the engine and run at idle for
several minutes with the refrigera- tion system running at the coldest setting.
2. Open the bonnet and inspect the
sight glass on the top of the receiverdryer.
3. If the refrigerant charge is insuffi- cient, a flow of bubbles will be ob-served through the sight glass.
4. If the refrigerant charge is satisfac- tory, no bubbles will be observedthrough the sight glass.
CAUTION:
Running the air conditioning systemwith a low refrigerant level may dam- age the compressor.
!
!WARNING:
Brake fluid is hygroscopic and should never be stored in an un-sealed container. The presence of water in the braking system will cause vapour locks and increase the possi-bility of brake fade along with pro- moting corrosion within the braking system. The brake fluid must bechanged at the specified time or mile- age interval to ensure continued safe operation of the system. Brake fluid will cause rapid and serious damage to paintwork. If accidental spillageoccurs, the affected area must be rinsed with water immediately. Do not allow brake fluid to come intocontact with the eyes or to be in- gested and ensure that fluid is safely stored away form the reach of chil-dren. SG140A1-E AIR CONDITIONING SYSTEM MAINTENANCECondenser Ensure that the condenser is periodi- cally inspected and that accumulations of dirt, dead insects and leaves etc, areremoved to ensure that the efficiency of the system is not impaired. Care must be exercised to ensure that the con-denser fins are not damaged during cleaning.
Page 430 of 463

DO-IT-YOURSELF MAINTENANCE 6- 19
B145A02TB-EAT CHANGING THE POLLEN FIL-
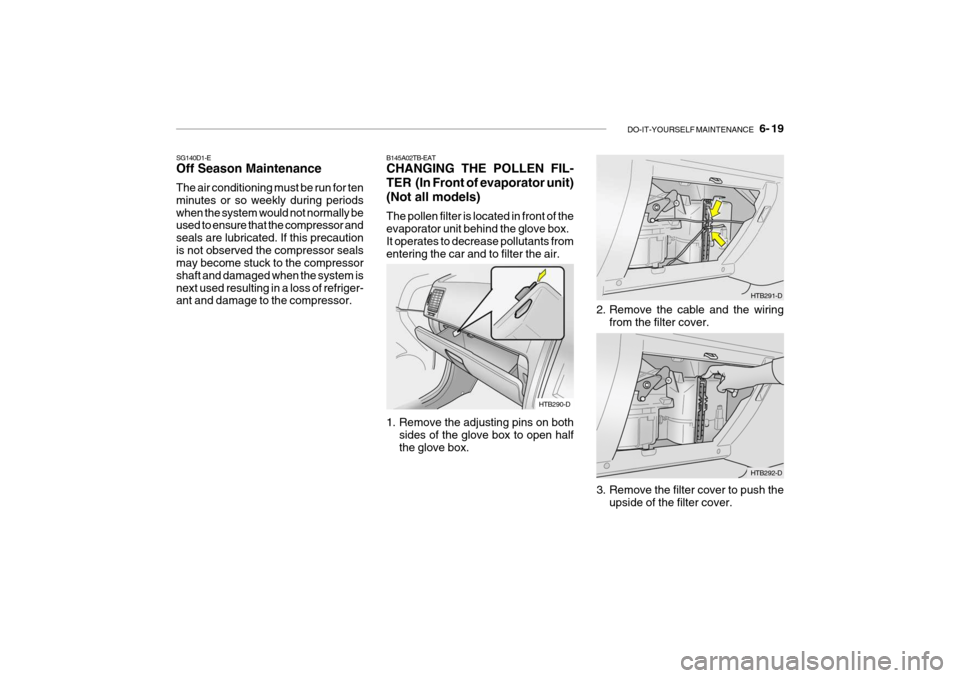
TER (In Front of evaporator unit)(Not all models) The pollen filter is located in front of the evaporator unit behind the glove box. It operates to decrease pollutants fromentering the car and to filter the air.
1. Remove the adjusting pins on both
sides of the glove box to open half the glove box.
HTB290-D
SG140D1-E Off Season Maintenance The air conditioning must be run for ten minutes or so weekly during periodswhen the system would not normally be used to ensure that the compressor and seals are lubricated. If this precautionis not observed the compressor seals may become stuck to the compressor shaft and damaged when the system isnext used resulting in a loss of refriger- ant and damage to the compressor.
3. Remove the filter cover to push theupside of the filter cover.
HTB291-D
2. Remove the cable and the wiring from the filter cover.
HTB292-D
Page 432 of 463

DO-IT-YOURSELF MAINTENANCE 6- 21
G190B01TB-GAT CHECKING DRIVE BELTS (Diesel) At the scheduled maintenance inspec- tion, belts should be examined forcracks, wear, fraying or other evidence of deterioration and replaced if neces- sary.Belt routing should also be checked to be sure there is no interference be- tween the belts and other parts of theengine.
!
SG200A1-E FUSIBLE LINKS The fusible link prevents damage to the wiring harness in the event of an elec-trical system malfunction. Failure of a fusiblelink is indicative of a serious overload condition having occurred andtherefore the electrical system should be checked by a Hyundai authorised repairer before a replacement link isfitted.
WARNING:
Under no circumstances should afusible link be replaced with any- thing other than a new link of the same rating. The use of higher ratedlinks or other means of connecting the circuit will create a potential fire hazard.G200B01E-EAT INDIVIDUAL CIRCUIT FUSES The fuse box containing the individual circuit fuses will be found in the back-side of multi box located in the right side of driver. The multi box is removed by pulling lightly and then releasing the lid.A fuse rating grid will be found on the reverse side of the cover. In the event of fuse failure, the fuse should be re-placed with one of equivalent rating. A fuse removal tool is provided within the fuse box to facilitate replacement. HTB180-D
A/C comp.
Water pump pulley
G190B01TB
Alternator Power steering pump
Tensioner
Crankshaft pulley
Page 434 of 463

DO-IT-YOURSELF MAINTENANCE 6- 23
!
SG220A1-E ELECTRIC COOLING FANS
WARNING:
The cooling fan is controlled by en- gine coolant temperature and maysometimes operate even when the engine is not running. Use extreme caution when working near theblades of the cooling fan so that you are not injured by a rotating fan blade. As the engine coolant tem-perature decreases, the fan will auto- matically shut off. This is a normal condition. The engine cooling fan should operate before the temperature gauge reachesthe upper portion of the scale and the condenser fan should operate when- ever the air conditioning is in use. SG230B1-E POWER STEERING HOSES Power steering hoses should be checked for damage, deterioration and leakage at each service.
NOTE: Grinding noise from power steering pump may be heard immediately after the engine is started in extremelycold condition (below -4°F). If the noise stops during warm up, there is no abnormal function in the system.This is due to a power steering fluid characteristic in extremely cold con- ditions. FLUID RECOMMENDATION Only automatic transmission fluid meet- ing the specification of Dexron 2 should be used in the power steering system.SG230A2-E POWER STEERING FLUID LEVEL The power steering fluid level should be checked daily.To check the power steering fluid level, be sure the ignition is "OFF", then check to make certain that the powersteering fluid level is between the "MAX" and "MIN" level markings on the fluid reservoir.
HTB163
Page 444 of 463

DO-IT-YOURSELF MAINTENANCE 6- 33
G200E01TB
G200E02TB-GAT Inner Panel
FUSE RATING
10A 10A10A15A10A10A 20A 15A10A 20A 10A 15A20A10A10A10A 30A 15A10A15A15A15APROTECTED COMPONENTS
Air conditioner
Stop/Tail Light (LH) A/Bag IndicatorAudio, Electronic Outside Mirror
Turn signal Light, Back-up Light
Stop/Tail Light (RH)Cluster
Power outlet PCM, ABS controlAir BagDoor Lock System, SunroofRear Wiper Motor
Start Relay, 9oTheft alarm system Seat Warmer Rear window DefrosterECM
Hazard Warning Light, ETACM Front Wiper Motor Rear Fog Light
Fog light, ETACM, Power Window, Headlight leveling Device
Blower, SunroofRear window DefrosterHeadlight (RH)Front Fog Light
High Beam Light Indicator, Headlight (LH) Room Lamp, Audio, Cluster
DESCRIPTION
A/C SW
TAIL LH
A/BAG IND
AUDIO
T/SIG
TAIL RH
CLUSTER
P/OUTLET ECU 1
A/BAG
D/LOCK
RR/WPR STARTS/HTD
HTD MIR ECU2
STOP
HAZARD
FRT WPR R/FOG
IGNITION BLOWER PR HTD
H/LP RH F/FOG
H/LP LH
POWER CONN & R/LP
Page 446 of 463

7- 2 EMISSION CONTROL SYSTEMS
SH010A1-E EMISSION CONTROL SYSTEMS (Not all models) Depending upon the market for which the vehicle is destined, the emissioncontrol system will comprise one or more of the following emission con- trol devices.
1) Crankcase emission control sys-
tem
2) Evaporative emission control sys-
tem
3) Exhaust emission control systemIn order that the proper functioning of the emission control systems may be ensured, it is recommended that the vehicle is inspected and maintainedby a Hyundai authorised repairer in accordance with the maintenance schedule in this manual. SH010B1-E
1. Crankcase emission
controlsystem
The positive crankcase ventilation
system is employed to prevent airpollution caused by blow-by gasesbeing emitted from the crankcase by introducing fresh air to the crankcase through the air cleaner where thismixes with blow-by gases and then passes through the PCV valve into the intake manifold from where it sub-sequently enters the combustion chamber and is burned.
SH010C1-E
2. Evaporative emission control
system
The Evaporative Emission Control
System is designed to prevent fuel vapours from escaping into the atmo- sphere through the fuel tank ventila- tion system. SH010D1-E
3. Exhaust emission con trol
system
The exhaust emission control system
is a highly effective system whichcontrols exhaust emission while main- taining good vehicle performance. Whilst the engine is not running, fuel
vapours generated inside the fuel tank are absorbed and stored in a char-coal canister. When the engine is started, the vapours stored in the canister are drawn into the inductionsystem through the purge control sole- noid valve and are subsequently burned.
The purge control solenoid valve is
controlled by the ECU; when the en-gine coolant temperature is low or the engine is idling, the purge control valve is closed and fuel vapours re-main stored in the canister. Under normal running conditions when the engine is warm, the valve opens andthe vapours are drawn into the inlet tract and subsequently burned in the combustion chamber.
Page 453 of 463

CONSUMER INFORMATION 8- 5
SI060B2-E TYRE REPLACEMENT
Wear indicator
0.06 in. (1.6 mm)
HGK248
NOTE:
o Do not use the temporary spare
tyre for tyre rotation.
o Aluminium wheels which are not
supplied as Original Equipment should not be mixed on the same vehicle with the original steelwheels. However, it is acceptable that the steel spare wheel be used in conjunction with Original Equip-ment aluminium wheels since the offset of both wheels is compat- ible. Radial and cross ply tyresshould not be mixed on the same vehicle.
SI060A1-E TYRE BALANCING Incorrect tyre balance will cause steer- ing vibration and uneven tyre wear. The vehicle tyres are balanced during pro-duction but may need further balancing throughout the life of the tyres. It is recommended that the tyres bebalanced on the car for best results and that the tyres are balanced whenever they have been removed from the wheelfor repair. Tyres must be replaced when the wearindicators appear as a solid bar acrossthe tyre tread. At this point, the remain- ing tread depth will be approximately 0.06 in.(1.6 mm). In addition to this, thetyre must be replaced if any portion of the tread has become bald or if there are any lumps, bulges or deep cuts in thesidewalls or tread. Replacement tyres must be of the rec- ommended size and rating and shouldbe of the same manufacture and tread pattern on each axle.
!WARNING:
Tires degrade over time, even when they are not being used. Regardless of the remaining tread, it is recom- mended that tires generally be re-placed after six (6) years of normal service. Heat caused by hot climates or frequent high loading conditionscan accelerate the aging process. Failure to follow this warning can result in sudden tire failure, whichcould lead to a loss of control and an accident involving serious injury or death.