2007 Hyundai Getz air condition
[x] Cancel search: air conditionPage 314 of 463

1- 48 FEATURES OF YOUR HYUNDAI
Warning light operation The parking brake/brake fluid level warn- ing light will be illuminated wheneverthe ignition switch is turned to the "ON" position irrespective of whether or not the parking brake is applied and mustbe extinguished when the engine starts and the parking brake released. If the warning light fails to extinguish orilluminates at any other time, the ve- hicle must be brought to rest in a safe location and the level of brake fluid inthe reservoir checked. If the fluid level is incorrect, fluid conforming to DOT 3 or DOT 4 specifications should be added.If, after correcting the brake fluid level, the warning light continues to be illumi- nated, the advice of the nearest Hyundaiauthorised repairer must be sought be- fore the vehicle is driven again. Your Hyundai is equipped with a diago-nally split dual braking system which will ensure that in the event of one of the brake circuits becoming defective, ap-proximately fifty per cent of the normal braking performance will be available.
!
B260H03A-EAT
PARKING BRAKE/ BRAKE FLUID LEVELWARNING LIGHT
SB210K1-E
OIL PRESSURE WARNING LIGHT
!CAUTION:
If the oil pressure light illuminates when the engine is running, an in- sufficient oil pressure level for con-tinued safe operation of the engine exists. Continued operation of the engine in this condition may resultin serious engine damage. Under normal circumstances, the light will illuminate when the igni- tion is turned "on" and will be extin-guished when the engine is started. If the oil pressure warning light illu- minates whilst the engine is run-ning, stop the engine immediately and check the engine oil level. If the level is insufficient, add the requiredamount of oil as indicated by the engine oil dipstick. If the light fails to extinguish when the engine is re-started, do not continue to operate the vehicle. If the oil pressure light illuminates during normal operation and the cause is not an insufficient oil level, or the light fails to illuminate whenthe ignition is turned "on", contact the nearest Hyundai authorised re- pairer before further operating thevehicle.
WARNING:
In the event of problems being sus- pected with the braking system, the advice of the nearest Hyundai authorised repairer must be soughtbefore the vehicle is driven. Driving the vehicle with either an electrical or hydraulic braking system defectmay be dangerous, resulting in acci- dent or personal injury.
Page 315 of 463

FEATURES OF YOUR HYUNDAI 1- 49
SB210M1-E
CHARGING SYSTEM WARNING LIGHT
The charging system warning light should illuminate when the ignition switch is turned to the "ON" positionand should be extinguished when the engine is started. If the light fails to illuminate when the ignition is turned"ON" or fails to extinguish after starting the engine, the nearest Hyundai authorised repairer should be contacted.If the light illuminates whilst the vehicle is being driven, stop the vehicle as soon as it is safe to do so and check thecondition of the alternator drive belt. If the belt is in place and the tension is satisfactory, the advice of a Hyundaiauthorised repairer should be sought. SB2100I-E
DOOR OPEN (AJAR) WARNING LIGHT
The door ajar warning light indicates that a door is not correctly closed. Ensure that the light is extinguished prior to driving the vehicle.
B260B01FC-EAT
TAIL GATE OPEN WARNING LIGHT
The tail gate warning light indicates when the tail gate is open or is not fully closed. Ensure that the light has extin-guished prior to driving the vehicle.
CAUTION:
If the drive belt (generator belt) is loose, broken, or missing while thevehicle is driving, there may be a serious malfunction, engine could overheat because this belt also drivesthe water pump.!
If failure of one of the circuits occurs, the required amount of pedal effort, pedal travel and stopping distance willbe increased. Use of the gearbox is recommended to assist in bringing the vehicle to rest. The vehicle must not bedriven once brake failure has occurred until the system has been repairered and is functioning normally.The braking system employs a vacuum servo in order that the pedal efforts are reduced. Power for the servo is derivedfrom the engine and therefore, in the event of the engine stopping or the vehicle being towed, pedal efforts willbe substantially increased.
Page 316 of 463

1- 50 FEATURES OF YOUR HYUNDAI
*1) When the ignition key is turned from
"OFF" position to "ON" within 1 minute.
*2) If the vehicle speed exceeds 9km/ h, the seat belt chime also soundsfor approimately 1~2 minutes. If the vehicle speed is below 9km/h,1 minute later the seat belt chime also sounds for about 1~2 minutes.
NOTE: If the driver's seat belt is operated in this order "unbuckled ��
��
� buckled
��
��
�
unbuckled ��
��
� buckled
� �
� �
� unbuck-
led" within 9 seconds after the seatbelt is buckled, the seat belt warning light and chime will not activate.
The seat belt warning light and chime will activate to the following table.
B265E01TB-EAT
SEAT BELT WARNING LIGHT AND CHIME
User (Driver) Condition
Seat Belt WarningLight
Seat Belt Ignition Switch
Unbuckled ON Stay on until buckled up
Buckled O N Come on for 6 seconds
Unbuckled ON * 1
Blink until buckled up
ON Blink until buckled up* 2
Buckled
��
��
�
Unbuckled
SB210P1-E
LOW FUEL LEVEL WARNING LIGHT
The low fuel warning light serves to warn the driver that the remaining fuel quantity is approximately 9 litres and that the vehicle should be refuelled. Ifthe vehicle is driven for an extended period with the low fuel warning light illuminated there exists a possibilitythat misfiring due to fuel shortage may occur. This situation must be avoided to prevent damage to the catalyst oc-curring.
B260N02FC-EAT MALFUNCTION INDICA- TOR LIGHT
This light illuminates when there is a malfunction of an exhaust gas related component, and the system is not func-tioning properly so that the exhaust gas regulation values are not satisfied. This light will illuminate when the ignition keyis tuned to the "ON" position, and will go out after the engine start. If it illumi- nates while driving, or does not illumi-nate when the ignition key is turned to the "ON" position, take your car to your nearest Hyundai authorised repairer andhave the system checked.
Page 317 of 463

FEATURES OF YOUR HYUNDAI 1- 51
B260U01TB-EAT
IMMOBILISER
INDICATOR LIGHT(Not all models)
This indicator light comes on for some seconds after the ignition key is turned to the "ON" position. At this time, youcan start the engine. The light goes out after the engine is running. In case this light goes out before you start the en-gine, you must turn to the "LOCK" position and restart the engine. In case this light blinks for five seconds whenthe ignition key is turned to "ON" posi- tion, this indicates that the immobiliser system is out of order. At this time,consult to the Hyundai authorised re- pairer.B260S01B-GAT DIESEL PRE-HEAT INDICATORLIGHT-AMBER(Diesel Engine)
The indicator light illuminates amber when the ignition switch is placed at the "ON" position. The engine can be started after the pre-heat indicator lightgoes off. The illuminating time varies with the water temperature, air tem- perature and battery condition. NOTE: If the engine were not started 10 seconds after the preheating is com-pleted, turn the ignition key once more to the "LOCK" position, and then to the "ON" position, in orderto preheat again.B265C01LZ-EAT ELECTRONIC STABIL-
ITY PROGRAM INDICA-TOR LIGHTS(NOT ALL MODELS)
The electronic stability program indica- tors change operation according to the ignition switch position and whether the system is in operation or not.They will illuminate when the ignition key is turned to the "ON" position, but should go out after three seconds. If theESP or ESP-OFF indicator stays on, take your car to your Hyundai authorised repairer and have the system checked.See section 2 for more information about the ESP.
Page 350 of 463

1- 84 FEATURES OF YOUR HYUNDAI
HTB033A-D
1
23
4 HTB034
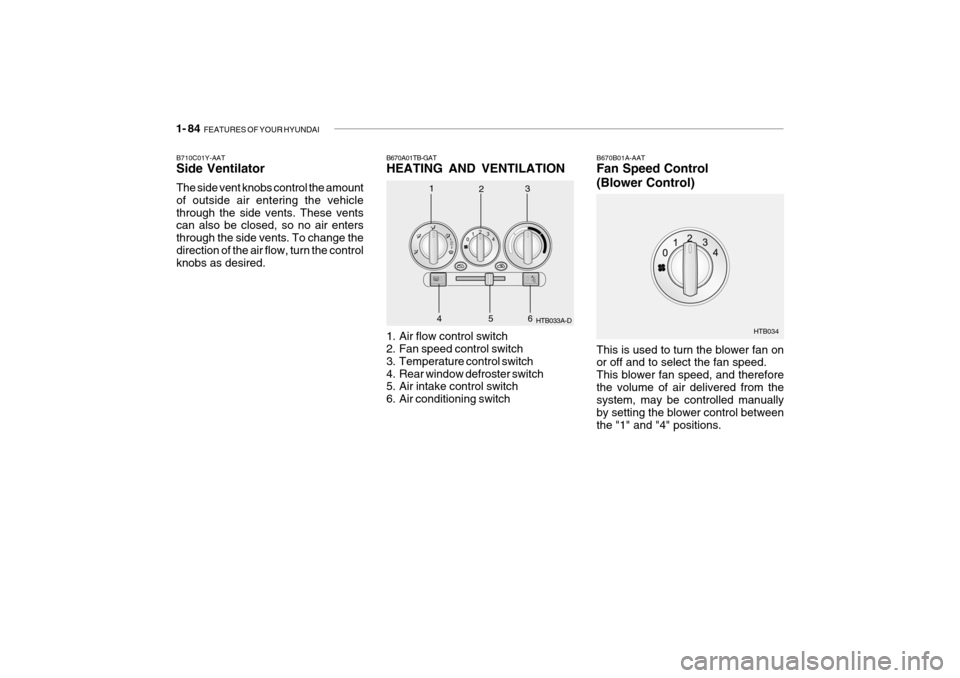
B670A01TB-GAT HEATING AND VENTILATION
1. Air flow control switch
2. Fan speed control switch
3. Temperature control switch
4. Rear window defroster switch
5. Air intake control switch
6. Air conditioning switch B670B01A-AAT Fan Speed Control (Blower Control) This is used to turn the blower fan on or off and to select the fan speed. This blower fan speed, and thereforethe volume of air delivered from the system, may be controlled manually by setting the blower control betweenthe "1" and "4" positions.
B710C01Y-AAT Side Ventilator The side vent knobs control the amount of outside air entering the vehiclethrough the side vents. These vents can also be closed, so no air enters through the side vents. To change thedirection of the air flow, turn the control knobs as desired.
56
Page 354 of 463

1- 88 FEATURES OF YOUR HYUNDAI
B670B01A-AAT BI-LEVEL HEATING Your Hyundai is equipped with bi-level heating controls. This makes it pos-sible to have cooler air from the dash- board vents and warmer air from the floor outlets at the same time. To usethis feature:
o Set the air intake control to the fresh
air ( ) position.
o Set the air flow control at the bi-level ( ) position.
o Set the temperature control between "Cool" and "Warm".
B690A01A-AAT HEATING CONTROLS For normal heating operation, set the air intake control to the fresh air ( )position and the air flow control to the floor ( ) position. For faster heating, the air intake con-trol should be set in the recirculate ( ) position. If the windows fog up, set the air flowcontrol to the defrost ( ) position and the air intake control to the fresh air ( ) position.For maximum heat, move the tem- perature control to "Warm". B720A01TB-EAT DEFROSTING/DEFOGGING
HTB045-D
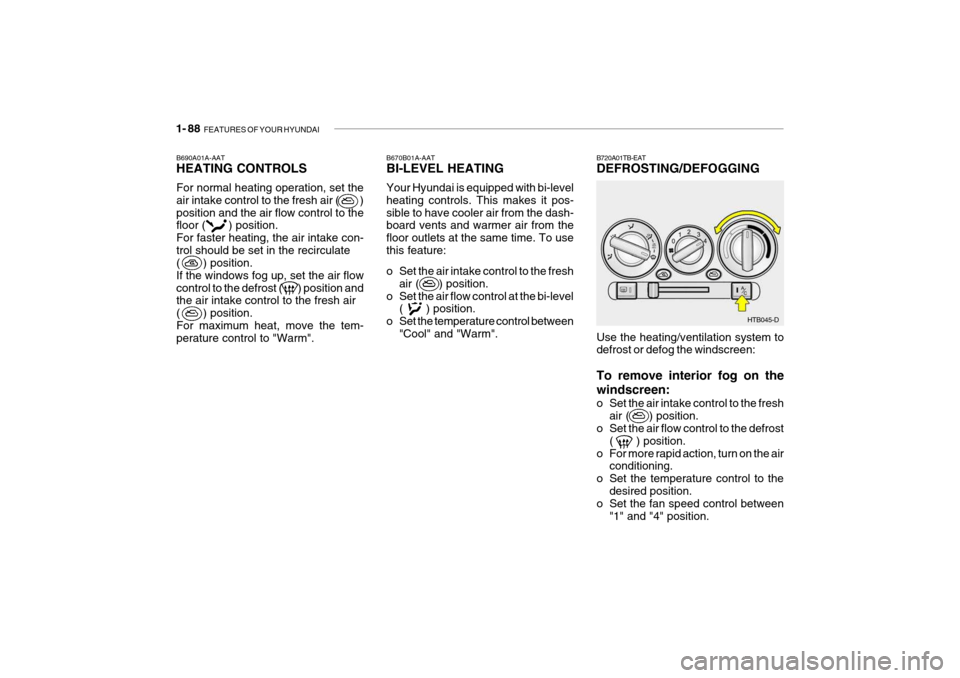
Use the heating/ventilation system to defrost or defog the windscreen: To remove interior fog on the windscreen:
o Set the air intake control to the fresh air ( ) position.
o Set the air flow control to the defrost
( ) position.
o For more rapid action, turn on the air conditioning.
o Set the temperature control to the
desired position.
o Set the fan speed control between
"1" and "4" position.
Page 355 of 463

FEATURES OF YOUR HYUNDAI 1- 89
B740A01A-AAT AIR CONDITIONING SWITCH (Not all models)
B730A01FC-EAT Operation Tips
o To keep dust or unpleasant fumes
from entering the car through the ventilation system, temporarily set the air intake control at "Recircula- tion". Be sure to return the control to"Fresh" when the irritation has passed to keep fresh air in the ve- hicle. This will help keep the driveralert and comfortable.
o Air for the heating/cooling system is
drawn in through the grilles justahead of the windscreen. Care should be taken that these are not blocked by leaves, snow, ice or other ob-structions.
o To prevent interior fog on the
windscreen, set the air intake controlto the fresh air ( ) position and fan speed to the desired position.
To remove the frost or exterior fog on the windscreen:
o Set the air intake control to the fresh
( ) position.
o Set the air flow control to the defrost ( ) position
o Set the temperature control to warm.
o Set the fan speed control to position
"3" or "4".
NOTE: When the A/C is operated continu- ously on the floor-defrost level ( ) or defrost level ( ), it may cause fog to form on the exteriorwindscreen. If this occurs, set the air flow control to the face level posi- tion ( ) and fan speed control tothe low position. The air conditioning is turned on by pushing the A/C button on the heating/ air conditioning control panel.
HTB037-D
Page 356 of 463

1- 90 FEATURES OF YOUR HYUNDAI
B740B02A-AAT AIR CONDITIONING OPERA- TION (Cooling)
B740C01A-AAT De-Humidified Heating
To use the air conditioning to cool the interior:
o Turn on the fan control switch (2).
o Turn on the air conditioning switch(5) by pushing in on the switch.The air conditioning indicator lightshould come on at the same time.
o Set the air intake control to the
position (4).
o Set the temperature control (3) to "Cool". ("Cool" provides maximumcooling. The temperature may bemoderated by moving the control toward "Warm".) HTB046-D
o Adjust the fan control (2) to the de-
sired speed. For greater cooling, turn the fan control to one of the higherspeeds or temporarily select the
position on the air intake control. For dehumidified heating:
o Turn on the fan control switch (2).
o Turn on the air conditioning switch
(5). The air conditioning indicator light should come on at the same time.
o Set the air intake control (4) to the fresh air ( ) position.
o Set the air flow control (1) to the face ( ) position.
o Adjust the fan control (2) to the
desired speed.
o For more rapid action, set the fan at one of the higher speeds.
o Adjust the temperature control (3) to provide the desired amount of warmth.
(1)
(2)
(3)
(4) (5)
HTB046-D
(1)
(2)
(3)
(5)
(4)