2007 Hyundai Accent warning light
[x] Cancel search: warning lightPage 9 of 282

1. Hood Release Lever ............................................ 1-90
2. Front/Rear Fog Light Switch (If Installed) ............ 1-77
3. Headlight Leveling Switch (If Installed) ................ 1-76
4. Instrument Cluster.............................................. 1-66
5. Multi-Function Light Switch................................. 1-72
6. Horn and Driver's Front Airbag (If Installed) 1-98, 1-44
7. Windshield W iper/Washer Switch ........................1-74
8. Hazard Warning Light Switch.............................. 1-76
9. Digital Clock ........................................................ 1-78
10. Rear Window De froster Switch ............................ 1-77
11. Audio System (If Installed) ................................ 1-118
12. Passenger's Front Airbag (If Installed) ................1-44
13. Glov e Box ........................................................... 1-86
CAUTION:
When installing a container of liquid air freshener inside the vehicle, do not place it near the instrument cluster nor on the instrument panel pad surface. If there is any leakage from the air freshener onto these areas (Instrument cluster, instrument panel pad or air ventilator), itmay damage these parts. If the liquid from air freshener does leak onto these areas, wash them with water immediately.
! 14. Heating/Air Conditioning Control Panel
(If Installed) ....................................................... 1-100
15. Multi Box ............................................................ 1-86
16. Cigarette Lighter .................................................. 1-78
17. Seat Warmer Switch (If Installed) ........................ 1-18
18. Electronic Stability Program (ESP) Switch
(If Installed) ......................................................... 2-14
19. Power Outlet ....................................................... 1-79
20. Ashtray ............................................................... 1-80
21. Shift Lever ........................................................... 2-9
22. Parking Brake Lever ........................................... 1-89
23. Front Drink Holder ............................................... 1-80
24. Trunk Lid Release Lever .....................................1-94
25. Fuel Filler Lid Release Lever ...............................1-92
Page 11 of 282

CAUTION:
When installing a container of liquid air freshener inside the vehicle, do not place it near the instrument cluster nor on the instrument panel pad surface. If there is any leakage from the air freshener onto these areas (Instrument cluster, instrument panel pad or air ventilator), it may damage these parts. If the liquid from air freshener does leak onto these areas, wash themwith water immediately.!
1. Hood
Release Lever ............................................ 1-90
2. Front/Rear Fog Light Switch (If Installed) ............ 1-77
3. Headlight Leveling Switch (If Installed) ................ 1-76
4. Instrument Cluster.............................................. 1-66
5. Multi-Function Light Switch................................. 1-72
6. Horn and Driver's Front Airbag (If Installed) . 1-98,1-44
7. Windshield W iper/Washer Switch ........................1-74
8. Hazard Warning Light Switch.............................. 1-76
9. Digital Clock ........................................................ 1-78
10. Rear Window De froster Switch ............................ 1-77
11. Audio System (If Installed) ................................ 1-118
12. Passenger's Front Airbag (If Installed) ................1-44
13. Glov e Box ........................................................... 1-8614. Heating/Air Conditioning Control Panel
(If Installed) ....................................................... 1-100
15. Multi Box ............................................................ 1-86
16. Cigarette Lighter .................................................. 1-78
17. Seat Warmer Switch (If Installed) ........................ 1-18
18. Electronic Stability Program (ESP) Switch (If Installed) ......................................................... 2-14
19. Power Outlet ....................................................... 1-79
20. Ashtray ............................................................... 1-80
21. Shift Lever ........................................................... 2-9
22. Parking Brake Lever ........................................... 1-89
23. Front Drink Holder ............................................... 1-80
24. Trunk Lid Release Lever .....................................1-94
25. Fuel Filler Lid Release Lever ...............................1-92
Page 12 of 282

YOUR VEHICLE AT A GLANCE
B255A02MC-GAT INDICATOR SYMBOLS ON THE INSTRUMENT PANEL * More detailed explanations of these items will be found begining on page 1-58.Turn Signal Indicator Lights
SRS (Airbag) Service Reminder Indicator (If Installed) O/D OFF Indicator Light (Automatic transaxle only) High Beam Indicator Light
Low Oil Pressure Warning Light
ABS Service Reminder Indicator (If Installed)
Door Ajar Warning Light
Parking Brake/Low Brake Fluid Level Warning Light
Charging System Warning Light Fuel Filter Warning Light (Diesel only)
Low Fuel Level Warning Light Diesel Pre-heat Indicator Light (Diesel only)
Malfunction Indicator Light (If Installed)
Immobilizer Warning Light (If Installed)
Passenger's Front Airbag OFF Indicator Light (If Installed)
Trunk Lid/Tail Gate Open Warning Light
Engine Coolant Temperature Indicator Light (If Installed) Seat Belt Warning Light
Electronic Power Steering (EPS) System Warning Light (If Installed)
Electronic Stability Program Indicator Lights (If Installed)
120
km/hOverspeed Warning Light (If Installed)
Page 13 of 282

Fuel Recommendations ................................................ 1-2
Breaking In Your New Hyundai .................................... 1-3
Keys ............................................................................. 1-4
Immobilizer System ...................................................... 1-5
Door Locks ................................................................... 1-7
Theft-Alarm System ...................................................... 1-9Window Glass ............................................................. 1-12
Seats ........................................................................... 1-14
Seat Belt ...................................................................... 1-24
Child Restraint System ................................................ 1-32
Supplemental Restraint (Airbag) System.................... 1-43
Instrument Cluster and Indicator Lights .......................1-54
Warning and Indicator Lights....................................... 1-58
Trip Computer .............................................................. 1-69
Multi-function Light Switch ........................................... 1-72
Windshield Wiper/Washer Switch ................................1-74
Sunroof ........................................................................ 1-81
Mirror ........................................................................... 1-87
Hood R elease .............................................................. 1-90
Heating and Cooling Control .......... ..............................1-99
Stereo Sound System ............................................... 1-116
Audio System ............................................................ 1-118
Antenna ..................................................................... 1-151
FEATURES OF YOUR HYUNDAI
1
1
Page 24 of 282

1FEATURES OF YOUR HYUNDAI
12
!
WINDOW GLASS
B050A01A-AAT
To raise or lower the window, turn the window regulator handle clockwise or counterclockwise. WARNING:
When opening or closing the win- dows, make sure your passenger'sarms, hands and body are safely out of the way.
3FDA2015
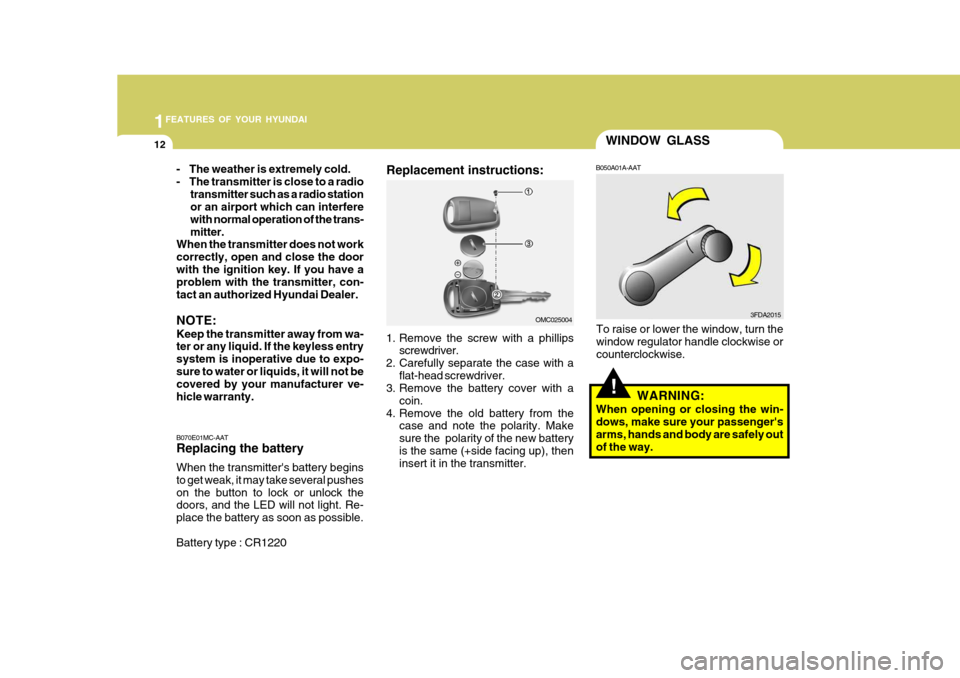
B070E01MC-AAT Replacing the battery When the transmitter's battery begins to get weak, it may take several pusheson the button to lock or unlock the doors, and the LED will not light. Re- place the battery as soon as possible. Battery type : CR1220 1. Remove the screw with a phillips
screwdriver.
2. Carefully separate the case with a flat-head screwdriver.
3. Remove the battery cover with a
coin.
4. Remove the old battery from the case and note the polarity. Make sure the polarity of the new batteryis the same (+side facing up), then insert it in the transmitter. OMC025004
- The weather is extremely cold.
- The transmitter is close to a radio
transmitter such as a radio station or an airport which can interfere with normal operation of the trans-mitter.
When the transmitter does not workcorrectly, open and close the doorwith the ignition key. If you have a problem with the transmitter, con- tact an authorized Hyundai Dealer. NOTE: Keep the transmitter away from wa- ter or any liquid. If the keyless entry system is inoperative due to expo-sure to water or liquids, it will not be covered by your manufacturer ve- hicle warranty. Replacement instructions:
Page 39 of 282

1
FEATURES OF YOUR HYUNDAI
27
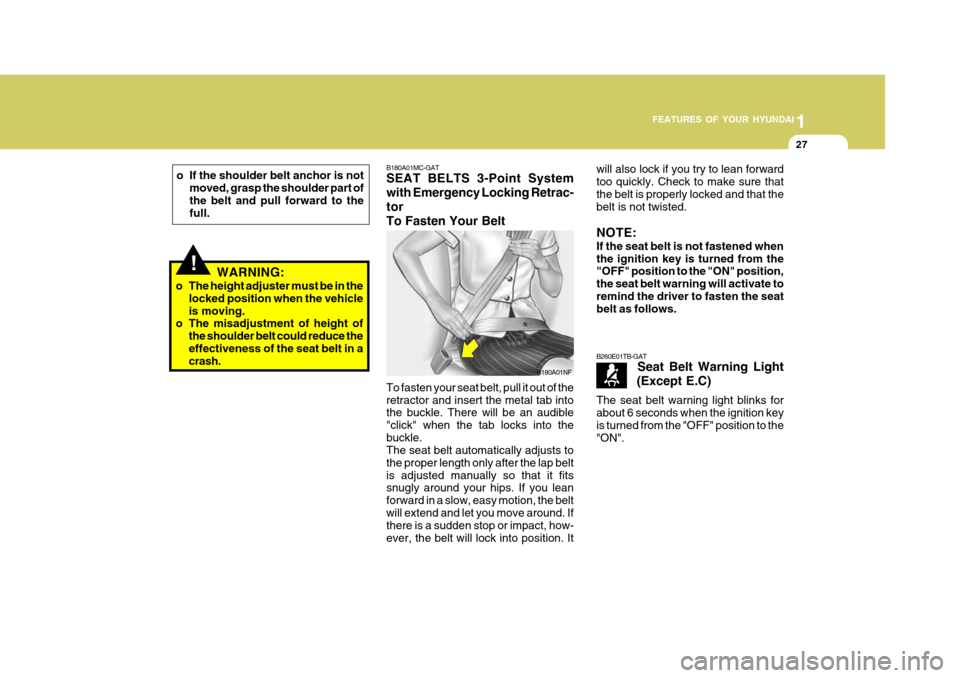
B180A01MC-GAT SEAT BELTS 3-Point System with Emergency Locking Retrac-torTo Fasten Your Belt To fasten your seat belt, pull it out of the retractor and insert the metal tab into the buckle. There will be an audible "click" when the tab locks into thebuckle. The seat belt automatically adjusts to the proper length only after the lap beltis adjusted manually so that it fits snugly around your hips. If you lean forward in a slow, easy motion, the beltwill extend and let you move around. If there is a sudden stop or impact, how- ever, the belt will lock into position. It
B180A01NF will also lock if you try to lean forward too quickly. Check to make sure thatthe belt is properly locked and that the belt is not twisted. NOTE: If the seat belt is not fastened when the ignition key is turned from the "OFF" position to the "ON" position, the seat belt warning will activate toremind the driver to fasten the seat belt as follows. B260E01TB-GAT
Seat Belt Warning Light
(Except E.C)
The seat belt warning light blinks for about 6 seconds when the ignition key is turned from the "OFF" position to the "ON".
!WARNING:
o The height adjuster must be in the locked position when the vehicle is moving.
o The misadjustment of height of
the shoulder belt could reduce theeffectiveness of the seat belt in a crash.
o If the shoulder belt anchor is not
moved, grasp the shoulder part of the belt and pull forward to the full.
Page 40 of 282

1FEATURES OF YOUR HYUNDAI
28
*1) When the ignition key is turned from"OFF" position to "ON" within 1 minute.
*2) The switch returns to "ON" when you let go of the key.
*3) If the vehicle speed exceeds 9km/
h, the seat belt chime also sounds for about 1~2 minutes. If the vehicle speed is below 9km/h, 1 minute later the seat belt chimealso sounds for about 1~2 minutes.
NOTE: If the driver's seat belt is operated in this order "unbuckled ��
��
� buckled
��
��
�
unbuckled" within 9 seconds after the seat belt is buckled, the seat belt warning light and chime will notactivate.
The seat belt warning light and chimewill activate to the following table.
B265E01MC-GAT
Seat Belt Warning Light
and Chime (E.C only)
User (Driver) Condition
Seat Belt WarningLight
Seat Belt Ignition Switch
Unbuckled ON Stay on until buckled up
Buckled ON Come on for 6 seconds
Unbuckled ON * 1
Blink until buckled up
START * 2
Blink until buckled up* 3
Buckled
��
��
�
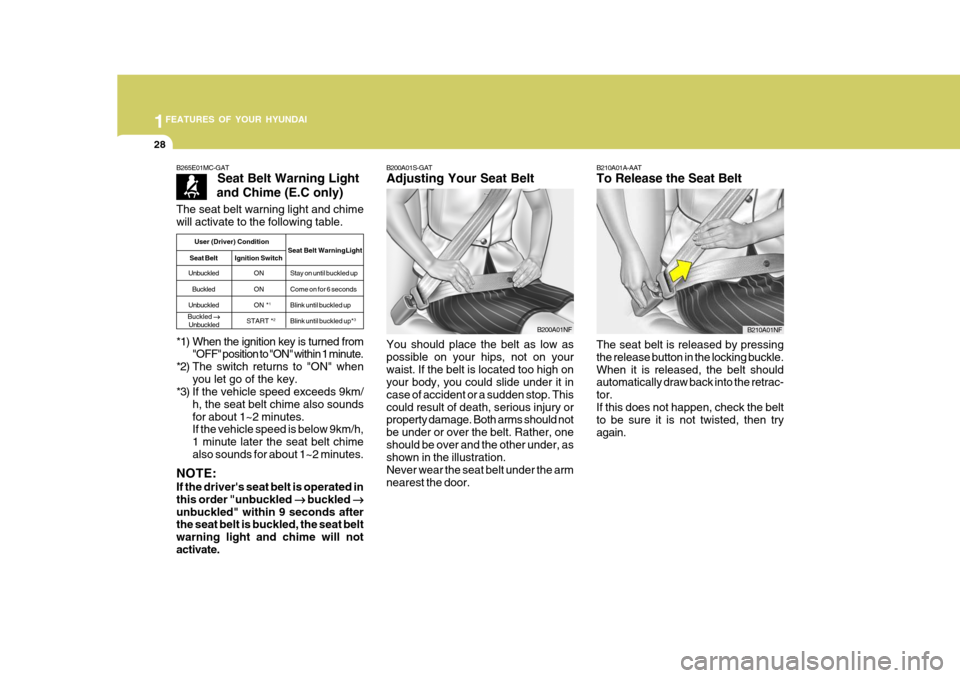
Unbuckled B200A01S-GAT Adjusting Your Seat Belt You should place the belt as low as possible on your hips, not on yourwaist. If the belt is located too high on your body, you could slide under it in case of accident or a sudden stop. Thiscould result of death, serious injury or property damage. Both arms should not be under or over the belt. Rather, oneshould be over and the other under, as shown in the illustration. Never wear the seat belt under the armnearest the door.
B200A01NFB210A01A-AAT To Release the Seat Belt
The seat belt is released by pressing the release button in the locking buckle.When it is released, the belt should automatically draw back into the retrac- tor.If this does not happen, check the belt to be sure it is not twisted, then try again.B210A01NF
Page 52 of 282

1FEATURES OF YOUR HYUNDAI
40
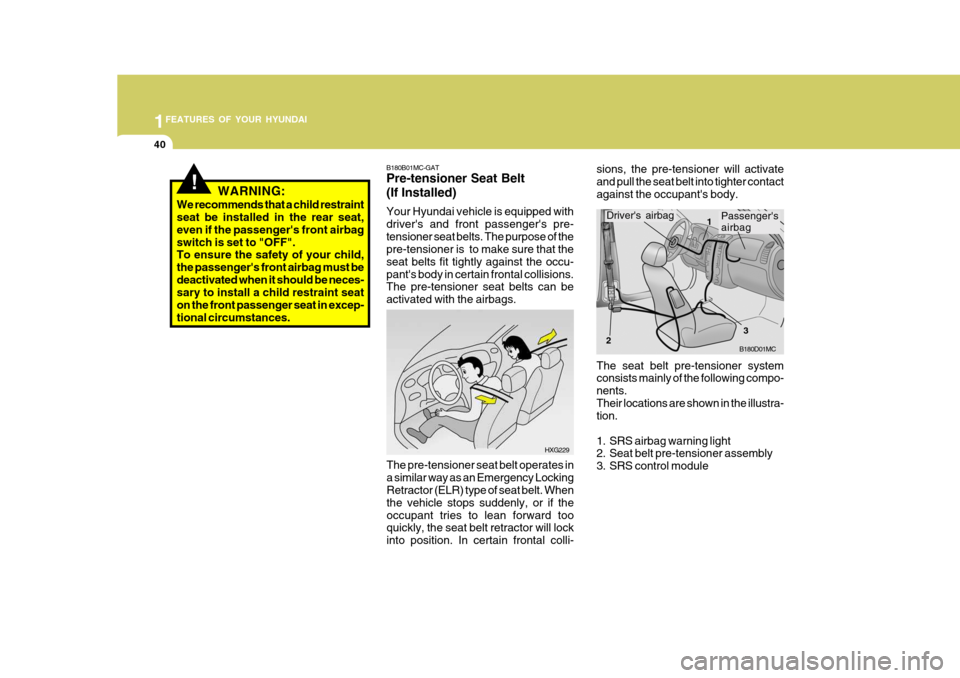
The seat belt pre-tensioner system consists mainly of the following compo- nents.Their locations are shown in the illustra- tion.
1. SRS airbag warning light
2. Seat belt pre-tensioner assembly
3. SRS control module
Passenger's airbag
B180D01MC
Driver's airbag1
2 3
sions, the pre-tensioner will activate and pull the seat belt into tighter contactagainst the occupant's body.
HXG229
B180B01MC-GAT Pre-tensioner Seat Belt (If Installed) Your Hyundai vehicle is equipped with driver's and front passenger's pre-tensioner seat belts. The purpose of the pre-tensioner is to make sure that the seat belts fit tightly against the occu-pant's body in certain frontal collisions. The pre-tensioner seat belts can be activated with the airbags.
The pre-tensioner seat belt operates ina similar way as an Emergency Locking Retractor (ELR) type of seat belt. When the vehicle stops suddenly, or if theoccupant tries to lean forward too quickly, the seat belt retractor will lock into position. In certain frontal colli-
!WARNING:
We recommends that a child restraint seat be installed in the rear seat, even if the passenger's front airbagswitch is set to "OFF". To ensure the safety of your child, the passenger's front airbag must bedeactivated when it should be neces- sary to install a child restraint seat on the front passenger seat in excep-tional circumstances.