2007 Hyundai Accent Repair my engine
[x] Cancel search: Repair my enginePage 214 of 282

5VEHICLE MAINTENANCE REQUIREMENTS
2MAINTENANCE INTERVALS
F010C01A-GAT
Specified Scheduled Procedures
These are the procedures such as
inspections, adjustments and replace- ments that are listed in the mainte-nance charts starting on page 5-4. These procedures must be performed at the intervals shown in the mainte-nance schedule to assure that your warranty remains in effect. Although it is strongly recommended that they beperformed by the factory-trained or distributor-trained technicians at your Hyundai dealer, these procedures maybe performed at any qualified service facility. F010D01A-GAT
General Checks
These are the regular checks you should perform when you drive your Hyundai or you fill the fuel tank. A list of these items will be found on page6-5.
F010A01A-GAT Service Requirements To assure that you receive the great- est number of kilometers of satisfying operation from your Hyundai, certain maintenance procedures must beperformed. Although careful design and engineering have reduced these to a minimum, those that are requiredare of the utmost importance.It is your responsibility to have thesemaintenance procedures performed to comply with the terms of the war- ranties covering your new Hyundai.The Service Passport supplied with your new vehicle provides further in- formation about these warranties.
F010B01A-AAT
Maintenance Requirements
The maintenance required for your
Hyundai can be divided into three main areas:
o Specified scheduled procedures
o General checks
o Do-it-yourself maintenance It is suggested that genuine Hyundai
service parts be used for any requiredrepairs or replacements. Other parts of equivalent quality such as engine oil, engine coolant, manual or autotransaxle oil, brake fluid and so on which are not supplied by Hyundai Motor Company or its distributor maybe used without affecting your war- ranty coverage but you should always be sure these are equivalent to thequality of the original Hyundai parts. Your Service Passport provides fur- ther information about your warrantycoverage.
Page 216 of 282

5VEHICLE MAINTENANCE REQUIREMENTS
4SCHEDULED MAINTENANCE
F030A01A-GAT The following maintenance services must be performed to assure good vehicle control and performance. Keep receipts for
all vehicle services to protect your warranty. Where both mileage and time are shown, the frequency of service is determined by whichever occurs first.
F030B02MC-GAT R : Replace I : Inspect and, after inspection, clean, adjust, repair or replace if necessary
ENGINE CONTROL SYSTEM MAINTENANCE (GASOLINE)
1 ENGINE OIL & FILTER
2 DRIVE BELT (WATER PUMP, ALTERNATOR & A/CON)
3 FUEL FILTER (MPI TYPE)
4 FUEL LINES, FUEL HOSES & CONNECTIONS
5 TIMING BELT
6 VAPOR HOSE & FUEL FILLER CAP
7 VACUUM HOSE
8 CRANKCASE VENTILATION HOSE
9 AIR CLEANER FILTER
10 FUEL TANK AIR FILTER
11 SPARK PLUGS
NO. DESCRIPTION105
84
R I I I I I 120
96
RR R I I I I I
90 72
R I I
R I I I
RR
75 60
R I I I I I
60 48
R R R II I I I I
45 36
R I I I I
RR
30 24
R I II I I I
15 12
R I I I I I
KILOMETERS X 1000 MONTHS
Note : (1) EVERY 40,000 KM : "R"
See Note (1)
Page 217 of 282

5
VEHICLE MAINTENANCE REQUIREMENTS
5
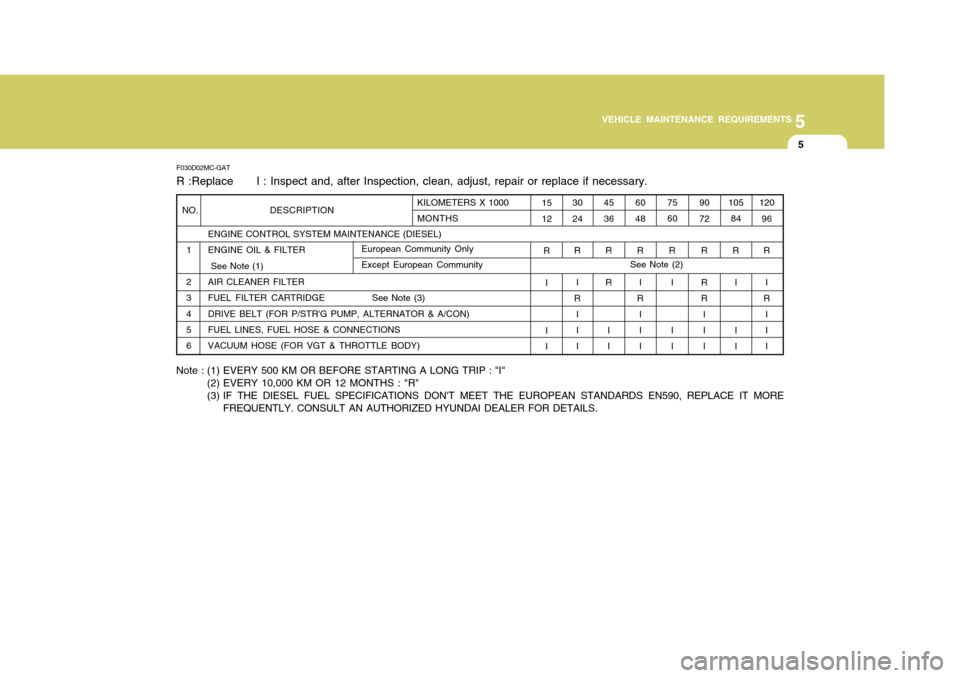
F030D02MC-GAT R :Replace I : Inspect and, after Inspection, clean, adjust, repair or replace if necessary.
ENGINE CONTROL SYSTEM MAINTENANCE (DIESEL) ENGINE OIL & FILTER See Note (1) AIR CLEANER FILTER
FUEL FILTER CARTRIDGE See Note (3)DRIVE BELT (FOR P/STR'G PUMP, ALTERNATOR & A/CON) FUEL LINES, FUEL HOSE & CONNECTIONS VACUUM HOSE (FOR VGT & THROTTLE BODY)
NO. DESCRIPTION
1 2 34 5 6 120
96
R
I
R
II I105 84
R I I I90 72R R R I I I75 60
R I I I60 48R
I
R
II I45 36
R R
I I30 24R
I
R
II I
1512
R I I IKILOMETERS X 1000 MONTHS
Note : (1) EVERY 500 KM OR BEFORE STARTING A LONG TRIP : "I" (2) EVERY 10,000 KM OR 12 MONTHS : "R"
(3) IF THE DIESEL FUEL SPECIFICATIONS DON'T MEET THE EUROPEAN STANDARDS EN590, REPLACE IT MOREFREQUENTLY. CONSULT AN AUTHORIZED HYUNDAI DEALER FOR DETAILS.
European Community Only Except European Community See Note (2)
Page 219 of 282

5
VEHICLE MAINTENANCE REQUIREMENTS
7
ENGINE OIL AND FILTER (
GASOLINE)
ENGINE OIL AND FILTER (DIESEL) AIR CLEANER FILTER SPARK PLUGS
TIMING BELT (GASOLINE)
BRAKE PADS, CALIPERS AND ROTORSREAR BRAKE DRUMS/LININGS, PARKING BRAKE
STEERING GEAR BOX, LINKAGE & BOOTS/ LOWER ARM BALL JOINT
DRIVE SHAFTS AND BOOTS MANUAL TRANSAXLE OIL AUTOMATIC TRANSAXLEFLUID CLIMATE CONTROL AIR FILTER R R R RR
II I I
RR R
European Community Only Except European Community
MAINTENANCE ITEM
EVERY 7,500 KM OR 6 MONTHS EVERY 7,500 KM OR 6 MONTHSEVERY 5,000 KM OR 6 MONTHS MORE FREQUENTLY MORE FREQUENTLYEVERY 60,000 KM OR 48 MONTHS MORE FREQUENTLY MORE FREQUENTLY MORE FREQUENTLY EVERY 15,000 KM OR 12 MONTHS EVERY 100,000 KM EVERY 45,000 KMEVERY 40,000 KM MORE FREQUENTLY A, B, C, D, E, F, G, H, I, K A, B, C, D, E, F, G, H, I, K C, E B, HB, D, E, F, G C, D, G, H C, D, G, H C, D, E, F C, D, E, F A, C, D, E, F, G, H, I, J A, C, E, F, G, H, I C, E
MAINTENANCE INTERVALS
DRIVING
CONDITION
MAINTENANCE
OPERATION
MAINTENANCE UNDER SEVERE USAGE CONDITIONS
F040A02MC-GAT The following items must be serviced more frequently on cars normally used under severe driving conditions. Refer to the
chart below for the appropriate maintenance intervals.
R : Replace I : Inspect and, after inspection, clean, adjust, repair or replace if necessary
European Community Only Except European Community
SEVERE DRIVING CONDITIONSA - Repeatedly driving short distance of less than 8km(5miles) in normal temperature or less than 16km(10miles) in freezing temperature
B - Extensive engine idling or low speed driving for long distances
C - Driving on rough, dusty, muddy, unpaved, graveled or salt- spread roads
D - Driving in areas using salt or other corrosive materials or in very cold weather E - Driving in sandy areas
F - Driving in heavy traffic area over 32°C(90°F) G - Driving on uphill, downhill, or mountain road H - Towing a Trailer, or using a camper, or roof rack
I - Driving as a patrol car, taxi, other commercial use or vehicle towing
J - Driving over 170 Km/h(100 MPH)K - Frequently driving in stop-and-go conditions
Page 241 of 282

6 DO-IT-YOURSELF MAINTENANCE
18
G140B01A-AAT Checking the Air Conditioning Operation
1. Start the engine and let it run at afast idle for several minutes with the air conditioning set at the maximum cold setting.
2. If the air coming out of the in-dash vents is not cold, have the air condi-tioning system inspected by yourHyundai dealer.
G140C01A-AAT Lubrication To lubricate the compressor and the seals in the system, the air conditioning should be run for at least 10 minuteseach week. This is particularly important during cool weather when the air condi- tioning system is not otherwise in use.
! CAUTION:
Running the air conditioning sys- tem for extended periods of time with a low refrigerant level may damage the compressor.
AIR CONDITIONING CARE
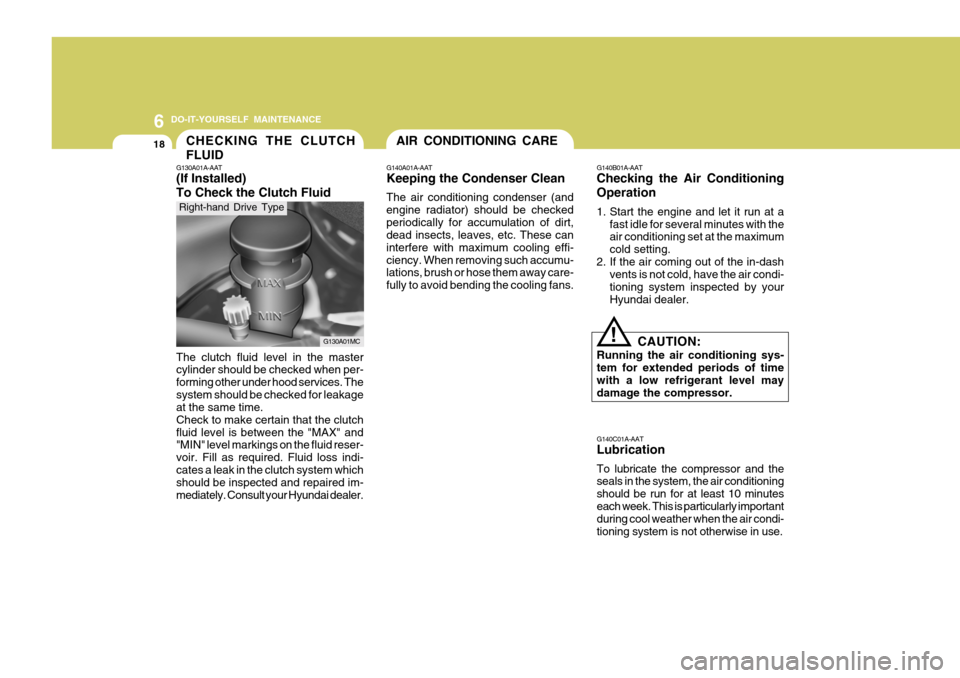
G140A01A-AAT Keeping the Condenser Clean The air conditioning condenser (and engine radiator) should be checkedperiodically for accumulation of dirt, dead insects, leaves, etc. These can interfere with maximum cooling effi-ciency. When removing such accumu- lations, brush or hose them away care- fully to avoid bending the cooling fans.CHECKING THE CLUTCH FLUID
G130A01A-AAT (If Installed) To Check the Clutch Fluid The clutch fluid level in the master cylinder should be checked when per- forming other under hood services. Thesystem should be checked for leakage at the same time. Check to make certain that the clutchfluid level is between the "MAX" and "MIN" level markings on the fluid reser- voir. Fill as required. Fluid loss indi-cates a leak in the clutch system which should be inspected and repaired im- mediately. Consult your Hyundai dealer.
G130A01MC
Right-hand Drive Type
Page 244 of 282

6
DO-IT-YOURSELF MAINTENANCE
21
4. Replace the blown fuse by pressing
a new fuse of the same rating into place. The fuse should be a snug fit. If it is not, have the fuse clip repaired or replaced by a Hyundai dealer.
1. Turn off the ignition and all other
switches.
2. Open the fuse box and examine each fuse. Remove each fuse bypulling it toward you (a small "fusepuller" tool is contained in the relay and fuse box of the engine room to simplify this operation).
3. Be sure to check all other fuses even if you find one that appears tohave burned out.
G200B02MC
If you do not have a spare fuse, you may be able to borrow a fuse of the same or lower rating from an acces- sory you can temporarily get alongwithout (the radio or cigarette lighter, for example). Always remember to replace the borrowed fuse.
G200B02L
Good B
urned out CAUTION:
A burned-out fuse indicates that there is a problem in the electrical circuit. If you replace a fuse and itblows as soon as the accessory is turned on, the problem is serious and should be referred to a Hyun-dai dealer for diagnosis and repair. Never replace a fuse with anything except a fuse with the same or alower amperage rating. A higher capacity fuse could cause damage and create a fire hazard. NOTE: See page 6-35 for the fuse panel descriptions.
!
Page 249 of 282

6 DO-IT-YOURSELF MAINTENANCE
26HEADLIGHT AIMING ADJUSTMENT
5. Open the hood.
6. Draw the vertical line (through the
center of each headlight beam pat-tern) and the horizontal line (throughthe center of each headlight beam pattern) on the aiming screen. And then, draw a horizontal parallel line at 30 mm (1.18 in.) under the horizontal line.
7. Adjust each cut-off line of the low beam to the parallel line with a phillipsscrewdriver - VERTICAL AIMING.
8. Adjust each cut-off line of the low
beam to each vertical line with aphillips screwdriver - HORIZONTAL AIMING. Horizontal aiming
Vertical aiming
If the vehicle has had front body repair and the headlight assembly has beenreplaced, an headlight aiming should be checked using an aiming screen as shown in the illustration. Turn on theheadlight switch. (Low Beam Position)
1. Adjust headlights so that main axisof light is parallel to center line of the body and is aligned with point "P" shown in the illustration.
2. Dotted lines in the illustration show the center of headlights.
G290B01MC-GAT Adjustment After Headlight As- sembly Replacement
G290A03A-GAT Before performing aiming adjustment, make sure of the following.
1. Keep all tires inflated to the correct
pressure.
2. Place the vehicle on level ground
and press the front bumper and rear bumper down several times. Place the vehicle at a distance of 3,000 mm (118 in.) from the test wall.
3. See that the vehicle is unloaded (except for full levels of coolant,engine oil and fuel, and spare tire,jack, and tools). Have the driver or equivalent weight placed in driver's seat.
4. Clean the head lights lenses and turn on the headlight (low beam). G290B01B
LW
H
H Cut-off line
Ground line
"P"
Horizontal line
Vertical line30 mm
G290A03MC