2007 Hyundai Accent wheel
[x] Cancel search: wheelPage 182 of 282

2
DRIVING YOUR HYUNDAI
19
2
DRIVING YOUR HYUNDAI
19
o Don't "lug" or "over-rev" the engine. Lugging is driving too slowly in too high a gear resulting in the engine bucking. If this happens, shift to a lower gear. Over-revving is racingthe engine beyond its safe limit. This can be avoided by shifting at the recommended speeds.
o Use your air conditioning sparingly. The air conditioning system is oper-ated by engine power so your fueleconomy is reduced when you use it.
more frequent maintenance is re- quired (see Section 5 for details).
o Keep your car clean. For maximum service, your Hyundai should bekept clean and free of corrosivematerials. It is especially important that mud, dirt, ice, etc. not be al- lowed to accumulate on the under-side of the car. This extra weight can result in increased fuel con- sumption and also contribute to cor-rosion.
o Travel lightly. Don't carry unneces-
sary weight in your car. Weight re-duces fuel economy.
o Don't let the engine idle longer than
necessary. If you are waiting (andnot in traffic), turn off your engine and restart only when you're ready to go.
o Remember, your Hyundai does not require extended warm-up. As soonas the engine is running smoothly,you can drive away. In very cold weather, however, give your engine a slightly longer warm-up period.
o Don't "ride" the brake or clutch pedal.
This can increase fuel consumptionand also increase wear on these components. In addition, driving with your foot resting on the brake pedalmay cause the brakes to overheat, which reduces their effectiveness and may lead to more serious con-sequences.
o Take care of your tires. Keep them
inflated to the recommended pres-sure. Incorrect inflation, either too much or too little, results in unnec- essary tire wear. Check the tire pres-sures at least once a month.
o Be sure that the wheels are aligned
correctly. Improper alignment canresult from hitting curbs or driving too fast over irregular surfaces. Poor alignment causes faster tire wearand may also result in other prob- lems as well as greater fuel con- sumption.
o Keep your car in good condition. For better fuel economy and reducedmaintenance costs, maintain yourcar in accordance with the mainte- nance schedule in Section 5. If you drive your car in severe conditions,
Page 184 of 282

2
DRIVING YOUR HYUNDAI
21
2
DRIVING YOUR HYUNDAI
21
C160H01A-AAT Use Approved Anti-Freeze in Window Washer System To keep the water in the window washer system from freezing, add an approvedanti-freeze solution in accordance with instructions on the container. Window washer anti-freeze is available fromHyundai dealers and most auto parts outlets. Do not use engine coolant or other types of anti-freeze as thesemay damage the finish. C160I01A-AAT Don't Let Your Parking Brake Freeze Under some conditions your parking brake can freeze in the engaged posi- tion. This is most likely to happen when there is an accumulation of snowor ice around or near the rear brakes or if the brakes are wet. If there is a risk the parking brake may freeze, apply itonly temporarily while you put the gear selector lever in "P" (automatic) or in first or reverse gear (manual transaxle)and block the rear wheels so the car cannot roll. Then release the parking brake.
C160G01A-GAT To Keep Locks from Freezing To keep the locks from freezing, squirt an approved de-icer fluid or glycerine into the key opening. If a lock is cov- ered with ice, squirt it with an approvedde-icing fluid to remove the ice. If the lock is frozen internally, you may be able to thaw it out by using a heatedkey. Handle the heated key with care to avoid injury. NOTE: The proper temperature for using the immobilizer key is from -40°C (-40°F) to 80°C(176°F). If you heat the immobilizer key over 80°C(176°F) to open the frozen lock, it may cause damage to the transpon- der in its head.
C160F01A-AAT Check Spark Plugs and Ignition System Inspect your spark plugs as described in Section 6 and replace them if neces-sary. Also check all ignition wiring and components to be sure they are not cracked, worn or damaged in any way.
C160D01A-AAT Check Battery and Cables Winter puts additional burdens on the battery system. Visually inspect thebattery and cables as described in Section 6. The level of charge in your battery can be checked by your Hyun-dai dealer or a service station. C160E01A-AAT Change to "Winter Weight" Oil if Necessary In some climates it is recommended that a lower viscosity "winter weight"oil be used during cold weather. See Section 9 for recommendations. If you aren't sure what weight oil you shoulduse, consult your Hyundai dealer.
Page 185 of 282

2 DRIVING YOUR HYUNDAI
22HIGHER SPEED MOTORING
C160K01A-AAT Carry Emergency Equipment Depending on the severity of the weather where you drive your car, you should carry appropriate emergencyequipment. Some of the items you may want to carry include tire chains, tow straps or chains, flashlight, emer-gency flares, sand, a shovel, jumper cables, a window scraper, gloves, ground cloth, coveralls, a blanket, etc.
C160J01A-AAT Don't Let Ice and Snow Accumu- late Underneath Under some conditions, snow and ice can build up under the fenders andinterfere with the steering. When driv- ing in severe winter conditions where this may happen, you should periodi-cally check underneath the car to be sure the movement of the front wheels and the steering components is notobstructed.
C170A01A-AAT Pre-Trip Inspections 1. Tires: Adjust the tire inflation pressures to specification. Low tire inflation pres-sures will result in overheating and possible failure of the tires. Avoid using worn or damaged tireswhich may result in reduced traction or tire failure. NOTE: Never exceed the maximum tire in- flation pressure shown on the tires.
2. Fuel, engine coolant and
engine oil:
High speed travel consumes more fuel than urban motoring. Do not forget tocheck both engine coolant and engine oil. 3. Drive belt: A loose or damaged drive belt may result in overheating of the engine.USE OF LIGHTS
C180A01A-AAT Check your lights regularly for correct operation and always keep them clean. When driving during the day in condi- tions of poor visibility, it is helpful todrive with headlights on low beam. This enables you to be seen as well as to see.
Page 189 of 282

2 DRIVING YOUR HYUNDAI
26
13. Avoid holding the brake pedal downtoo long or too frequently. This could cause the brakes to over- heat, resulting in reduced braking efficiency.
14. When going down a hill, shift into a lower gear and use the engine brak-ing effect.When ascending a long grade, downshift the transaxle to a lower gear and reduce speed to reducechances of engine overloading and/ or overheating.
15. If you have to stop while going uphill, do not hold the vehicle inplace by pressing on the accelera- tor. This can cause the automatictransaxle to overheat. Use the park- ing brake or footbrake.
NOTE: When towing check transaxle fluid more frequently.
When being passed by a large ve-hicle, keep a constant speed andsteer straight ahead. If there is too much wind buffeting, slow down to get out of the other vehicle's airturbulence.
8. When parking your car and trailer,
especially on a hill, be sure to fol-low all the normal precautions. Turn your front wheel into the curb, set the parking brake firmly, and putthe transaxle in 1st or Reverse (manual) or Park (automatic). In addition, place wheel chocks ateach of the trailer's tires.
9. If the trailer has electric brakes,
start your vehicle and trailer mov-ing, and then apply the trailer brake controller by hand to be sure the brakes are working. This lets youcheck your electrical connection at the same time.
10. During your trip, check occasion- ally to be sure that the load issecure, and that the lights and any trailer brakes are still working.
11. Avoid jerky starts, sudden accel- eration or sudden stops.
12. Avoid sharp turns and rapid lane changes. CAUTION:
If overheating should occur whentowing, (temperature gauge readsnear red zone), taking the following action may reduce or eliminate the problem.
!
1. Turn off the air conditioner.
2. Reduce highway speed.
3. Select a lower gear when going uphill.
4. While in stop and go traffic, place the gear selector in park or neu- tral and idle the engine at a higherspeed.
Page 196 of 282

3
WHAT TO DO IN AN EMERGENCY
7
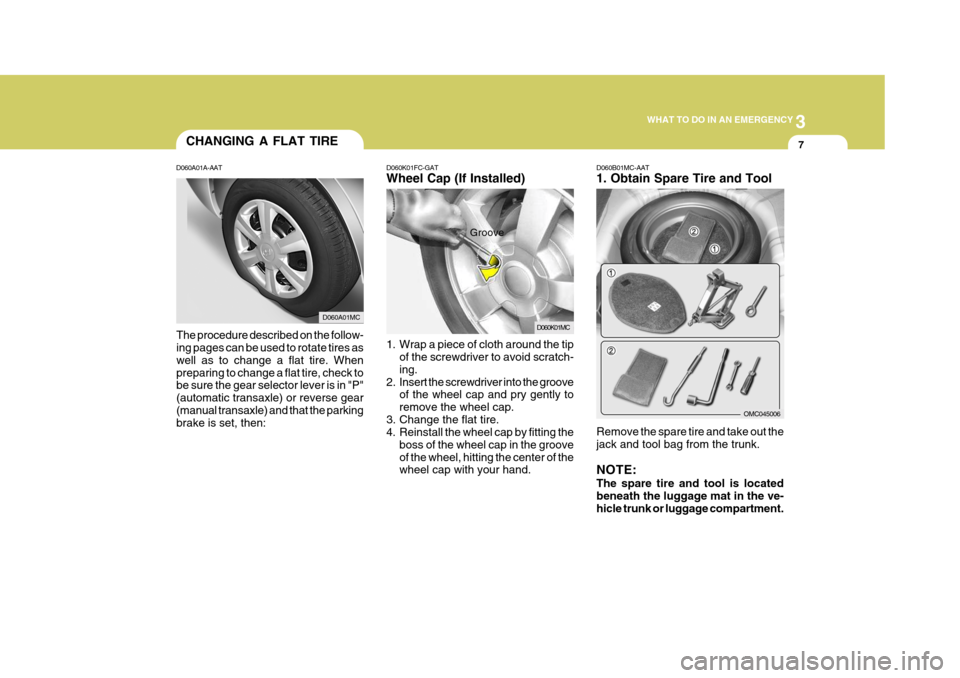
D060K01FC-GAT Wheel Cap (If Installed)
1. Wrap a piece of cloth around the tip
of the screwdriver to avoid scratch- ing.
2. Insert the screwdriver into the groove of the wheel cap and pry gently toremove the wheel cap.
3. Change the flat tire.
4. Reinstall the wheel cap by fitting the boss of the wheel cap in the groove of the wheel, hitting the center of the wheel cap with your hand.
D060A01A-AAT
The procedure described on the follow-ing pages can be used to rotate tires as well as to change a flat tire. Whenpreparing to change a flat tire, check to be sure the gear selector lever is in "P" (automatic transaxle) or reverse gear(manual transaxle) and that the parking brake is set, then: Groove
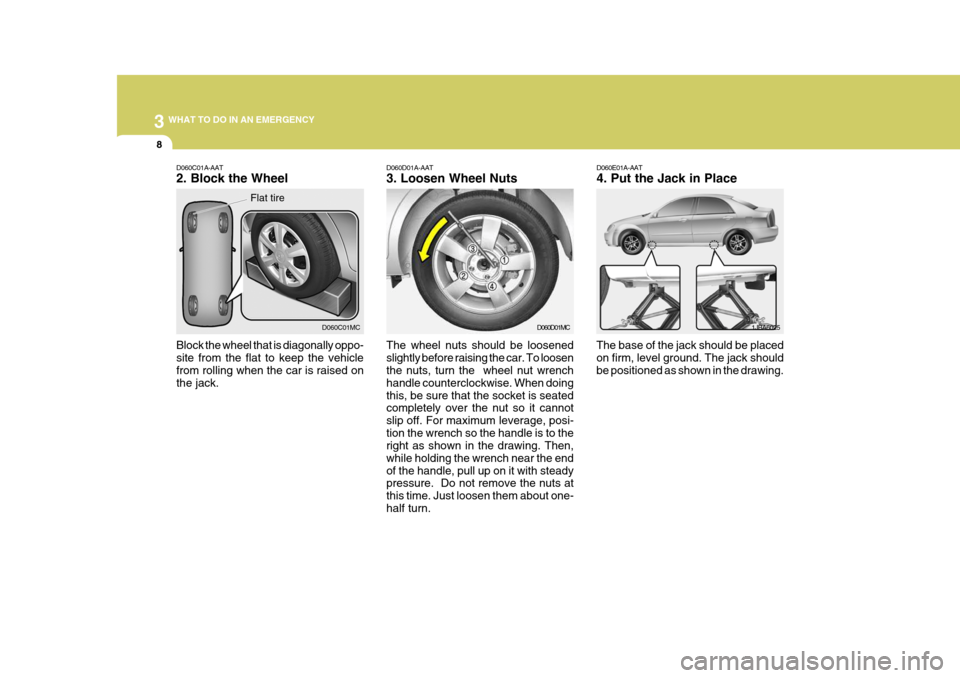
D060B01MC-AAT 1. Obtain Spare Tire and Tool Remove the spare tire and take out the jack and tool bag from the trunk. NOTE: The spare tire and tool is located beneath the luggage mat in the ve-hicle trunk or luggage compartment.
CHANGING A FLAT TIRE
D060K01MCD060A01MC
OMC045006
Page 197 of 282

3 WHAT TO DO IN AN EMERGENCY
8
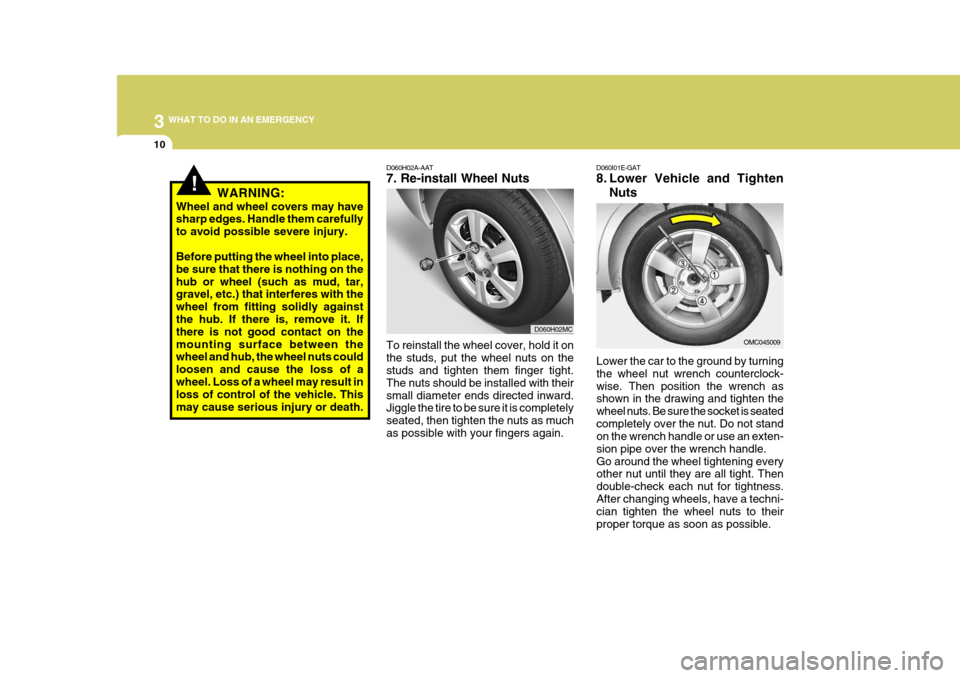
D060D01A-AAT 3. Loosen Wheel Nuts The wheel nuts should be loosened slightly before raising the car. To loosen the nuts, turn the wheel nut wrench handle counterclockwise. When doingthis, be sure that the socket is seated completely over the nut so it cannot slip off. For maximum leverage, posi-tion the wrench so the handle is to the right as shown in the drawing. Then, while holding the wrench near the endof the handle, pull up on it with steady pressure. Do not remove the nuts at this time. Just loosen them about one-half turn. D060E01A-AAT 4. Put the Jack in Place
The base of the jack should be placed on firm, level ground. The jack should be positioned as shown in the drawing. 1JBA6025
D060D01MC
D060C01A-AAT 2. Block the Wheel Block the wheel that is diagonally oppo- site from the flat to keep the vehicle from rolling when the car is raised on the jack.D060C01MC
Flat tire
Page 198 of 282

3
WHAT TO DO IN AN EMERGENCY
9
!
D060G02Y-AAT 6. Changing Wheels Loosen the wheel nuts and remove them with your fingers. Slide the wheel off the studs and lay it flat so it cannotroll away. To put the wheel on the hub, pick up the spare tire, line up the holes
D060F02E-AAT 5. Raising the Car After inserting a wrench bar into the wheel nut wrench, install the wrench bar into the jack as shown in the draw- ing. To raise the vehicle, turn the wheelnut wrench clockwise. As the jack be- gins to raise the vehicle, double check that it is properly positioned and willnot slip. If the jack is on soft ground or sand, place a board, brick, flat stone or other object under the base of the jackto keep it from sinking. Raise the car high enough so that the fully inflated spare tire can be installed.To do this, you will need more ground clearance than is required to remove the flat tire.
Wrench bar
Wheel nut wrench WARNING:
Do not get under the car when it is supported by the jack! This is very dangerous as the vehicle could falland cause serious injury or death. No one should stay in the car while the jack is being used.
D060F01MC with the studs and slide the wheel ontothem. If this is difficult, tip the wheelslightly and get the top hole in the wheel lined up with the top stud. Then jiggle the wheel back and forth until thewheel can be slid over the other studs.
D060G02MC
D060G03MC
Page 199 of 282

3 WHAT TO DO IN AN EMERGENCY
10
!
D060H02A-AAT 7. Re-install Wheel Nuts
Lower the car to the ground by turning the wheel nut wrench counterclock-wise. Then position the wrench as shown in the drawing and tighten the wheel nuts. Be sure the socket is seatedcompletely over the nut. Do not stand on the wrench handle or use an exten- sion pipe over the wrench handle.Go around the wheel tightening every other nut until they are all tight. Then double-check each nut for tightness.After changing wheels, have a techni- cian tighten the wheel nuts to their proper torque as soon as possible.
D060I01E-GAT
8. Lower Vehicle and Tighten
Nuts
To reinstall the wheel cover, hold it on the studs, put the wheel nuts on the studs and tighten them finger tight. The nuts should be installed with theirsmall diameter ends directed inward. Jiggle the tire to be sure it is completely seated, then tighten the nuts as muchas possible with your fingers again. OMC045009
WARNING:
Wheel and wheel covers may have sharp edges. Handle them carefully to avoid possible severe injury. Before putting the wheel into place, be sure that there is nothing on thehub or wheel (such as mud, tar, gravel, etc.) that interferes with the wheel from fitting solidly againstthe hub. If there is, remove it. If there is not good contact on the mounting surface between the wheel and hub, the wheel nuts could loosen and cause the loss of awheel. Loss of a wheel may result in loss of control of the vehicle. This may cause serious injury or death.
D060H02MC