Page 69 of 228

�´
�Õ �Ü
To replace the battery, remove the
round cover on the back of the
transmitter by turning it
counterclockwise with a coin. Insert
a new battery with the side facing
up. Align the mark on the cover
with the mark on the
transmitter. Set the cover in place,
andturnitclockwise.
If it takes several pushes on the
button to lock or unlock the doors,
replace the battery as soon as
possible.
Battery type: CR2025 An improperly disposed of battery
can hurt the environment.
Always conf irm local regulations f or
battery disposal.
As required by the FCC:
This device complies with Part 15 of theFCC rules. Operation is subject to thef ollowing two conditions: (1) This devicemay not cause harmf ul interf erence, and(2) this device must accept anyinterf erence received, includinginterf erence that may cause undesiredoperation.
Changes or modif ications not expresslyapproved by the party responsible f orcompliance could void the user’sauthority to operate the equipment.
This device complies with IndustryCanada Standard RSS-210.Operation is subject to the f ollowing twoconditions: (1) this device may not causeinterf erence, and (2) this device mustaccept any interf erence that may causeundesired operation of the device.Replacing the Transmitter
Battery
Remote Transmitter
66
BATTERY ROUND
COVER
Page 70 of 228
�µ
To adjust the seat forward and
backward, pull up on the lever under
the seat cushion’s front edge. Then
trytomovetheseattomakesureit
is locked in position. To
change the seat-back angle, pull
up on the lever on the outside of the
seat bottom.
Make
all seat adjustm ents before
you start driving.
See pages f or important saf ety
inf ormation and warnings about how toproperly position the seats and seat-backs. 10 12
Seats
Inst rument s and Cont rols
67
Page 73 of 228

The convertible top on your vehicle
lowers and raises electrically.
It is advisable to raise the top
whenever you park the vehicle. This
helps to protect the vehicle f rom
unexpected weather changes, and
f rom thef t of your valuables.Bef ore operating the convertible top,
make sure the vehicle is parked on
level ground, the rear def ogger is of f ,
and there is enough clearance above
the top.
Apply the parking brake. The
convertible top will not operate
unless the parking brake is f ully
engaged.
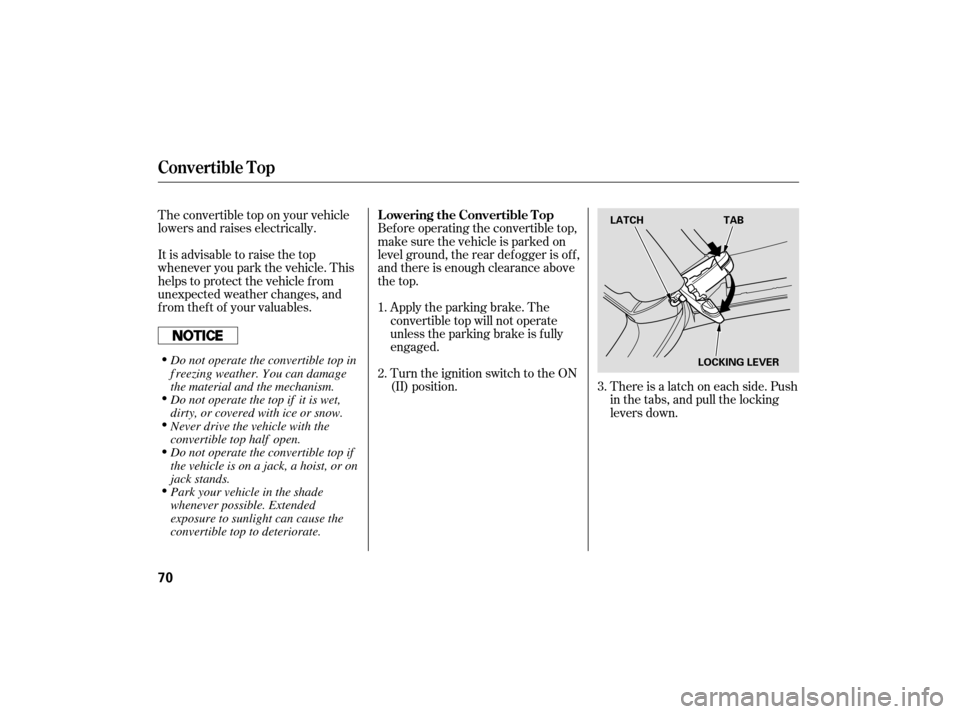
Thereisalatchoneachside.Push
in the tabs, and pull the locking
levers down.
Turn the ignition switch to the ON
(II) position.
1.
2.
3.
Lowering the Convertible Top
Convertible Top
70
LATCH
TAB
LOCKING LEVER
Park your vehicle in the shade
whenever possible. Extended
exposure to sunlight can cause the
convertible top to deteriorate. Do not operate the convertible top if
the vehicle is on a jack, a hoist, or on
jack stands. Never drive the vehicle with the
convertible top half open. Do not operate the top if it is wet,
dirty, or covered with ice or snow. Do not operate the convertible top in
f reezing weather. Y ou can damage
the material and the mechanism.
Page 74 of 228
With the latches released, push
the locking levers up until they
latch.PullbackandholdtheROOF
switch. The windows lower and
the roof f olds back. Release the
ROOF switch when the roof is
retracted completely into the rear
shelf .
4.
5.
Convertible Top
Inst rument s and Cont rols
71
LOCKING LEVER
ROOF SWITCH
Operating the convertible top
while any part of a passenger is
in the way of the convertible top
can cause serious injury.
Make sure that you, your
passenger, or any other people
around the vehicle are clear of
the moving convertible top.
Do not sit on the f olded convertible top,
or place any items on top of it. You
could damage the top or the rear
window.
Page 77 of 228

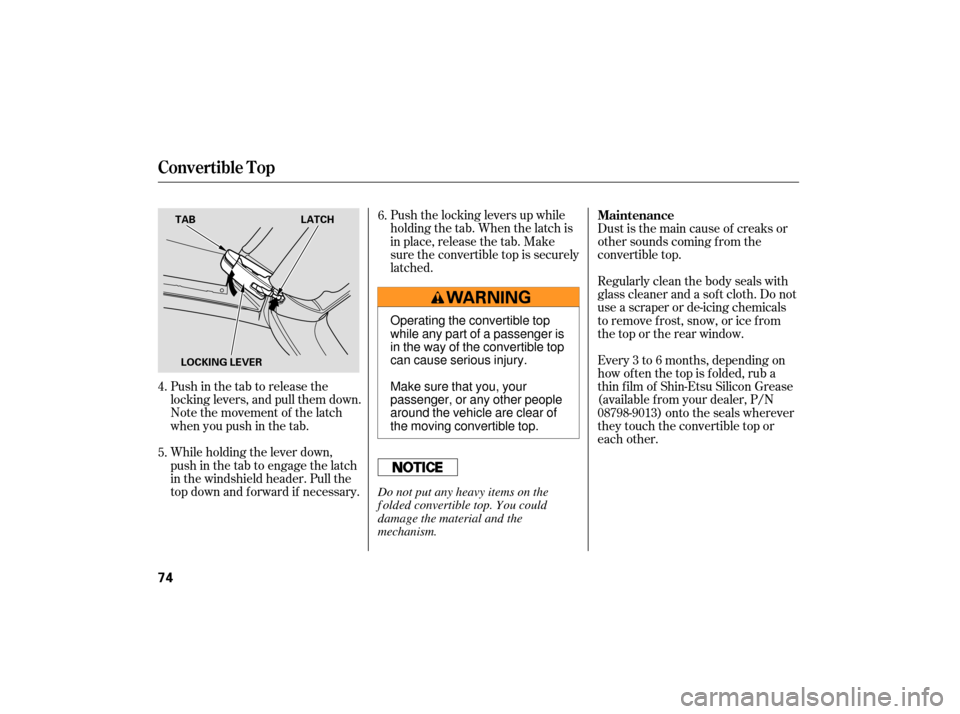
Push in the tab to release the
locking levers, and pull them down.
Note the movement of the latch
when you push in the tab.
While holding the lever down,
push in the tab to engage the latch
in the windshield header. Pull the
topdownandforwardif necessary.Push the locking levers up while
holding the tab. When the latch is
in place, release the tab. Make
sure the convertible top is securely
latched.
Dust is the main cause of creaks or
other sounds coming f rom the
convertible top.
Regularly clean the body seals with
glass cleaner and a soft cloth. Do not
useascraperorde-icingchemicals
to remove f rost, snow, or ice f rom
the top or the rear window.
Every 3 to 6 months, depending on
how of ten the top is f olded, rub a
thin f ilm of Shin-Etsu Silicon Grease
(available f rom your dealer, P/N
08798-9013) onto the seals wherever
they touch the convertible top or
each other.
5. 6.
4. Maintenance
Convertible Top
74
TAB
LATCH
LOCKING LEVER
Operating the convertible top
while any part of a passenger is
in the way of the convertible top
can cause serious injury.
Make sure that you, your
passenger, or any other people
around the vehicle are clear of
the moving convertible top.
Do not put any heavy items on the
f olded convertible top. You could
damage the material and the
mechanism.
Page 82 of 228
To open the audio panel, push on the
top center, and let the panel swing
down.Toclose,pivotthepanelup,
andpushonituntilitlatches.
The lever to open the upper
compartment is inside the lower
compartment. Push up the lever, and
lif t the lid. To close, lower the lid,
and push it down until it latches.
The area between the seats has two
compartments. Open the lower
compartment by squeezing the
handle. Close it with a f irm push.
You can lock or unlock the lower
compartment with the master key.
Interior Convenience Items
Audio Panel
Console Compartments
Inst rument s and Cont rols
79
Page 83 of 228
If the switch is in the center position,
the interior light will come on when
you remove the key f rom the ignition
switch.
The interior light has a three-
position switch; ON, Door Activated,
and OFF. In the Door Activated
(center) position, the light comes on
when you: Open either door.
Unlock the doors with the key or
the remote transmitter.
The dashboard lower pocket is
located next to the audio panel. Dashboard L ower Pocket
Interior L ight
Interior Convenience Items, Interior L ight
80
DOOR
ACTIVATED
Page 88 of 228

Push this lever up and down to
increase or decrease the fan speed
and airflow. The indicato rs next to
the lever show you the speed and
airflow selected.
This button turns the air
conditioning on and off. The
indicator in the button comes on
when the A/C is on.
Tu
rning this dial clockwise increases
the temperature of the airflow. This
button turns the rear window
def ogger of f and on (see page ).
Do not push the def ogger button
when the convertible top is f olded.
Use the mode control dial to select
the vents the air flows from. Some
air will f low f rom the dashboard
vents in all modes.
Air flows from the vents on
both sides of the instrument panel,
andfromthedashboardventinfront
of the passenger.
Airf low is divided between
the vents in the dashboard and the
f loor vents.
When the recirculation indicator is
on, air f rom the vehicle’s interior is
sent through the system again
(recirculation mode). When the
indicator is of f , air is brought in f rom
the outside of the vehicle (f resh air
mode).
The outside air intakes f or the
heating and cooling system are at
the base of the windshield. Keep this
area clear of leaves and other debris.
Thesystemshouldbeleftinfresh
air mode under almost all conditions.
Keeping the system in recirculation
mode, particularly with the A/C of f ,
can cause the windows to fog up.
Switch to recirculation mode when
driving through dusty or smoky
conditions, then return to fresh air
mode. 59
CONT INUED
Vents, Heating, and A/C
Fan Control L ever
Air Conditioning (A/C) Button T emperature Control Dial
Rear Window Def ogger Button
Mode Control Dial
Recirculation Button
A irf low Controls
Features
85