Page 7 of 331
�Î
�Î
�Î
CONTINUED: If equipped
Your Vehicle at a Glance
Y
ou r Vehicle at a Glance
3
POWER WINDOW
SWITCHES
HOOD RELEASE
HANDLE
PARKING BRAKE
PEDAL GLOVE BOX
AUDIO SYSTEM
MIRROR CONTROLS
CENTER CONSOLE ACCESSORY POWER SOCKETSHEATING/COOLING
CONTROLS
CLIMATE CONTROL
SYSTEM
DRIVER’S FRONT
AIRBAG
GAUGES INSTRUMENT PANEL INDICATORS
FUEL FILL DOOR
RELEASE HANDLE
Vehicle with navigation system is shown. (P.9, 23)
(P.9, 23)
PARKING BRAKE
RELEASE HANDLE
POWER DOOR LOCK
MASTER SWITCH AUXILIARY INPUT
JACK
REAR VIEW MIRROR WITH
COMPASS
(P.59)
(P.70)
(P.109)
(P.111)
(P.83)
(P.105)
(P.109)(P.113) (P.116)(P.115)
(P.128)
(P.122)
(P.161) (P.133)
(P.168)
PASSENGER’S
FRONT
AIRBAG
(P.181)
(P.179)
Page 61 of 331

This section gives inf ormation about
the controls and displays that
contribute to the daily operation of
your vehicle. All the essential
controls are within easy reach............................
Control Locations .58
............................
Instrument Panel .59
..........
Instrument Panel Indicators .61
.............................................
Gauges .70
Controls Near the Steering
...........................................
Wheel .74
........................
Multi-Control Lever .75
...................
Headlight Control Dial .76
........
Instrument Panel Brightness .78
.................
Hazard Warning Button .79
..........
Steering Wheel Adjustment .79
..................................................
Keys .80
........................
Immobilizer System .81
................................
Ignition Switch .82
......................................
Door Locks .83
.......................
Remote Transmitter .89
.......................
Dual-Action Tailgate .92
...............................
In-Bed Trunk .95
.................................................
Seats .98
..................................
Seat Heaters .104
............................
Power Windows .105
.......................................
Moonroof .108
...............................
Parking Brake .109
...........................................
Mirrors .110 .........
Interior Convenience Items .112
.........................
Center Console .113
.......
Console Compartments .113
.........................
Cargo Hooks .114
.....................
Beverage Holders .114
..................................
Glove Box .115
................................
Coat Hooks .115
....................
Sunglasses Holder .115
........
Accessory Power Sockets .116
...................................
Sun Visor .117
............................
Vanity Mirror .117
...............................
Interior Lights .118
.....................................
Bed Lights .120
Instruments and Controls
Inst rument s and Cont rols
57
TM
Page 62 of 331
�Î
�Î
�Î
Ifequipped
Control
Locations
58
HOOD RELEASE
HANDLE
PARKING BRAKE
PEDAL GLOVE
BOX
AUDIO
SYSTEM
POWER WINDOW
SWITCHES INSTRUMENT
PANEL INDICATORS
GAUGES
HEATING/COOLING
CONTROLS
CENTER CONSOLE
POWER
DOOR LOCK
MASTER SWITCH
MIRROR
CONTROLS
Vehicle with navigation system is shown. CLIMATE
CONTROL
SYSTEM
ACCESSORY POWER SOCKETS
PARKING
BRAKE
RELEASE HANDLE
FUEL FILL DOOR
RELEASE HANDLE AUXILIARY
INPUT
JACK
REAR
VIEW MIRROR WITH
COMPASS
(P.59)
(P.70)
(P.109)
(P.111)
(P.83)
(P.105)
(P.109) (P.113) (P.116)(P.115)
(P.128)
(P.122)
(P.161)
(P.133)
(P.168)
(P.179)
(P.181)
Page 84 of 331
These keys contain electronic
circuits that are activated by the
immobilizer system. They will not
work to start the engine if the
circuits are damaged.
Protect the keys from direct
sunlight, high temperature, and
high humidity.
Donotdropthekeysorsetheavy
objects on them.
Keep the keys away from liquids.
If they get wet, dry them
immediately with a soft cloth.
The
master key fits all the locks on
your vehicle. The valet key works
only in the ignition and the driver’s
door lock. You can keep the glove
boxlockedwhenyouleaveyour
vehicle and the valet key at a parking
facility.
You can also keep the In-Bed Trunk
locked by using the main switch in
theglovebox(seepage ). Youshouldhavereceivedakey
number tag with your keys. You will
need this key number if you ever
have to get a lost key replaced. Use
only Honda-approved key blanks.
97
Keys
80
VALET KEY
(LIGHT GRAY)
MASTER KEY
WITH REMOTE
TRANSMITTER
KEY
NUMBER
TAG
Page 101 of 331
There are two cargo hooks f or
plastic grocery bags at the back of
the In-Bed Trunk. They are designed
to hold light items. Heavy objects
may damage the hooks.
To protect items in the In-Bed Trunk,
you can disable its release button by
turning off the main switch in the
glove box and locking the glove box
with the master key.
Even if the main switch is in the OFF
position, you can open the In-Bed
Trunk with the master key.
When you are f inished washing the
In-Bed Trunk, dry it with a sof t cloth,
and reinstall the drain plug. Youcanwashtheinsideof the
In-Bed Trunk with a water and mild
detergent solution, and a sof t brush
or cloth.
To drain water from the In-Bed
Trunk, remove the drain plug by
turning it counterclockwise.Cargo Hooks
Washing the In-Bed T runk
In-Bed T runk Main Switch
In-Bed Trunk
Inst rument s and Cont rols
97
DRAIN PLUG CARGO HOOKS
MAIN SWITCH
TM
Page 116 of 331
�Î
�Î
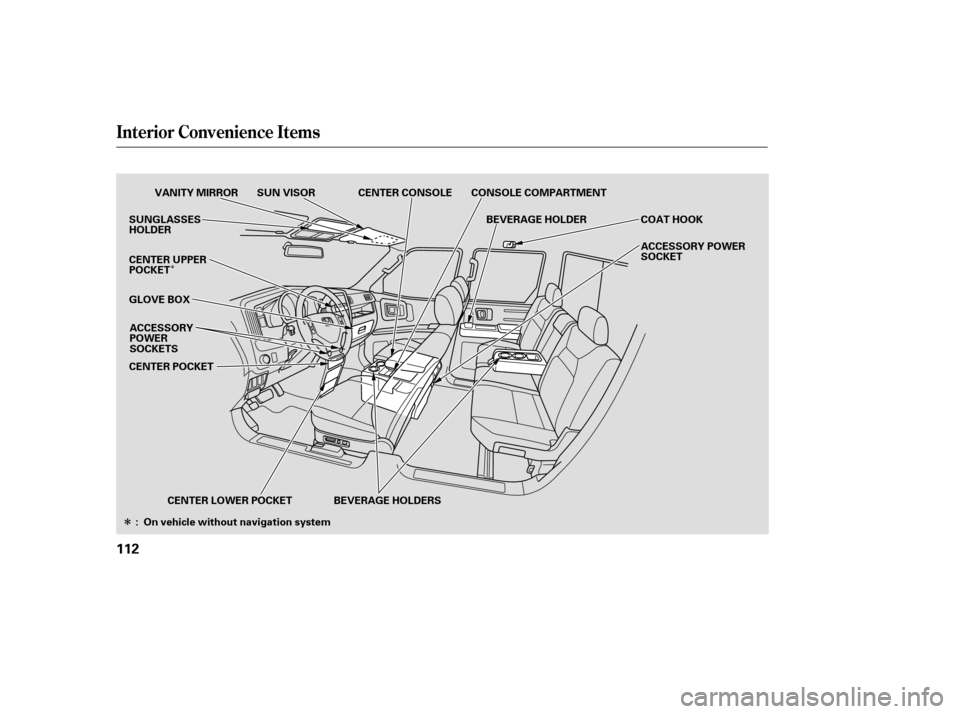
Interior Convenience Items
112
GLOVE BOXVANITY MIRROR SUN VISOR CENTER CONSOLE
BEVERAGE HOLDER
CONSOLE COMPARTMENT
COAT HOOK
ACCESSORY POWER
SOCKET
SUNGLASSES
HOLDER
CENTER UPPER
POCKET
CENTER POCKET
CENTER LOWER POCKET BEVERAGE HOLDERS
ACCESSORY
POWER
SOCKETS
: On vehicle without navigation system
Page 119 of 331
Open the glove box by pulling the
handle. Close it with a f irm push.
Lock or unlock the glove box with
the master key.
The glove box light comes on when
the parking lights are on.Some larger styles of sunglasses
may not f it in the holder.
These hooks are not designed f or
large or heavy items.
To open the sunglasses holder, push
on the rear edge. Make sure the
holder is closed while you are driving.
Glove Box Sunglasses Holder
Coat Hooks
Interior Convenience Items
Inst rument s and Cont rols
115
SUNGLASSES HOLDER
An open glove box can cause
serious injury to your passenger
inacrash,evenifthe
passenger is wearing the seat
belt.
Always keep the glove box
closed while driving.
Page 165 of 331
 or down ( ). Press the top
or bottom of the button, hold it until
the desired volume is reached, then
release it. Three controls f or the")
�Û�Ý�Û
�Ý
�Û �Ý
The VOL button adjusts the volume
up ( ) or down ( ). Press the top
or bottom of the button, hold it until
the desired volume is reached, then
release it. Three controls f or the audio system
are mounted in the steering wheel
hub. They let you control basic
f unctions without removing your
hand f rom the steering wheel. The MODE button changes the
mode. Pressing the button
repeatedly selects FM1, FM2, AM,
XM Radio (U.S. models), CD (if a
disc is loaded) or a tape (if the
optional tape player is installed and a
tape is loaded).
If you are listening to the radio, use
the CH button to change stations.
Each time you press the top ( ) of
the button, the system goes to the
next preset station on the band you
are listening to. Press the bottom
( ) to go back to the previous
station.
If youareplayingaCD,thesystem
skips to the beginning of the next
track each time you press the top
( ) of the CH button. Press the
bottom ( ) to return to the
beginning of the current track. Press
it again to return to the previous
track. You will see the disc and track
numbers in the display.
When the appropriate audio unit is
connected to the auxiliary input jack,
press the CD/AUX or AUX button to
select the unit. The auxiliary input jack is on the tray
above the glove box. The system will
accept auxiliary input f rom standard
audio accessories.
On RTS, RTL, and Canadian EXL
models On vehicles with navigation system
Auxiliary Input Jack
Remote A udio Controls, Playing an Optional A udio Unit
Features
161
MODE BUTTON
VOL BUTTON
CH BUTTON AUXILIARY
INPUT JACK