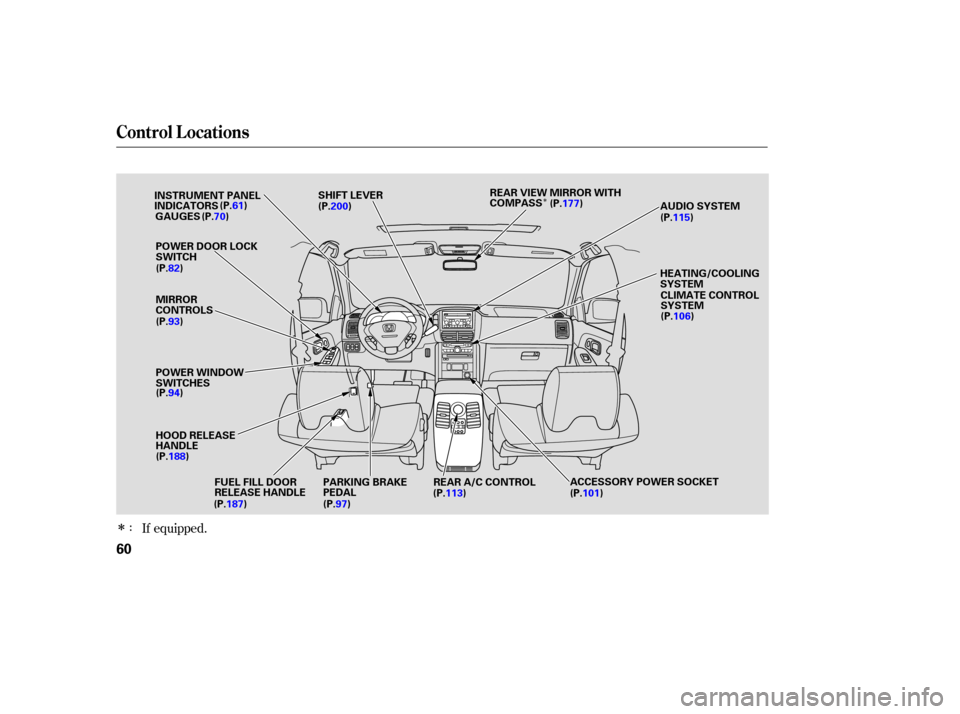
Page 7 of 319
�Î
�Î
If equipped.
:
Your Vehicle at a Glance
4
GAUGES
MIRROR
CONTROLS
POWER WINDOW
SWITCHES
HOOD RELEASE
HANDLE PARKING BRAKE
PEDALREAR A/C CONTROL
DRIVER’S FRONT
AIRBAG
(P.
11, 28) REAR VIEW MIRROR WITH
COMPASS
(P. 70)
(P. 82)
(P. 93)
(P. 94)
(P. 188)
(P. 187) (P. 97) (P.
113) (P.
177)
Vehicle with rear entertainment system is shown. INSTRUMENT PANEL
INDICATORS
(P.
61)
FUEL FILL DOOR
RELEASE HANDLE SHIFT LEVER
(P.
200)
ACCESSORY POWER SOCKET(P. 101) HEATING/COOLING
SYSTEM
CLIMATE CONTROL
SYSTEM AUDIO SYSTEM
(P.
115)
PASSENGER’S
FRONT AIRBAG
(P. 106)
GLOVE BOX
(P. 99)
POWER DOOR LOCK
SWITCH
(P. 11, 35)
Page 62 of 319

This section gives inf ormation about
the controls and displays that
contribute to the daily operation of
your vehicle. All the essential
controls are within easy reach............................
Control Locations .60
............................
Instrument Panel .61
..........
Instrument Panel Indicators .62
.............................................
Gauges .70
...................................
Trip Meter .70
.....................................
Odometer .70
..................................
Fuel Gauge .70
...................
Temperature Gauge .71
Outside Temperature
...................................
Indicator .71
..........
Check Fuel Cap Message .72
Controls Near the Steering ...........................................
Wheel .73
.
Windshield Wipers and Washers .74
.................
Turn Signal, Headlights .75
Automatic Lighting Off .....................................
Feature .76
............
Daytime Running Lights .76
........
Instrument Panel Brightness .76
.................
Hazard Warning Button .77
.................
Rear Window Def ogger .77
..........
Steering Wheel Adjustment .78
...............................
Keys and Locks .79
........................
Immobilizer System .79
................................
Ignition Switch .81 ......................................
Door Locks .82
......................
Power Door Locks .82
........................................
Tailgate .82
..................
Childproof Door Locks .83
.......................
Remote Transmitter .83
....................................
Seat Heaters .86
.................................................
Seats .87
..........................
Head Restraints .91
.............................................
Mirrors .92
..............................
Power Windows .94
.........................................
Moonroof .96
.................................
Parking Brake .97
...........
Interior Convenience Items .98
.......................
Beverage Holders .99
...............
Console Compartment .99
....................................
Glove Box .99
....................
Sunglasses Holder .100
................
Conversation Mirror .100
...................................
Sun Visor .101
............................
Vanity Mirror .101
........
Accessory Power Sockets .101
...............................
Interior Lights .102
Instruments and Controls
Inst rument s and Cont rols
59
Page 63 of 319
�Î
�ÎIf equipped.
Control Locations
60
MIRROR
CONTROLS
POWER WINDOW
SWITCHES
HOOD RELEASE
HANDLE AUDIO
SYSTEM
PARKING BRAKE
PEDAL
GAUGES(P.70)
(P.82)
(P.93)
(P.94)
(P.188) (P.187) (P.97) (P.177)
REAR
VIEW MIRROR WITH
COMPASS
(P.115)
(P.106)
: FUEL
FILL DOOR
RELEASE HANDLE HEATING/COOLING
SYSTEM
INSTRUMENT
PANEL
INDICATORS (P.61)
(P.200)
CLIMATE CONTROL
SYSTEM
ACCESSORY POWER SOCKET
(P.101)
(P.113) REAR A/C CONTROL
SHIFT LEVER
POWER DOOR LOCK
SWITCH
Page 95 of 319
Keeptheinsideandoutsidemirrors
clean and adjusted for best visibility.
Be sure to adjust the mirrors before
you start driving.
The inside mirror has day and night
positions. The night position reduces
glare from headlights behind you.
Flip the tab on the bottom edge of
the mirror to select the day or night
position. Therearviewmirrorhasacompass
function
to indicate the vehicle’s
direction.
Refer to on page . 177
If equippedMirrors
Compass
Mirrors
92
TAB
Page 96 of 319
The outside mirrors are heated to
remove fog and frost. With the
ignition switch in the ON (II)
position, turn on the heaters by
pressing the button. The indicator in
the button comes on as a reminder.
Press the button again to turn the
heaters off.
Push the appropriate edge of the
adjustment switch to move the
mirrorright,left,up,ordown.
Move the selector switch to L
(driver’s side) or R (passenger’s
side). Turn the ignition switch to the ON
(II) position. When you f inish, move the
selector switch to the center (off)
position. This turns the
adjustment switch of f to keep your
settings.
1.
2. 3.
4.
If equipped
PowerMirrorHeaters
Adjusting the Power Mirrors
Mirrors
Inst rument s and Cont rols
93
HEATED MIRROR BUTTON
ADJUSTMENT SWITCH SELECTOR SWITCH
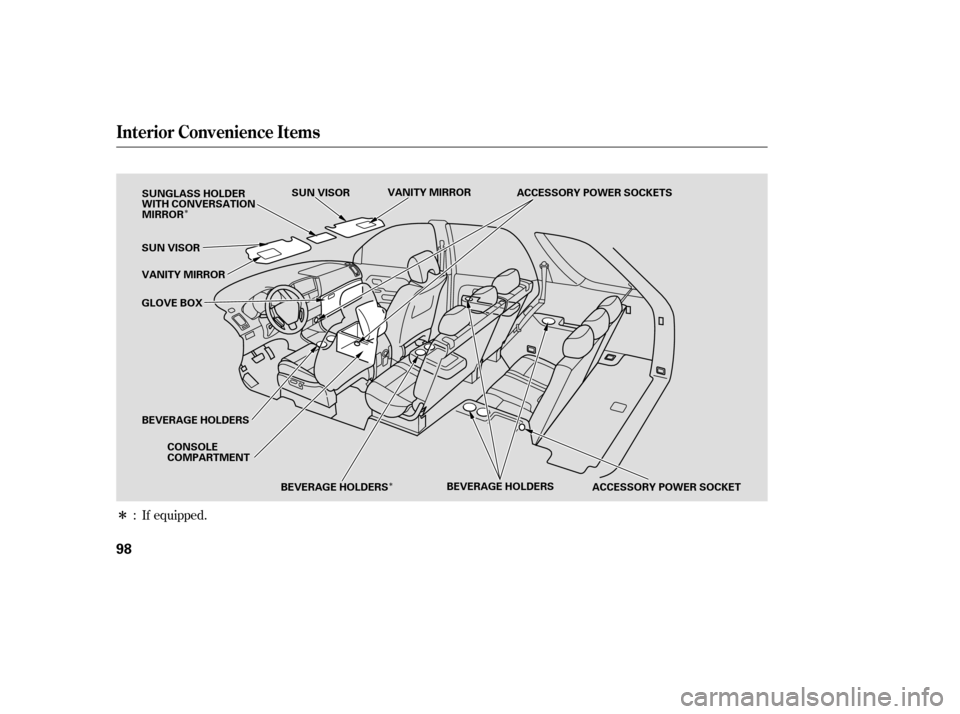
Page 101 of 319
�Î�Î
�ÎIf equipped.
:
Interior Convenience Items
98
BEVERAGE HOLDERS
BEVERAGE HOLDERS
GLOVE BOX
ACCESSORY POWER SOCKETS
VANITY MIRROR VANITY MIRROR
SUN VISOR
SUN VISOR SUNGLASS HOLDER
WITH CONVERSATION
MIRROR
BEVERAGE HOLDERS ACCESSORY POWER SOCKET
CONSOLE
COMPARTMENT
Page 103 of 319
The sunglasses holder uses a convex
mirror f or its bottom panel. You can
see all the vehicle passengers in this
mirror. To use the mirror, open the
sunglasses holder f ully, push it to the
f irst detent, and release it.
You may also store small items in
thisholder.Makesuretheyare
small enough to let the holder close
and latch, and that they are not
heavy enough to cause the holder to
pop open while driving.
To open the sunglasses holder, push
on the f ront edge. Make sure the
holder is closed while you are driving.
Some larger styles of sunglasses
may not f it in the holder.
On EX-L models
Interior Convenience Items
Sunglasses Holder
Conversation Mirror
100
Push
SUNGLASSES HOLDER
Page 104 of 319
Make sure you put the sun visor
back in place when you are getting
into or out of the vehicle. Do not use
the extended sun visor over the rear
view mirror.None of the sockets will power an
automotive type cigarette lighter
element. When both sockets are
being used, the combined power
rating of the accessories should be
120 watts or less (10 amps).
The light comes on when you pull up
the cover.
Whenusingthesunvisorforthe
side window, remove the support rod
f rom the clip and swing it out. Slide
the extension out to get more
coverage on the side window. To use the vanity mirror on the back
of the sun visor, pull up the cover.
The vanity mirror light will not come
on if the sun visor is slid outward.Each socket is intended to supply
power f or 12 volt DC accessories
that are rated 120 watts or less (10
amps).
Sun Visor A ccessory Power Sockets
Vanity Mirror
Interior Convenience Items
Inst rument s and Cont rols
101
SUN VISOR
EXTENSION


position, turn on the heaters by
pressing the button. The indicator in
the button comes on as a reminder")