Page 77 of 319

�µ
�µ
�µ
�µ �µ�µ
�µ
�µ �µ
MIST
OFF
INT Intermittent
LO Low speed
HI High speed
Windshield washers
Push the right lever up or down to
select a position. The wipers run at high
speed until you release the lever. Rotate the switch clockwise to
turn the rear window wiper ON.
Hold past ON to spray the rear
window washer.
OFF
Hold past OFF to spray the rear
window washer and turn the rear
window wiper on for a short
interval.
The wipers run at low speed. The wipers are not activated.
The length of the wiper
interval is varied automatically
according to the vehicle’s speed.
Vary the delay by turning the INT
TIME ring. If you turn it to the
shortest delay, the wiper speed
will increase to low speed
operation when the vehicle speed
exceeds 12 mph (20 km/h).
The wipers run at high speed. Pull the
wiper control lever toward you,
andholdit.Thewashersspray
until you release the lever. The
wipers run at low speed, then
complete one more sweep af ter
you release the lever.
1.
2.
3.
4.
5.
6.
1.
2.
3.
4. Rear Window Wiper and Washer
MIST LO OFF
INT
HI
Windshield Washers
Windshield Wipers and Washers
74
Page 105 of 319

Always run the engine when you use
the AC Power Outlet.The maximum capacity f or this
power outlet is 115 volt AC at 100
watts or less. If you use an appliance
which requires more than 100 watts,
it automatically stops supplying the
power. If this happens, turn the
ignition switch of f and turn it on
again.
The AC power outlet is not
designed f or electric appliances
which require high initial peak
wattage such as cathode-ray tube
type televisions, ref rigerators,
electric pumps, etc. It is also not
suitable f or devices that process
precise data such as medical
equipment or measuring instruments.
Any appliances that require an
extremely stable power supply such
as microcomputer-controlled electric
blankets, touch sensor lamps, etc.,
should not be connected to this
outlet. ON
All the individual map lights come
onandstayonaslongasthe
switch remains in the ON position.
The individual map lights in the
f ront can be turned on and of f with
the switches next to the lights. None of the lights come on when a
door or the tailgate is opened.
There is a 115 volt AC power outlet
in the console compartment. To use
the AC power outlet, open the
console compartment lid and open
the outlet cover. Insert the plug into
the receptacle slightly, turn it 90°
clockwise, then push in the plug all
the way.
When this switch is in the position:
If equipped
When the switch is in the OFF position:
Interior Convenience Items, Interior L ights
AC Power OutletLight Control Switch
102
NOTE:
DOOR
ACTIVATED
POSITIONOFF
ON
Page 108 of 319

The heating and air conditioning
system in your vehicle provides a
comf ortable driving environment in
all weather conditions.
The standard audio system has
many f eatures. This section
describes those f eatures and how to
use them.
Your vehicle has an anti-theft audio
system that requires a code number
to enable it.
The security system helps to dis-
courage vandalism and thef t of your
vehicle..............
Vents, Heating, and A/C . 106
.......................
Air Flow Buttons .107
......
Automatic Climate Control . 112
.........
Using the Rear A/C Unit . 113
................................
Audio System .115
..........................
Playing the Radio .117
........................
Radio Reception .122
...
Playing the XM Satellite Radio . 124
................................
Playing a Disc .130
........................
Disc Changer .131, 134
...................
Protecting your Discs . 135
.......
Disc Player Error Messages . 136
Disc Changer Error ...................................
Messages .137
................
Remote Audio Controls . 138
.................
Radio Thef t Protection . 139..........................
Setting the Clock .140
........
Rear Entertainment System . 142
............................
Security System .174
...............................
Cruise Control .175
.........................................
Compass .177
.
Rear View Camera and Monitor . 180
HomeLink Universal ................................
Transceiver .181
On EX and EX-L models
Features
Features
105
Page 110 of 319

Press the RR A/C MANUAL button
to adjust the temperature of the rear
passenger compartment
independently. See page for
info rmation using the rear A/C unit.
When you turn the A/C off, the
system cannot regulate the inside
temperature if you set the dial below
the outside air temperature.
This
button turns the air
conditioning on and off. On LX
models, the indicator in the button is
on when the A/C is on. On EX and
EX-L models, you will see A/C ON
or A/C OFF in the display.
The
temperature setting is shown in
the display.
Tu
rning this dial clockwise increases
the temperature of the airflow.
Select the fan speed by pressing the
fan control buttons ( or ).
The fan speed is shown in vertical
bars on the display.
Tu
rn the dial clockwise to increase
the fan speed and airflow. Turn the
dial counterclockwise to decrease it. On EX and EX-L models, see page f or inf ormation on automatic
climate control and semi-automatic
operation. The climate control system can also
be operated by voice control. See the
Navi section in your quick start
guide f or an overview of this system,
and the navigation system manual
f or complete details.
112 113
On vehicles with navigation system
On LX models On EX and EX-L models
On EX and EX-L models On EX and EX-L models
On EX and EX-L models
Vents, Heating, and A/C
RR A/C MANUAL Button
Air Conditioning (A/C) Button T emperature Control Dial
Fan Control Voice Control System
Features
107
Page 116 of 319

�µ
�µ
�µ
A passenger in the second row can
use the rear fan control dial to adjust
the amount of airf low to the rear
passenger compartment.
Press the RR A/C MANUAL button
to enable the rear temperature
control dial; a second row passenger
can now adjust the temperature in
the rear passenger compartment
with the rear temperature control
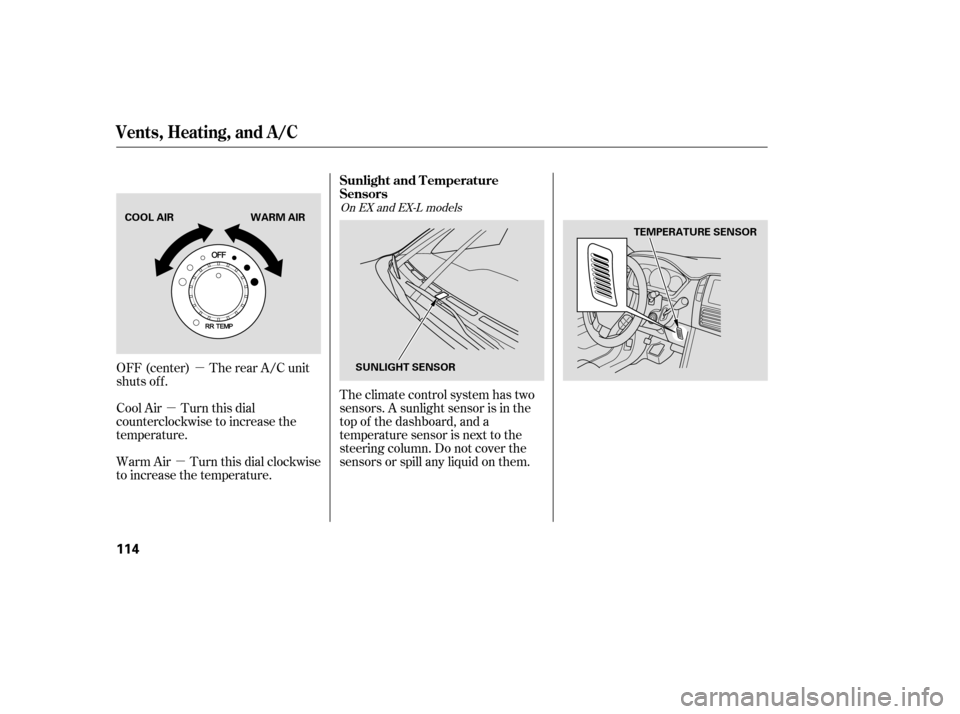
dial. OFF (center) The rear A/C unit
shuts off.
Cool Air Turn this dial
counterclockwise to increase the
airflow.
Warm Air Turn this dial clockwise
to increase the airflow.When the RR A/C MANUAL button
is on, you can adjust the temperature
of the rear passenger compartment
manually f rom the second row seat.
When the RR A/C MANUAL button
is off, the temperature in the rear
passenger compartment is controlled
by the f ront passenger with f ront
control panel.
CONT INUED
On LX models
On EX and EX-L models On LX models On EX and EX-L models
Using the Rear A/C Unit
Vents, Heating, and A/C
Features
113
COOL AIR
WARM AIR
REAR A/C MANUAL BUTTON
The rear climate control system
has upper and lower vents. The
system can direct airflow to either
the upper or lower vent. It cannot
direct airflow to both vents at the
same time.
All models
Page 117 of 319
�µ
�µ
�µ Theclimatecontrolsystemhastwo
sensors. A sunlight sensor is in the
top of the dashboard, and a
temperature sensor is next to the
steering column. Do not cover the
sensors or spill any liquid on them.
OFF (center) The rear A/C unit
shuts off.
Cool Air Turn this dial
counterclockwise to increase the
temperature.
Warm Air Turn this dial clockwise
to increase the temperature.
On EX and EX-L models
Sunlight and T emperature
Sensors
Vents, Heating, and A/C
114
SUNLIGHT SENSOR TEMPERATURE SENSOR
COOL AIR WARM AIR
Page 143 of 319
Setting the Clock
140
CLOCKH BUTTON
M BUTTON
CLOCK CLOCK BUTTON
H BUTTON RESET BUTTON
M BUTTON
SET BUTTON
LX models
EX and EX-L models
Page 144 of 319

buttonsetstheclockbac")
�µ�´
You can quickly set the time to the
nearest hour. If the displayed time is
bef ore the half hour, pressing and
holding the clock button, then
pressing the RESET (preset 6)
buttonsetstheclockbacktothe
previous hour. If the displayed time
is af ter the half hour, the clock sets
f orward to the beginning of the next
hour.
For example: 1:06 will reset to 1:00
1:52 will reset to 2:00 The display shows the time when the
ignition is in the ACCESSORY (I) or
the ON (II) position.
Press and hold the SET (TUNE)
button until the numbers f lash.
Change the hours by pressing the
H ( ) button until the numbers
advance to the desired time. Change
the minutes by pressing the M ( )
button until the numbers advance to
the desired time. When you are
finished, press the SET button again.
Refer to the navigation system
manual f or how to adjust the time.
Press and hold the CLOCK (SCAN/
RPT) button. Change the hours by
pressing the H (preset 4) button
until the numbers advance to the
desired time. Change the minutes by
pressing the M (preset 5) button
until the numbers advance to the
desired time. When you are f inished,
release the CLOCK button.
On models with Navigation System
EX and EX-L models
LX models
Setting the Clock
Features
141