Page 221 of 304
Fluid Locations
Except U.S. Si model
222
RADIATOR CAP
ENGINE OIL DIPSTICK
(Orange loop)
ENGINE OIL
FILL CAP
WASHER FLUID
(Blue cap)
POWER STEERING
FLUID (Red cap)
AUTOMATIC
TRANSMISSION
FLUID DIPSTICK
(Yellow loop)
ENGINE COOLANT
RESERVOIR
CLUTCH FLUID
(Manual
Transmission only)
(Light gray cap)
BRAKE FLUID
(Black cap)
�����—�����—�����y�
����
������
�y���
�(�#�����
���y���������y
Page 234 of 304

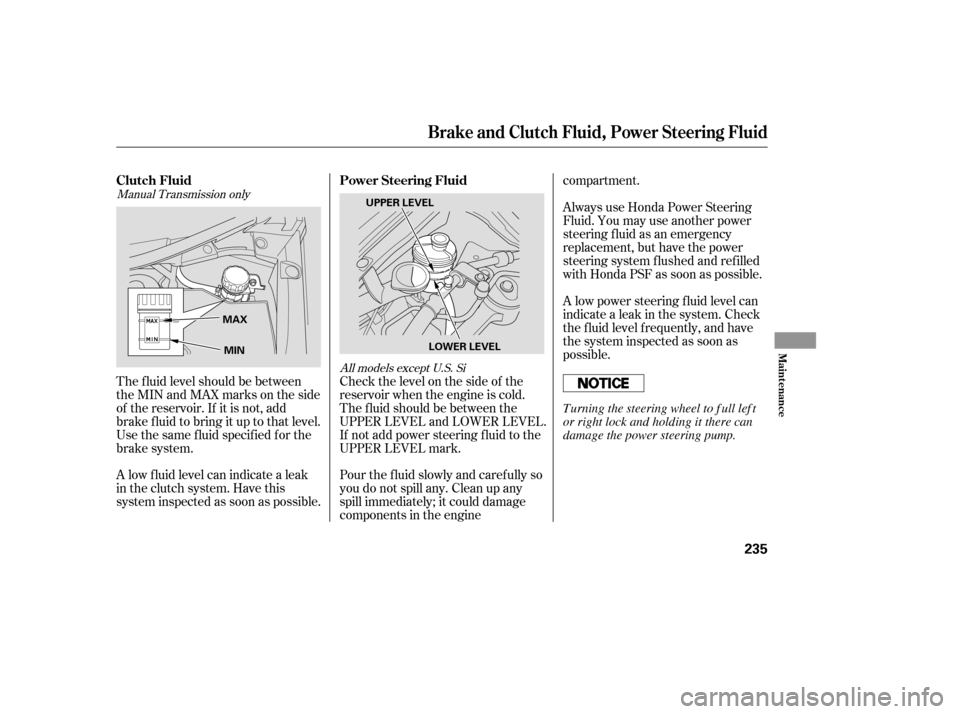
Check the level on the side of the
reservoir when the engine is cold.
The f luid should be between the
UPPER LEVEL and LOWER LEVEL.
If not add power steering f luid to the
UPPER LEVEL mark.
Pour the f luid slowly and caref ully so
you do not spill any. Clean up any
spill immediately; it could damage
components in the enginecompartment.
Always use Honda Power Steering
Fluid. You may use another power
steering f luid as an emergency
replacement, but have the power
steering system f lushed and ref illed
with Honda PSF as soon as possible.
A low power steering f luid level can
indicate a leak in the system. Check
the f luid level f requently, and have
the system inspected as soon as
possible.
The f luid level should be between
theMINandMAXmarksontheside
of the reservoir. If it is not, add
brake f luid to bring it up to that level.
Use the same fluid specified for the
brake system.
A low f luid level can indicate a leak
in the clutch system. Have this
system inspected as soon as possible.
Manual Transmission only
All models except U.S. Si
Brake and Clutch Fluid, Power Steering Fluid
Power Steering Fluid
Clutch Fluid
Maint enance
235
MAX
MIN LOWER LEVEL
UPPER LEVEL
T urning the steering wheel to f ull lef t
or right lock and holding it there can
damage the power steering pump.
�����—�����—�����y�
����
����
���y���
�(�#�����
���y���������y
Page 236 of 304

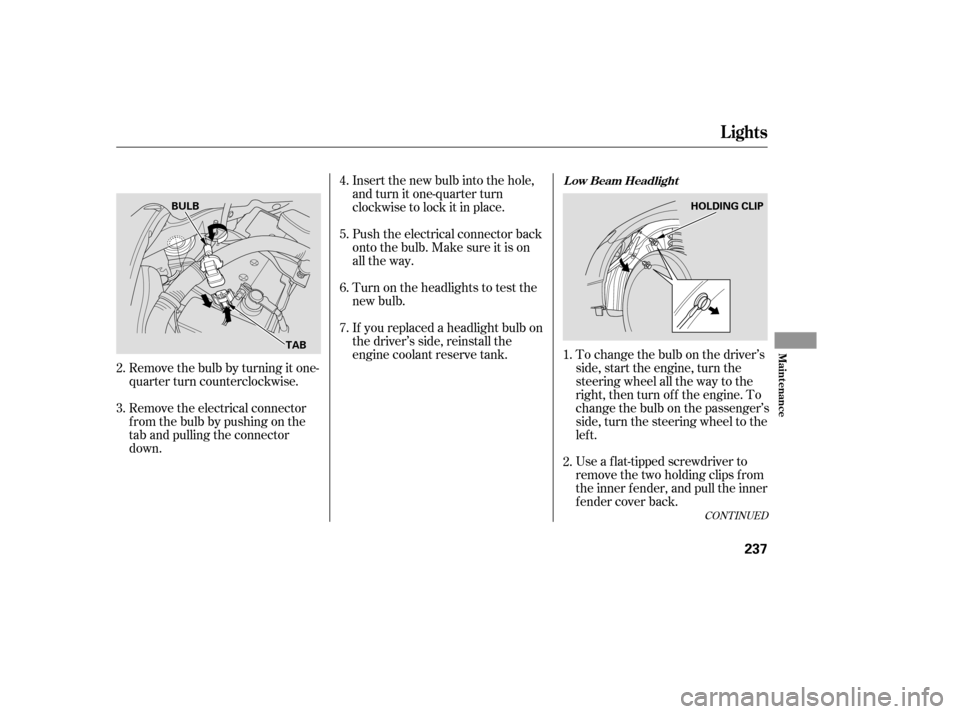
If youreplacedaheadlightbulbon
the driver’s side, reinstall the
engine coolant reserve tank. To change the bulb on the driver’sside, start the engine, turn the
steering wheel all the way to the
right, then turn off the engine. To
change the bulb on the passenger’s
side, turn the steering wheel to the
lef t.
Use a f lat-tipped screwdriver to
remove the two holding clips f rom
the inner f ender, and pull the inner
f ender cover back.
Remove the bulb by turning it one-
quarter turn counterclockwise. Push the electrical connector back
onto the bulb. Make sure it is on
all the way.
Insert the new bulb into the hole,
and turn it one-quarter turn
clockwise to lock it in place.
Turn on the headlights to test the
new bulb.
Remove the electrical connector
f rom the bulb by pushing on the
tab and pulling the connector
down.
2. 3.
2.
4. 5.6. 7.
1.
CONT INUED
Lights
L ow Beam Headlight
Maint enance
237
TAB HOLDING CLIP
BULB
�����—�����—�����y�
����
��������y���
�(�#�����
���y���������y
Page 237 of 304
To change the bulb on the driver’s
side, start the engine, turn the
steering wheel all the way to the
right, then turn off the engine. To
change the bulb on the passenger’s
side, turn the steering wheel to the
lef t.
Reinstall the inner f ender cover.
Then reinstall the holding clips,
andlocktheminplacebypushing
on their centers.
Insert the new bulb into the hole,
and turn it one-quarter turn
clockwise to lock it in place.
Push the electrical connector back
onto the bulb. Make sure it is on
all the way.
Turn on the headlights to test the
new bulb.
Remove the electrical connector
f rom the bulb by pushing on the
tab and pulling the connector
down.
Remove the bulb by turning it one-
quarter turn counterclockwise. 5. 6.
1.
7. 8.
3. 4.
Lights
Replacing the Front Side Marker/
Parking/Turn Signal Light Bulb
238
TAB HOLDING CLIP
SOCKET
�����—�����—�����y�
����
��������y���
�(�#�����
���y���������y
Page 248 of 304

Replace your tires with radial tires of
the same size, load range, speed
rating, and maximum cold tire
pressure rating (as shown on the
tire’s sidewall).
Mixing radial and bias-ply tires on
your vehicle can reduce braking
ability, traction, and steering
accuracy. Using tires of a dif f erent
size or construction can cause the
ABS to work inconsistently.
Themileageyoucanexpectfrom
yourvehicletiresisthesameas
comparable mid-and rear-engine
sports cars, and it will vary greatly
with your driving habits.
If you drive moderately, the f ront
tires could last more than 10,000
miles (16,000 km). However, the
mileage will be substantially less if
you tend to drive your vehicle at the
upper limits of its capabilities.
You should caref ully inspect your
vehicle’s tires f or wear, damage, and
proper inf lation every 7,500 miles
(12,000 km).
It is best to replace all f our tires at
thesametime.If thatisnotpossible
or necessary, replace the two f ront
tires or two rear tires as a pair.
Replacing just one tire can seriously
af f ect your vehicle’s handling.TheABSworksbycomparingthe
speed of the wheels. When replacing
tires, use the same size originally
supplied with the vehicle. Tire size
and construction can affect wheel
speed and may cause the system to
activate.
Replacement wheels are available at
your dealer.
If you ever replace a wheel, make
sure that the wheel’s specif ications
match those of the original wheels.
CONT INUED
Replacing T ires and Wheels
Tires
Maint enance
249
�����—�����—�����y�
������
������y���
�(�#�����
���y���������y
Page 268 of 304
The under-hood f use box is on the
driver’s side, next to the brake f luid
reservoir. To open it, push the tabs
as shown.If something electrical in your
vehicle stops working, the first thing
youshouldcheckforisablownfuse.
Determine f rom the chart on pages
and , or the diagram on the
f use box lid, which f use or f uses
control that device. Check those
f uses f irst, but check all the f uses
bef ore deciding that a blown f use is
the cause. Replace any blown f uses,
and check if the device works.
Thefusesareintwofuseboxes.The
interior f use box is underneath the
steering column. 274 275
Fuses
Checking and Replacing Fuses
270
INTERIOR
UNDER-HOOD
TAB
FUSE LABEL
�����—�����—�����y�
�������������y���
�(�#�����
���y���������y
Page 274 of 304

�µ�µ
If your vehicle needs to be towed,
call a prof essional towing service or
organization. Never tow your vehicle
with just a rope or chain. It is very
dangerous.
The operator
loads your vehicle on the back of a
truck.
Therearetwowaystotowyour
vehicle: If , due to damage, your vehicle must
be towed with the f ront wheels on
the ground, do this:
Release the parking brake.
Shif t the transmission to neutral.
Turn of f the engine.
ShifttoD,thentoN.
Start the engine.
Release the parking brake.
Leave the ignition switch in the
ACCESSORY (I) position so the
steering wheel does not lock.
Leave the ignition switch in the
ACCESSORY (I) position so the
steering wheel does not lock.
The tow
truck uses two pivoting arms that go
under the f ront tires and lif t them of f
the ground. The rear tires remain on
the ground. With the f ront wheels on the ground,
do not tow the vehicle more than 50
miles (80 km), and keep the speed
below35mph(55km/h).
Manual transmission:
Automatic transmission:
Flat -bed Equipment
Wheel-lif t Equipment
T his is the best way to
transport your vehicle.
This is an acceptable
way to tow your vehicle.
Emergency Towing
276
Improper towing preparation will
damage the transmission. Follow the
above procedure exactly. If you cannot
shif t the transmission or start the
engine (automatic transmission), your
vehicle must be transported with the
f ront wheels of f the ground.
�����—�����—�����y�
�������������y���
�(�#�����
���y�������
�y
Page 275 of 304
Do not tie down the vehicle at an
angle that would allow the towing
cables to contact the vehicle’s f ront
bumper. To avoid possible damage,
protect the f ront bumper with tape.
If your vehicle is equipped with a
f ront spoiler, remove it bef ore
towing so it is not damaged.
Emergency Towing
T aking Care of t he Unexpect ed
277
The steering system can be damaged if
the steering wheel is locked. Leave the
ignition switch in the ACCESSORY (I)
position, and make sure the steering
wheel turns f reely bef ore you begin
towing.
Trying to lif t or tow your vehicle by the
bumpers will cause serious damage.
The bumpers are not designed to
support the vehicle’s weight.
�����—�����—�����y�
���������
�
�y���
�(�#�����
���y���������y