Page 95 of 268
�µ�µ
If the MAIN switch is OFF, the
passenger windows cannot be raised
or lowered. Keep the MAIN switch
off whenyouhavechildreninthe
vehicle so they do not injure
themselves by operating the
windows unintentionally. To open or close the
driver’s window, push or pull the
window switch firmly down or up to
the second detent, and release it.
The window will automatically go
down or up all the way. To stop the
window, pull or push the window
switch brief ly.
If the driver’s
window senses any obstacle while it
is closing automatically, it will
reverse direction, and then stop. To
close the window, remove the
obstacle, then use the window switch
again.
Auto reverse stops sensing when the
window is almost closed. You should
always check that all passengers and
objects are away from the window
bef ore closing it.
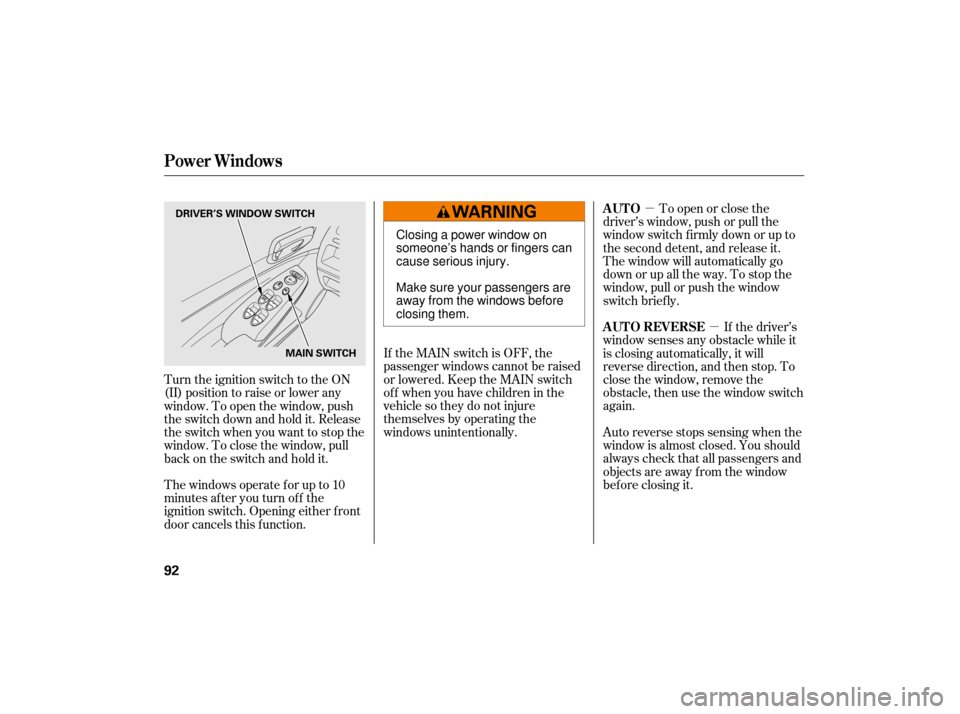
Turn the ignition switch to the ON
(II) position to raise or lower any
window. To open the window, push
the switch down and hold it. Release
the switch when you want to stop the
window. To close the window, pull
back on the switch and hold it.
Thewindowsoperateforupto10
minutes after you turn off the
ignition switch. Opening either f ront
door cancels this f unction. AUTO
AUTO REVERSE
Power Windows
92
DRIVER’S WINDOW SWITCH
MAIN SWITCH
Closing a power window on
someone’s hands or fingers can
cause serious injury.
Make sure your passengers are
away from the windows before
closing them.
Page 96 of 268
Keeptheinsideandoutsidemirrors
clean and adjusted f or best visibility.
Be sure to adjust the mirrors bef ore
you start driving.
The inside mirror has day and night
positions. The night position reduces
glare f rom headlights behind you.
Flip the tab on the bottom edge of
the mirror to select the day or night
position.Turn the ignition switch to the ON
(II) position.
Move the selector switch to L
(driver’s side) or R (passenger’s
side).
Push the appropriate edge of the
adjustment switch to move the
mirrorright,left,up,ordown.
When you f inish, move the
selector switch to the center (off)
position. This turns the
adjustment switch of f to keep your
settings.
1.
2.
3.
4.
Mirrors
Adjusting the Power Mirrors
Inst rument s and Cont rols
93
SELECTOR SWITCH
TAB
ADJUSTMENT SWITCH
Page 97 of 268
On Canadian models
The outside mirrors are heated to
remove fog and frost. With the
ignition switch in the ON (II)
position, turn on the heaters by
pressing the button. The indicator in
the button comes on as a reminder.
Press the button again to turn the
heaters off. Pressing this button also
turns the rear window defogger on
and off. To
apply the parking brake, pull the
lever up fully. To release it, pull up
slightly, push the button, and lower
the lever. The parking brake
indicator on the instrument panel
should go out when the parking
brake is f ully released (see page ). 58
Mirrors, Parking Brake
Heated Mirrors Parking Brake
94
HEATED MIRROR BUTTONPARKING BRAKE LEVER
Driving the vehicle with the parking
brake applied can damage the rear
brakes and axles. A beeper will sound
if the vehicle is driven with the parking
brake on.
Page 99 of 268
Be caref ul when you are using the
beverage holders. A spilled liquid
that is very hot can scald you or your
passengers. Spilled liquids can
damage the upholstery, carpeting,
and electrical components in the
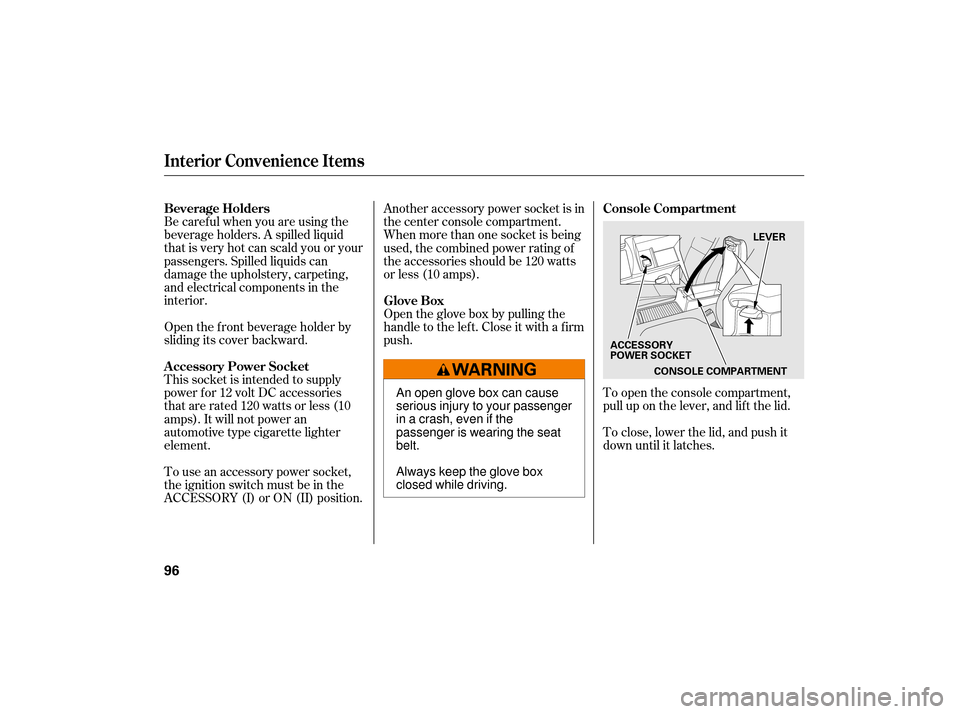
interior.To open the console compartment,
pull up on the lever, and lif t the lid.
To close, lower the lid, and push it
down until it latches.
Open the f ront beverage holder by
sliding its cover backward. Another accessory power socket is in
the center console compartment.
When more than one socket is being
used, the combined power rating of
the accessories should be 120 watts
or less (10 amps).
Open the glove box by pulling the
handle to the lef t. Close it with a f irm
push.
This socket is intended to supply
power f or 12 volt DC accessories
that are rated 120 watts or less (10
amps). It will not power an
automotive type cigarette lighter
element.
To use an accessory power socket,
the ignition switch must be in the
ACCESSORY (I) or ON (II) position. Beverage Holders Console Compartment
Glove Box
A ccessory Power Socket
Interior Convenience Items
96
LEVER
CONSOLE COMPARTMENT
ACCESSORY
POWER SOCKET
An open glove box can cause
serious injury to your passenger
inacrash,evenifthe
passenger is wearing the seat
belt.
Always keep the glove box
closed while driving.
Page 100 of 268
Open any door.
Unlock the doors with the key or
remote transmitter.
Remove the key from the ignition.The f ront ceiling light has two
spotlights. Push the spotlight lenses
to turn them on and off.
The ceiling light has a three-position
switch; ON, Door Activated, and
OFF. In the Door Activated (center)
position, the light comes on when
you: If you do not open either door af ter
you unlock the driver’s door or
remove the key from the ignition
switch, the light f ades out in about
30 seconds.
If you leave either door open without
the key is in the ignition switch, the
ceiling light will go of f af ter 3
minutes. After all doors are closed tightly, the
light dims slightly, then f ades out in
about 30 seconds.
Ceiling L ight Spotlights
Interior Lights
Inst rument s and Cont rols
97
DOOR ACTIVATED
ON
OFF
Page 112 of 268
�µ
�µ
�µ
�µ
�µ �µ
CONT INUED
The ignition switch must be in the
ACCESSORY (I) or ON (II) position.
Turn the system on by pushing the
PWR/VOL knob. Adjust the volume
by turning the same knob.
The band and f requency that the
radio was last tuned to is displayed.
To change bands, press the AM/FM
button (AM or FM button). On the
FM band, ST will be displayed if the
stationisbroadcastinginstereo.
Stereo reproduction in AM is not
available. If you do nothing, the system will
then scan f or the next strong station
andplayitfor10seconds.Whenit
plays a station you want to listen to,
press the SCAN button again.
Each side of the bars
(1 6) can store one station on AM,
and two stations on FM.
Use the TUNE knob to
tune the radio to a desired f requency.
Turn the knob right to tune to a
higher f requency, or lef t to tune to a
lower f requency.
The seek f unction
searches up and down from the
current f requency to f ind a station
with a strong signal. To activate it,
press the or side of the
SEEK bar, then release it.
The scan f unction samples
all stations with strong signals on the
selected band. To activate it, press
the SCAN button, then release it.
You will see SCAN in the display.
The system will scan f or a station
with a strong signal. When it f inds
one, it will stop and play that station
f or about 10 seconds. Repeat steps 1 through 3 to store a total of six stations on AM and
twelve stations on FM. Pick a preset number (1 6), and
hold it until you hear a beep. Usethetune,seek,orscan
function to tune the radio to a
desired station. Select the desired band, AM or
FM. FM1 and FM2 let you store
twelve stations.
You can use any of f ive methods to
find radio stations on the selected
band: TUNE, SEEK, SCAN, the
preset bars, and AUTO SELECT. 1.
2.
3.
4.
Playing the Radio
To Play the Radio
To Select a StationPRESET
TUNE
SEEK
SCAN
Features
109
Page 116 of 268
To load or play discs, the ignition
switch must be in the ACCESSORY
(I) or ON (II) position.
You operate the CD player with the
same controls used f or the radio. To
select the CD player, press the CD
button. You will see ‘‘CD’’ in the
display. The number of the track
playing is shown in the display. The
system will continuously play a disc
until you change modes.The specif ications of the compatible
MP3 f ile are:
Sampling f requency: 32/44.1/48 kHz
(MPEG1), 24, 22.05, 16 kHz
(MPEG2)
Bit rate: 32/40/48/56/64/80/96/
112/128/160/192/224/256/320 kbps
(MPEG1), 8/16/24/32/40/48/56/
64/80/96/112/128/160 kbps
(MPEG2)
Compatible with variable bit rate and
multi-session.
Maximum layers
(including ROOT): 8 layers
Sampling f requency: 32/44.1/48 kHz
Bit rate: 48/64/80/96/128/160/192
kbps
Compatible with variable bit rate and
multi-session.
Maximum layers (including ROOT):
8 layers The specif ications of the compatible
WMA f ile are:Insert the disc about half way into the
disc slot. The drive will pull the disc
in the rest of the way and begin to
play it. When the system reaches the
end of the disc, it will return to the
beginning and play the disc again.
You can also play 3-inch (8-cm) discs
without using an adapter ring.
To play the radio when a disc is
playing, press the AM/FM button
(AM or FM button). Press the CD
button again to switch back to the
CD player.
The disc player can also play CD-Rs
andCD-RWscompressedinCD-
TEXT,MP3,andWMAformats.
When playing a disc in MP3 or WMA,
you will see ‘‘MP3’’ or ‘‘WMA’’ in the
display. You can select up to 255
folders or tracks.
Video CDs and DVDs will not work
in this unit.
CONT INUED
To Play a Disc
Playing a Disc
Features
113
Do not use discs with adhesive labels.
The label can curl up and cause the
disc to jam in the unit.
Page 120 of 268
�µ�µIn MP3/WMA mode
Press the eject button ( ) to
remove the CD. If you eject the CD,
but do not remove it from the slot,
the system will automatically reload
the CD after 10 seconds and put it in
pause mode. To begin playing, press
the CD button.
Press the AM/FM button (AM or
FM button) to switch to the radio
while a CD is playing. Press the CD
button to play the CD.
If you turn the system off while a
disc is playing, either with the PWR/
VOL knob or by turning off the
ignition switch, the disc will stay in
the drive. When you turn the system
back on, the disc will begin playing
where it lef t of f .
For inf ormation on how to handle
and protect compact discs, see page .
The scan f unction samples
all the tracks/f iles on the disc in the
order they are recorded on the disc.
To activate the scan feature, press
the SCAN button. You will see SCAN
in the display. You will get a 10
second sampling of each track on the
disc. You will also see a track/f ile
name in the display. Press and hold
the SCAN button to get out of the
system and play the last track
sampled. This f eature, when
activated, samples the first file of
each f older f or 10 seconds. To
activate the folder scan feature,
press the SCAN button until you see
F-SCAN in the display. The f older
name is also displayed. To hear the
rest of the f older, press the SCAN
button, within 10 seconds. If you do
not, the system advances to the next
f older, plays 10 seconds of it, and
continues throughout the rest of the
folderthesameway.Whenthe
system samples the f irst f ile of all
f olders, F-SCAN is cancelled, and the
system plays normally.
141
Playing a Disc
To Stop Playing a Disc
SCAN
Protecting Discs
F-SCAN
Features
117