Page 95 of 268

�µ�µ
If the MAIN switch is OFF, the
passenger windows cannot be raised
or lowered. Keep the MAIN switch
off whenyouhavechildreninthe
vehicle so they do not injure
themselves by operating the
windows unintentionally. To open or close the
driver’s window, push or pull the
window switch firmly down or up to
the second detent, and release it.
The window will automatically go
down or up all the way. To stop the
window, pull or push the window
switch brief ly.
If the driver’s
window senses any obstacle while it
is closing automatically, it will
reverse direction, and then stop. To
close the window, remove the
obstacle, then use the window switch
again.
Auto reverse stops sensing when the
window is almost closed. You should
always check that all passengers and
objects are away from the window
bef ore closing it.
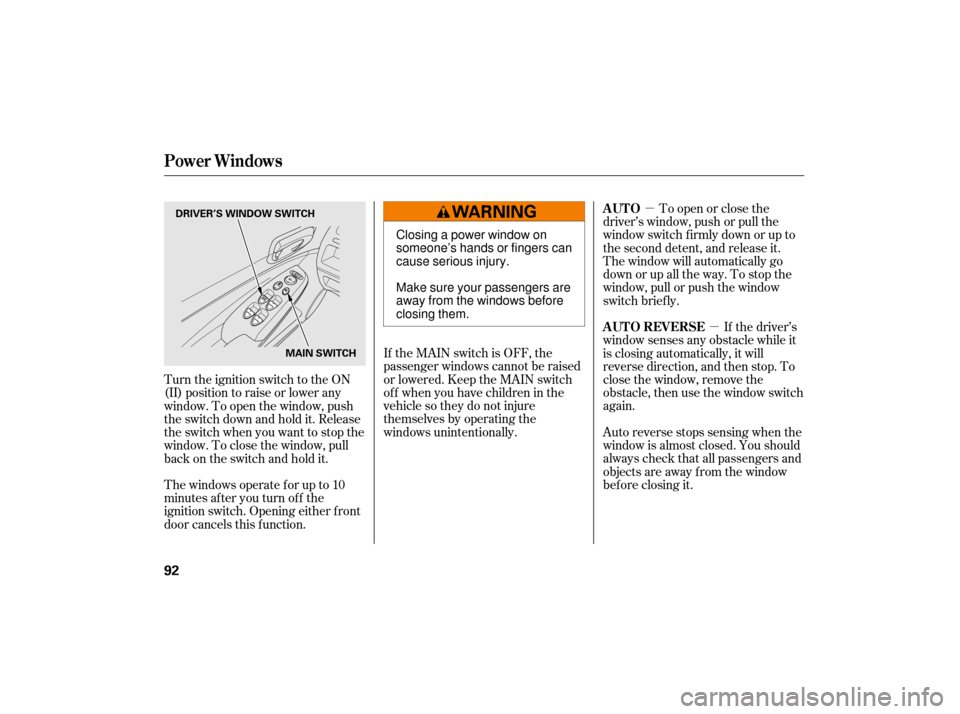
Turn the ignition switch to the ON
(II) position to raise or lower any
window. To open the window, push
the switch down and hold it. Release
the switch when you want to stop the
window. To close the window, pull
back on the switch and hold it.
Thewindowsoperateforupto10
minutes after you turn off the
ignition switch. Opening either f ront
door cancels this f unction. AUTO
AUTO REVERSE
Power Windows
92
DRIVER’S WINDOW SWITCH
MAIN SWITCH
Closing a power window on
someone’s hands or fingers can
cause serious injury.
Make sure your passengers are
away from the windows before
closing them.
Page 97 of 268
On Canadian models
The outside mirrors are heated to
remove fog and frost. With the
ignition switch in the ON (II)
position, turn on the heaters by
pressing the button. The indicator in
the button comes on as a reminder.
Press the button again to turn the
heaters off. Pressing this button also
turns the rear window defogger on
and off. To
apply the parking brake, pull the
lever up fully. To release it, pull up
slightly, push the button, and lower
the lever. The parking brake
indicator on the instrument panel
should go out when the parking
brake is f ully released (see page ). 58
Mirrors, Parking Brake
Heated Mirrors Parking Brake
94
HEATED MIRROR BUTTONPARKING BRAKE LEVER
Driving the vehicle with the parking
brake applied can damage the rear
brakes and axles. A beeper will sound
if the vehicle is driven with the parking
brake on.
Page 103 of 268
Climat e Cont rol
100
REAR WINDOW DEFOGGER BUTTONFAN CONTROL DIAL
TEMPERATURE CONTROL
DIAL AUTO BUTTON
MODE CONTROL BUTTON
AIR CONDITIONING BUTTON
FRESH AIR BUTTON
RECIRCULATION BUTTON
WINDSHIELD DEFROST BUTTON
OFF BUTTON
Page 105 of 268

Airf low is divided between
the f loor vents and def roster vents at
the base of the windshield.
Air f lows f rom the def roster
vents at the base of the windshield.
When you select , the system
automatically switches to fresh air
mode and turns on the A/C.
In AUTO mode, the system controls
the airf low direction automatically
between the dashboard vents and
the f loor vents.
This button turns the air
conditioning on and of f . The
indicatorinthebuttonisonwhen
the A/C is on.
When the recirculation indicator is
on, air f rom the vehicle’s interior is
sent throughout the system again.
To select recirculation mode when
driving through dusty or smoky
conditions, then return to fresh air
mode.
The outside air intakes f or the
heating and cooling system are at
the base of the windshield. Keep this
area clear of leaves and other debris.
When the f lesh air indicator is on, air
is brought in f rom the outside of the
vehicle. Thesystemshouldbeleftinfresh
air mode under almost all conditions.
Keeping the system in recirculation
mode, particularly with the A/C of f ,
can cause the windows to fog up.
Use the mode control buttons to
select the vents air flows from. Some
air will f low f rom the dashboard
corner vents in all modes.
Air flows from the center
and corner vents in the dashboard.
Airf low is divided between
the vents in the dashboard and the
f loor vents.
Air f lows f rom the f loor
vents. When you select , the
system automatically switches to
f resh air mode.
Air Conditioning (A/C) Button
Recirculation Button
Fresh Air Button
Mode Control Button
Climat e Cont rol
102
Page 106 of 268

The flow-through ventilation system
draws in outside air, circulates it
through the interior, then exhausts it
th rough vents near the rear side
panels. Set the temperature to the lower
limit.
Make sure the A/C is off.
Select and fresh air mode.
Set the fan to the desired speed.
The heater uses engine coolant to
warm the air. If the engine is cold, it
will be several minutes before you
feel warm air coming from the
system. Air
conditioning places an extra load
on the engine. Watch the engine
coolant temperature gauge (see page ). If it moves near the red zone,
turn of f the A/C until the gauge
reading returns to normal.
Turn on the A/C by pressing the
button. The indicator in the button
comesonwhenafanspeedis
selected.
Make sure the temperature is set
to maximum cool.
Select .
If the outside air is humid, select
recirculation mode. If the outside
air is dry, select f resh air mode.
Set the f an to the desired speed. you can
cool it down more rapidly by partially
opening the windows, turning on the
A/C, and setting the fan to
maximum speed in f resh air mode. Air conditioning, as it cools, removes
moisture from the air. When used in
combination with the heater, it
makes the interior warm and dry and
can prevent the windows f rom
f ogging up.
Select .
When you select , the system
automatically switches to the fresh
air mode.
Set the f an to the desired speed.
Adjust the warmth of the air with
the temperature control dial. This setting is suitable f or all driving
conditions whenever the outside
temperature is above 32°F (0°C).
Turn the fan on.
Turn on the air conditioning.
Select and fresh air mode.
Adjust the temperature to your
pref erence.
1.
2.
3.
4.
1.
2.
3.
4.
5.
1.
2.
3. 65
1.
2.
3.
4.
If the interior is very warm,
Climat e Cont rol
Ventilation
Using the Heater Using the A /C Dehumidif y the Interior
Features
103
Page 107 of 268

To clear the windows f aster, you can
close the dashboard corner vents by
rotating the wheel below each vent.
This sends more warm air to the
windshield def roster vents. Once the
windshield is clear, select f resh air
mode to avoid f ogging the windows.
For your saf ety, make sure you have
a clear view through all the windows
bef ore driving.
Select . When you select
, the system automatically
switches to f resh air mode and
turns on the A/C. The A/C
indicator will not come on, if it was
previously of f .
Select .
Set the f an and temperature
controls to maximum level.
Set the f an to the desired speed, or
high f or f aster def rosting.
Select . When you select
, the system automatically
switches to f resh air mode and
turns on the A/C. The A/C
indicator will not come on, if it was
previously of f .
Adjust the temperature so the
airflow feels warm.
Select to help clear the
rear window.
To increase airf low to the
windshield, close the corner vents.
To remove f og f rom the inside of the
windows:
1.
2.
3.
4.
5.
1.
2.
3.
Climat e Cont rol
T o Def og and Def rost
T o Remove Exterior Frost or Ice
From the Windows
104
Page 108 of 268
Press the OFF button. However, a
lack of airf low can cause the
windowstofogup.Youshouldkeep
the fan on at all times so stale air and
moisture do not build up in the
interior and cause f ogging.To regulate the interior temperature
and humidity, the climate control
system has two sensors. A sunlight
sensor is located in the top of the
dashboard and a temperature/
humidity sensor is next to the
steering column. Do not cover the
sensors or, spill liquid or spray
chemical cleaners on the sensors.
To Turn Everything Off Sunlight, Temperature, and
Humidity Sensors
Climat e Cont rol
Features
105
TEMPERATURE/HUMIDITY SENSOR
SUNLIGHT SENSOR
Page 159 of 268

Your dealer has Honda accessories
that allow you to personalize your
vehicle. These accessories have
been designed and approved for your
vehicle, and are covered by warranty.
When properly installed, cellular
phones, alarms, two-way radios, and
low-powered audio systems should
not interfere with your vehicle’s
computer controlled systems, such
as your airbags and anti-lock brakes. Befo
re installing any accessory:
Make sure the accessory does not
obscure any lights, or interfere
with proper vehicle operation or
performance.
Modifying
your vehicle, or installing
some non-Honda accessories, can
make it unsafe. Before you make any
modifications or add any accessories,
be sure to read the following
info rmation.
Al though non-Honda accessories
may fit on your vehicle, they may not
meet factory specifications, and
could adversely affect your vehicle’s
handling and stability. Be sure electronic accessories do
not overload electrical circuits
(see page ) or interf ere with
the proper operation of your
vehicle.
Do not install accessories on the
side pillars or across the rear
windows. In these areas,
accessories may interf ere with
proper operation of the side
curtain airbags. Bef ore installing any electronic
accessory, have the installer
contact your dealer for assistance.
If possible, have your dealer
inspect the f inal installation.
231
A ccessories
A ccessories and Modif ications
156
Improper accessories or
modifications can affect your
vehicle’s handling, stability, and
performance, and cause a
crash in which you can be hurt
or killed.
Follow all instructions in this
owner’s manual regarding
accessories and modifications.