2007 GMC SIERRA CLASSIC fuse
[x] Cancel search: fusePage 9 of 674

Front Seats
Manual Seats
{CAUTION:
You can lose control of the vehicle if you
try to adjust a manual driver’s seat while
the vehicle is moving. The sudden
movement could startle and confuse you,
or make you push a pedal when you do
not want to. Adjust the driver’s seat only
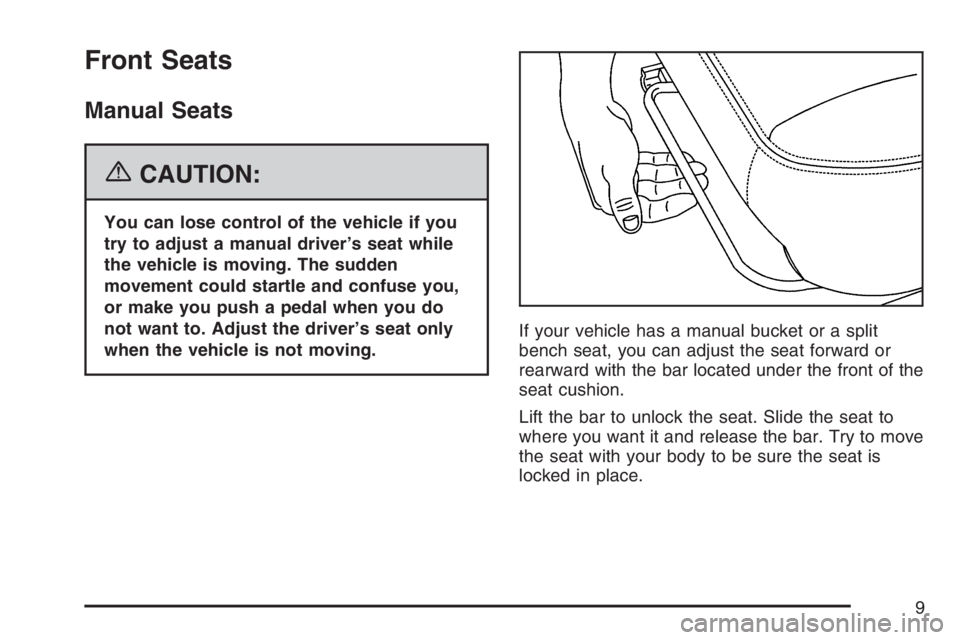
when the vehicle is not moving.If your vehicle has a manual bucket or a split
bench seat, you can adjust the seat forward or
rearward with the bar located under the front of the
seat cushion.
Lift the bar to unlock the seat. Slide the seat to
where you want it and release the bar. Try to move
the seat with your body to be sure the seat is
locked in place.
9
Page 15 of 674

Reclining Seatbacks
Manual Reclining Seatbacks
{CAUTION:
You can lose control of the vehicle if you
try to adjust a manual driver’s seat while
the vehicle is moving. The sudden
movement could startle and confuse you,
or make you push a pedal when you do
not want to. Adjust the driver’s seat only
when the vehicle is not moving.
{CAUTION:
If the seatback is not locked, it could
move forward in a sudden stop or crash.
That could cause injury to the person
sitting there. Always push and pull on the
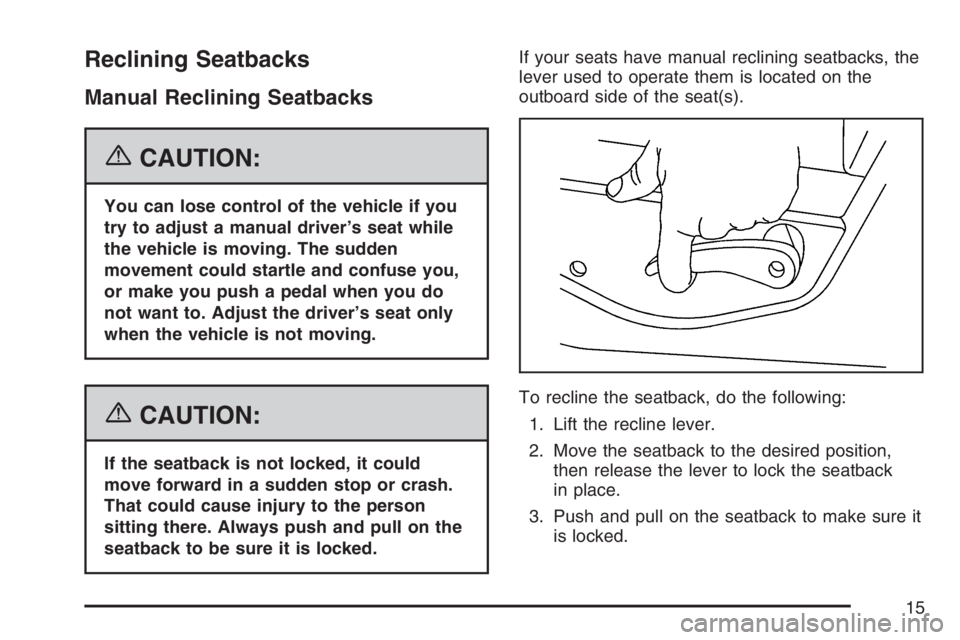
seatback to be sure it is locked.If your seats have manual reclining seatbacks, the
lever used to operate them is located on the
outboard side of the seat(s).
To recline the seatback, do the following:
1. Lift the recline lever.
2. Move the seatback to the desired position,
then release the lever to lock the seatback
in place.
3. Push and pull on the seatback to make sure it
is locked.
15
Page 133 of 674

Testing the Alarm
The alarm can be tested by following these steps:
1. From inside the vehicle, lower the driver’s
window and open the driver’s door.
2. Activate the system by locking the doors with
the RKE transmitter.
3. Get out of the vehicle, close the door and wait
for the security light to go out.
4. Then reach in through the window, unlock the
door with the manual door lock and open the
door. This should set off the alarm.
If the alarm does not sound when it should, but
the vehicle’s headlamps �ash, check to see if the
horn works. The horn fuse may be blown. To
replace the fuse, seeFuses and Circuit Breakers
on page 600.
If the alarm does not sound or the vehicle’s
headlamps do not �ash, see your dealer for
service.
Passlock®
Your vehicle has the Passlock®theft-deterrent
system.
Passlock
®is a passive theft-deterrent system.
Passlock®enables fuel if the ignition lock cylinder
is turned with a valid key. If a correct key is
not used or the ignition lock cylinder is tampered
with, fuel is disabled.
If the engine stalls and the security light �ashes,
wait until the light stops �ashing before trying
to restart the engine. Remember to release the key
from START as soon as the engine starts.
If the engine is running and the security light
comes on, you will be able to restart the engine if
you turn the engine off. However, your
Passlock
®system is not working properly and
must be serviced by your dealer. Your vehicle is
not protected by Passlock
®at this time. You
may also want to check the fuse. SeeFuses and
Circuit Breakers on page 600. See your dealer
for service.
In an emergency, call the GM Roadside
Assistance Center. SeeRoadside Assistance
Program on page 644.
133
Page 140 of 674

3. Plug it into a normal, grounded 110-volt AC
outlet.
{CAUTION:
Plugging the cord into an ungrounded
outlet could cause an electrical shock.
Also, the wrong kind of extension cord
could overheat and cause a �re. You
could be seriously injured. Plug the cord
into a properly grounded three-prong
110-volt AC outlet. If the cord will not
reach, use a heavy-duty three-prong
extension cord rated for at least 15 amps.
4. Before starting the engine, be sure to unplug
and store the cord as it was before to keep it
away from moving engine parts. If you do
not, it could be damaged.
How long should you keep the coolant heater
plugged in? The answer depends on the outside
temperature, the kind of oil you have, and
some other things. Instead of trying to list
everything here, we ask that you contact yourdealer in the area where you will be parking your
vehicle. The dealer can give you the best
advice for that particular area.
Automatic Transmission Operation
If your vehicle has an automatic transmission,
it features an electronic shift position indicator
within the instrument panel cluster. This display
must be powered anytime the shift lever is moved
out of PARK (P). SeeFuses and Circuit Breakers
on page 600.
There are several different positions for your shift
lever.
Automatic Transmission
140
Page 211 of 674

The main components of your instrument panel are the following:
A. Dome Lamp Override Button. SeeDome Lamp
Override on page 227.
B. Headlamp Controls. SeeHeadlamps on
page 221.
C. Air Outlets. SeeOutlet Adjustment on
page 243.
D. Automatic Transfer Case/Electronic Transfer
Case/Traction Assist System (TAS). See
Four-Wheel Drive on page 153andTraction
Assist System (TAS) on page 363.
E. Multifunction Lever. SeeTurn
Signal/Multifunction Lever on page 214.
F. Instrument Panel Cluster. SeeInstrument Panel
Cluster on page 245.
G. Range Selection Mode (Allison Transmission
®
only) Button (If Equipped). SeeAutomatic
Transmission Operation on page 140.
H. Shift Lever. SeeAutomatic Transmission
Operation on page 140orManual Transmission
Operation on page 149for manual
transmissions.
I. Tow/Haul Selector Button (If Equipped). See
Tow/Haul Mode on page 147.J. Audio System. SeeAudio System(s) on
page 289.
K. Climate Control System. SeeClimate Control
System on page 230,Dual Climate Control
System on page 231andDual Automatic
Climate Control System on page 235.
L. Instrument Panel Fuse Block.Instrument Panel
Fuse Block on page 600.
M. Cargo Lamp Button. SeeCargo Lamp on
page 228.
N. Hood Release. SeeHood Release on
page 479.
O. Steering Wheel Control Buttons (If Equipped).
SeeDriver Information Center (DIC) on
page 265orAudio Steering Wheel Controls on
page 349.
P. Center Instrument Panel Fuse Block. See
Center Instrument Panel Fuse Block on
page 602.
Q. Parking Brake Release. SeeParking Brake on
page 169.
R. Tilt Wheel Lever. SeeTilt Wheel on page 213.
211
Page 215 of 674

An arrow on the
instrument panel cluster
will �ash in the
direction of the turn or
lane change.
As you signal a turn or a lane change, if the
arrows �ash more quickly than normal, a signal
bulb may be burned out and other drivers will not
see your turn signal.
If a bulb is burned out, replace it to help avoid an
accident. If the arrows do not go on at all when
you signal a turn, check for burned-out bulbs and a
blown fuse. SeeFuses and Circuit Breakers on
page 600.Turn Signal On Chime
If your turn signal is left on for more than 3/4 of a
mile (1.2 km), a chime will sound at each �ash
of the turn signal and the message TURN SIGNAL
ON will also appear in the Driver Information
Control (DIC). To turn the chime and message off,
move the turn signal lever to the off position.
Headlamp High/Low-Beam Changer
53(Headlamp High/Low Beam
Changer):To change the headlamps from low to
high beam, push the lever toward the instrument
panel. To return to low-beam headlamps, pull
the multifunction lever toward you. Then release it.
When the high beams
are on, this indicator light
on the instrument panel
cluster will also be on.
215
Page 229 of 674

Certain power accessory plugs may not be
compatible to the accessory power outlet and
could result in blown vehicle or adapter fuses.
If you experience a problem, see your dealer for
additional information on the accessory power
plugs.
Notice:Adding any electrical equipment to
your vehicle may damage it or keep other
components from working as they should.
The repairs would not be covered by your
warranty. Do not use equipment exceeding
maximum amperage rating of 20 amperes.
Check with your dealer before adding electrical
equipment.
When adding electrical equipment, be sure to
follow the proper installation instructions included
with the equipment.
Notice:Improper use of the power outlet can
cause damage not covered by your warranty.
Do not hang any type of accessory or
accessory bracket from the plug because the
power outlets are designed for accessory
power plugs only.Ashtray(s) and Cigarette Lighter
Your vehicle may have a front ashtray located near
the center of the instrument panel. Pull on the
door to open it.
Notice:If you put papers, pins, or other
�ammable items in the ashtray, hot cigarettes
or other smoking materials could ignite
them and possibly damage your vehicle. Never
put �ammable items in the ashtray.
To remove the front ashtray, pull the ashtray
toward you. To replace the ashtray, place
the ashtray on the slides at the side of its location
in the instrument panel. To use the cigarette
lighter, push it in all the way, and let go. When it
is ready, the lighter will pop back out by itself.
Notice:Holding a cigarette lighter in while it
is heating will not allow the lighter to back
away from the heating element when it is hot.
Damage from overheating may occur to the
lighter or heating element, or a fuse could be
blown. Do not hold a cigarette lighter in
while it is heating.
229
Page 377 of 674

Environmental Concerns
Off-road driving can provide wholesome and
satisfying recreation. However, it also raises
environmental concerns. We recognize these
concerns and urge every off-roader to follow these
basic rules for protecting the environment:
Always use established trails, roads, and areas
that have been specially set aside for public
off-road recreational driving; obey all
posted regulations.
Avoid any driving practice that could damage
the environment — shrubs, �owers, trees,
grasses — or disturb wildlife. This includes
wheel-spinning, breaking down trees, or
unnecessary driving through streams or over
soft ground.
Always carry a litter bag — make sure all
refuse is removed from any campsite
before leaving.
Take extreme care with open �res where
permitted, camp stoves, and lanterns.
Never park your vehicle over dry grass or
other combustible materials that could
catch �re from the heat of the vehicle’s
exhaust system.
Traveling to Remote Areas
It makes sense to plan your trip, especially when
going to a remote area. Know the terrain and plan
your route. You are much less likely to get bad
surprises. Get accurate maps of trails and terrain.
Try to learn of any blocked or closed roads.
It is also a good idea to travel with at least
one other vehicle. If something happens to
one of them, the other can help quickly.
Does your vehicle have a winch? If so, be sure to
read the winch instructions. In a remote area, a
winch can be handy if you get stuck. But you will
want to know how to use it properly.
377