2007 GMC CANYON buttons
[x] Cancel search: buttonsPage 33 of 492

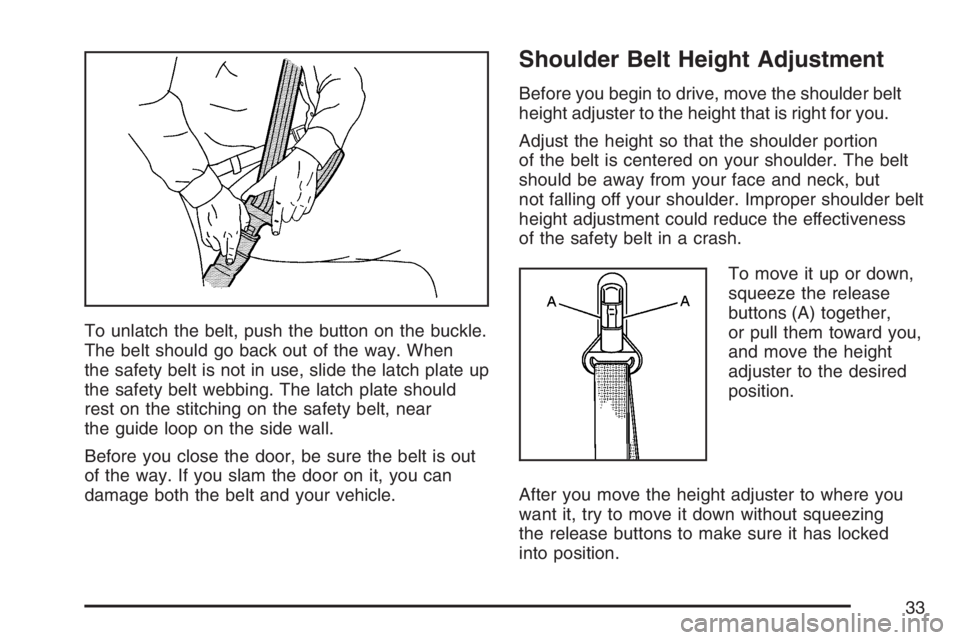
To unlatch the belt, push the button on the buckle.
The belt should go back out of the way. When
the safety belt is not in use, slide the latch plate up
the safety belt webbing. The latch plate should
rest on the stitching on the safety belt, near
the guide loop on the side wall.
Before you close the door, be sure the belt is out
of the way. If you slam the door on it, you can
damage both the belt and your vehicle.
Shoulder Belt Height Adjustment
Before you begin to drive, move the shoulder belt
height adjuster to the height that is right for you.
Adjust the height so that the shoulder portion
of the belt is centered on your shoulder. The belt
should be away from your face and neck, but
not falling off your shoulder. Improper shoulder belt
height adjustment could reduce the effectiveness
of the safety belt in a crash.
To move it up or down,
squeeze the release
buttons (A) together,
or pull them toward you,
and move the height
adjuster to the desired
position.
After you move the height adjuster to where you
want it, try to move it down without squeezing
the release buttons to make sure it has locked
into position.
33
Page 126 of 492

Four-Wheel Drive
If your vehicle has four-wheel drive, you can send
your engine’s driving power to all four wheels
for extra traction. To get the best performance
out of four-wheel drive, you must be familiar
with its operation. Read the part that follows
before using four-wheel drive. You should use
two-wheel-drive high for most normal driving
conditions.
Notice:Driving on clean, dry pavement in
four-wheel drive for an extended period of time
can cause premature wear on your vehicle’s
powertrain. Do not drive on clean, dry pavement
in four-wheel drive for extended periods of time.
Notice:If your vehicle has four-wheel drive
and the compact spare tire is installed on your
vehicle, do not drive in four-wheel drive until
you can have your �at tire repaired and/or
replaced. You could damage your vehicle, and
the repair costs would not be covered by your
warranty. Never use four-wheel drive when the
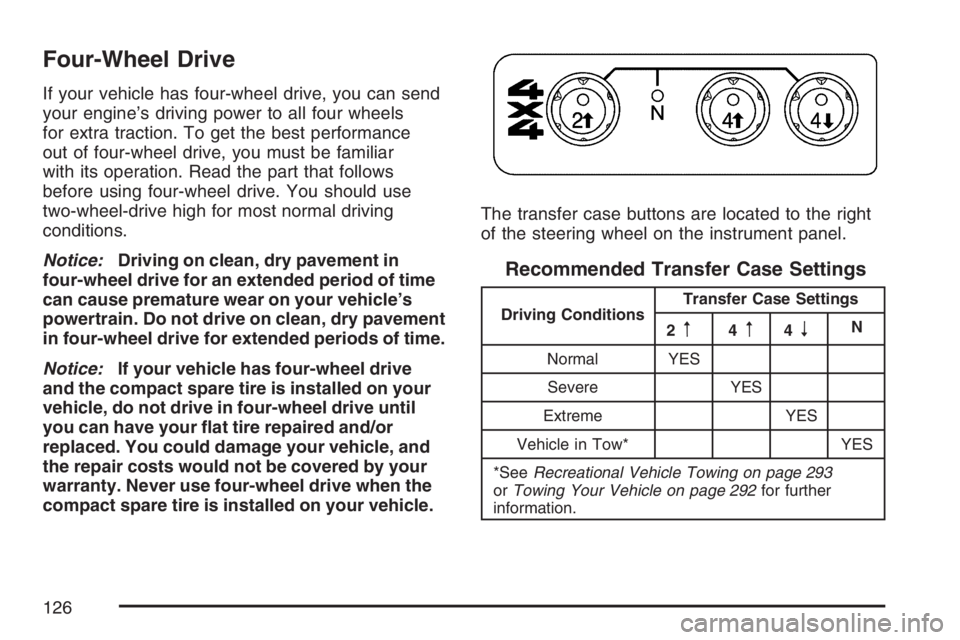
compact spare tire is installed on your vehicle.The transfer case buttons are located to the right
of the steering wheel on the instrument panel.
Recommended Transfer Case Settings
Driving ConditionsTransfer Case Settings
2m4m4nN
Normal YES
Severe YES
Extreme YES
Vehicle in Tow* YES
*SeeRecreational Vehicle Towing on page 293
orTowing Your Vehicle on page 292for further
information.
126
Page 127 of 492

Use these buttons to shift into and out of four-wheel
drive. You can choose from the following:
2
m(Two-Wheel High):This setting is for driving
in most street and highway situations. Your front
axle is not engaged in two-wheel drive.
{CAUTION:
Shifting the transfer case to NEUTRAL
can cause your vehicle to roll even if the
transmission is in PARK (P), or if you
have a manual transmission, even if you
are in gear. You or someone else could
be seriously injured. Be sure to set the
parking brake before placing the transfer
case in NEUTRAL. SeeParking Brake
on page 130.
N (NEUTRAL):Shift the vehicle’s transfer case to
NEUTRAL only when towing your vehicle.4
m(Four-Wheel High):This setting engages
your front axle to help drive your vehicle. Use
four-wheel high when you need extra traction, such
as on snowy or icy roads, or in most off-road
situations.
4
n(Four-Wheel Low):This setting also
engages your front axle to give you extra traction.
It sends the maximum power to all four wheels.
You might choose four-wheel low if you were
driving off-road in sand, mud, or deep snow and
while climbing or descending steep hills.
Indicator lights in the buttons show you which
setting you are in. The indicator lights will come on
brie�y when you turn on the ignition and one will
stay on the selected setting. If the lights do
not come on, you should take your vehicle in for
service. An indicator light will �ash while shifting.
It will stay on when the shift is completed.
If for some reason the transfer case does not shift,
it will return to the last chosen setting.
127
Page 129 of 492

Shifting from Four-Wheel Low to
Two-Wheel High or Four-Wheel High
To shift from Four-Wheel Low to Two-Wheel
High or Four-Wheel High, your vehicle must be
stopped or moving less than 3 mph (5 km/h)
with the transmission in NEUTRAL (N) for
an automatic transmission or the clutch pedal
engaged for a manual transmission. The preferred
method for shifting out of four-wheel low is to
have your vehicle moving 1 to 2 mph
(1.6 to 3.2 km/h).
Press and release the Four-Wheel High or
Two-Wheel High button. You must wait for the
Four-Wheel High or Two-Wheel High indicator
light to stop �ashing and stay on before shifting
the transmission into gear or releasing the
clutch pedal.
If the Four-Wheel High or Two-Wheel High button
is pressed when your vehicle is in gear and/or
moving faster than 3 mph (5km/h), the Four-Wheel
High or Two Wheel High indicator light will �ash
for 30 seconds but not complete the shift.
Shifting to NEUTRAL
Use NEUTRAL when you plan to tow your vehicle.
SeeRecreational Vehicle Towing on page 293
for towing instructions. To shift the transfer case
into NEUTRAL do the following:
1. Set the parking brake.
2. Start the vehicle.
3. Press the regular brake pedal and shift the
transmission in NEUTRAL (N), or press in
the clutch for vehicles with a manual
transmission.
4. Shift the transfer case to Two-Wheel High.
5. Press and hold the Two-Wheel High and
Four-Wheel Low buttons at the same time
for 10 seconds. The NEUTRAL (N) light
will come on when the transfer case shift to
NEUTRAL (N) is complete.
6. Press and hold the regular brake pedal and
shift the transmission to REVERSE (R) for
one second, then shift the transmission
to DRIVE (D) for one second, or FIRST (1) for
vehicles with manual transmissions, and let
out the clutch to insure the transfer case is in
NEUTRAL. If the vehicle is not in NEUTRAL,
repeat this procedure starting at Step 3.
129
Page 139 of 492

There are also three OnStar®buttons located at
the bottom of the mirror. See your dealer for more
information on the system and how to subscribe
to OnStar
®. SeeOnStar®System on page 146
for more information about the services OnStar®
provides.
Cleaning the Mirror
When cleaning the mirror, use a paper towel or
similar material dampened with glass cleaner.
Do not spray glass cleaner directly on the mirror
housing.
Automatic Dimming Rearview Mirror
with OnStar
®, Compass and
Temperature Display
Your vehicle may have this feature. When on,
the automatic dimming mirror dims to the proper
level to minimize glare from lights behind you
after dark.
The mirror has a dual display in the upper right
corner of the mirror face that shows the compass
reading and the outside temperature.Control buttons for the OnStar
®system are at
the bottom of the mirror. SeeOnStar®System
on page 146for more information about the
services OnStar
®provides.
P(On/Off):This is the on/off button.
Temperature and Compass Display
Press the on/off button, located to the far
left, brie�y to turn the compass/temperature
display on or off.
If the display reads CAL, the compass needs
to be calibrated. For more information, see
“Compass Calibration” following.
To adjust between Fahrenheit and Celsius,
do the following:
1. Press and hold the on/off button for
approximately four seconds until either a
�ashing F or C appears.
2. Press the button again to change the display
to the desired unit of measurement. After
approximately four seconds of inactivity,
the new unit will be locked in and the
compass/temperature display will return.
139
Page 149 of 492

How OnStar®Service Works
In order to provide you with OnStar®services, your
vehicle’s OnStar®system has the capability of
recording and transmitting vehicle information.
This information is automatically sent to an OnStar
®
Call Center at the time of an OnStar®button press,
Emergency button press or if your airbags or AACN
system deploys. The vehicle information usually
includes your GPS location and, in the event of a
crash, additional information regarding the accident
that your vehicle has been involved in (e.g. the
direction from which your vehicle was hit). When
you use the Virtual Advisor feature of OnStar
®
Hands-Free Calling, your vehicle also sends
OnStar®your GPS location so that we can provide
you with location-based services.
OnStar
®service cannot work unless your vehicle
is in a place where OnStar®has an agreement
with a wireless service provider for service in that
area. OnStar
®service also cannot work unless
you are in a place where the wireless service
provider OnStar
®has hired for that area
has coverage, network capacity and reception
when the service is needed, and technology that
is compatible with the OnStar
®service. Not all
services are available everywhere, particularly in
remote or enclosed areas, or at all times.OnStar
®service that involves location information
about your vehicle cannot work unless GPS
satellite signals are unobstructed and available in
that place as well.
Your vehicle must have a working electrical
system (including adequate battery power) for the
OnStar
®equipment to operate. There are other
problems OnStar®cannot control that may prevent
OnStar®from providing OnStar®service to you
at any particular time or place. Some examples are
damage to important parts of your vehicle in an
accident, hills, tall buildings, tunnels, weather
or wireless phone network congestion.
Your Responsibility
You may need to increase the volume of your
radio to hear the OnStar®advisor. If the light next
to the OnStar®buttons is red, this means that
your system is not functioning properly and should
be checked by a dealer. If the light appears
clear (no light is appearing), your OnStar
®
subscription has expired. You can always press
the blue OnStar®button to con�rm that your
OnStar®equipment is active.
149
Page 152 of 492

Lift the lid from the center area to access the
storage box.
Sunroof
Your vehicle may have a sunroof.
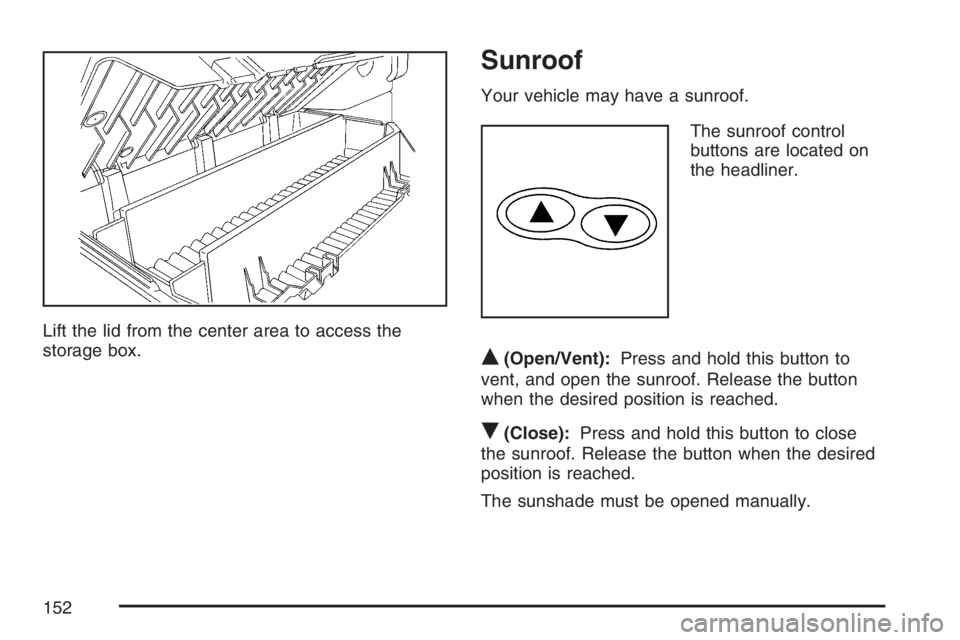
The sunroof control
buttons are located on
the headliner.
Q(Open/Vent):Press and hold this button to
vent, and open the sunroof. Release the button
when the desired position is reached.
R(Close):Press and hold this button to close
the sunroof. Release the button when the desired
position is reached.
The sunshade must be opened manually.
152
Page 157 of 492

The main components of your vehicle’s instrument panel are the following:
A. Air Outlets. SeeOutlet Adjustment on
page 176.
B. Turn Signal/Multifunction Lever. SeeTurn
Signal/Multifunction Lever on page 159.
C. Instrument Panel Cluster. SeeInstrument Panel
Cluster on page 178.
D. Hazard Warning Flasher Button. SeeHazard
Warning Flashers on page 158.
E. Passenger Side Airbag. SeeAirbag System on
page 76.
F. Exterior Lamp Controls. SeeExterior Lamps on
page 166. Fog Lamps (If Equipped). SeeFog
Lamps on page 169. Exterior Cargo Lamps.
SeeExterior Cargo Lamps on page 169.
G. Parking Brake Release. SeeParking Brake
on page 130.H. Horn. SeeHorn on page 158.
I. Traction Control Button or Four-Wheel Drive
Buttons. SeeTraction Control System (TCS) on
page 249andFour-Wheel Drive on page 126.
J. Audio System. SeeAudio System(s) on
page 203.
K. Cigarette Lighter (If Equipped). SeeAshtray(s)
and Cigarette Lighter on page 173.
L. Climate Control System. SeeClimate Control
System on page 173.
M. Accessory Power Outlet. SeeAccessory Power
Outlet(s) on page 172.
N. Passenger Air Bag Status Indicator. See
Passenger Airbag Status Indicator on page 182.
O. Glove Box. SeeGlove Box on page 150.
157