Page 364 of 492
Center High-Mounted Stoplamp
(CHMSL)
To replace the CHMSL bulb, do the following:
1. Remove the two screws and lift off the lamp
assembly from the vehicle.
2. Turn the bulb socket counterclockwise and
remove it from the lamp assembly.
3. Holding the socket, pull the bulb to release it
from the socket.
4. Push the new bulb into the socket until it
clicks.
5. Insert the bulb socket into the lamp assembly
and turn it clockwise to secure.
6. Reinstall the lamp assembly and tighten the
screws.
Taillamps, Turn Signal, Stoplamps
and Back-up Lamps
A. Stoplamp/Taillamp
B. Turn Signal/Taillamp
C. Back-up Lamp
364
Page 365 of 492
To replace one of these bulbs, do the following:
1. Open the tailgate. SeeTailgate on page 108
for more information.
2. Remove the two
rear lamp assembly
screws near the
tailgate latch.3. Pull the lamp assembly away from the
vehicle.
4. Turn the bulb socket counterclockwise to
remove it from the taillamp assembly.
5. Holding the socket, pull the old bulb to
release it from the socket.
6. Push the new bulb into the socket until it
clicks.
7. Insert the bulb socket into the taillamp
assembly and turn it clockwise to secure.
8. Reinstall the taillamp assembly and tighten
the screws.
9. Close the tailgate.
365
Page 366 of 492
License Plate Lamp
To replace one of these bulbs, do the following:
1. Reach under the rear bumper for the bulb
socket.
2. Turn the bulb socket counterclockwise and
pull the bulb socket out of the connector.
3. Pull the old bulb straight out from the bulb
socket.
4. Push the new bulb straight in until it clicks to
secure it.
5. Reverse Steps 1 through 3 to reinstall the
license plate lamp.
Replacement Bulbs
Exterior Lamp Bulb Number
Center High-Mounted
Stoplamp (CHMSL)912
License Plate Bulb W5W
Headlamps
High-beam 9005
Low-beam/Daytime Running
Lamp (DRL)9006
Parking/Front Turn Signal 3757KA
Parking Lamp (Inboard) 3157A
Stoplamp, Rear Turn Signal,
Taillamp, and Back-up Lamp3057
For replacement bulbs not listed here, contact
your dealer.
366
Page 367 of 492

Windshield Wiper Blade
Replacement
Windshield wiper blades should be inspected for
wear and cracking. SeeScheduled Maintenance
on page 437for more information.
Replacement blades come in different types and
are removed in different ways. For proper type and
length, seeNormal Maintenance Replacement
Parts on page 449.
Allowing the wiper blade arm to touch the
windshield when no wiper blade is installed could
damage the windshield. Any damage that
occurs would not be covered by your warranty. Do
not allow the wiper blade arm to touch the
windshield.
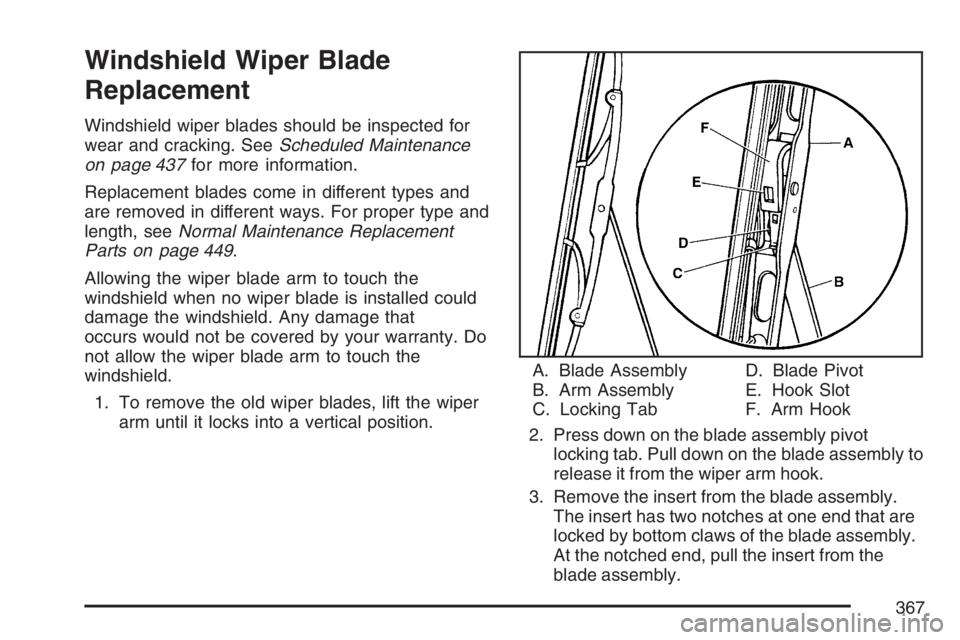
1. To remove the old wiper blades, lift the wiper
arm until it locks into a vertical position.A. Blade Assembly
B. Arm Assembly
C. Locking TabD. Blade Pivot
E. Hook Slot
F. Arm Hook
2. Press down on the blade assembly pivot
locking tab. Pull down on the blade assembly to
release it from the wiper arm hook.
3. Remove the insert from the blade assembly.
The insert has two notches at one end that are
locked by bottom claws of the blade assembly.
At the notched end, pull the insert from the
blade assembly.
367
Page 368 of 492
4. To install the new wiper insert, slide the
insert (D), notched end last, into the end
with two blade claws (A). Slide the insert all
the way through the blade claws at the
opposite end (B). The plastic caps (C) will be
forced off as the insert is fully inserted.
5. Be sure that the notches are locked by the
bottom claws. Make sure that all other claws
are properly locked on both sides of the
insert slots.A. Claw in Notch
B. Correct Installation
C. Incorrect Installation
6. Put the blade assembly pivot in the wiper arm
hook. Pull up until the pivot locking tab locks
in the hook slot.
7. Carefully lower the wiper arm and blade
assembly onto the windshield.
368
Page 382 of 492

5. Remove the valve cap from the valve cap
stem. Activate the TPMS sensor by
increasing or decreasing the tire’s air pressure
for 10 seconds, then stop and listen for a
single horn chirp. The single horn chirp should
sound within 15 seconds, con�rming that
the sensor identi�cation code has been
matched to this tire and wheel position. If you
do not hear the con�rming single horn
chirp, turn the ignition switch to LOCK and
start over beginning with Step 2. To let
air-pressure out of a tire you can use the
pointed end of the valve cap, a pencil-style air
pressure gage, or a key.
6. Proceed to the passenger’s side front tire, and
repeat the procedure in Step 5.
7. Proceed to the passenger’s side rear tire, and
repeat the procedure in Step 5.8. Proceed to the driver’s side rear tire, and
repeat the procedure in Step 5.
9. After hearing the con�rming horn chirp for the
driver side rear tire, check to see if the TPMS
low tire warning light and the DIC LOW
TIRE messages have turned off. If yes, the
TPMS sensors have been relearned. Turn the
ignition switch to LOCK.
If the low tire warning light and the DIC SERV
TPM messages are on after completing
Step 5 for the driver side rear tire, the sensor
relearn process has not been successful.
Turn the ignition switch to LOCK and repeat
the matching process beginning with Step 2.
10. Set all four tires to the recommended
air pressure level as indicated on the Tire and
Loading Information label.
11. Put the valve caps back on the valve stems.
382
Page 388 of 492
Different Size Tires and Wheels
If you add wheels or tires that are a different size
than your original equipment wheels and tires,
this may affect the way your vehicle performs,
including its braking, ride and handling
characteristics, stability, and resistance to rollover.
Additionally, if your vehicle has electronic
systems such as, anti-lock brakes, traction control,
and electronic stability control, the performance
of these systems can be affected.{CAUTION:
If you add different sized wheels, your
vehicle may not provide an acceptable
level of performance and safety if tires not
recommended for those wheels are
selected. You may increase the chance
that you will crash and suffer serious
injury. Only use GM speci�c wheel and
tire systems developed for your vehicle,
and have them properly installed by a GM
certi�ed technician.
SeeBuying New Tires on page 386and
Accessories and Modi�cations on page 316for
additional information.
388
Page 394 of 492

Changing a Flat Tire
If a tire goes �at, avoid further tire and wheel
damage by driving slowly to a level place. Turn on
your hazard warning �ashers. SeeHazard
Warning Flashers on page 158for more
information.
{CAUTION:
Changing a tire can be dangerous. The
vehicle can slip off the jack and roll over
or fall on you or other people. You and
they could be badly injured or even killed.
Find a level place to change your tire. To
help prevent the vehicle from moving:
1. Set the parking brake �rmly.
2. Put an automatic transmission shift
lever in PARK (P), or shift a manual
transmission to FIRST (1) or
REVERSE (R).
CAUTION: (Continued)
CAUTION: (Continued)
3. If you have a four-wheel-drive vehicle,
be sure the transfer case is in a drive
gear – not in NEUTRAL.
4. Turn off the engine and do not restart
while the vehicle is raised.
5. Do not allow passengers to remain in
the vehicle.
To be even more certain the vehicle will not
move, put blocks at the front and rear of
the tire farthest away from the one being
changed. That would be the tire on the
other side, at the opposite end of the
vehicle.
394