2007 GMC ACADIA window
[x] Cancel search: windowPage 117 of 554
Programming the Power Windows
If the battery one your vehicle has been recharged,
disconnected, or replaced, windows with the
express-up feature need to be reprogrammed for
this feature to work. To program the window:
1. With the ignition in the ACCESSORY or RUN
positions, or when Retained Accessory
Power (RAP) is active, close all doors. See
Retained Accessory Power (RAP) on
page 125.
2. Press and continue to hold the window switch
until the window is fully open.
3. Pull up and hold the window switch to close the
window. Continue to hold it brie�y after the
window is fully closed.
4. Repeat for each window that has the express
up feature.
Anti-Pinch Feature
The anti-pinch feature is on windows with the
express-up feature. If an object is in the way of the
window as it is express-closing, or in certain
weather conditions like severe icing, the window will
stop and open to a factory preset position. The
window functions normally once the obstruction is
removed.
Window Lockout
o
(Window Lockout):The window lockout
switch is located with the power window switches
on the driver’s door armrest. This feature
prevents the rear passenger windows from
operating, except from the driver’s position. Press
the switch to turn the lockout feature on or off.
An indicator light will come on to show the lockout
feature is on.
Sun Visors
Pull the sun visor down to block glare. Detach the
sun visor from the center mount and slide it
along the rod from side-to-side to cover the driver
or passenger side of the front window. Swing
the sun visor to the side to cover the side window.
It can be moved along the rod from side-to-side
in this position also.
Lighted Visor Vanity Mirror
Your vehicle has lighted visor vanity mirrors on
both the driver’s and passenger’s sun visors. Pull
the sun visor down and lift the mirror cover to
turn the lamps on.
117
Page 120 of 554
Testing the Alarm
To test the alarm:
1. From inside the vehicle, lower the driver’s
window and open the driver’s door.
2. Activate the system by locking the doors with
the RKE transmitter.
3. Get out of the vehicle, close the door and wait
for the security light to go out.
4. Then reach in through the window, unlock the
door with the manual door lock and open the
door. This should set off the alarm.
If the alarm does not sound when it should, but the
vehicle’s headlamps �ash, check to see if the horn
works. The horn fuse may be blown. To replace the
fuse, seeFuses and Circuit Breakers on page 490.
If the alarm does not sound or the vehicle’s
headlamps do not �ash, see your dealer/retailer for
service.
PASS-Key®III+
The PASS-Key®III+ system operates on a radio
frequency subject to Federal Communications
Commission (FCC) Rules and with Industry
Canada.
This device complies with Part 15 of the FCC
Rules. Operation is subject to the following
two conditions:
1. This device may not cause harmful
interference.
2. This device must accept any interference
received, including interference that may
cause undesired operation.
This device complies with RSS-210 of Industry
Canada. Operation is subject to the following
two conditions:
1. This device may not cause interference.
2. This device must accept any interference
received, including interference that may
cause undesired operation of the device.
120
Page 125 of 554
Key In the Ignition
Never leave your vehicle with the keys inside, as it
is an easy target for joy riders or thieves. If you
leave the key in the ignition and park your vehicle,
a chime will sound when you open the driver’s
door. Always remember to remove your key from
the ignition and take it with you. This will lock
your ignition and transmission. Also, always
remember to lock the doors.
The battery could be drained if you leave the key
in the ignition while your vehicle is parked.
You may not be able to start your vehicle after it
has been parked for an extended period of time.
Retained Accessory Power (RAP)
These vehicle accessories can be used for up to
10 minutes after the ignition key is turned off:
Audio System
Power Windows
Sunroof (if equipped)
Power to the windows and sunroof will work up to
10 minutes or until a door is opened.
The radio continues to work for 10 minutes or until
the driver’s door is opened.
For an additional 10 minutes of operation, close all
the doors and turn the key to ON and then back
to OFF.
All these features will work when the key is in the
ON or ACCESSORY positions.
125
Page 138 of 554
Engine Exhaust
{CAUTION:
Engine exhaust can kill. It contains the
gas carbon monoxide (CO), which you
cannot see or smell. It can cause
unconsciousness and death.
You might have exhaust coming in if:
The exhaust system sounds strange
or different.
Your vehicle gets rusty underneath.
Your vehicle was damaged in a
collision.
CAUTION: (Continued)
CAUTION: (Continued)
Your vehicle was damaged when
driving over high points on the road
or over road debris.
Repairs were not done correctly.
Your vehicle or the exhaust system
has been modi�ed improperly.
If you ever suspect exhaust is coming into
your vehicle:
Drive it only with all the windows
down to blow out any CO; and
Have your vehicle �xed immediately.
138
Page 140 of 554

Mirrors
Manual Rearview Mirror with
OnStar
®
When you are sitting in a comfortable driving
position, adjust the mirror so you can see clearly
behind your vehicle. Hold the mirror in the
center to move it up or down and side to side. The
day/night adjustment allows you to adjust the
mirror to avoid glare from the lamps behind you.
Move the lever to the right for nighttime use and to
the left for daytime use.
There may also be three OnStar
®buttons located
at the bottom of the mirror face. SeeOnStar®
System on page 145for more information.
Automatic Dimming Rearview Mirror
with OnStar
®and Compass
Your vehicle may have an automatic-dimming
rearview mirror with a compass.There may be three additional buttons for the
OnStar
®system. See your dealer/retailer for more
information on the system and how to subscribe
to OnStar
®. SeeOnStar®System on page 145for
more information about the services OnStar®
provides.
O(On/Off):This is the on/off button.
Automatic Dimming Mirror Operation
The automatic dimming mirror comes on each time
the ignition is turned to start. To turn the
automatic dimming feature off or back on, press
the on/off button. The indicator light on the mirror is
lit when the automatic dimming feature is on.
Compass Operation
Press the on/off button once to turn the compass
on or off.
There is a compass display in the window in the
upper right corner of the mirror face.
Compass Calibration
Press and hold the on/off button to activate the
compass calibration mode. CAL will be displayed
in the compass window on the mirror.
140
Page 141 of 554

The compass can be calibrated by driving the
vehicle in circles at 5 mph (8 km/h) or less until the
display reads a direction.
If after a few seconds the display does not show a
compass direction, (N for North for example),
there may be a strong magnetic �eld interfering
with the compass. Such interference may be
caused by a magnetic antenna mount, note pad
holder, or similar object. If the letter C or CAL
appears in the compass window, the compass may
need to be reset or calibrated.
Compass Variance
Compass variance is the difference between
earth’s magnetic north and true geographic north.
The mirror is set to zone eight upon leaving
the factory. It will be necessary to adjust the
compass to compensate for compass variance if
you live outside zone eight. Under certain
circumstances, such as during a long distance
cross-country trip, it will be necessary to adjust for
compass variance. If not adjusted to account
for compass variance, your compass could give
false readings.To adjust for compass variance:
1. Find your current location and variance zone
number on the following zone map.
2. Press and hold the on/off button until the zone
number is displayed. The number shown is
the current zone number.
141
Page 142 of 554
3. Scroll through the zone numbers that appear
in the window on the mirror by pressing the
on/off button. Once you �nd your zone
number, release the button. After about
four seconds, the mirror will return to the
compass display, and the new zone number
will be set. If C or CAL appears in the
compass window, the compass may need
calibration. See “Compass Calibration” listed
previously.
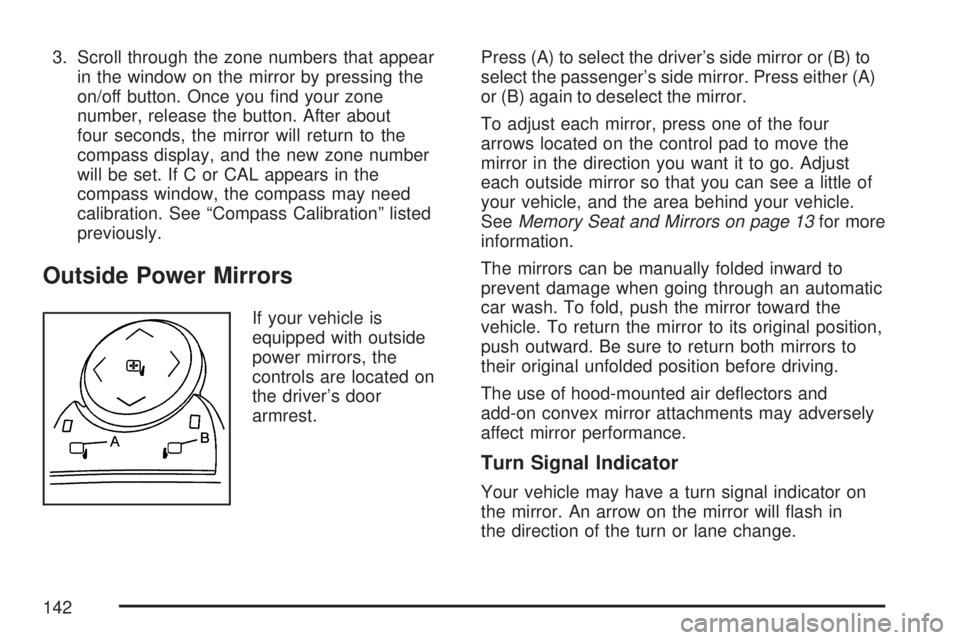
Outside Power Mirrors
If your vehicle is
equipped with outside
power mirrors, the
controls are located on
the driver’s door
armrest.Press (A) to select the driver’s side mirror or (B) to
select the passenger’s side mirror. Press either (A)
or (B) again to deselect the mirror.
To adjust each mirror, press one of the four
arrows located on the control pad to move the
mirror in the direction you want it to go. Adjust
each outside mirror so that you can see a little of
your vehicle, and the area behind your vehicle.
SeeMemory Seat and Mirrors on page 13for more
information.
The mirrors can be manually folded inward to
prevent damage when going through an automatic
car wash. To fold, push the mirror toward the
vehicle. To return the mirror to its original position,
push outward. Be sure to return both mirrors to
their original unfolded position before driving.
The use of hood-mounted air de�ectors and
add-on convex mirror attachments may adversely
affect mirror performance.
Turn Signal Indicator
Your vehicle may have a turn signal indicator on
the mirror. An arrow on the mirror will �ash in
the direction of the turn or lane change.
142
Page 145 of 554
Outside Heated Mirrors
Press the rear window defogger button, located on
the climate control panel, to also turn the outside
heated mirrors on or off. The mirrors will heat to
help clear fog or frost from the surface of the mirror.
See “Rear Window Defogger” underDual
Automatic Climate Control System on page 203
for more information.
OnStar®System
OnStar®uses several innovative technologies and
live advisors to provide you with a wide range
of safety, security, information, and convenience
services. If your airbags deploy, the system is
designed to make an automatic call to OnStar
®
Emergency advisors who can request emergency
services be sent to your location. If you lockyour keys in the vehicle, call OnStar
®at
1-888-4-ONSTAR and they can send a signal to
unlock your doors. If you need roadside
assistance, press the OnStar
®button and they
can contact Roadside Service for you.
OnStar
®service is provided to you subject to the
OnStar®Terms and Conditions. You may
cancel your OnStar®service at any time by
contacting OnStar®as provided below. A complete
OnStar®Owners Guide and the OnStar®Terms
and Conditions are included in the vehicle’s
OnStar
®Subscriber glove box literature. For more
information, visit onstar.com or onstar.ca,
contact OnStar
®at 1-888-4-ONSTAR
(1-888-466-7827) or TTY 1-877-248-2080, or
press the OnStar
®button to speak with an
OnStar®advisor 24 hours a day, 7 days a week.
Not all OnStar
®features are available on all
vehicles. To check if your vehicle is equipped to
provide the services described below, or for a
full description of OnStar
®services and system
limitations, see the OnStar®Owner’s Guide in your
glove box or visit onstar.com.
145